A Custom UJOR-Sportsmobile Build

ujoint

Supporting Sponsor
The front frame support does help to strengthen the front of the frame, but it will still allow flex since the stock bumper holes are slotted (and so are the FF001's) and the stock F bumper isn't very strong.

So under hard flex like this you'll get some movement. A stronger front bumper will help eliminate this.
 

bknudtsen

Expedition Leader
The front frame support does help to strengthen the front of the frame, but it will still allow flex since the stock bumper holes are slotted (and so are the FF001's) and the stock F bumper isn't very strong.

So under hard flex like this you'll get some movement. A stronger front bumper will help eliminate this.

Obviously, most guys won't be using their vans as rockcrawlers, so this should rarely be an issue. I was just taken back by how much movement there is in the frame. Makes me concerned about the stress at the motor mounts.

I am glad that "notmiller" posted these picks though, as they clearly show the need for proper bumpstops and frame bracing. You can tell that he comes from a rockcrawling background since flexing out your rig and checking for clearance and bumpstop heights is common practice in that arena. Some guys use forklifts; others ditches. Pick your poison, cuz it's all good!
 
Last edited:

notmiller

Observer
Obviously, most guys won't be using their vans as rockcrawlers, so this should rarely be an issue. I was just taken back by how much movement there is in the frame. Makes me concerned about the stress at the motor mounts.

I am glad that "notmiller" posted these picks though, as they clearly show the need for proper bumpstops and frame bracing. You can tell that he comes from a rockcrawling background since flexing out your rig and checking for clearance and bumpstop heights is common practice in that arena. Some guys use forklifts; others ditches. Pick your poison, cuz it's all good!

Ha ha, I wish I had a forklift! I've been keeping my eye out around town for a good ramp to test on rather than driving all the way out to the desert to test it. I debated using the loading dock at the local Vons, but never got around to it. And you're right, the rockcrawling background has made me test and adjust all these things, which is a plus, but it's also a curse since I'm constantly striving for maximum travel and ground clearance with minimal lift. I also wasn't super happy with the final crawl ratio. I got the 3.8 Atlas, which is even lower than the 3.0 that SMB installs and lower than the 2.72 NV271, and gives me a ~42:1 crawl ratio, but it just didn't seem very low. Albeit, the day before I was driving my truck all day which has a 96:1 ratio, so that may have been the problem.

As for the frame flex, I do have Chris' frame brace but didn't have it attached at that point. I've had the same concerns that Chris mentioned, and the front bumper and winch box I'm in the midst of building should reduce the allowable flex. But you are definitely correct that there was a lot of flex going on. My wife pointed out that there was probably a 3" difference in vertical clearance between bumper and body from left to right. I know SMB welds in a tube connecting the two front spring hangers rearward of the spring eye to reduce this, but the UJOR shackles don't quite have enough extra meat to allow for this. Funny thing is, when I stopped in that position, I had to force the driver's door open because there was enough flex in the body to pin it shut.
 

notmiller

Observer
Here's some more build updates from the last couple of months:

Rear shocks: I cut out the old rear shock member and fabbed a new tube unit. I was able to stuff short body 12" travel Bilsteins in but the reservoir hose juuuuuust fits below the floorpan (one of the things verified in the flex testing). I'm not sure why they point the hoses upward out of the shock body, but it's really difficult to deal with. I lost the exhaust support mount that was on the stock shock mount bar, but I plan on re-routing the exhaust anyways. For now, there's nothing a clothes hanger can't fix!

IMG_0033.JPG

IMG_0034.JPG

On a side note, Jeff at Deaver was a big help with the shocks. It turned out one of the shocks was leaking where it threaded into the body. Instead of having to take the shock off and put the van out of commission for weeks, he ordered a new custom one and shipped it directly to me, allowing me to keep building and testing. He definitely treats his customers well!

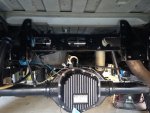
House battery: I let SMB install the house battery where they normally do for my configuration because I hadn't thought that far ahead about how I wanted to arrange things underneath. They locate it under the rearward side barn door by cutting into the sheet metal and recessing it up above the lower edge of the frame rail. They box in the sheet metal they cut out, though. I finally decided that I wanted to relocate it to right behind the rear axle and put a 2gal air tank in its place. I made a crossmember out of some structural C-channel and welded the SMB battery brackets to it. The bracket then bolts to some 1/4 brackets on each side. I also included some mounts on the cross-support for the compressor tray (discussed below).

IMG_0035.JPG

battery.JPG

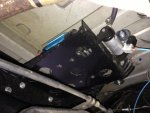
Air system: I built a shelf for an ARB CKMTA12 continuous duty compressor to mount to the front-side of the battery crossmember. This plumbs to a 3-way valve, which allows me to switch between filling a 2gal tank or to hoses running to the front and rear bumpers. Each circuit has its own regulator. This way I can set the pressure to the front and rear lines and a given tire pressure to fill the tires without having to check/re-check. I located the 3-way valve in the front of the rear passenger wheel well so I don't have to crawl around on the ground to switch it. Now I just need a fancy label maker so I can remember which way to turn it.

compressor.JPG

valve.JPG

And here's a sneak peek of the bumper effort....

IMG_0043.JPG
 

notmiller

Observer
Finally got to get out and enjoy the van over the holidays after working on it non-stop for months. I will update on the technical stuff in the coming weeks, but for now here's some pics from our 2-week trip to Arizona, New Mexico, Colorado, and Utah. Trips like this totally remind me why we've been slaving away on this van for so long! Temps pretty much never got higher than 25F once we hit NM and got down to around 0F at night.

At intersection of Hwy 70 and Hwy 24, Utah.

70and24.jpg

Burr Trail switchbacks, Capitol Reef National Park, Utah

burr trail.jpg

Calf Creek, Utah.

calf creek.jpg

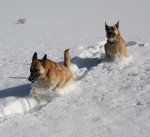
The dogs got LOTS of snow time!

dogs.jpg

Glenwood Canyon on the 70 heading west toward Grand Junction, CO. This is one of my favorite stretches of highway!

Glenwood.jpg

Rock formations along Hwy 24, Utah.

hwy24.jpg

Red Canyon, Utah.

red rock.jpg

A great trip and bummer to be back home and back to work. The van ran great and had no issues with cold starts. I had the rear leaves adjusted by Deaver one last time before we left because they were still too stiff, in my opinion. He ended up removing a leaf and replacing it with a spacer. That made a huge difference and the van rode perfectly after that. We're probably a little less than 9000lb fully loaded. Of course, by the end of the trip I had a huge new list of things to add/improve with the van. I'm still in the midst of building the front bumper and should have some pics and updates on that soon. Additionally, I built a ladder bar (torque arm) to limit axle wrap which is a huge story on its own, but let's just say, I've still got driveline vibration issues!
 

adventureduo

Dave Druck [KI6LBB]
Awesome thread and thank you for sharing. You make me want to build up our E350 commercial cargo we just bought dab nabbit!
 

notmiller

Observer
Thanks, guys! I went with SMB for the interior because of time. They have all the fit and finish pretty much dialed in and it would've taken me forever to do a full interior build. After getting their conversion and seeing all the little things that were done, it makes you really realize how much time it would've taken for one person to do it all, especially starting from scratch.

Doing the 4wd conversion has taken a lot longer than expected but mainly because I started deviating from the Ujoint kit and doing things on my own. The Ujoint kit is definitely the way to go as a cheaper alternative to SMB's 4x4 conversion without sacrificing strength or quality. And there is something to be said about being intimately familiar with everything you've done versus blindly assuming the craftsmanship of others. If something goes wrong in the interior, it'll take me awhile to even get familiar with what's going on before deducing the cause. If something goes wrong underneath the vehicle, I'll immediately know what the culprit may be and how to address it. That being said, I'm now extremely aware of any slight noise that may come from the chassis or drivetrain and my wife hates it!
 

notmiller

Observer
Bumper Build!

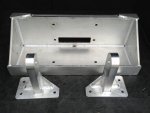
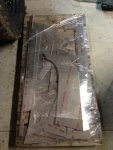
A quick update. I've been working slowly on the front bumper. I decided to do an aluminum bumper like the popular Aluminess front bumper, but I didn't like how much it sticks out or how plain the brush guard is. My main requirement was to fit the new Warn 16.5 I picked up for a sweet deal (cheaper than an M12 and supposedly same size and weight). I built the winch box separate from the bumper and bolted it directly to some brackets I welded to the frame. The goal with that was to make the bumper easily removable as well as stiffen up the frame which flexes an ungodly amount. Now the winch and box are essentially a structural member of the frame. I haven't taken it out and flexed it yet, but it's either going to reduce frame flex a lot or crack the box. :D:D I plan on doing some frame flex testing with and without the box and will post results on here. Anyways, I drew up some plans for the bumper and sent them out for waterjetting and here are the results!

All the cut pieces.

IMG_0007.JPG

First layout of top plate. The recovery points are bolted directly to the frame.

IMG_0012.JPG

The center is stiffened around the winch access opening with an additional plate.

IMG_0008.JPG

All plates tacked up....

IMG_0077.JPG

Interior is supported by additional webbing.

IMG_0079.JPG

Fully welded exterior seams

IMG_0087.JPG

After hours of grinding and massaging....

IMG_0097.JPG

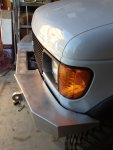
Mounted up!

IMG_0101.JPG

The bumper sticks out a little less than 8 inches from the grill. An Aluminess bumper sticks out 12".

IMG_0103.JPG
 

notmiller

Observer
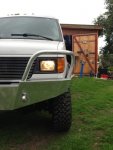
I also started playing with brushguards, but haven't been happy with the results so far :(

IMG_0109.JPG

They look good from every other angle except front on. The sides were following the angle of the side plate of the bumper, but it makes it look way too wide!

IMG_0117.JPG

IMG_0119.JPG


So I'm going to scrap these and try some different angles and then make a center crossbar. I'll post those pics as soon as I'm done!
 

Forum statistics

Threads
188,527
Messages
2,906,258
Members
230,547
Latest member
FiscAnd

Members online

Top