I bought my M416 about 17 years ago from an Army Surplus Store in Oklahoma. From the bumper number, I learned it originated in an USAR Combat Engineering Company located down the coast in Corpus Christi.
It was in decent shape when I got it, but years of Houston humidity and weather took its toll. I used it for hauling dirt and anything I could not put in my car or van. Some years were spent years in the garage and some were spent outside. I started removing paint, but got tired of fighting the old Army paint. Expecting to get back on it soon, I did not prime the areas I stripped. Regretfully, I would pay for that laziness when I started working on it for real years later.
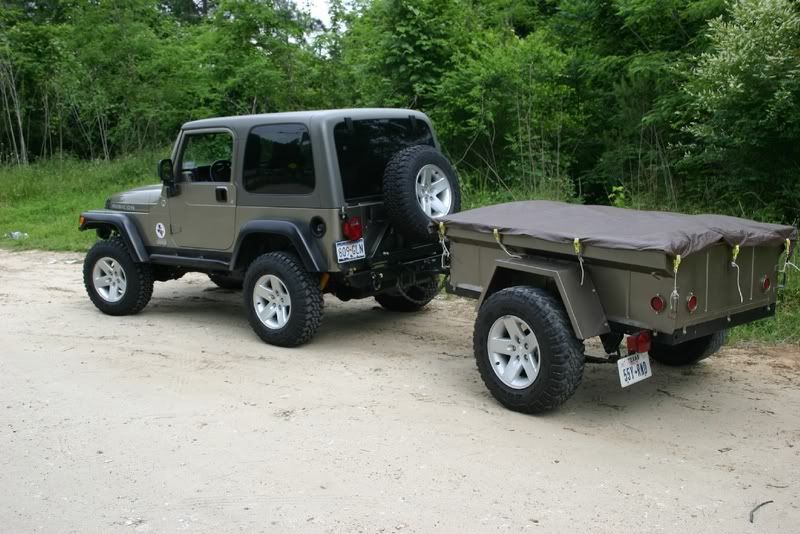
I started rebuilding it three years ago. A category five hurricane passed near us and we determined a fully reliable trailer would help if we ever have to evacuate. I had also just bought a 2005 Jeep Rubicon and wanted to update the trailer to pull behind it.
When I started the rebuild, I had some surface rust I did not have when I bought it. Here are some pictures of what I started with:
The trailer was generally very straight…note the civilian coupler welded on to the drawbar bracket.


The floor had hints of pitting due to rust

The frame looks bad in the picture, but in reality it is in very good condition.

This is proof a M416 will fit in the bed of a pickup truck. My truck has an extended cab with a six foot bed. I loaded up the tub, disassembled frame, axle, and fenders to get blasted. I blasted all smaller pieces myself. I did not want anything to get lost.

A week later and it was back in the truck. I had the sand blaster coat everything with an industrial strength epoxy primer. It was hard to sand smooth, but it provided a good base for the final primer.

This was the first look at the damage caused by failing to apply primer over the areas I stripped several years before. The good news is the metal is so thick, I did not have any structural damage.

It was in decent shape when I got it, but years of Houston humidity and weather took its toll. I used it for hauling dirt and anything I could not put in my car or van. Some years were spent years in the garage and some were spent outside. I started removing paint, but got tired of fighting the old Army paint. Expecting to get back on it soon, I did not prime the areas I stripped. Regretfully, I would pay for that laziness when I started working on it for real years later.
I started rebuilding it three years ago. A category five hurricane passed near us and we determined a fully reliable trailer would help if we ever have to evacuate. I had also just bought a 2005 Jeep Rubicon and wanted to update the trailer to pull behind it.
When I started the rebuild, I had some surface rust I did not have when I bought it. Here are some pictures of what I started with:
The trailer was generally very straight…note the civilian coupler welded on to the drawbar bracket.
The floor had hints of pitting due to rust
The frame looks bad in the picture, but in reality it is in very good condition.
This is proof a M416 will fit in the bed of a pickup truck. My truck has an extended cab with a six foot bed. I loaded up the tub, disassembled frame, axle, and fenders to get blasted. I blasted all smaller pieces myself. I did not want anything to get lost.
A week later and it was back in the truck. I had the sand blaster coat everything with an industrial strength epoxy primer. It was hard to sand smooth, but it provided a good base for the final primer.
This was the first look at the damage caused by failing to apply primer over the areas I stripped several years before. The good news is the metal is so thick, I did not have any structural damage.


")