And now the moment you didn't know you've been waiting for...Atl-Atl's 4x4 Ford E350 RV documentation thread!!

Atl-atl

Adventurer
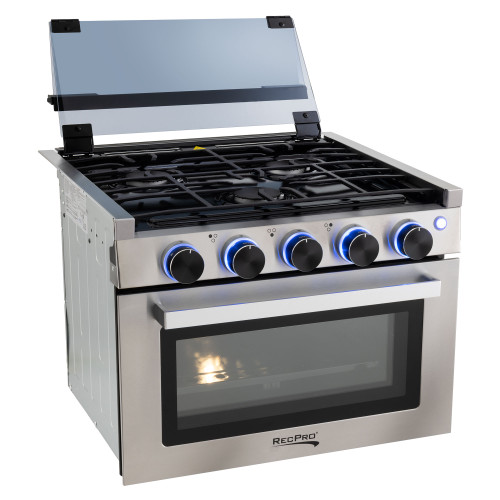
Nice range. It looks like the Furrion. $600 is a bargain. Where did you find it?
Thanks it came from RecPro which was a site I only recently came across. $600 is with the matching hood, just the range is only $499!! Whats interesting is on their website its listed as their own RecPro brand but when it showed up it has this Greystone logo on it. Must be one of those rebranding situations. It seems to have good reviews and it fit the dimensions that I needed. Its also much higher quality than I expected which is nice. Hopefully it lasts!
 

blakeape

Adventurer
I love these RV builds! I'm in the middle of a Ujoint swap on a regular van now but could see an RV in the future. I bet it boogies with that 6 speed, the V10 and 4.56 gears. Do you know what rear axle you have and do you plan a locker/limited slip for it?
 

Atl-atl

Adventurer
I love these RV builds! I'm in the middle of a Ujoint swap on a regular van now but could see an RV in the future. I bet it boogies with that 6 speed, the V10 and 4.56 gears. Do you know what rear axle you have and do you plan a locker/limited slip for it?
Nice! I will probably do a regular van after we get back from our trip with this RV. It does have plenty of get-up-and-go and I havent even installed the programmer yet! I dont actually recall which axle it is, I only looked at the tag to see the gearing. I dont plan to install a locker right now since I dont need to open up the axle. If I had needed to regear I would have installed a selectable locker. Hopefully I dont come to regret that decision.
 

b. rock

Active member
How much wiggle is there in that cover for the stove top? Meaning, how much do you think it will rattle on a dirt road?
 

Atl-atl

Adventurer
How much wiggle is there in that cover for the stove top? Meaning, how much do you think it will rattle on a dirt road?
Currently the glass actually rests on top of the iron grates. Seems wrong but there are no provisions for any kind of rubber feet or bumpers so I guess its supposed to be that way. I will definitely be adding something to keep it quiet/stop it from breaking on rough roads.
 

RVflyfish

Fishing is life. The rest is details.
Thanks it came from RecPro which was a site I only recently came across. $600 is with the matching hood, just the range is only $499!! Whats interesting is on their website its listed as their own RecPro brand but when it showed up it has this Greystone logo on it. Must be one of those rebranding situations. It seems to have good reviews and it fit the dimensions that I needed. Its also much higher quality than I expected which is nice. Hopefully it lasts!
Awesome, thanks for the link and info. That goes on the list!
 

Atl-atl

Adventurer
Ask and ye shall receive. Prep, prep and more prep. Getting ready to paint is so incredibly tedious and time consuming. Thankfully I was able to employ the wife and my mom for the actual painting. Got everything primed today. Paint will start tomorrow.
IMG_4873.jpeg
IMG_4881.jpeg
IMG_4879.jpeg
IMG_4900.jpeg
IMG_4905.jpeg
IMG_4904.jpeg
IMG_4906.jpeg
 

Todd780

OverCamper
Great build!

To get a bit more counter space, I suggest getting a cutting board for over the stove. Either make one like we did or you can find them pre-made. Don't put any weight on that folding glass cover. It'll bend the hinges. Ask me how I know a Keurig is too heavy to put on it.....


Atl-atl

Adventurer
Great build!

To get a bit more counter space, I suggest getting a cutting board for over the stove. Either make one like we did or you can find them pre-made. Don't put any weight on that folding glass cover. It'll bend the hinges. Ask me how I know a Keurig is too heavy to put on it.....


Good ideas and thanks for the heads up!
 

b. rock

Active member
Btw, what did you do with the chrome grill you took off? I'm in CO so it'd involve shipping, but I'd be interested if you're not keeping it.
 

Todd780

OverCamper
Nice! I will probably do a regular van after we get back from our trip with this RV. It does have plenty of get-up-and-go and I havent even installed the programmer yet! I dont actually recall which axle it is, I only looked at the tag to see the gearing. I dont plan to install a locker right now since I dont need to open up the axle. If I had needed to regear I would have installed a selectable locker. Hopefully I dont come to regret that decision.
As in you won't be keeping this RV and will sell it to get a van?
 

Atl-atl

Adventurer
Btw, what did you do with the chrome grill you took off? I'm in CO so it'd involve shipping, but I'd be interested if you're not keeping it.
Ive got it and its in the box ready to go. Send me a private message and we can figure something out.

As in you won't be keeping this RV and will sell it to get a van?
No idea whats going to happen yet. We are going to use it for our trip and then either rent it or sell it when we get back. Wont know until we get back though. We have a few business ideas related to it but it will take some time to iron out the details. Short answer is I will probably build a few of these RVs/vans with UJoint kits to see how I like the different variations. Sell the ones we dont like/want and keep the one we like best.
 

Atl-atl

Adventurer
Well as you've all surely been hoping, Ive been busting ass on the RV even though I havent posted any updates so get ready. Theres a lot coming over the next few days even though I had a week long hiatus spent in Flagstaff because Snowbowl got 90" of snow in 7 days. I still have my priorities. Other than touchups that are inevitable in this situation the painting is done. Thank the lord. What an unbelievable amount of time for such a small space/small amount of square footage, even with 3 people working on it. Pictures do zero justice to the amount of work required. Also black is a bad choice when it comes to interior color because it shows every blemish, looks friggin rad though.
IMG_5010.jpeg

There are 10 cabinet doors that needed paint. There were also 10 panels for a DIY chest that I assembled for extra storage that will be installed later. The floor of the house was taken up by cabinetry for a week as we painted, sanded and waited between coats.
IMG_4914.jpeg

The amount of trim, switchplates, control panels, light fixtures, speakers and misc. plastic crap on the walls of an RV is off the charts.
IMG_4917.jpeg

Sad dog is sad she isnt getting much attention lately.
IMG_4912.jpeg

Took a break from painting to make a new support panel for the mattress and cover it in vinyl I got from a local upholstery shop. Pretty decent match considering every piece of vinyl/fabric/plastic trim in the cab of the van is a different shade of light taupey grey. The original mattress was 4 pieces of tetris'd together plywood panels with foam and cloth that formed a mattress or were able to be moved around to create an area between the front seats where you could stand up. Im not exactly sure why they did this, you dont need it to get into the back of the RV and there is plenty of headroom when seated in the front seats. We opted to create a small platform to cover the "cutout" and be able to use a regular mattress so our bed is comfier, looks nicer, doesnt have large gaps/seams in the cushions and doesnt need to be broken down and remade constantly.
IMG_4972.jpeg
IMG_4975.jpeg
IMG_4973.jpeg

A keen eye will notice something is missing...
IMG_5011.jpeg

Next I got to making the new counter top. Decided on butcher block for a variety of reasons but mostly because its cool looking and relatively easy to work with. Since our sink is round and we're keeping it due to size/shape constraints down below I decided to build a trammel for my jig saw. I used the old counter as a template for the shape and it worked out really well.
IMG_5037.jpeg

Fast forwarding a little bit here. Counter top is done and dusted. Took about a week to get it cut, test fit, trimmed, test fit, router'd, sealed and installed. Then it took a day or two to get the new range installed but Im happy to report that its all up and running and works like a champ. Pretty huge upgrade with this one.
IMG_5065.jpeg
 
Last edited:

Atl-atl

Adventurer
So I spent a couple days getting familiar with the roof. Turns out there is a mini solar panel up there which is cool. Theres a light on the control panel that has a label that says "solar charging when lit" but I missed the panel last time I was up there since its about 12" x 18" and stuck to the top of the AC unit. I cant imagine it does much but its better than nothing.

Also the two vents are enclosed in these massive boxes that are meant to allow the vents to be open during any weather. Thats great and all except they render the vents nearly useless. When wide open they have almost no air flow. So I ripped out the one above the bed in favor of a powered fan. Super pumped about this one. I happened to have the exact fan new in the box because I was going to install it in my Go Fast Camper but never got around to it.

Old vent box
IMG_5136.jpeg
Old vent
IMG_5062.jpeg

The name of the game on RV roofs is GOOP and lots of it. What a pain in the ass to remove, especially since the roof is thin rubber. Best tool I found was this fiber strand removal wheel. Too much force and it will go through the rubber but it did a great job.
IMG_5063.jpeg
IMG_5068.jpeg
IMG_5069.jpeg

New fan
IMG_5137.jpeg
IMG_5073.jpeg

Next up I cut the opening for the new range hood. This one actually vents to the exterior unlike the old one that did nothing.
IMG_5074.jpeg

Installed some fake subway tile as the backsplash.
IMG_5070.jpeg

Also installed a new tinted operable window with a screen. Its a slightly smaller size than the one I removed which is not great. It also uses a slightly different mounting flange that Im not happy with. Looks great but its not sealed correctly and Im kinda stuck about what to do. Just waiting on the new faucet to arrive so I can finish putting the kitchen back together.
IMG_5081.jpeg
 

Forum statistics

Threads
188,367
Messages
2,903,806
Members
230,227
Latest member
banshee01
Top