Barn Door for JK factory hardtops

jscherb

Expedition Leader
When I was at the SEMA Show last month I posted that for a while now I've wanted to experiment with on board air system designs. At the show I talked with a compressor company and they supplied me with a compressor and tank to prototype with.
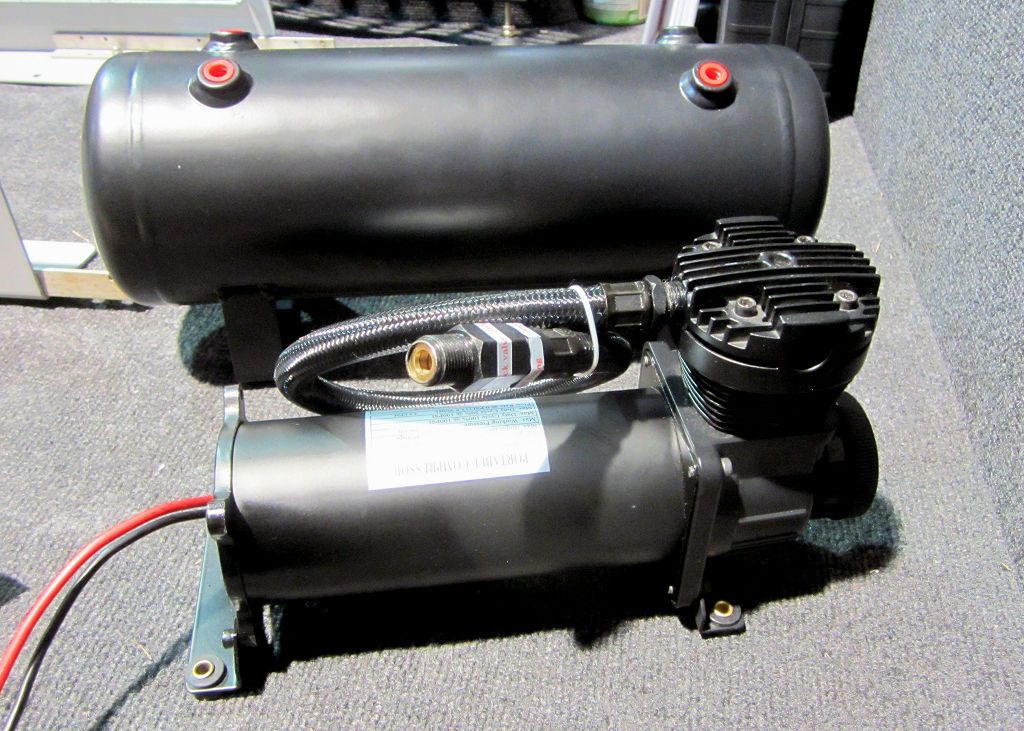
Compressor1_zpsd1si3uew.jpg


I'm looking at several solutions for mounting the compressor in the Jeep. It fits very nicely inside a Jeep wheel, so it could be mounted inside the spare carrier on the tailgate to avoid taking up space inside the Jeep.
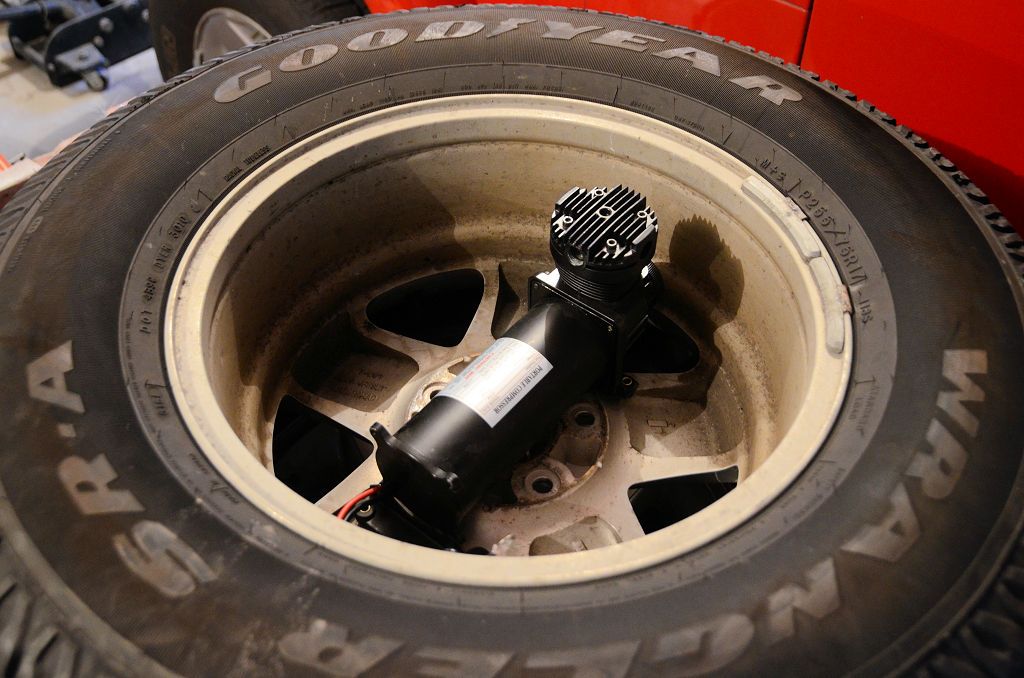
WheelFit_zpsb3wglslq.jpg


In this photo it's sitting on top of the spare carrier to show the comparison in size, it could fit inside the carrier without too much trouble.
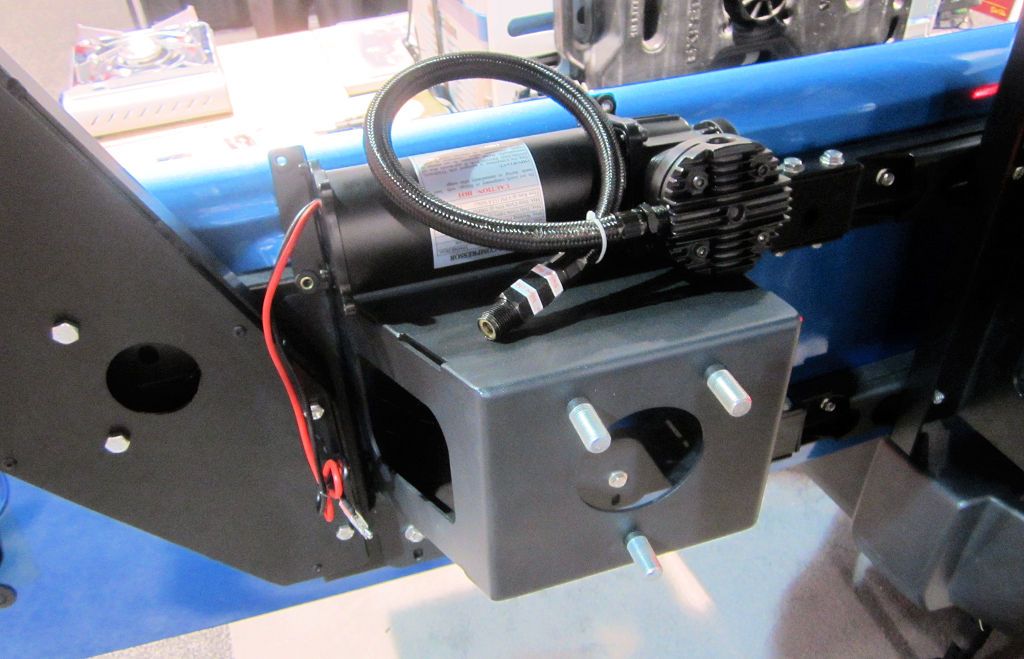
Compressor2_zpsys4i5fkk.jpg


I may also work up a mount to go in the inner fender ammo can trays, this would work in both my JKU and the LJ. Shown is the compressor sitting in the tray in the JKU.
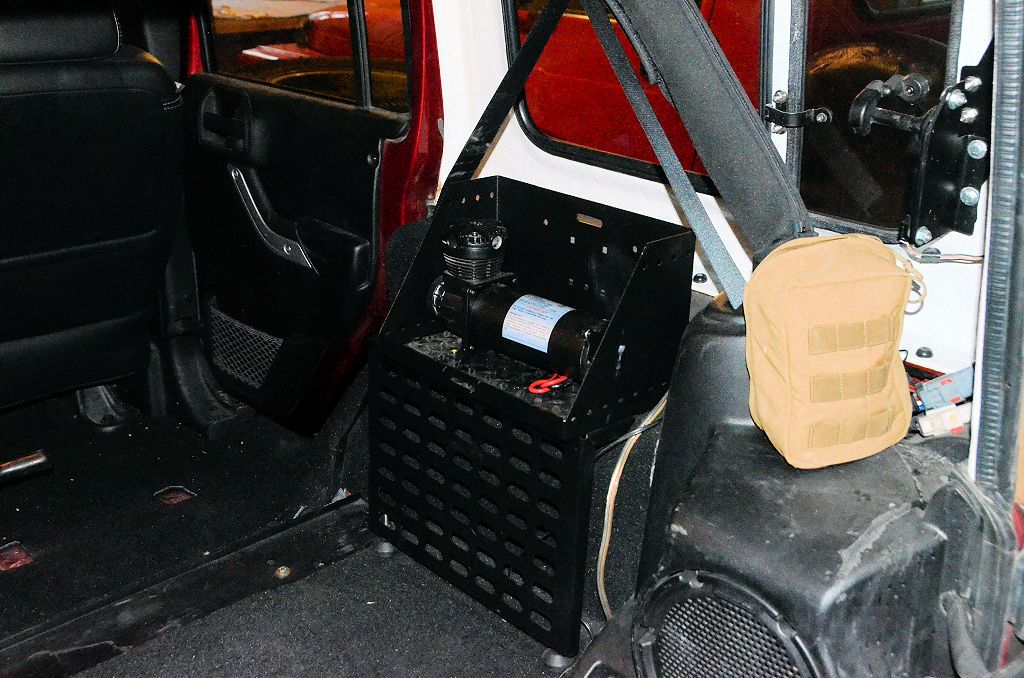
AmmoTrayMount_zpsuchxhio2.jpg


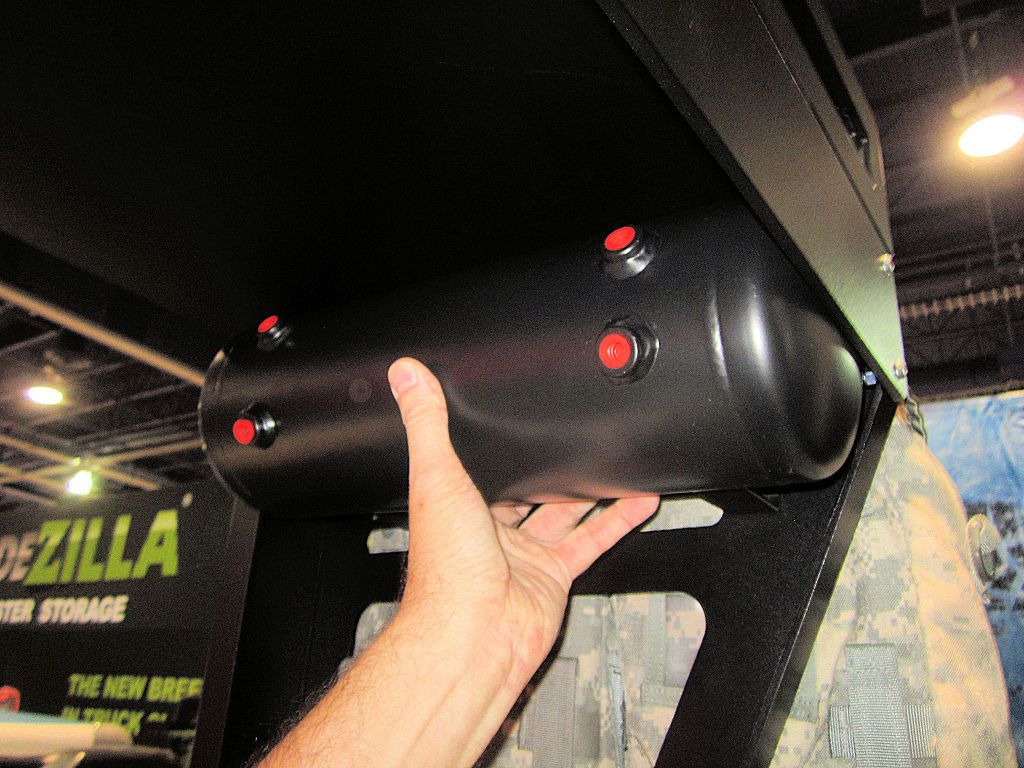
The company also gave me an air tank to experiment with. A tank isn't really needed if all the compressor is being used for is airing up tires, but if air tools are to be run it would improve the usability quite a bit. It turns out there's plenty of room underneath both Jeeps to mount the tank, in this photo I'm holding the tank in place under the floor of the LJ. The tank is above the bottom of the frame rails and driveshaft so it's a fairly safe place for it. The compressor could also easily mount underneath, but I'm not sure I'd want to subject it to the environment under there.
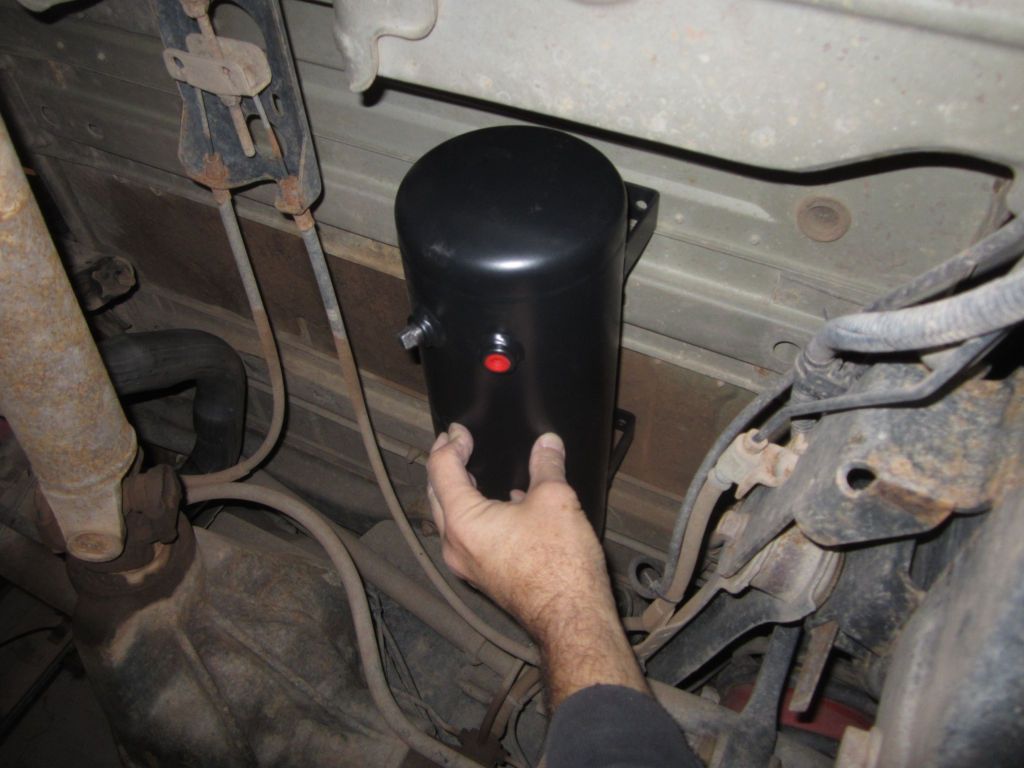
UnderneathLJ2_zps6frvwkpo.jpg


I welcome any ideas or input you might have; I'm just starting this design project so any and all ideas for the design are welcome. What would you like to see in an on-board air system and where would you like to have it mounted?
 

jscherb

Expedition Leader
Scherb, Good to see you're working on something of interested to us. We have the same system & have yet to determine where the tank & compressions should be mounted. One thing that you/we should make a note on, is that the compressor itself should be mounted in the center of the vehicle as the limited length of the hose restricts how far you can air up. IE: If the compressor is mounted towards the rear of the jeep as within your images, the hose would not reach to the front tires. Adding a second line would reduce the PSI from the compressor thus taking longer to air up. The next bit of info would be to mount the compressor anywhere on the jeep, yet create designated lines which branch off from the rear and front of the jeep, which the air line can quick disconnect from designated points about the vehicle. lastly, If you jeep has a pocket under the cargo floor mat, this could be cut out and a skid plate box mounted in it's place, this skid box could then hold the air tank and /or compressor with those hard lines branching off the box.

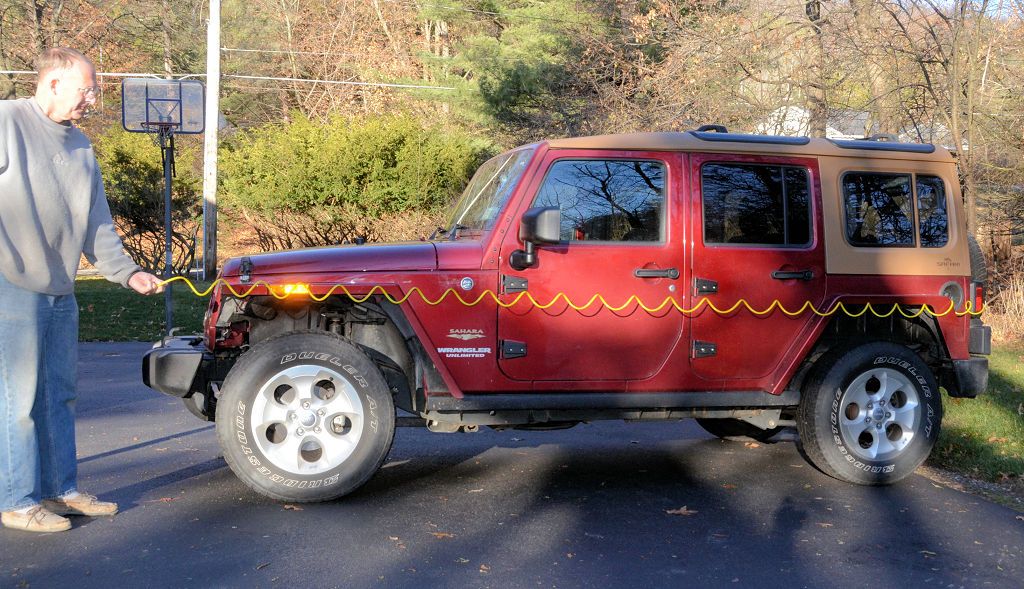
The compressor does not have to be located in the center of the vehicle in order to reach all 4 corners, nor do you need complicated permanently installed lines to the corners of the Jeep. In this photo I've clamped a recoil air hose to the spare carrier, you can see it easily reaches the front of the Jeep.

RecoilAirHoseReach_zpshnzpnuwf.jpg


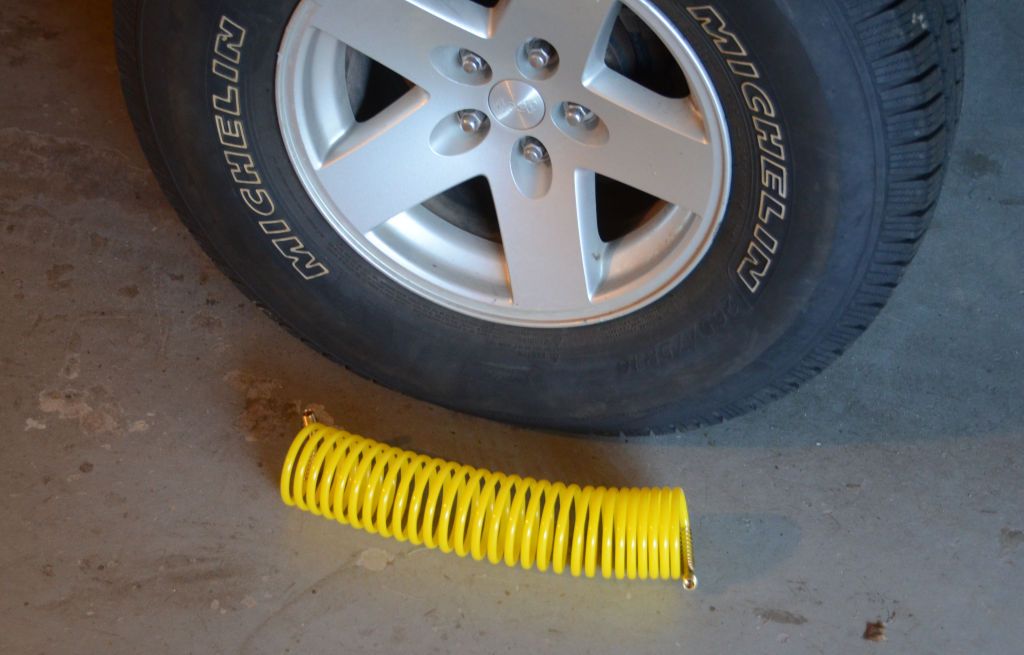
I picked up this hose for about $5. It recoils back to a size that's very easily stored.

RecoilAirHose_zpsogz6eock.jpg
 

jscherb

Expedition Leader
One benefit of mounting the compressor inside the spare tire carrier is that it's space that isn't used for any other purpose. Mounting it in the center console as has been suggested would take up space that I use regularly for storing other things.

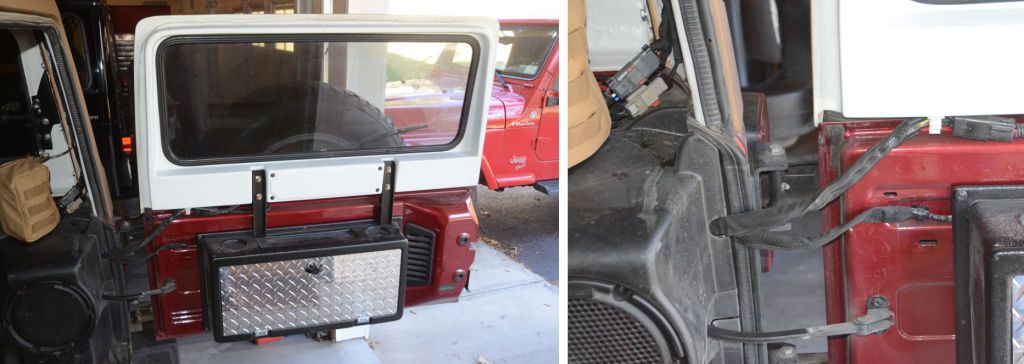
If I mounted the compressor inside the spare carrier, getting wiring to the tailgate is pretty easy - for the Safari cab barn door I had to run wires to the tailgate for the wiper and defroster and the washer hose, here's how those wires are run, it's the top set above the factory third brake wiring.

WiperWiring_zpsymyh9drm.jpg


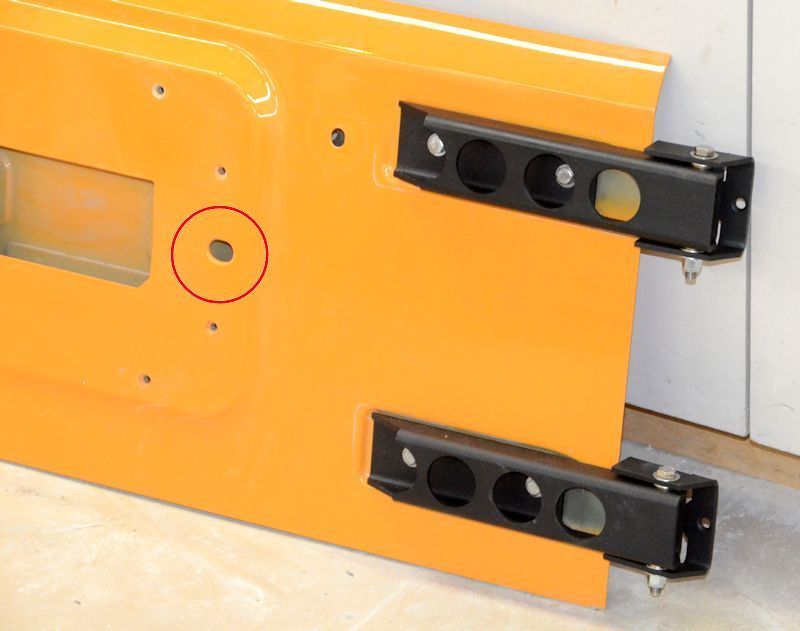
And to get outside to the compressor, Jeep has conveniently provided a wiring hole through the tailgate:

TailgateHole_zpssyhbchla.jpg


It would be a no-drill installation.
 

jscherb

Expedition Leader
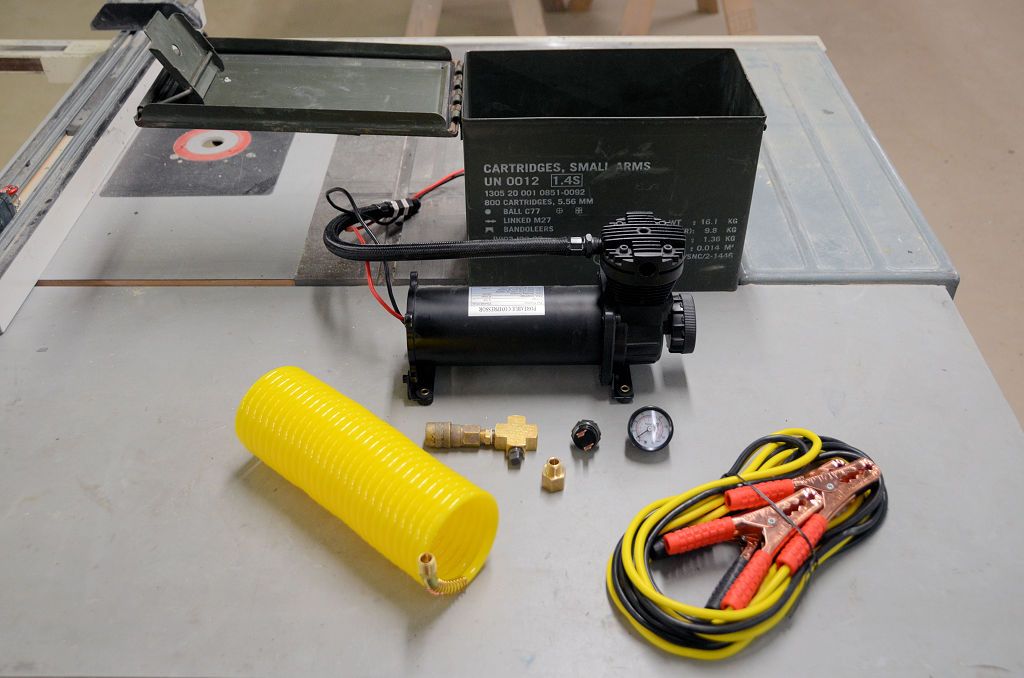
While I'm working on on-board compressor and tank mounting designs, I'm also going to implement a portable air solution - I'll install the compressor in an ammo can. The idea is that I could use this air supply any of my Jeeps, just throw the can in the back and take it out when I need air. I've picked up all the bits and pieces I'll need, and everything will fit nicely inside a Fat 50 can.

I've got an inexpensive jumper cable set which will be used to connect the compressor to the Jeep's battery. I'll cut the clamps off one end of it and make permanent connections inside the ammo can. A 25' coiled air hose will also fit inside the can. The main parts:

AmmoAir1_zpsevincwyb.jpg


I've got a pressure regulator to automatically turn off the compressor when it's not in use. Haven't decided if I'll include the pressure gauge in the design or not, or if it even needs a power switch - when it gets connected to the battery the compressor will run a few seconds until the air hose is up to pressure, then it will shut off. When air is being used, the compressor will start up, and when air is no longer being used it will shut off, so it may be that a switch is unnecessary.

Comments and suggestions on this idea also very welcome.
 

Dexter612

New member
Is the pressure regulator part of the pump, or is it something you added? I like the concept of being able to move it from vehicle to vehicle as needed.

I found the answer. I'll be following your project.
 
Last edited:

jscherb

Expedition Leader
Is the pressure regulator part of the pump, or is it something you added? I like the concept of being able to move it from vehicle to vehicle as needed.

I added it. It's the small part with two terminals in the photo, just to the left of the pressure gauge. It's a switch that turns the compressor on when the pressure falls below 90 psi and turns it off above 115 psi. Also required, but not shown in the photo, is a relay which controls the power to the compressor - the contacts in the pressure switch aren't rated for the amount of current the compressor requires.
 

akpostal

Adventurer
I liked the idea of having the compressor and tank under the rear rack on the back. What you have there looks like the perfect size.
 

jscherb

Expedition Leader
I liked the idea of having the compressor and tank under the rear rack on the back. What you have there looks like the perfect size.

Thanks, nice to hear from you again after so long, I hope everything's been ok with you. Was just wondering about you yesterday since it's been several months since you've posted here.
 

Bullseye240

Adventurer
Out of curiosity Jeff, what are the dimensions on the tank? It might fit behind some after-market bumpers between the bumper and rear frame cross member. If so two of those tanks would provide a good supply of stored air in a place that is otherwise wasted.
 

jscherb

Expedition Leader
Out of curiosity Jeff, what are the dimensions on the tank? It might fit behind some after-market bumpers between the bumper and rear frame cross member. If so two of those tanks would provide a good supply of stored air in a place that is otherwise wasted.
The tank they gave me is 1.5 gallons; it's 17" long and 5.5" in diameter. The company has other sizes from 1/2 gallon up to 5 gallons but I chose the 1.5 because it's a size that shouldn't be too hard to mount somewhere in, under or around a Jeep. I posted this photo when I was at SEMA, it shows me holding the tank under the basket on the prototype Overland Rack MORryde had at the show.

Compressor3_zpsfmdgp0lv.jpg
 

jscherb

Expedition Leader
Some work-in-progress photos of the JL Grille Kit.

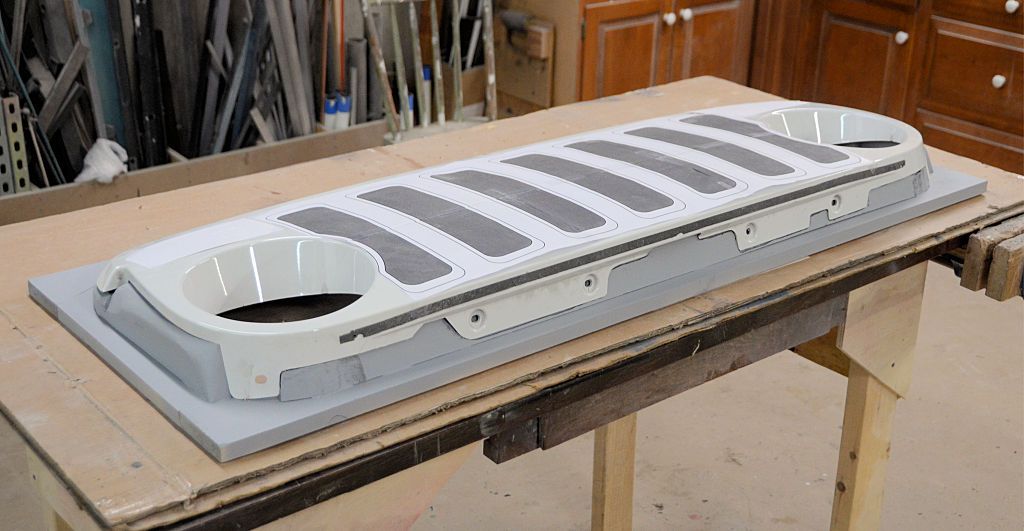
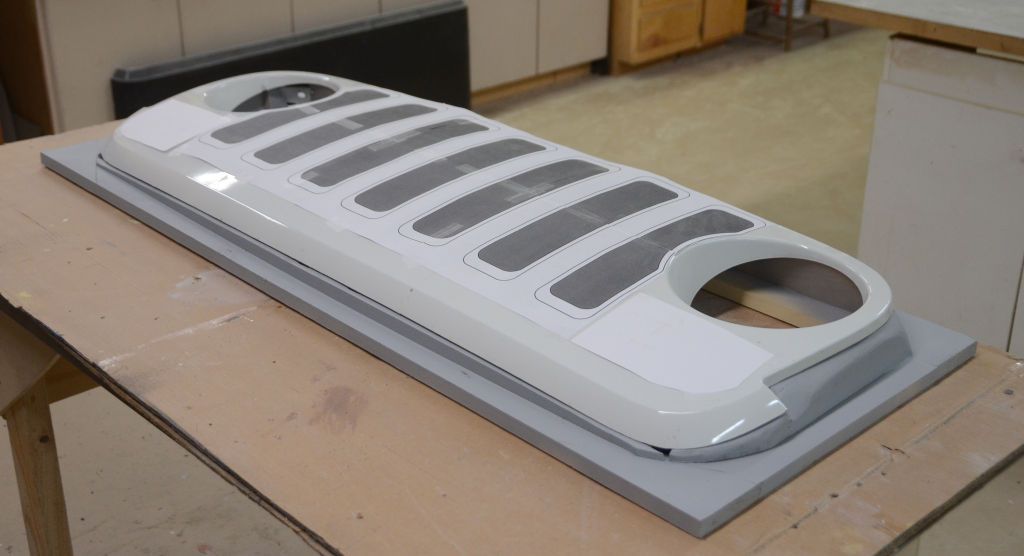
Since I'm deriving the JL grille from a factory JK grille, I'll be modifying the JK grille with new slats and then making a mold from that. Typically when a mold is made, the margins (edges) are made longer than the actual part so the part can be trimmed exactly after it comes out of the mold. Making a mold from a finished part, the margins won't be longer, so some way is needed to make the mold with longer margins. Sometimes it's as simple as adding to the edge with masking tape, but another issue with the factory grille is that it's so flexible it would be hard to guarantee the mold wouldn't be twisted. The solution is a fixture that supports the grille and adds to the margins, so that was the first step of this project.

GrilleFixture1_zpszw7dhlvx.jpg


GrilleFixture2_zpsaktfagso.jpg


The grille fits very tightly onto the fixture, but even so there are slight gaps between the grille and the fixture. Those gaps will be filled with modeling clay before the mold release is applied. Because the grille won't be permanently affixed to the fixture, the fixture can be used again if I ever decide to do another grille project requiring that a mold be made from a factory grille.

One of the reasons the fixture is the first step of this project is to hold the grille firmly and flat as I modify it. Making the mods with it in the fixture will ensure everything is perfectly flat and correct when the mold is made.

I've got a little bit of bodywork to do on the fixture before it's ready to be used for mold making, but it's done enough for now to serve the purpose of supporting the modification work to the grille.

The modifications to the grille actually aren't the next step though... the next step is to make an intermediate mold for the slots. The slots on the JL grille are fairly complicated, all the photos I've seen show the grilles with inserts in the slots. I'm going to include the inserts in the grille mold, and the easiest way to ensure all 7 slots are identical is to make a mold for a slot, mold 7 of them, and use those slots when modifying the JK grille. So the next step is to make a the slot mold.
 

jscherb

Expedition Leader
Scherb,

One thing I'd like to find out is how does one create the plastic emblems. I'm sure a emblem would have to be designed first then a mold made from it as to create multiple emblems, similar to the molds you use for the projects you create. I like the grille process but doubt I would purchase one. I'd rather see you get back to the old style gladiator grille mold.

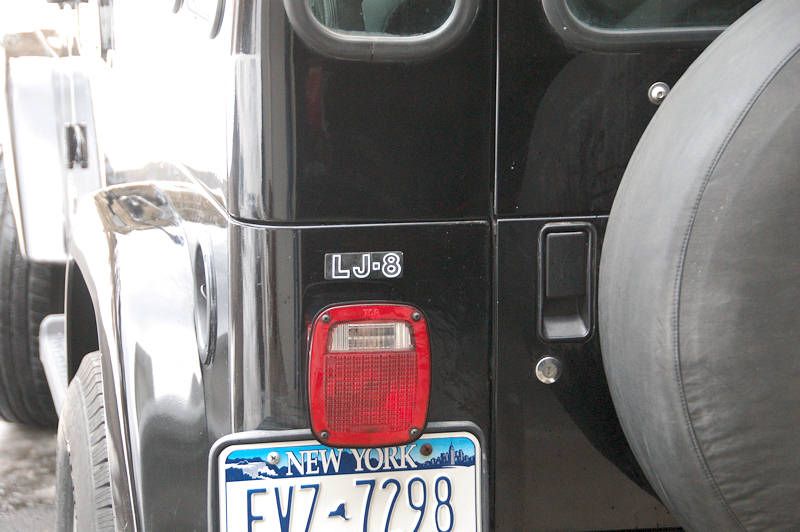
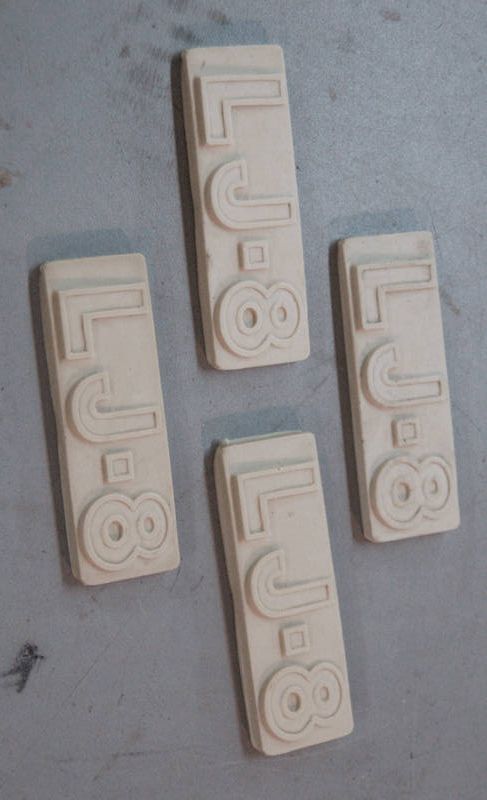
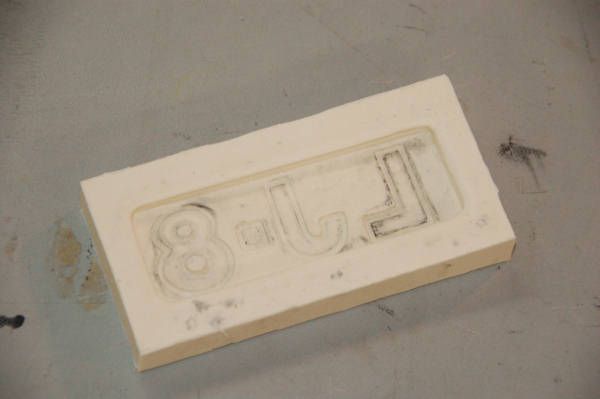
Depends on what kind of emblem you want to do. I've done several over the years - when I did the CJ Grille Kit for the TJ and installed it on my LJ, I wanted a factory looking emblem on the back so I made up an "LJ-8" emblem master, made a mold in silicone rubber, and cast some in urethane...

The finished emblem:

LJ8EmblemTest2.jpg


A few just out of the mold:

LJ8EmblemsMolded.jpg


The silicone mold:

LJ8EmblemMold.jpg


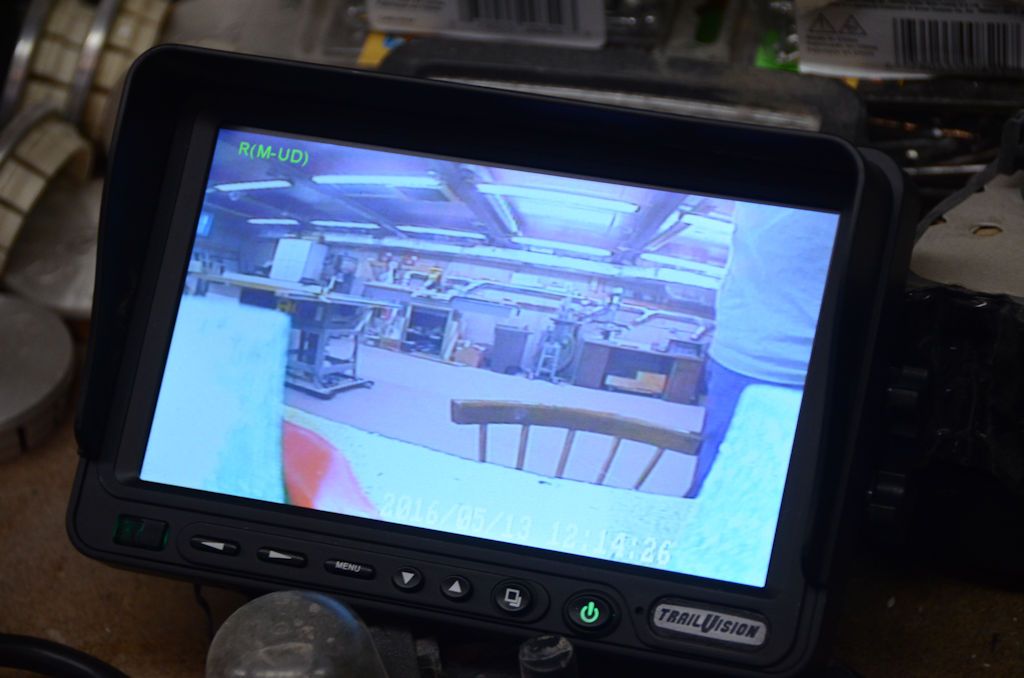
When I did the Trailvision camera system for Retrofit Offroad, I wanted an emblem on the monitor so I had an emblem company make what's called a "dome label" - it's a printed label with a clear plastic domed lens over it. It's on the lower right corner of the monitor. It looks very nice, this photo doesn't do it justice. Dome Labels are very commonly used in the automotive aftermarket.

DistanceIndicatorOff_zpsy6abxug8.jpg


There are also companies who will make custom emblems in metal, usually one or two of them exhibit each year at SEMA. I've talked to them about emblems for various projects but they're a bit expensive.

The plastic emblems on vehicles today are made from CAD models, the model directly drives the mold-making process so no original master part is required.

The jk gladiator grille project is still ongoing, but recently I've had other projects that interest me more so those have gotten priority.

BTW my name is Jeff.
 

rubicon91

Explorer
Scherb,

I never assumed we were on a first name bases, Thus I've been using your sir name. Seems only fitting unless you would prefer Mr. Scherb.
Or Jscherb as his screen name says would work. Only 1 more letter:D

Sent from my SAMSUNG-SM-G890A using Tapatalk
 

jscherb

Expedition Leader
Another electrical project I'm working on...

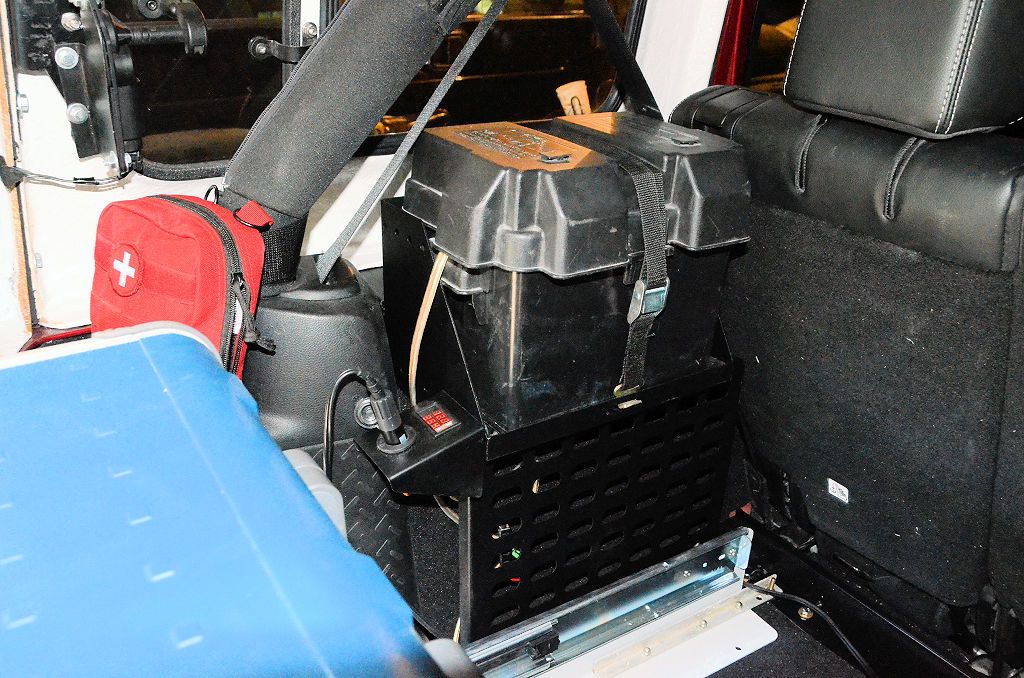
I've been asked to update my fridge power system into a design that could go into production. My current implementation (pictured below with the fridge slide pulled out to provide a better view) works very well - above the inner fender I'm using a MORryde ammo can mount to hold the fridge battery. The power panel is at left, bolted to the side of the battery tray. It's got voltage and amperage displays and a power outlet for the fridge. It's wired so the fridge runs off the battery when the Jeep isn't running, and when the Jeep is running the fridge battery gets recharged by the Jeep and the fridge runs off Jeep power. The fridge can run all the time without draining the Jeep battery, usually the fridge will run 3 days before the fridge battery voltage falls enough so the fridge shuts off, but as long as the Jeep is driven a bit in those 3 days the battery will get topped off.

BatteryAndOutlet_zpsh3s4zpzx.jpg


My current version taps into the Safari Cab hardtop power which won't work for everyone else, so I'm planning a small redesign to make it plug-and-play with the Jeep, and probably going to add a few features.

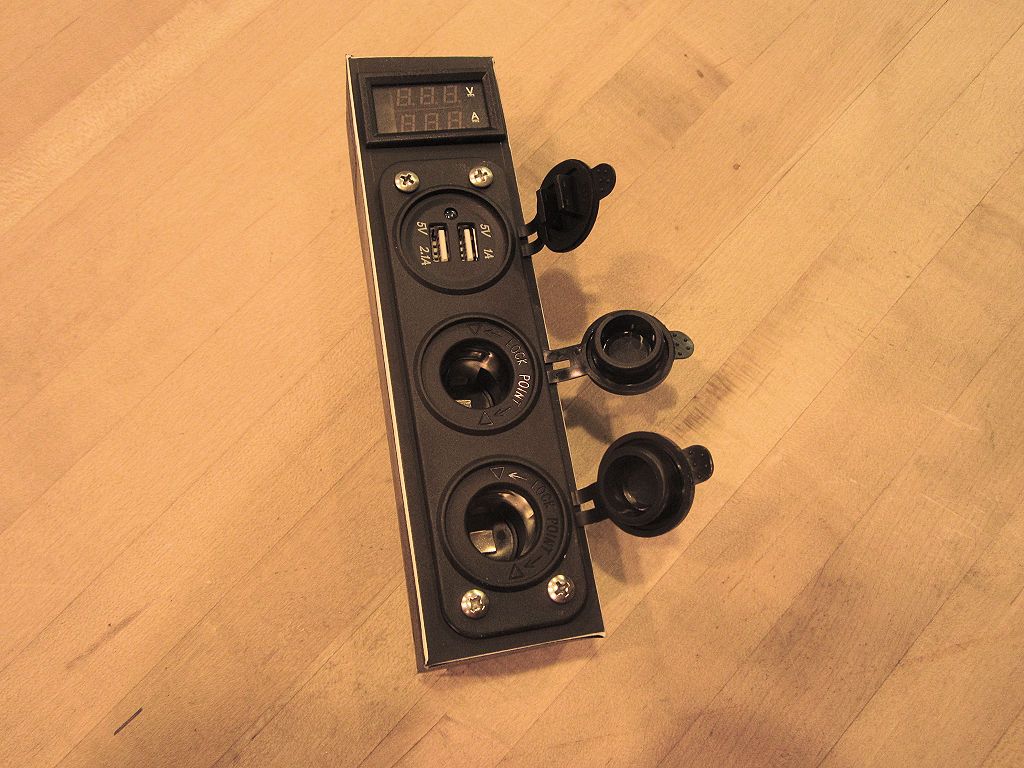
These next photos show a mockup of what I think I'll do. I'll make it a more general kitchen power system, the power panel is larger and contains two outlets plus two USB connections as well as the voltage and amperage displays. One of the outlets would be switchable between constant power and Jeep power, for things you only wanted to power when the Jeep is running, the other outlet would be constant power only (for the fridge).

PowerPanelMockup1_zpsixkkr0l0.jpg


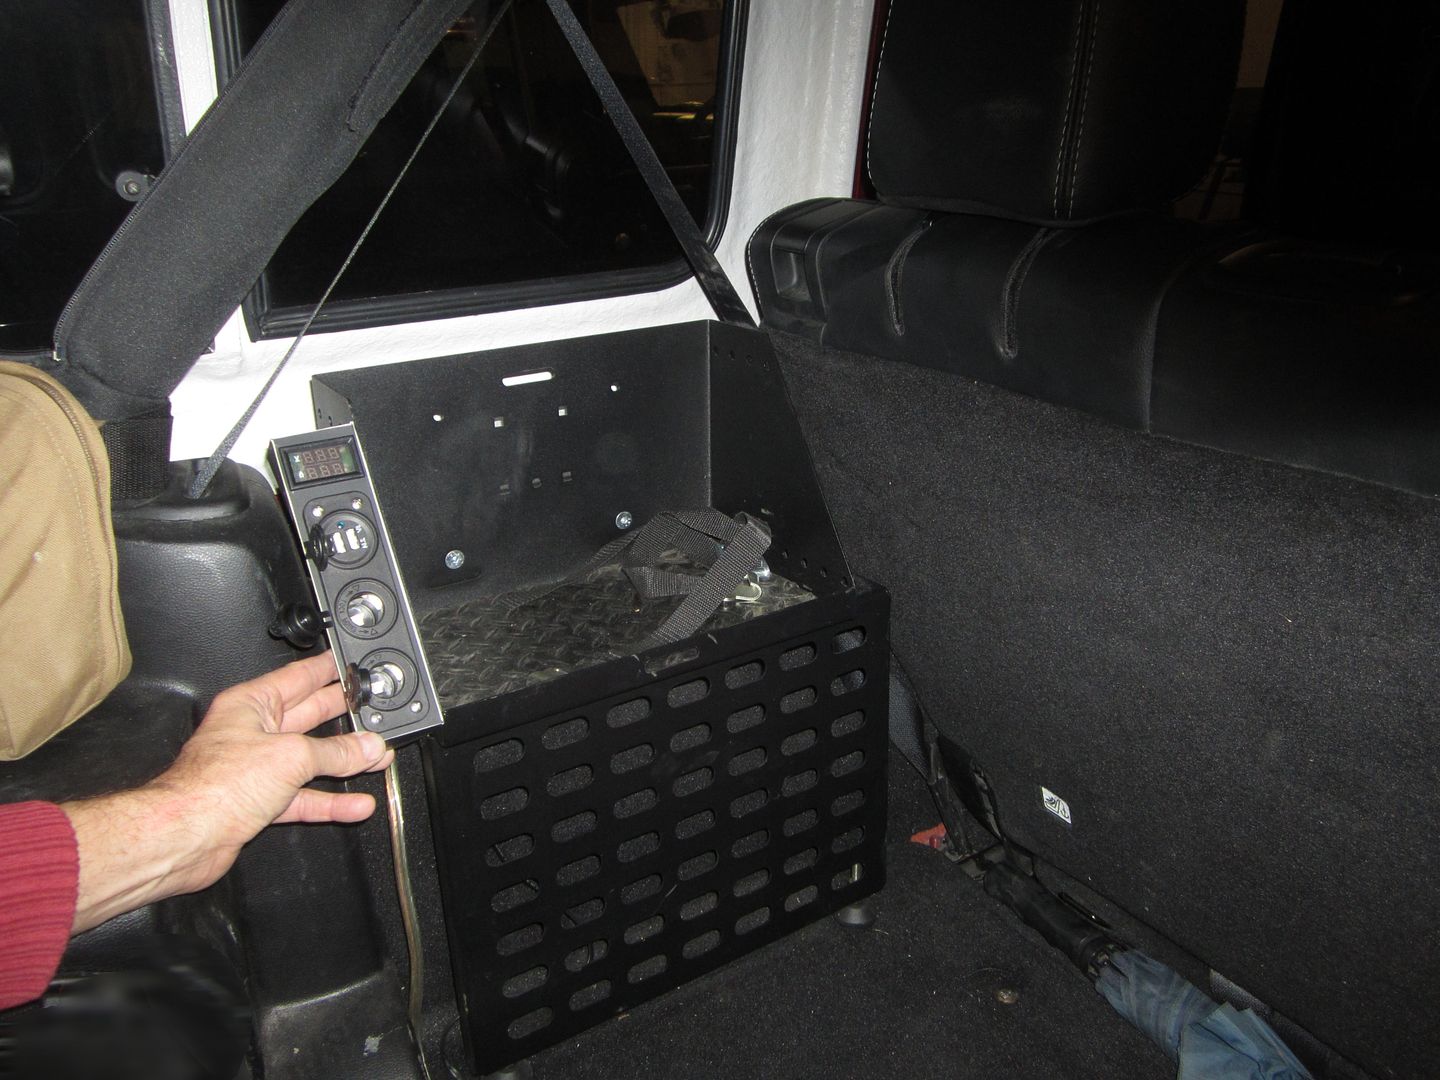
It would mount on the side of the tray as shown below, but it could mount elsewhere if that made sense for someone's particular implementation.

PowerPanelMockup1a_zpsh4v2htvw.jpg


I'm still in the design phase, so I'd like to hear any comments or suggestions you've got.
 

Comanche Scott

Expedition Leader
This sounds like a very cool project.
Four thoughts come to mind:

1). Optional 4 pack of switches would be great. This would make wiring in things like LED strip lights a breeze.

2). Seems like the majority of threads I've read where people have installed these power port systems (myself included), mounted the panels close to the rear tail gate for ease of access when the back is full of stuff. I've seen a lot of threads where the whole back of the Jeep is loaded floor to ceiling.

3). Avoid tapping into the Jeeps electrical if at all possible.

4). Seal the connectors best as possible. A lot of dusty places are pretty alkali. Alkali is very corrosive to copper. Deutsch or Weather Pack connectors are easy to find, and the tools to make repairs are cheap. They also seal really well.

Hope this input is helpful.
 

Forum statistics

Threads
188,266
Messages
2,904,734
Members
229,805
Latest member
Chonker LMTV

Members online

Top