Barn Door for JK factory hardtops

DCH109

Adventurer
So one thing I would do is question Auxbeam on in these are DOT compliant. I highly doubt they are as they only have 12 items on their web page that are.

Secondly I would read this well written article from Guru Daniel Stern https://www.danielsternlighting.com/tech/bulbs/Hid/conversions/conversions.html

Also an interesting article on Jalopnik https://jalopnik.com/why-most-led-headlight-upgrades-dont-really-work-an-ex-1843070472

While both articles are older, they still are accurate. Especially if you look at the Jeep headlight. Not a heck of a lot has changed on the stock factory halogen lights in the JK/JL.
In 2020 I bought a brand new Ram truck with the basic halogen lights. Might as well not had them on for as much light that they did not put out.

I asked him about LED lighting in the past and he made the simple comment that JW speaker light are about as good is it gets for retofit. That said, the pattern to me was total garbage with dark and hotspots which I did mention to him and he agreed it is a problem. I tried the Mopar lights and while they were 100% better than the JW lights, the snow packing was terrible. I went back to halogen lights (his recommended setup). I maybe could have fixed it now that I installed the horizontal adjusters on my JK (US models do not have these) but my new lights have given me no reason to change.

He also has a good article on aiming lights http://www.danielsternlighting.com/tech/aim/aim.html.
 
Last edited:

jscherb

Expedition Leader
I installed the new Auxbeam LED headlight bulbs this morning. Installation was pretty straightforward and took me about 20 minutes, which includes the time it took to take step-by-step photos. Because of the way the JK is designed, the grille and headlight housings must be removed in order to access the bulbs, so that plus the photo time is why it took 20 minutes, but even so it was an easy install. A quick test in the garage shows that they are much brighter than stock, but that doesn't prove anything - I'll have to wait until dark to give them a real test. I think I'll drive with them for a week or so before posting a review so I can have enough night driving time to test them enough. Stay tuned.
 

jscherb

Expedition Leader
Full review to come soon, but here's my quick take on the new headlight bulbs - they are quite a bit brighter than the factory bulbs and in drives after dark for the past 3 nights nobody has flashed at me so apparently the new lights are not offensive to oncoming drivers.
 

jscherb

Expedition Leader
Auxbeam recently released new LED headlight bulbs that they rate at 25,000 lumens and they say are 650% brighter than standard halogen bulbs. They list these features:

  • The ultra-thin surface interval of the light pole makes the chips of the led bulb much closer to projecting a Super-Focused beam, a wider and farther illumination range, no blinding or glare to oncoming traffic, safer and reliable.
  • Driver system improves the compatibility with the CANBUS computer system of 99% of vehicles.
  • 10 minutes quick installation. Almost 1:1 mini size design as halogen, easy to install. [Note: due to the way bulbs in the Wrangler are accessed, the installation will probably take longer].
  • 50,000 hour lifespan due to a high efficiency heat dissipation cooling system which consists of an Aviation Aluminum hollow-carved heat sink and a 12000 rpm turbofan.
  • Two year warranty

Two weeks ago they sent me a pair to test. My goal for testing was to verify that they work properly in the JK Wrangler, to do a subjective evaluation of the improved brightness, and verify that they don't bother approaching drivers. Being July, I cannot verify their performance in winter ice and snow, but assuming the bulbs continue to operate satisfactorily from now until winter, I'll post an update on their winter performance after some experience in winter weather.

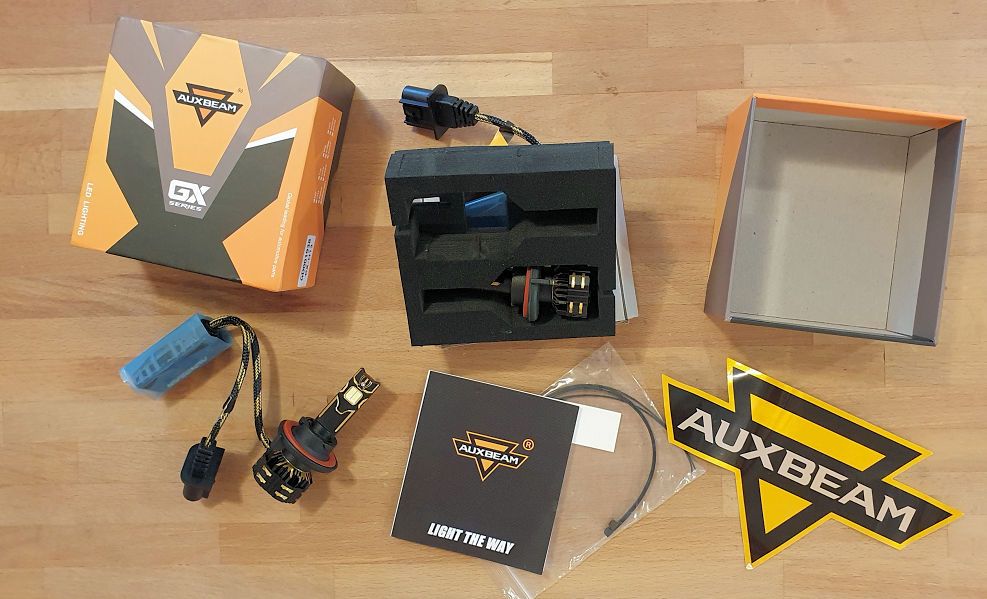
The bulbs come packaged in a high quality box with foam padding for protection. Included are two bulbs, an instruction booklet, some mounting materials for the CANBUS driver modules and a large Auxbeam decal.

AuxbeamH13Bulbs.jpg


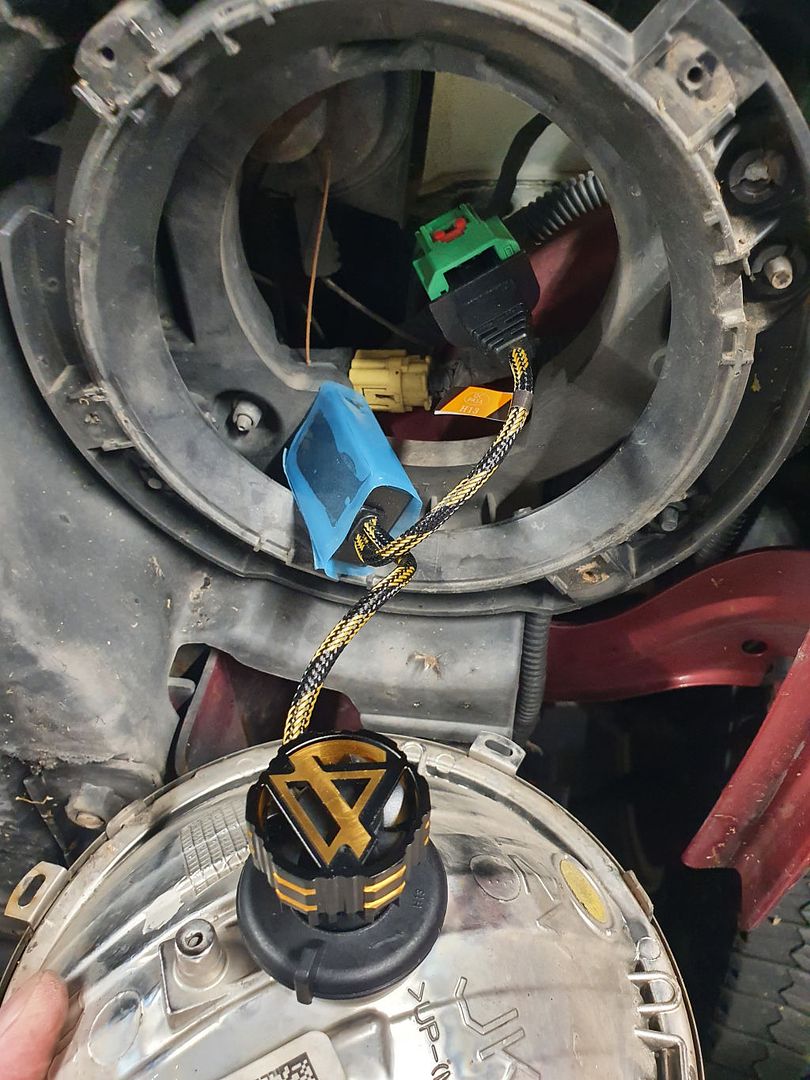
There are large LEDs on both sides of the bulb; only one side is visible in this photo. The box wrapped in blue plastic is the CANBUS driver module, which needs to be mounted securely somewhere.

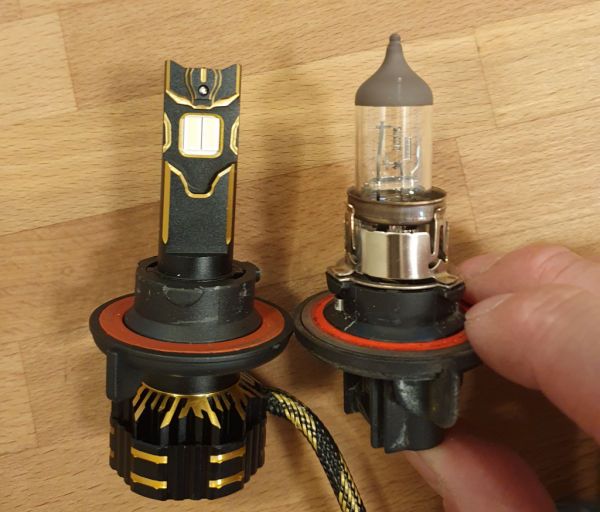
The LEDs are placed in the same position as the filaments in the halogen bulbs, so they should retain the stock beam pattern pretty well:

BulbComparison2.jpg


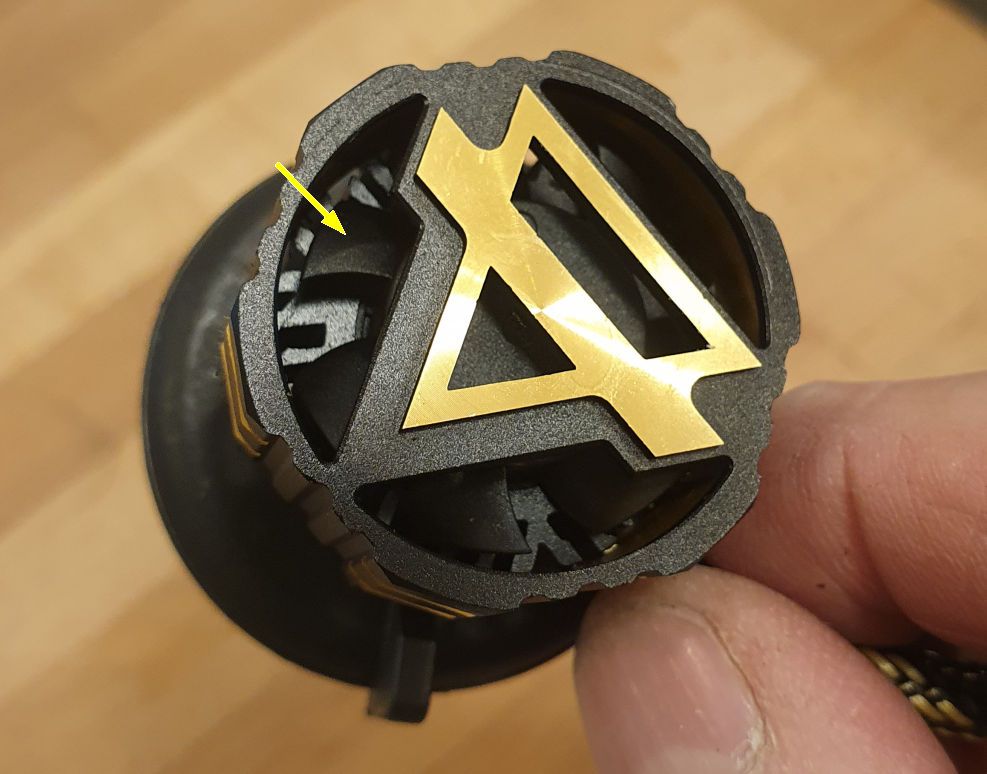
Looking at the back of the bulb, the fan blades are visible inside the housing:

LEDBulbFan.jpg


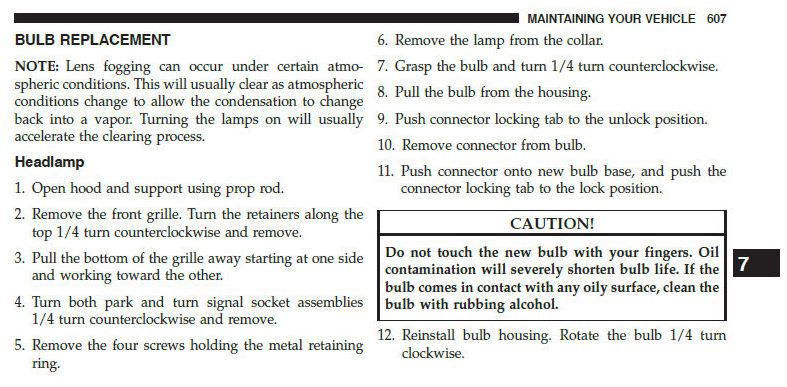
Installation in the JK requires removing the grille and removing the headlight housings, since the bulbs can't easily be accessed from the rear. From the JK owner's manual:

JKOwnersManual2.jpg


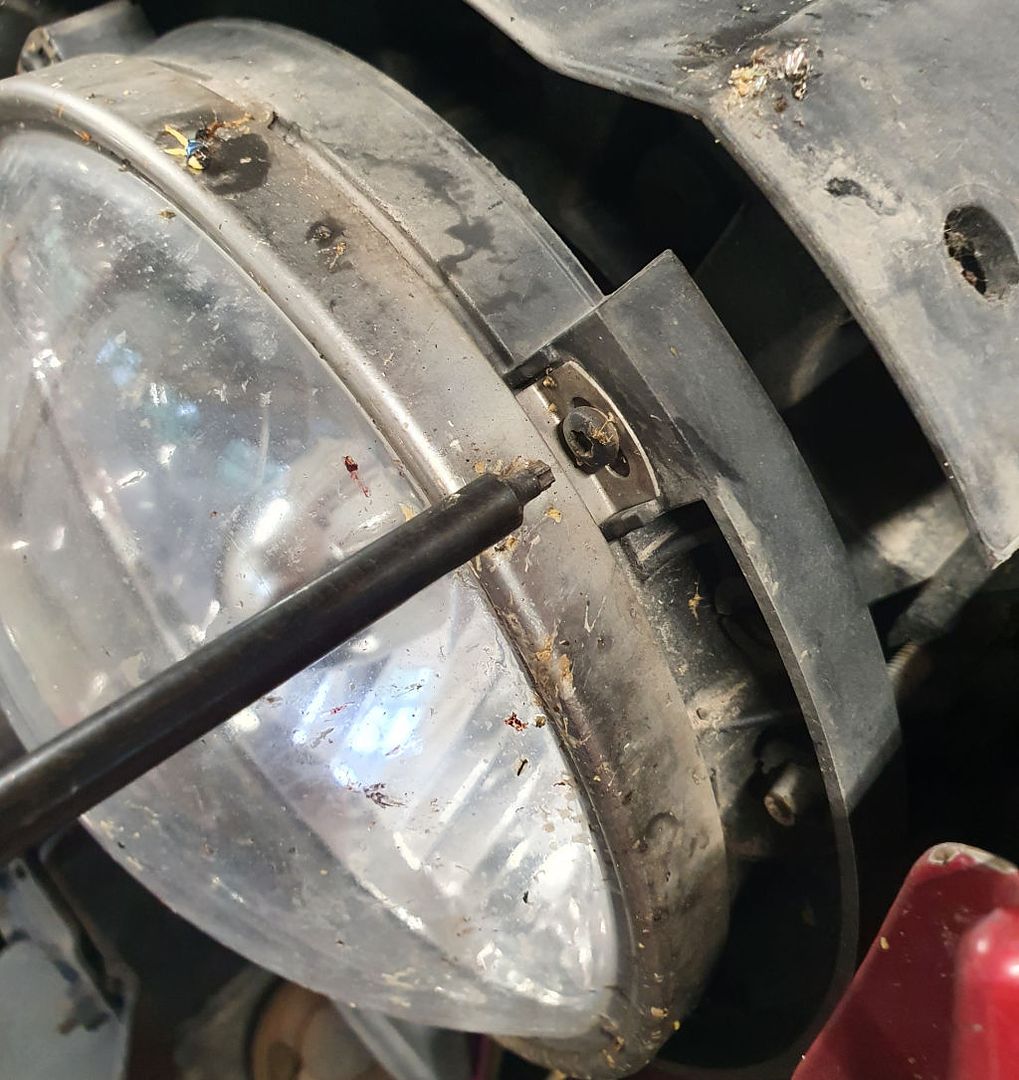
Following the steps in the owners manual, here's one of the headlight housings removed. One thing step 5 doesn't say - you'll need a T-15 Torx driver to remove the headlight housing retaining rings.

RetainingRingT15.jpg


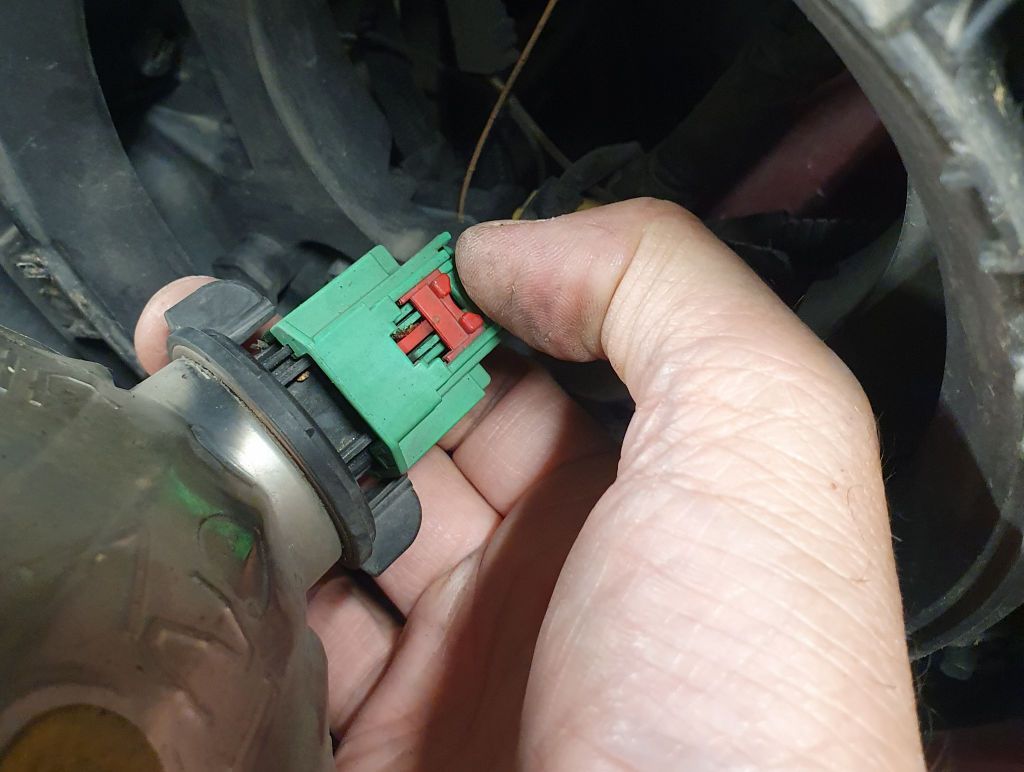
Removing the old bulbs: the red locking tab must be slid towards the back of the connector as shown in this next photo in order to unlock the connector. Once that's unlocked, press down on the tab in the back of the connector (where my thumb is) and pull the connector off. I recommend removing the connector before removing the old bulb - it's easier when you can grab the entire housing than just grabbing the small bulb, and that way you won't get oil from your fingers on the glass of the old bulb.

RemovingOldBulb.jpg


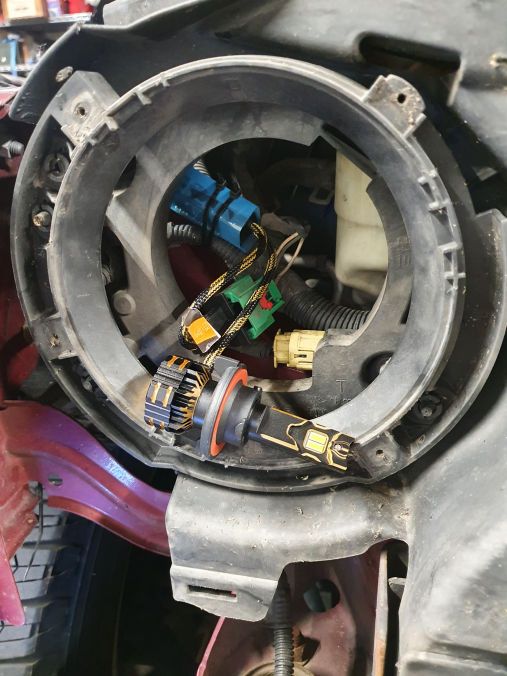
The new bulb installs exactly like the original bulb, but a place must be found to securely mount the driver module. In this next photo the bulb is installed in the housing but the driver module hasn't been mounted yet.

BulbInPlace.jpg


The installation instructions included with the bulbs do not provide any information about mounting the driver modules, but it's easy to figure out.

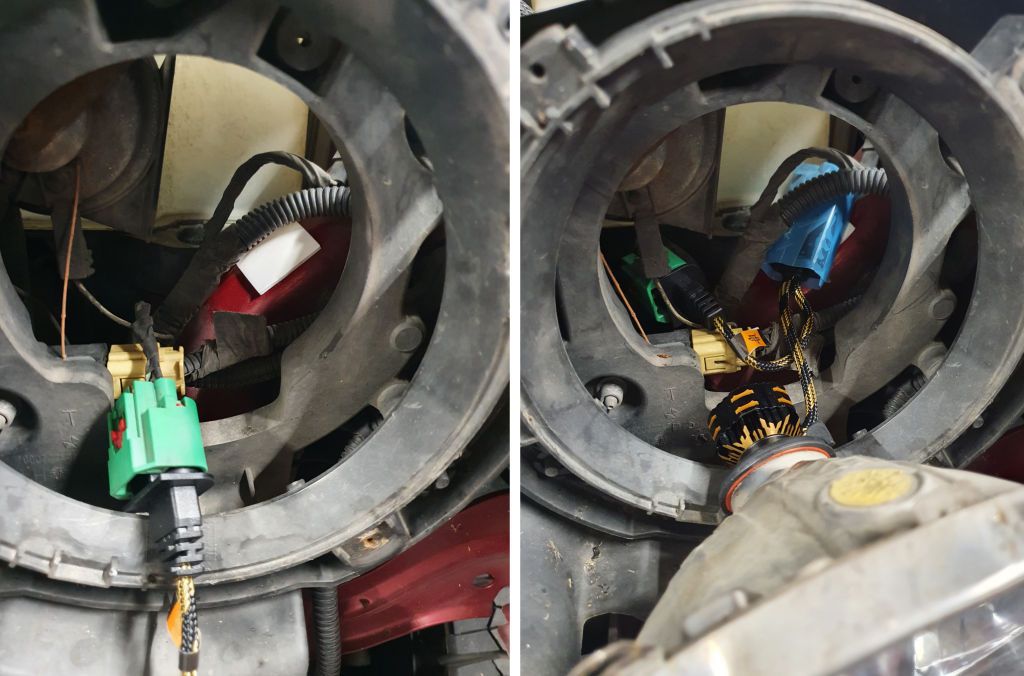
On the drivers side, I used the provided double-sided tape to mount the driver module to the core support. I left the blue plastic cover on the module for clarity in these photos but it can be removed. In the left photo the tape is on the core support; in the right photo the module is mounted to the tape.

DriverModuleDriverSide.jpg


On the passenger side, the Jeep's wiring harness is larger and makes it more difficult to mount the module to the core support, so I used the provided zip ties to secure it to the large wiring harness.

DriverModulePsgrSide.jpg


Installation wasn't difficult, I think it took me 20 minutes from beginning to end and that includes the time it took to take the photos.

I finished the installation about 9am, and there wasn't any point in taking a drive to test them because the sun was out, so I took these three photos in the garage. The camera is set to manual aperture and shutter speed so all three photos are comparable. Left to right: stock headlights, LED on drivers side/stock on passenger, and both LEDs installed.

InitialTest.jpg


The images above don't prove anything except that at about a 5 foot distance the LEDs appear brighter on the garage door. Next I'll test them on the road at night, and even that will have to be fairly subjective because a true empirical comparison would require sophisticated measuring equipment and direct comparisons between the halogens and the LEDs. But I'll drive with them for maybe a week before I form my subjective opinions, which will mostly be focused on "do they help me see better at night" and "do they bother oncoming drivers".

It was quiet in the garage with the engine not running so when I turned on the lights I could hear the fans in the new bulbs running. They're very quiet and of course won't be audible when the engine is running.

A week later... I took a few night photos. Since it isn't quick to swap the LED bulbs and the halogens, it wasn't practical to do direct comparisons, so I'll provide these photos.

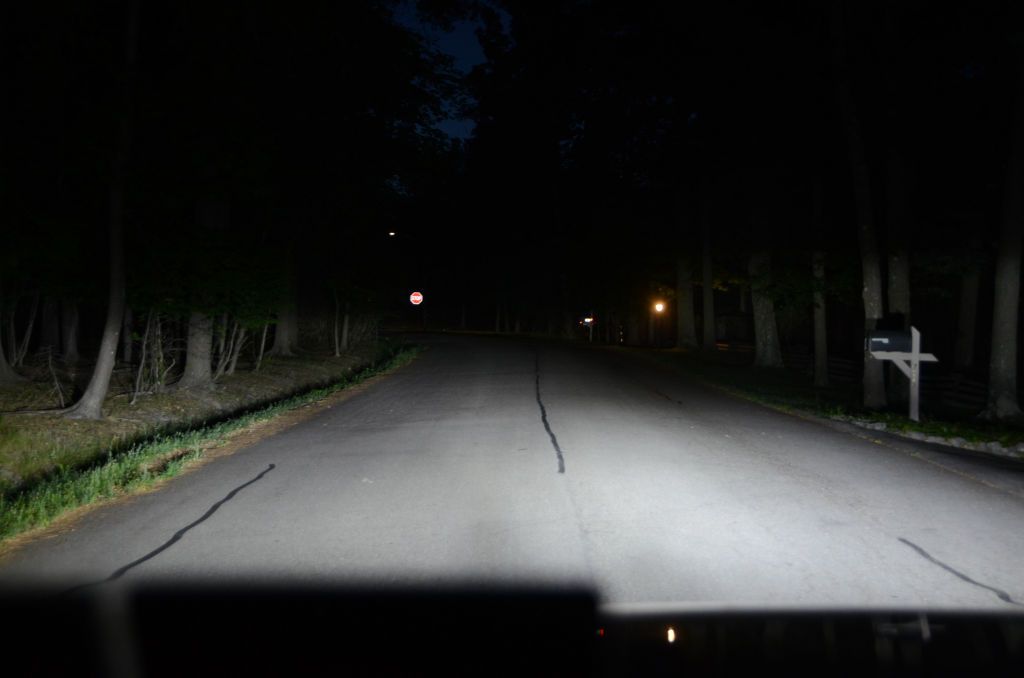
In this photo the stop sign is about 400' away. I don't think it would be illuminated by the factory halogens.

StopSign.jpg


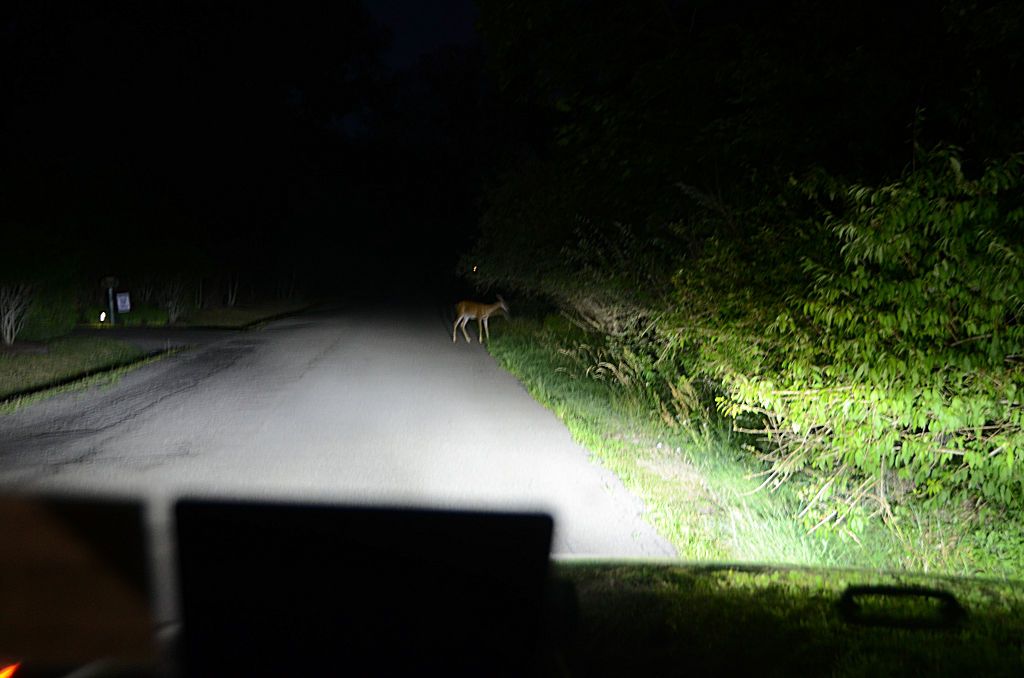
One of the reasons I've been looking for a brighter solution:

DeerInTheHeadlights.jpg


It's been about a week since I installed the new bulbs and I've done enough driving at night to offer the following observations:

  • The LEDs don't seem to bother oncoming drivers. Nobody flashed at me.
  • There is an increase in range, especially for things like road signs.
  • There is a lot of extra peripheral illumination; both photos show this, both in the lighting on the deer, the brightness of the road in front of the Jeep and the brightness of the foliage on the sides of the road.

One thing I like about them is that since they're just bulbs that fit in the factory housings, they retain the stock look of the Jeep headlights. I'm not a fan of those LED's that don't look stock or have halos or other goofy "features".

I'll have to wait until the snow season to test these for snow accumulation. When we get a snowstorm (in 6 months maybe) I'll post an update to this review.

I don't know if this matters to you but the original halogen bulbs I removed had a DOT indication stamped on them. These new LEDs do not have any indication on them that they are DOT compliant. I don't know if that means they are not DOT compliant or if they are; there's no indication in the installation instructions or on the web site.

After using them for a week, do they provide enough improvement that I would buy them? Yes, I would. The increase in brightness is useful and the fact that they don't bother oncoming drivers is worth a lot. In my opinion these are an excellent upgrade for normal driving. I might pair them with high-power longer-distance driving lights for high speed driving on lonely highways, but for night driving under normal conditions with other vehicles on the road I think they're excellent.

I've reviewed several longer-distance driving light solutions from Auxbeam in the past, these would be a good addition for much longer distance illumination, although you wouldn't use them where there are other vehicles: https://expeditionportal.com/forum/...factory-hardtops.127687/page-322#post-2940341

These also have a wider beam pattern and would be a good complement to the LED headlight bulbs in this review; again you wouldn't use them in traffic but on lonely roads either these would add more illumination: https://expeditionportal.com/forum/...factory-hardtops.127687/page-327#post-2963491

Neither of those "driving light" solutions would be as useful in normal driving conditions as the LED bulbs in this review - as I said the LED headlight bulbs provide a good increase in illumination without bothering other drivers; the driving lights would definitely bother other drivers.

One last thing: when I received the bulbs I sent an email to Auxbeam letting them know they arrived and thanking them. They replied:

Awesome, thanks for the update! Please use this coupon code and product link in your review, much appreciated!!

Extra 12% Off with Code: Jeff12
Auxbeam NEW GX Series Headlights: https://auxbeam.com/products/gx-series-led-headlight-bulb-spu00222

I'm a bit embarrassed that they used my name for the discount code; I am not associated with Auxbeam and don't want anyone to think that I am. BTW I checked and the code (at least at the time I checked) worked for other items on the Auxbeam web site, so if you've seen my reviews of their multi-gang switch panels or other LED driving lights over the past couple of years and are interested in those, you might try using the code for those too.
 

jscherb

Expedition Leader
Following on to the headlight review... Auxbeam offers LED replacement fog lights for the JK.

AuxbeamJKFogLights.jpg


https://auxbeam.com/collections/jeep-wrangler-jk/products/qp009066

They say these have 3 times the brightness of the stock fog light, so they should be a good complement to the headlights.

I asked them if they would send me a pair to test and review and they agreed. They tell me I should have them by the first half of next week. When they arrive I'll install them and post a review.


Full disclosure: They also emailed me and invited me to join their affiliate program. I didn't look into the details of that program but apparently they offer commissions of up to 20% to people who review their products. I declined to join the program and told them I did would not accept compensation for doing reviews. I want people to know that I am not being paid and that my reviews are as unbiased and truthful as I can make them, without any financial influence. They responded:

If you don't want to join our alliance, no problem, I will respect your wishes, which is admirable! We would like to help your readers with some discounts.

So they will provide discount codes which I can pass on when I do a review, but I want everyone to know that I do not and will not receive any financial compensation for doing reviews of their products or anyone else's products.
 

jscherb

Expedition Leader
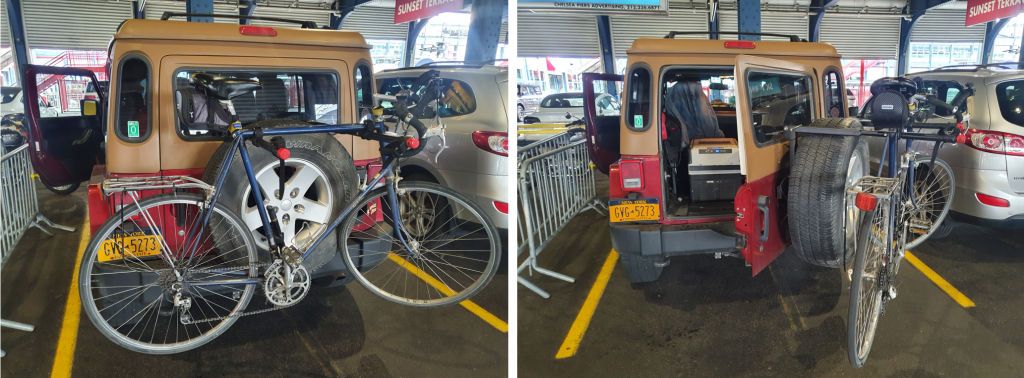
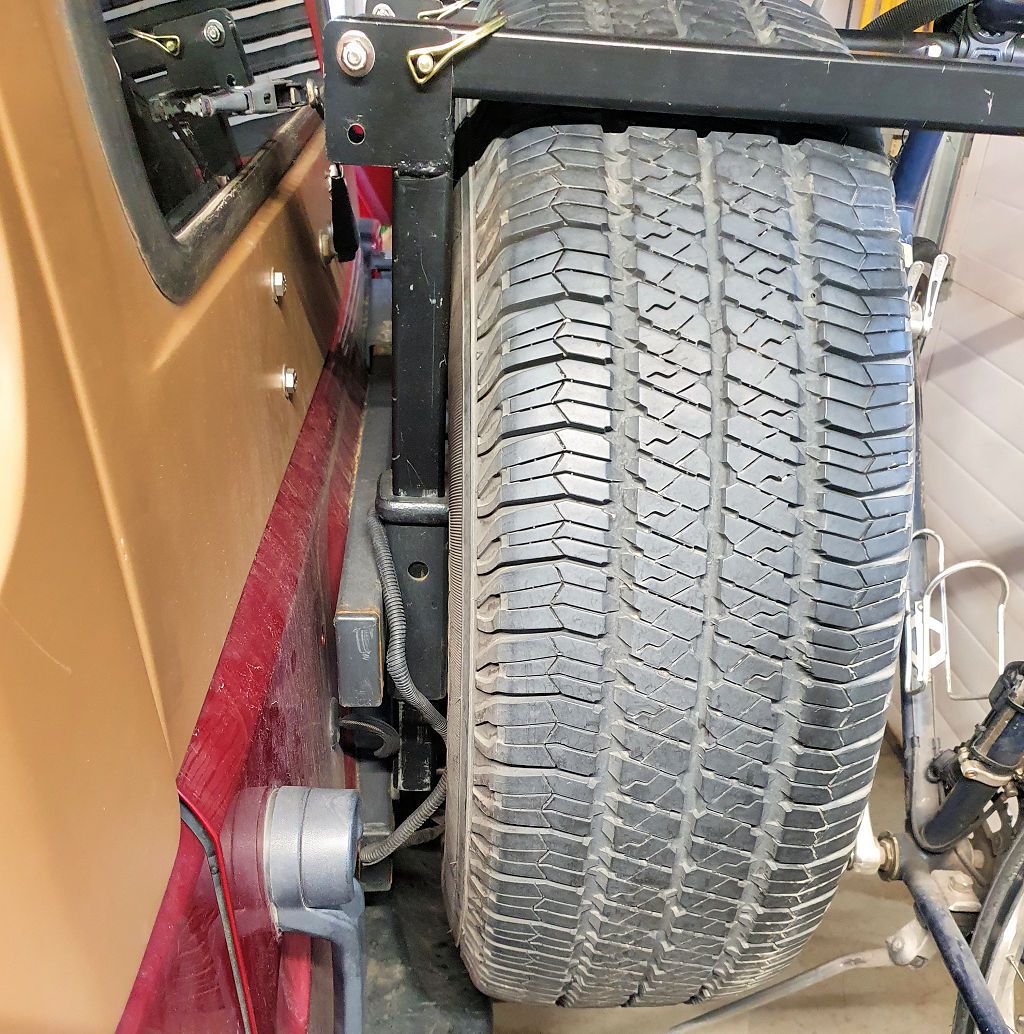
A week ago I posted in my LJ thread about my prototype bicycle carrier for the tailgate reinforcement cargo receiver system (https://expeditionportal.com/forum/...fit-this-custom-lj.46300/page-67#post-3035836). I use it with both the LJ and the JKU since both have prototype cargo receiver systems installed. Yesterday I used it with the JKU - several times a year I bring my bike to Manhattan to ride around the city. These photos were taken yesterday in the Chelsea Pier parking garage in Manhattan.

ChelseaPier.jpg


After taking the bike off the rack, the rack arms slip out of the receivers, fold up and get stowed very compactly in the back of the Jeep.

CargoRcvr.jpg


The rack arms can be secured with hitch pins, which might be a good idea on rough trails, but for the trip to Manhattan and back (250 miles each way) I let gravity do the work and didn't bother with the hitch pins.

Definitely one of my favorite designs.
 

jscherb

Expedition Leader
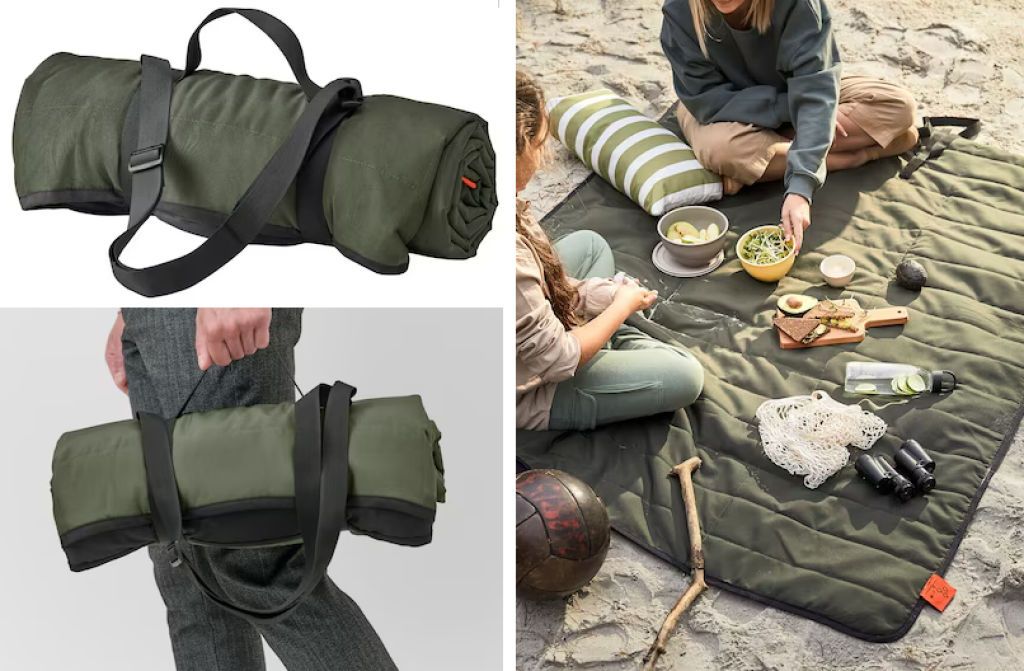
Also while in the NYC area on Saturday we stopped at Ikea and picked up a FJÄLLMOTT picnic blanket (https://www.ikea.com/us/en/p/fjaellmott-picnic-blanket-deep-green-black-70516383/). We do a lot of picnics and have been wanting something like this for a while. Last year by the time I discovered them Ikea had run out of them for the season so I was determined to get one this year. It's about 5 1/2' long and a little over 4' wide; it's got a waterproof backing and it's nicely padded. Ikea images:

FJALLMOTT.jpg


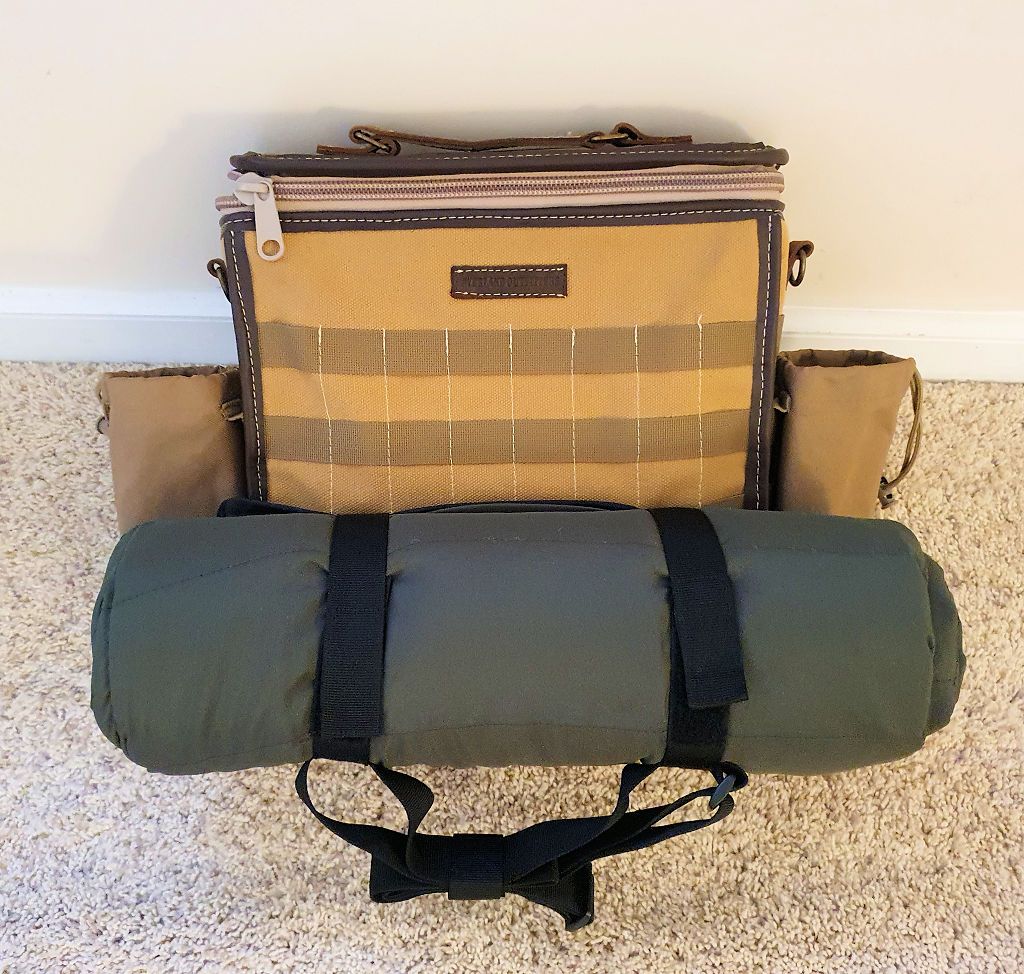
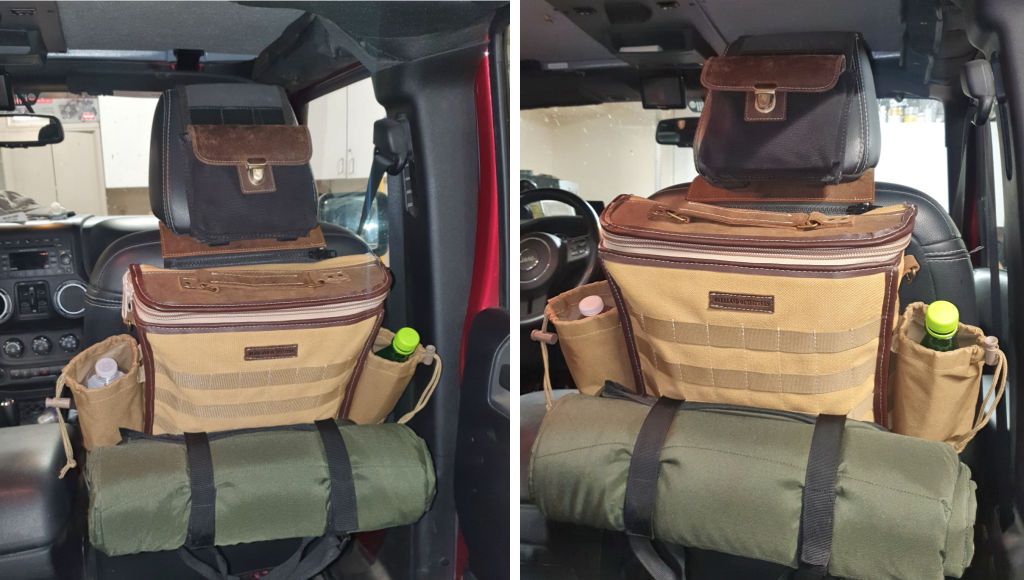
For most of our picnics we use a Cool Bag and without modification the FJÄLLMOTT attaches to the MOLLE on the front of the bag.

FJALLMOTT2.jpg


FJALLMOTT3.jpg


Perfect.
 

jscherb

Expedition Leader
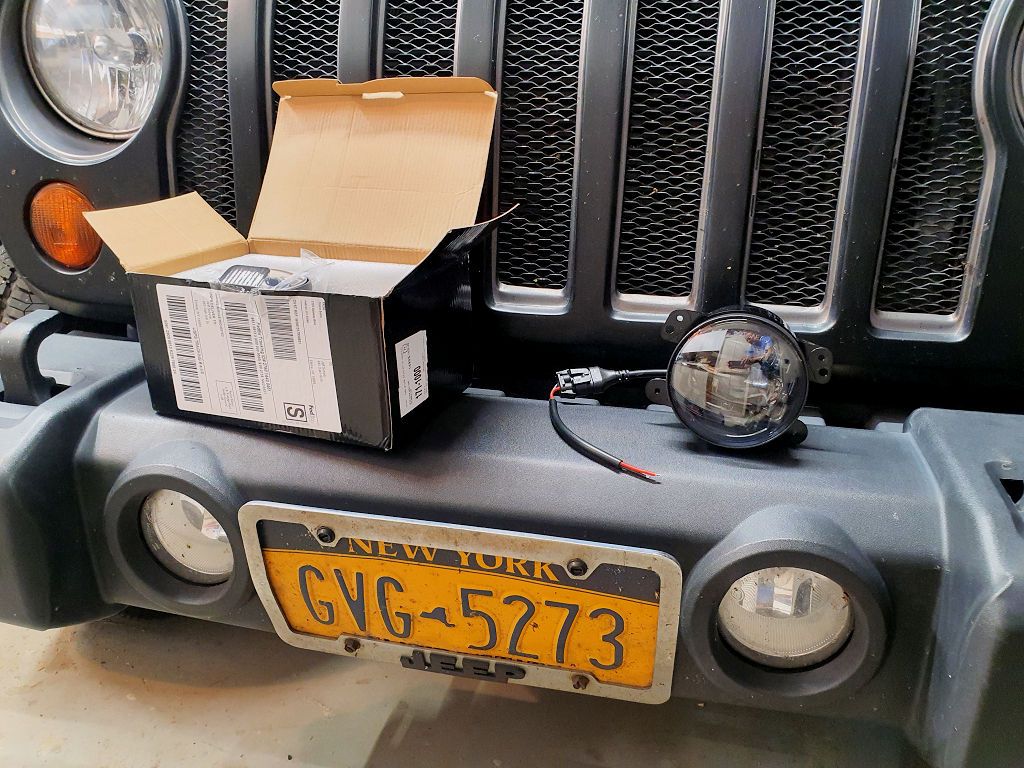
The LED factory replacement JK fog lights Auxbeam sent me arrived today. I'll install them and test them at night for a few days and then I'll post a review along with installation instructions. Stay tuned.

FoglightsArrived.jpg
 

jscherb

Expedition Leader
Tutorial: How to sew a MOLLE panel.

Someone asked how to sew a MOLLE panel the other day. MOLLE panels are pretty easy to make and I thought some people would be interested in making their own custom panels, so I sewed one to document the process. I used scrap materials found in my sewing room so what I'll sew in this post is just a demo panel, it isn't made for a specific use or location, and I did it in several different colors to make the details clear in the photos.

Step 1 is to cut the main panel. I'm using red fabric for this example because this scrap was on my sewing table. Thick fabric is better than thin; this is 24-ounce cotton duck canvas. I think the best you might find in a place like Joann Fabrics is maybe 9 oz, so if I were to use that I'd probably use two layers. Once all the sewing is done the two layers will be sewn together as one, so two 9 oz. layers will end up being thick enough.

I radiused the ends for style reasons but the corners can be left straight if you prefer. It is a bit easier run binding around the curved corners than straight ones, more on the binding in a later step.

The grid, probably more correctly called a PALS grid (Pouch Attachment Ladder System) is made with rows of 1" webbing with 1" spaces between the rows. The vertical lines of stitching are 1 1/2" apart. When planning your panel, try to plan the width so it's a multiple of 1 1/2", and the height so it's an odd number if inches tall (three rows of webbing would have two spaces between, so the total height of that grid is 5"). Also plan a bit extra at each side (maybe 1/4" on each side) to allow for edge binding and a bit more at the top and bottom if you plan to add grommets for attaching the panel to a surface.


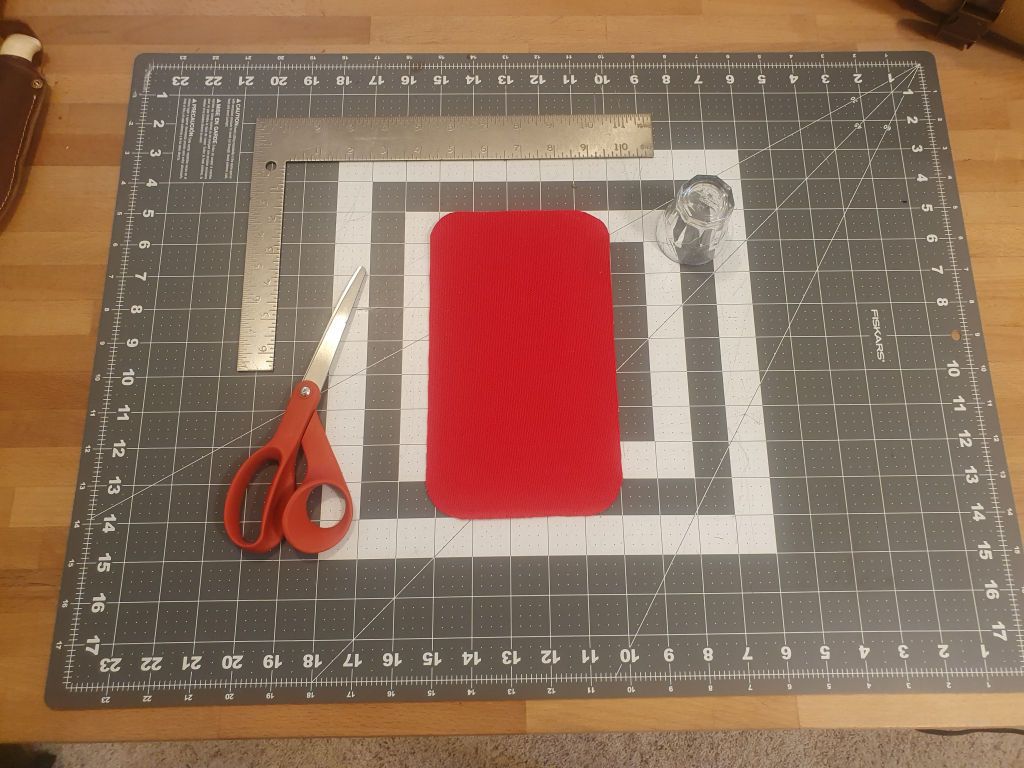
I've cut my scrap fabric 5 1/4" wide and 9" tall; that will allow for 4 rows of webbing and 3 vertical lines of stitching plus and edge allowance for binding and top and bottom allowances for grommets. I keep both small (shown) and large carpenter's squares in my sewing room to cut panels accurately; the shot glass in the photo isn't for drinking, it's for tracing the radii on the panel edges.

PanelBlank.jpg


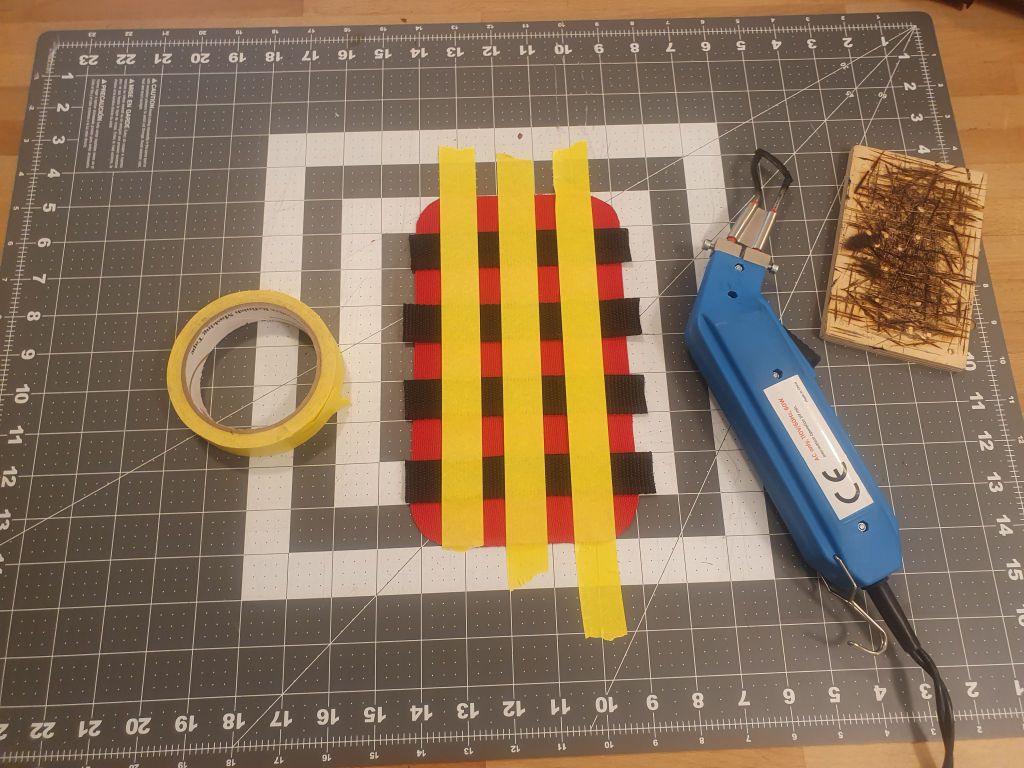
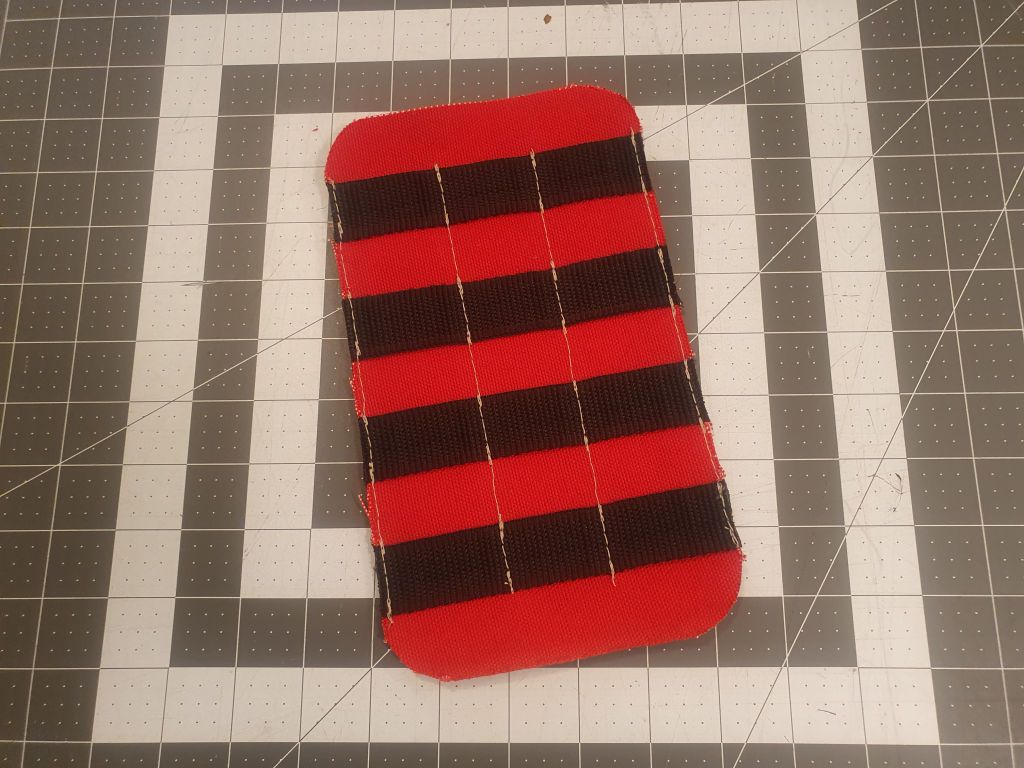
The next step is to lay out the webbing on the panel. I usually start with the webbing hanging over the edges a bit and I trim it after the webbing is sewn to the panel. It can be hard to sew the webbing in place to end up with everything perfectly parallel and spaced nicely, so I typically use 1" masking tape placed vertically on the panel to hold the webbing in place and to serve as guides for sewing. I apply the tape with 1/2" between each column, that way I can stitch between the columns to provide for 1 1/2" spacing between the stitching. A cutting mat with 1" divisions makes laying out and aligning the webbing accurate.

WebbingTaped.jpg


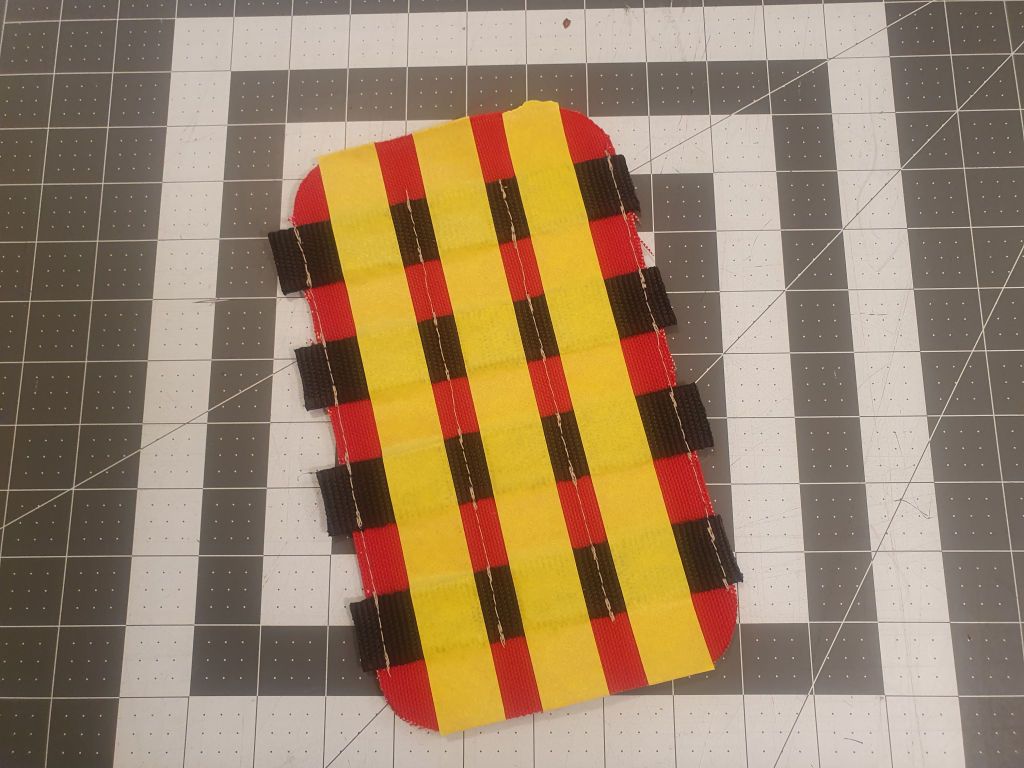
I used tan thread for this example so the stitching can be seen. You should run the stitching back and forth, especially at the top edge of the webbing because that's where the most stress on the stitching will be so going back and forth there with stitching will make it stronger.

WebbingSewed.jpg


Tape removed and ends of the webbing trimmed:

WebbingTrimmed.jpg


It's not necessary for this project because the edges will be bound, but webbing cut with scissors will unravel at the ends so I use a hotknife (the blue tool in an earlier photo) to cut synthetics like webbing (acrylic, polyester, polypropylene) because the heat will melt and seal the edges and prevent fraying. But not necessary for this project.

The edges of the panel will fray and also should be reinforced, so the next step is to "bind" the edges. You could use bias binding tape commonly sold in places like Joann Fabric, but for panels like this I like to use webbing. I typically use 3/4" webbing because it'll end up being about 1/4" wide when applied and it's narrow enough to go around the curved corners I put on the panel.

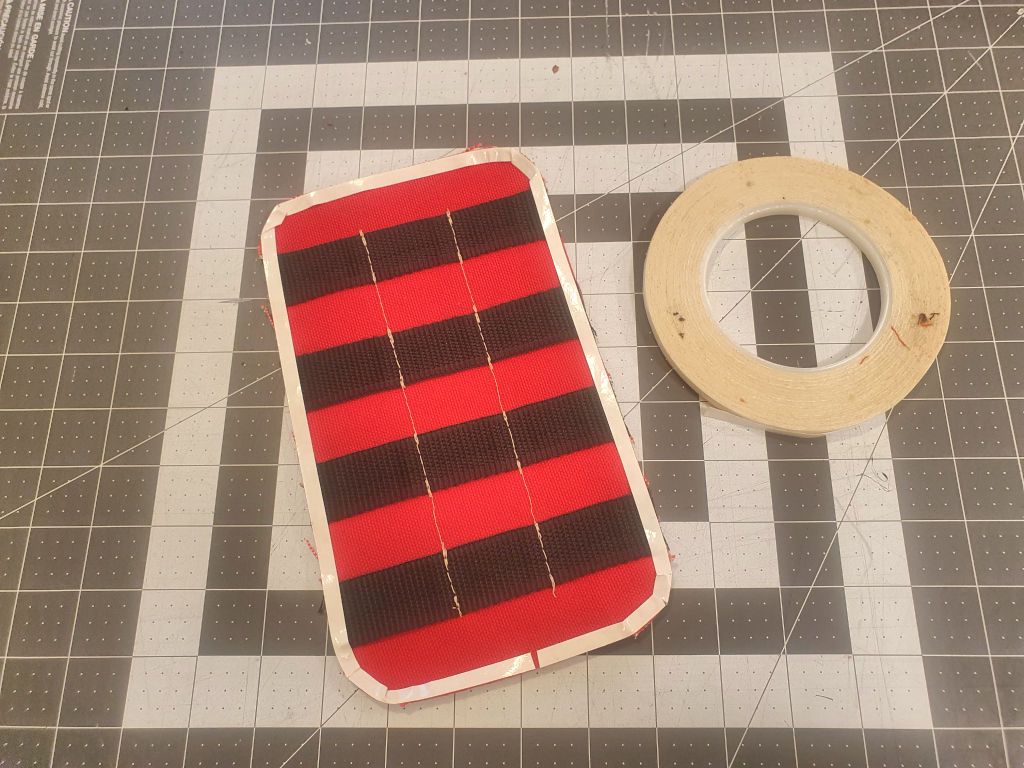
To place the binding accurately and keep it in place for sewing, I use 1/4" wide double sided "basting tape" (https://www.sailrite.com/Seamstick-1-4-Basting-Tape-for-Canvas-Upholstery-36-Yards). The process of holding pieces of fabric together temporarily for sewing is called basting, and is often done with pins, but for applications like this I find basting tap to be easier to use and more accurate. In this next photo I've applied the tape around the edge on both the front and back.

BastingTape.jpg


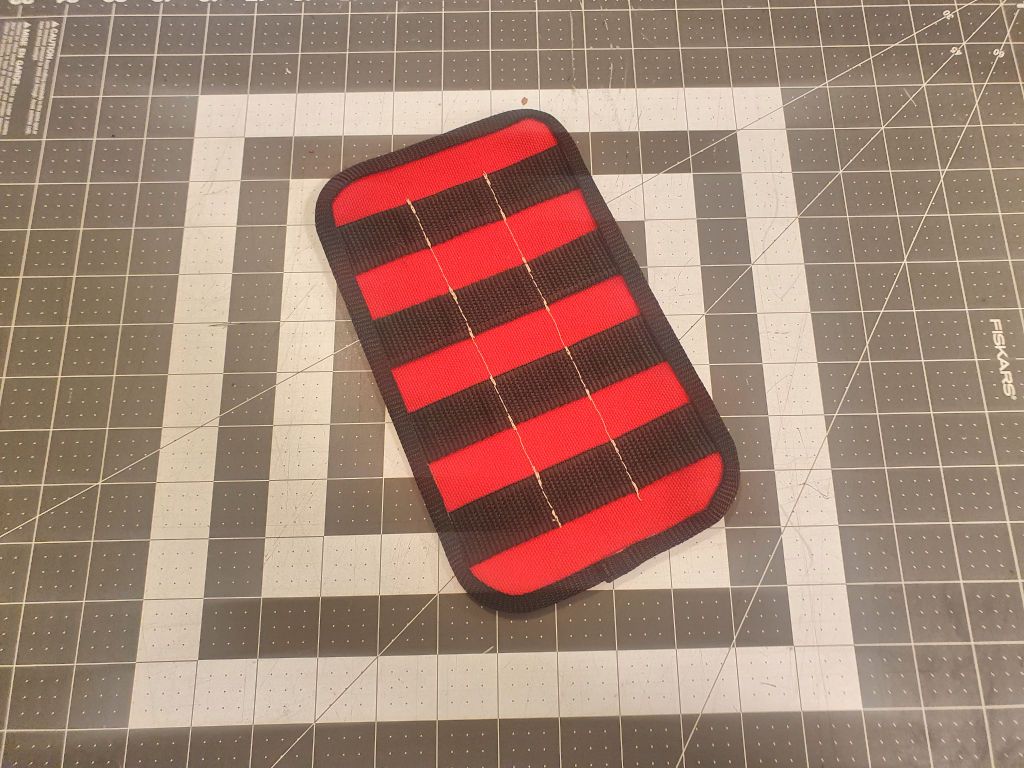
Remove the backing from one side and run the webbing around the edge, then remove the backing from the other side and fold the webbing over so it covers both edges.

BindingBasted.jpg


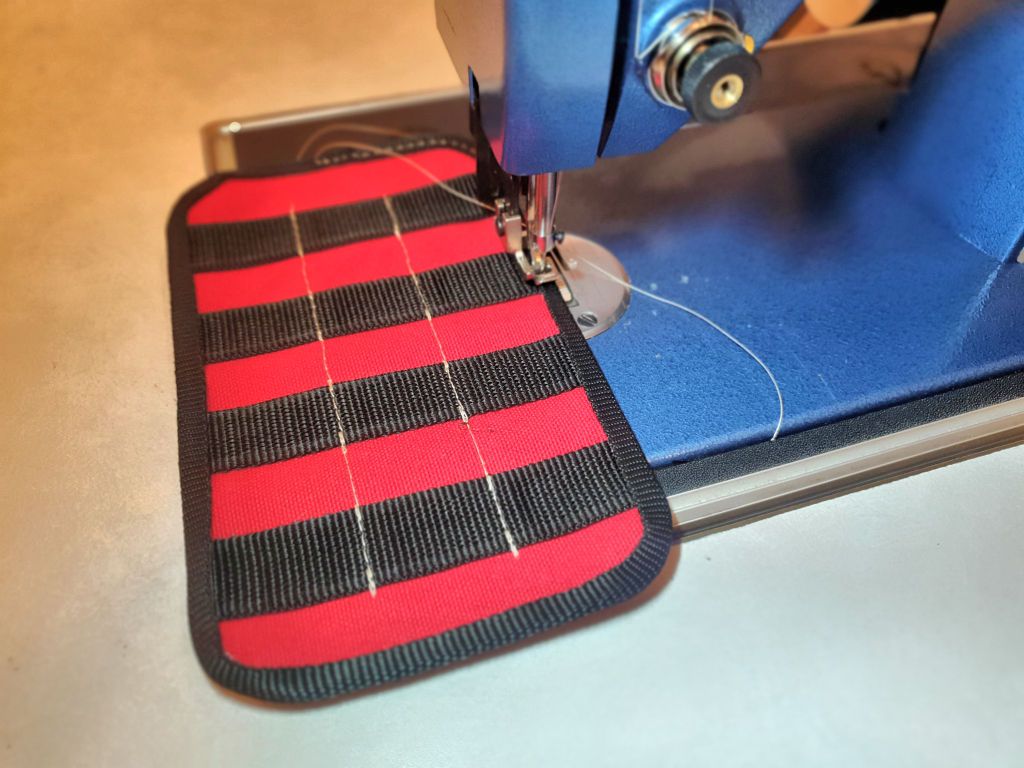
Once the webbing is basted, sew it in place.

BindingSewing.jpg


Binding sewed:

BindingSewed.jpg


Depending on how/where you plan to use your panel, you may need some way to attach it to a surface. I'm adding grommets to each corner of the panel; we'll imagine that this demo panel will be attached to a surface with screws.

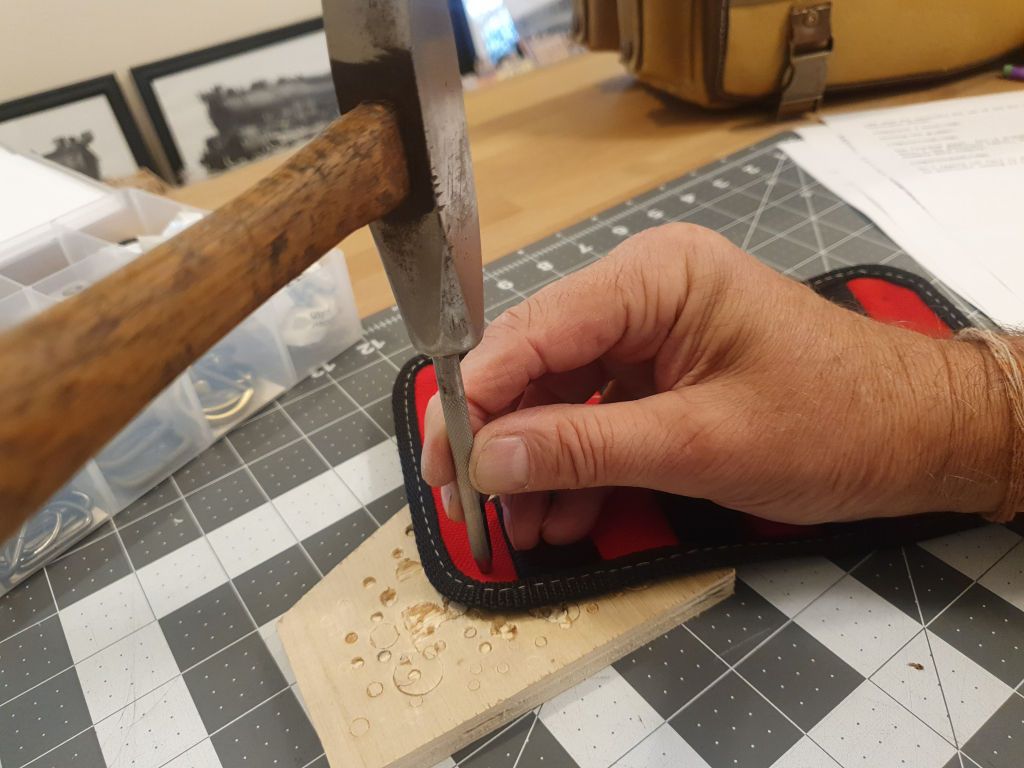
Grommets are easy - first punch a hole for the grommet, then use a grommet die set to crimp the grommet in place. Grommets (somtimes called eyelets) are sold in places like Joann, Michaels Crafts and Hobby Lobby and either come with the necessary die set of the die sets are sold separately for a reasonable price). I use a punch and a hammer to make accurate holes.

GrommetHolePunching.jpg


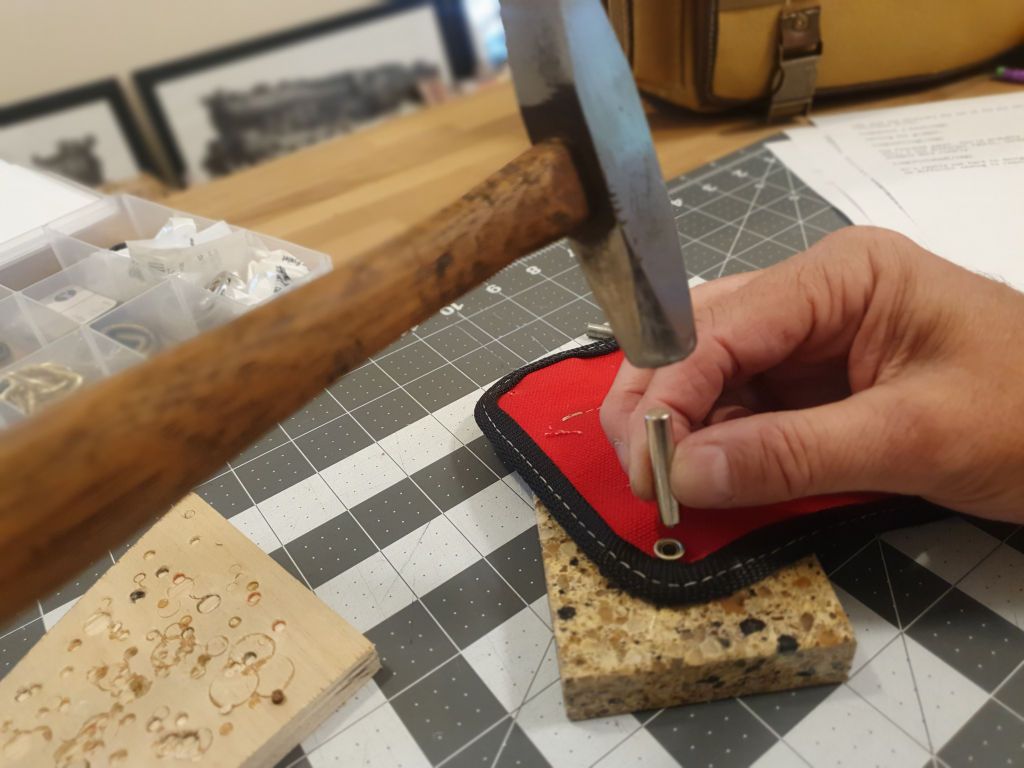
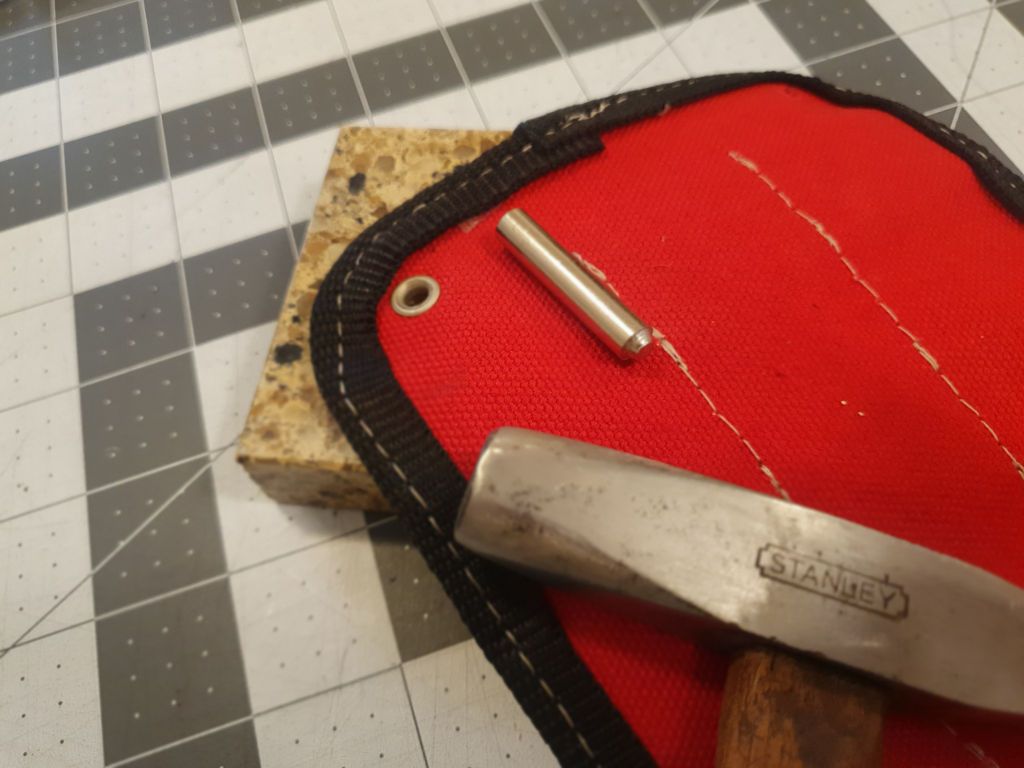
Setting a grommet:

GrommetSetting.jpg


GrommetSet.jpg


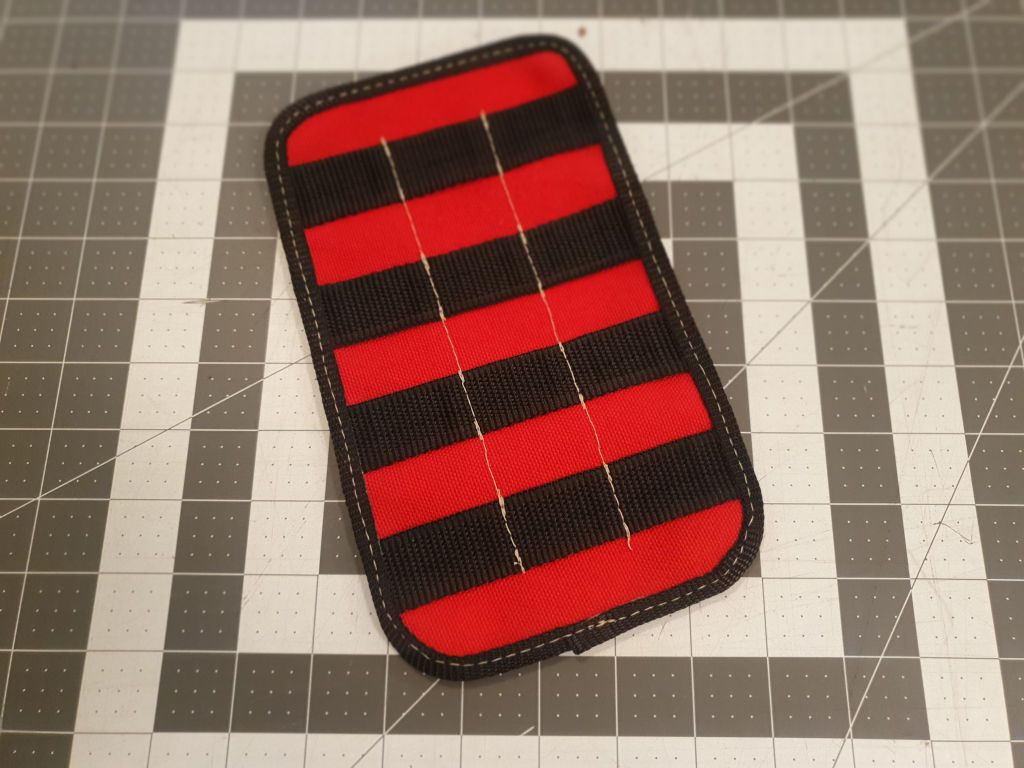
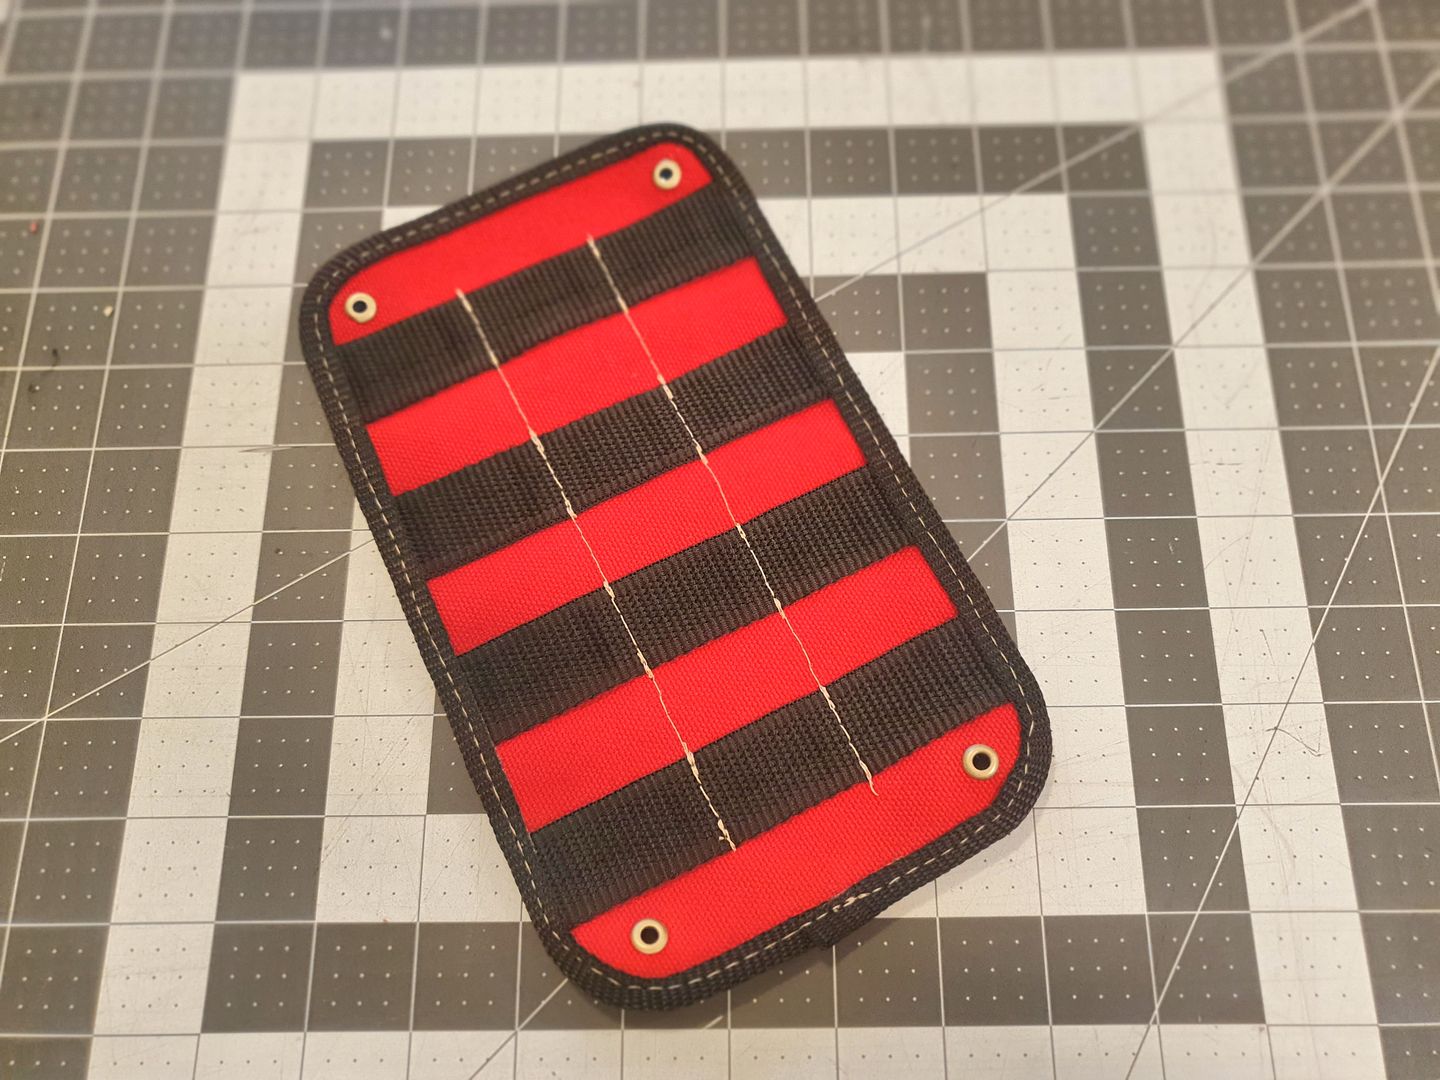
The finished panel. You're probably not going to make a multicolor one like this; I used different color fabric, thread and webbing colors to illustrate this example more clearly.

PanelDone.jpg


It's really not hard to design a custom panel to fit your specific needs and no difficult sewing is required. It took me longer to do this writeup than it did to make the panel.
 

jscherb

Expedition Leader
Many JK Wrangler owners feel that the factory headlights and fog lights are insufficient. I installed Auxbeam's new LED headlights a few weeks ago and they're a very nice upgrade from the factory halogens (https://expeditionportal.com/forum/...factory-hardtops.127687/page-343#post-3036924).

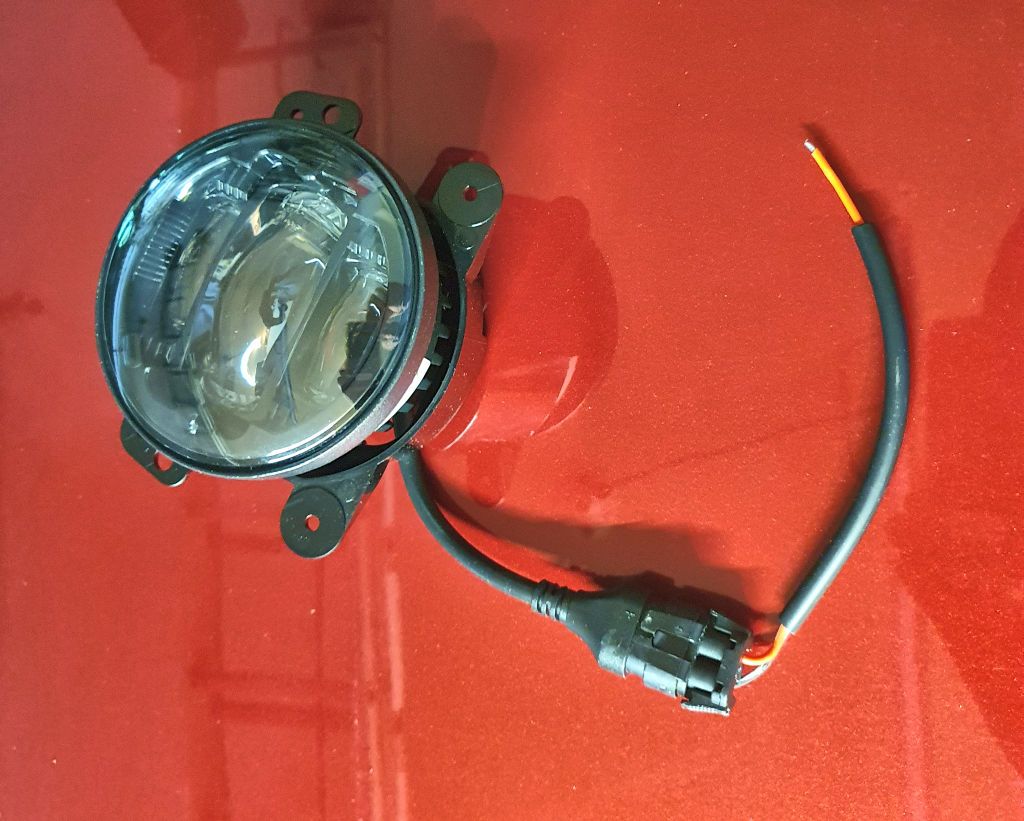
I never use the factory fog lights in the bumper because they really don't do much so I've been thinking of upgrading those for a while. Auxbeam was kind enough to provide a set of their LED replacement fog lights for me to test and in this post I'll cover the installation of the lights and some commentary on how well they work. The lights can be found at https://auxbeam.com/products/qp009066. They say these have 3 times the brightness of the stock fog light, so they should be a good complement to the headlights.

AuxbeamJKFogLights.jpg


Their web site lists these specs:

  • Power: 30W/pcs
  • Voltage: 12V
  • Lumens: 2100LM/pcs
  • Color Temperature: 6000K
  • Life Span: 50,000 Hours
  • Material: Aluminum Alloy
  • Lens material: PC [polycarbonate] lens
  • Waterproof Rate: IP67 waterproof
  • Fitment: Fit for Jeep Wrangler JK 2007 2008 2009 2010 2011 2012 2013 2014 2015 2016 2017

Features:
  • 3 times the brightness of the stock fog light, improves your visual effect and provides better lighting effect, driving safely in the fog environment.
  • Made of high-performance LED and transparent PC cover, 99% of the light source can easily pass through the car cover, ensuring that it can be seen well under special driving conditions
  • Durable die-casting aluminum housing and ribbed design for efficient cooling. The rebreather hole at the backside can solve the problem of getting water and moisture inside.
  • Plug and play design, easy installation. Come with 2 types of brackets to fit original & modified steel bumper. Very easy to install, Plug & Play, No need to make any changes. (I'll have some comments on this later in the review).

    The lights arrived a few days ago; the box contained two lights with wiring pigtails. There were no instructions included.

    FoglightsArrived.jpg


    Removing the factory fog lights

    The factory fog lights are mounted in the bumper, and while it probably is possible to remove the old ones and install the new ones by removing the upper trim panel behind the bumper, I recommend removing the bumper for better access. Removing the bumper is fairly straightforward.

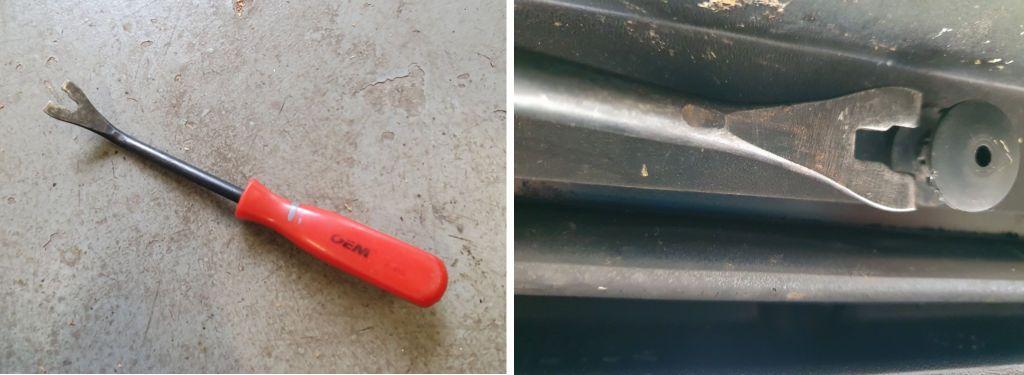
    First remove the lower trim panel below/behind the bumper. The panel is held in place with 6 plastic clips; the clips have a center stud that pulls out to release the clip. The stud can be pulled out by prying with a screwdriver, but I find it to be much easier with a clip removal tool:

    ClipRemovalTool.jpg


    Clip removal tools are available at all auto parts stores for less than $10 and I highly recommend having one in your tool collection.

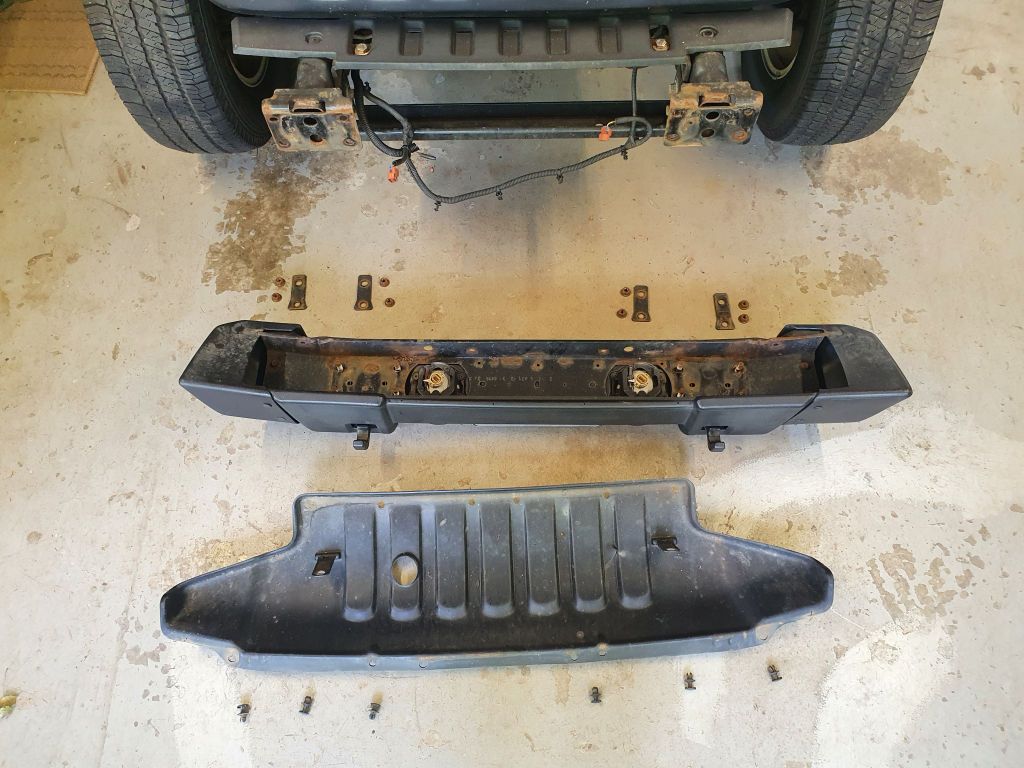
    Once the lower trim panel is removed, the bumper can come off. It's held in place with 4 nuts on each side. This photo shows the removed parts laid out on the garage floor. The lower trim panel and its 6 clips are at the bottom of the photo. The bumper nuts and washer plates are sitting on the floor above the bumper, you can see the studs on the inside of the bumper and the holes for the studs on the end of the frame rails. When all of the nuts are removed, the bumper can be pulled forward and before pulling it too far, unclip the wiring harness from each factory fog light, and remove the wiring harness clips from the back of the bumper. The clip removal tool is used for these clips as well and can prevent breaking the clips when they are pulled out. In the photo the wiring harness is hanging loose; the clips which hold it to the back of the bumper are still attached to the harness.
    BumperRemoved.jpg


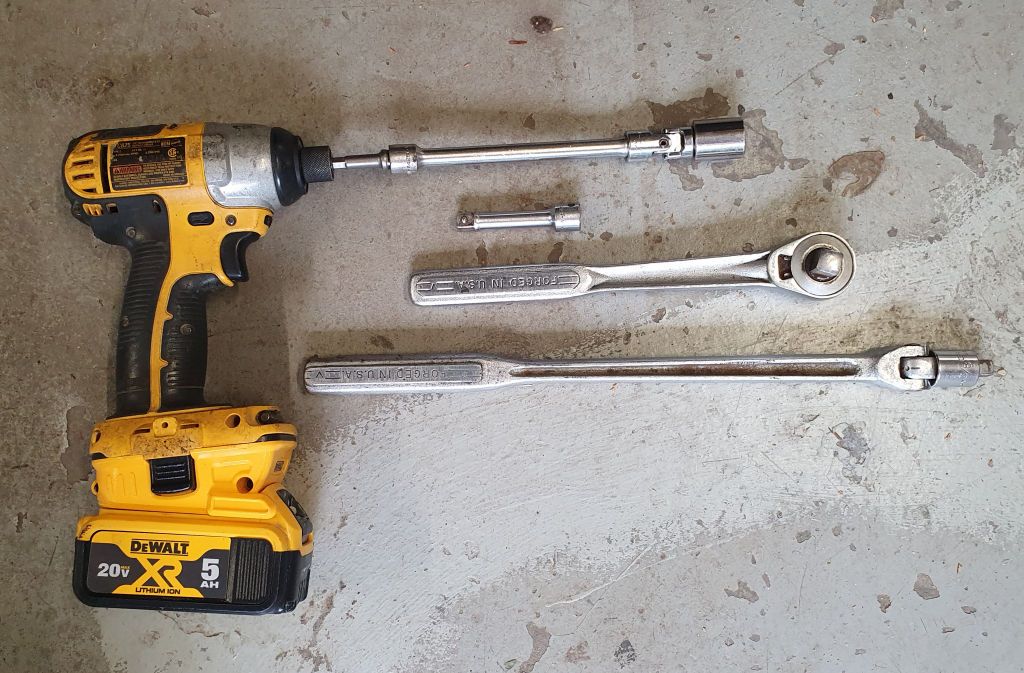
    The bumper nuts are fairly easily accessible from below/behind the bumper, I did it laying on the garage floor. The top inside nuts on each side are easier to remove with a universal joint on the end of your socket extension. The nuts may be tight at first; I used a 1/2" drive breaker bar to break them loose, once loose I used a ratchet on some and the impact driver on others. The tools I used:

    BumperRemovalTools.jpg


    Wiring

    The fog lights include a wiring pigtail. This is good because the plug that's on the new lights is not compatible with the factory wiring harness, so the pigtail will need to be hard-wired into the factory harness. The new light and its pigtail:

    Pigtail.jpg


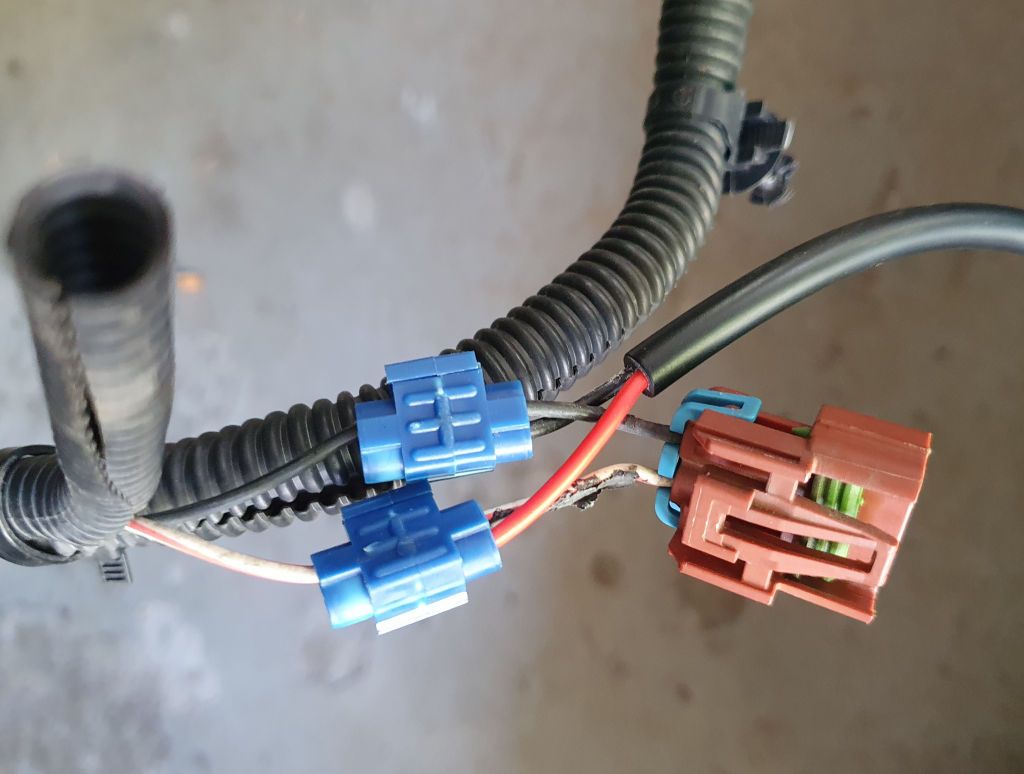
    One way to do the wiring would be to cut the factory plugs off the harness and wire the new pigtail to the cut ends. I didn't do i that way because I wanted to preserve the ability to go back to factory or factory plug compatible lights at some point in the future, so I left the factory plugs in place and used suitcase connectors to splice connect the pigtail to the factory harness:

    SuitcaseConnectors.jpg


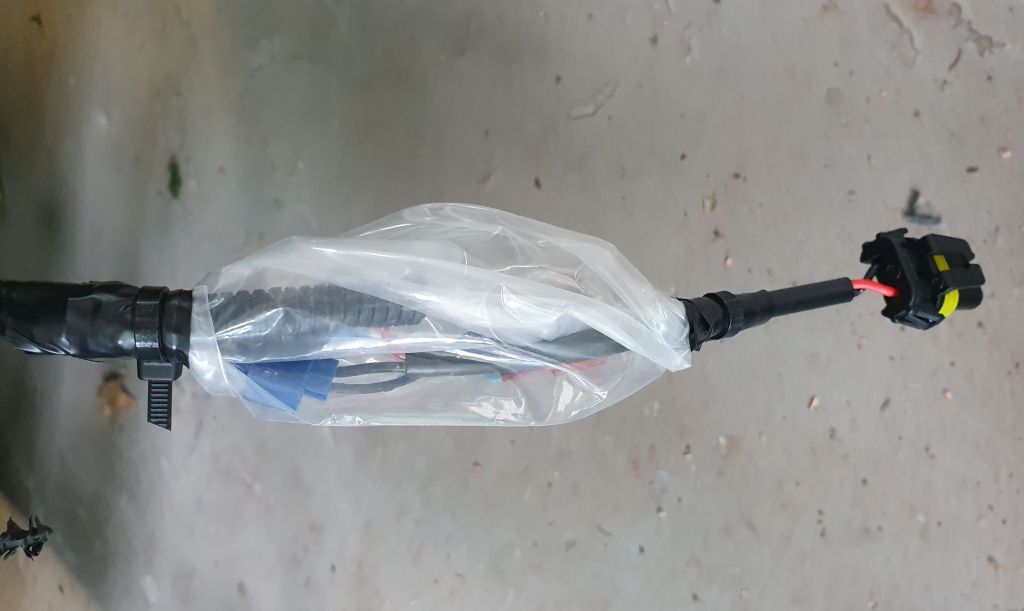
    To protect the factory connectors and weatherproof the suitcase connectors, I cut the end off of a thick plastic bag to make a tube, slid it over the connectors, wrapped the ends in electrical tape and secured it all with zip ties on each end.

    PlasticWrap.jpg


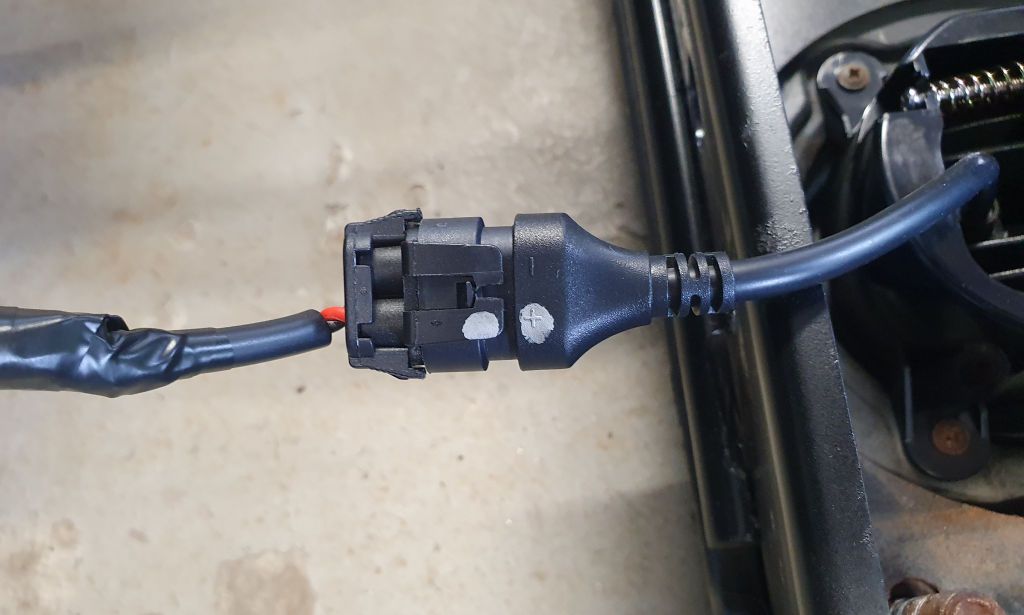
    One other discovery - the new plugs are not polarized - they can be plugged together either way and since these are LEDs, if the plugs are put together the wrong way the lights won't work. There is a small "+" sign molded into the plug on the light and that is to line up with the red wire on the pigtail, but the "+" is small and easy to miss. I used a silver Sharpie marker to indicate the matching sides of the plugs.

    NonPolarized.jpg


    It would be nice if the new lights came with factory-compatible plugs to eliminate the need to splice the pigtail into the factory harness and to eliminate the possibility of plugging the non-polarized connectors together backwards, but dealing with the pigtail and the non-polarized connectors wasn't a big deal.

    Aiming the new lights

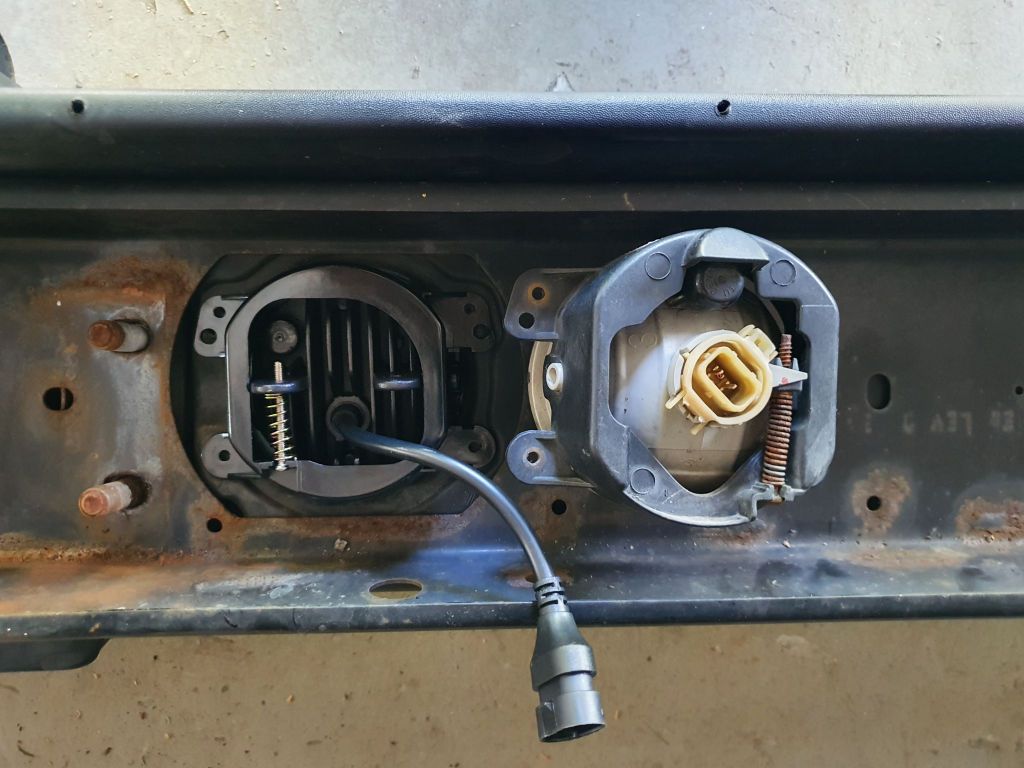
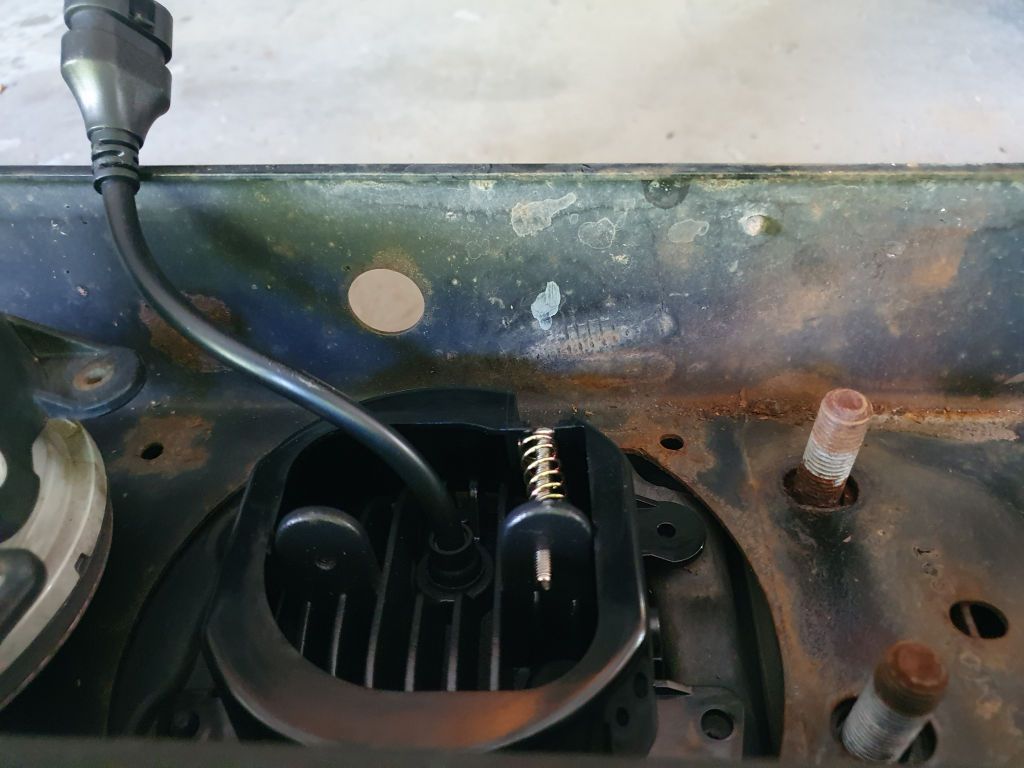
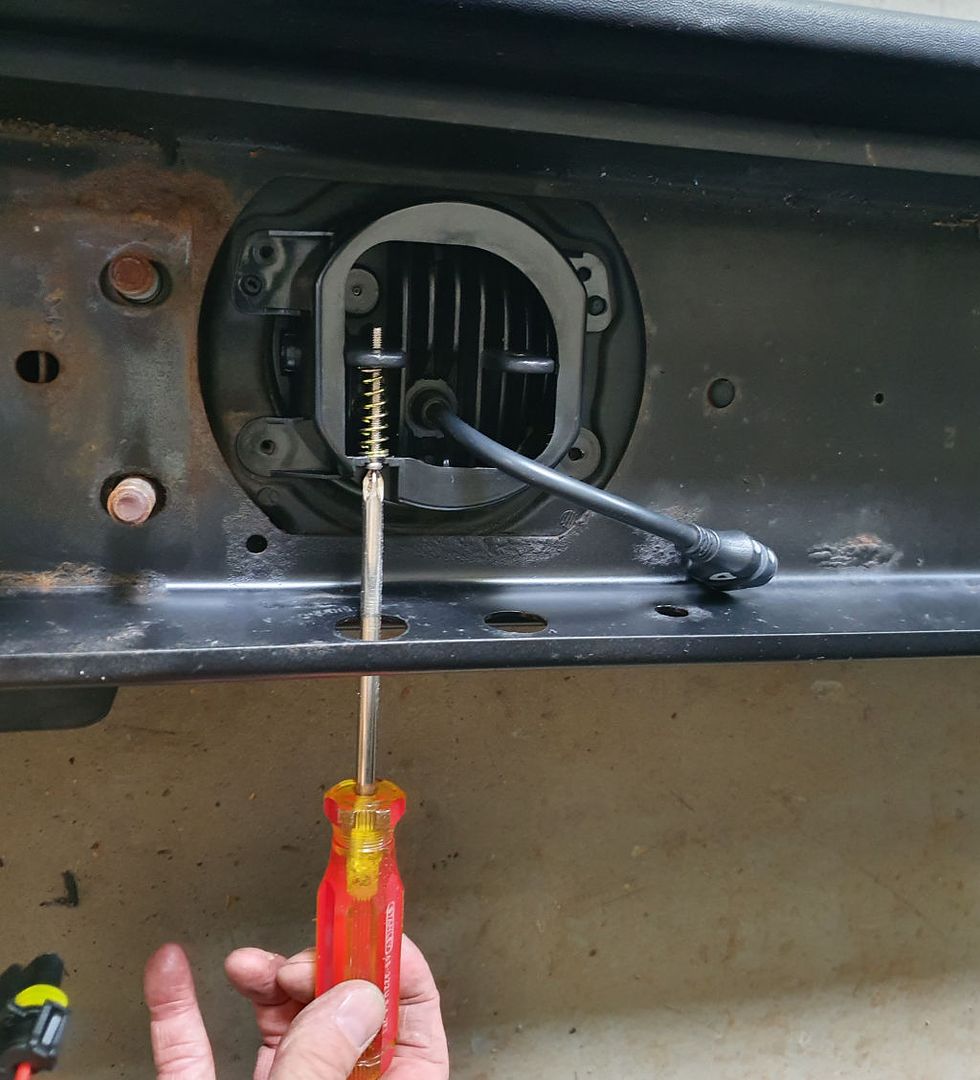
    Probably most people don't know this, but the factory fog lights are adjustable. There's an adjustment screw on the bottom side of the light housing, and it's accessed through a hole in the bottom of the bumper. In this next photo, the new LED light is in place in the bumper and the factory light is sitting next to it. What can be seen in this photo is that the adjuster on the new LED is on the wrong side, which means it won't be accessible through the adjustment hole in the bottom of the bumper:

    AdjusterSide.jpg


    Not a big problem - it's easy to make new adjustment holes in the bumper. In this photo I've marked the location for the new hole with a silver Sharpie marker:

    AdjHoleNewLocation.jpg


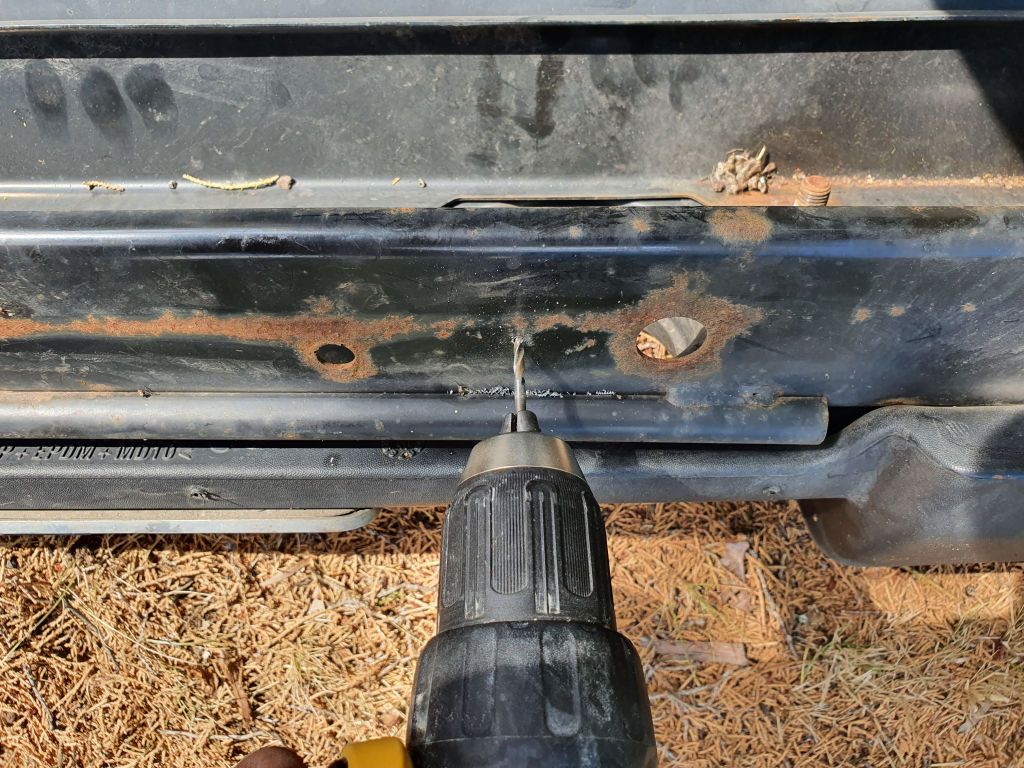
    Best practice for making the new holes are to use a centerpunch to mark the location of the new hole and then use a small drill to make a pilot hole at the centerpunch mark. The centers of the new holes are 1 3/4" away from the center of the old holes.

    AdjHolePilot.jpg


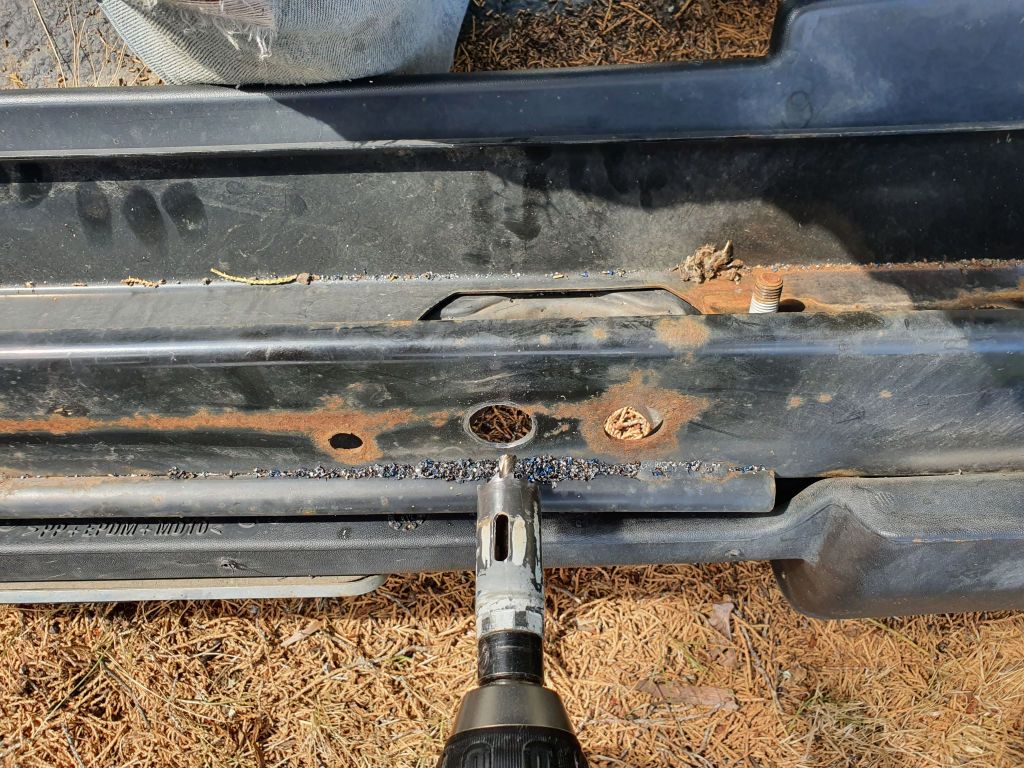
    The pilot hole ensures that the final hole will be located accurately; if you start with a large drill the drill may drift and the hole may be mislocated. Use a 7/8" hole saw at the pilot hole location to make the final hole:

    AdjHole78HoleSaw.jpg


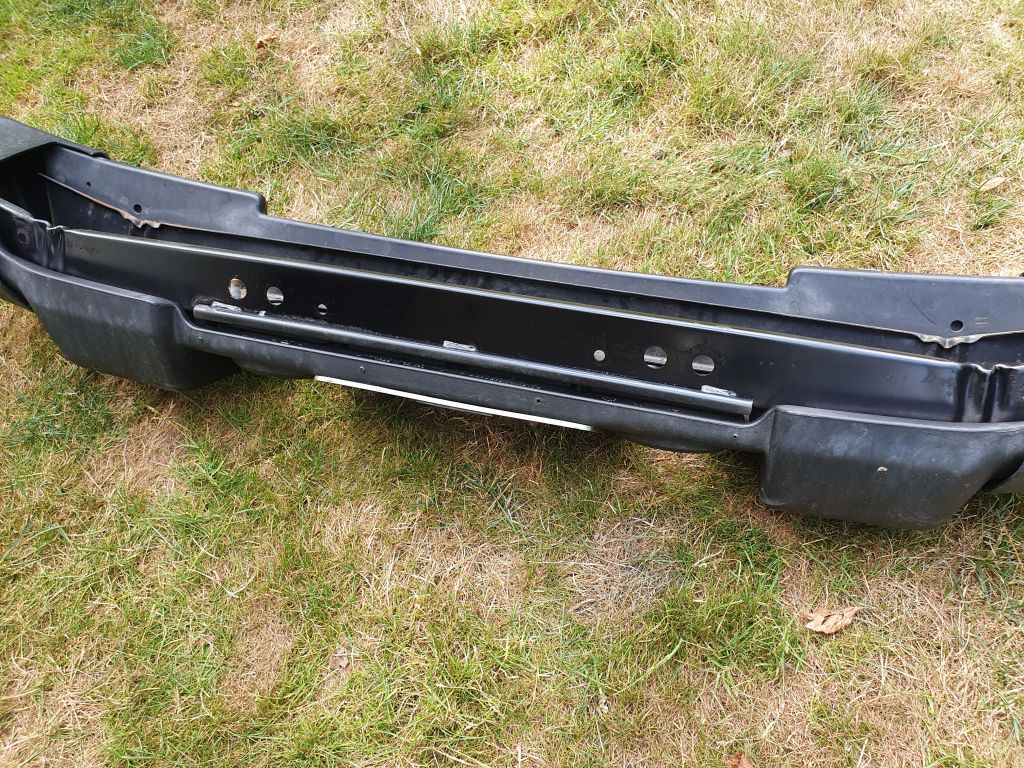
    After cleaning up any burrs on the drilled holes with coarse sandpaper I touched up the new holes and some surface rust on the underside of the bumper with rattle can satin black paint.

    AdjHoleTouchedUp.jpg


    The new holes allow adjustment from below the bumper:

    AdjHoleDone.jpg


    One thing I didn't realize until reassembly is that matching holes need to be made in the front of the lower trim panel because that panel overlaps the lower edge of the bumper where the adjustment holes are. I didn't make holes in the lower trim panel but will do so if I need to adjust the new lights or the next time I remove the lower panel for any other reason.

    Testing and review continued in the next post
 

jscherb

Expedition Leader
Continued from the previous post...

Garage Test


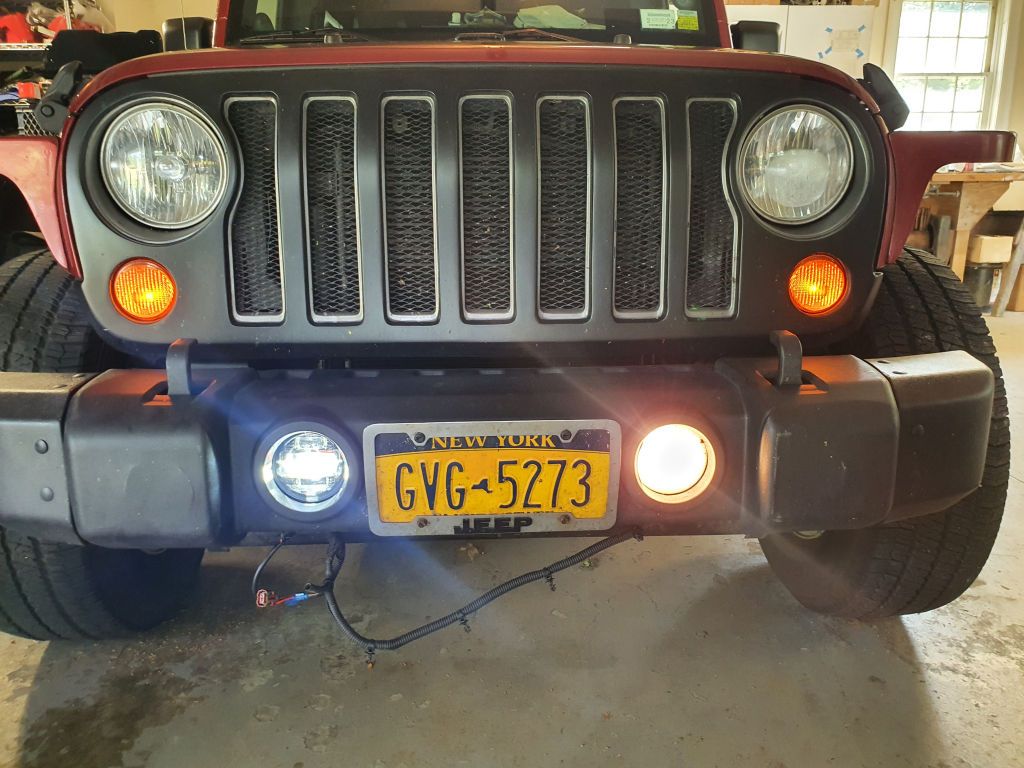
I installed a new light on the passenger side and left the factory light installed on the drivers side for these comparison photos. The bumper isn't bolted on yet, it's just sitting in place with the studs through the holes in the front of the frame rails but no nuts installed.

InitialLightUp.jpg


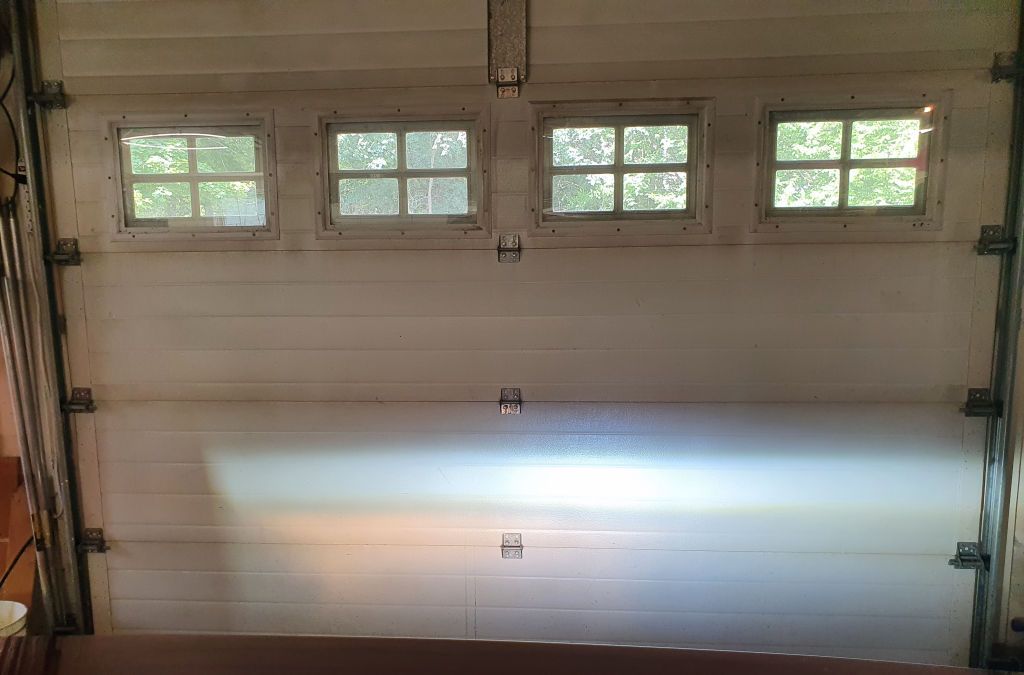
Lighting up the garage door, the pinkish light is the drivers side factory light; it's aimed lower and its beam isn't as wide as the new whiter LED on the passenger side. I did notice before installing the LEDs that out of the box they're aimed higher than the factory lights I was taking out, which in my case is probably good because my factory fogs lit up a lot of the road directly in front of the Jeep but not much at any distance.

GarageDoorTest.jpg


I've driven the Jeep several evenings trying with and without the fog lights. Here's one example; the camera is set to manual exposure so both photos are equivalent. On the left I'm using the Auxbeam LED headlights alone and on the right I've also turned the fog lights on. Click on the photos below to display them full screen, the difference will be more visible when the photos are larger.

WithoutWithFogLights.jpg


The fog lights (I haven't tested them in fog yet but I think they more accurately might be considered driving lights) have added quite a bit of illumination to the sides of the road and quite a bit of distance - look at the mailbox on the right side of the road and compare the area behind the mailbox in both photos.

I didn't drive into oncoming traffic with these lights on because standing in front of the Jeep I could see that they might bother oncoming drivers. But when there's no oncoming traffic, I'll use these instead of the high beams from now on - they provide much better illumination than the high beams.

The aim is as they came out of the box, which is higher than the factory lights were set to. I'll drive with these a while longer before deciding if I want to adjust the aim. For now I like how they're aimed.

Conclusion

My overall subjective impression of these lights is that they do a much better job than the factory fog lights. They're much brighter and provide more useful illumination than the factory fogs. It may be that I could have adjusted the factory fogs to aim them a bit higher, but even so they wouldn't be as bright as these and so wouldn't add as much to the illumination than these bright LED's do.

As I noted before, it would be nice if the lights came with plugs that are compatible with the factory wiring harness and nice if the adjusters were on the correct side, but those are easy to deal with during installation.

At $59.99 per pair (and usually less with Auxbeam's frequent coupon codes and sales), I think they're a pretty good value. These lights together with Auxbeam's new LED headlight bulbs are a very good combination and an excellent improvement in visibility.

If you're looking for a different style, Auxbeam also offers JK fog lights with Bluetooth-controlled halo rings (https://auxbeam.com/collections/jeep-wrangler-jk/products/qp008608). They're a bit less bright than the ones I tested in this post, but they do offer additional capabilities, such as "Music Sync" - the lights can be synchronized with your music, glowing and dancing to the rhythm.
 

Bullseye240

Adventurer
Probably most people don't know this, but the factory fog lights are adjustable.
Most people have no idea that their headlights are adjustable and that if they are properly aimed that alone will improve headlight performance to the point they may think twice about simply replacing their stock lights. I still run sealed beams on my LJ for that reason and the fact that so far all aftermarket LED headlights simply look like crap.
 

jscherb

Expedition Leader
More from the folks at Auxbeam...

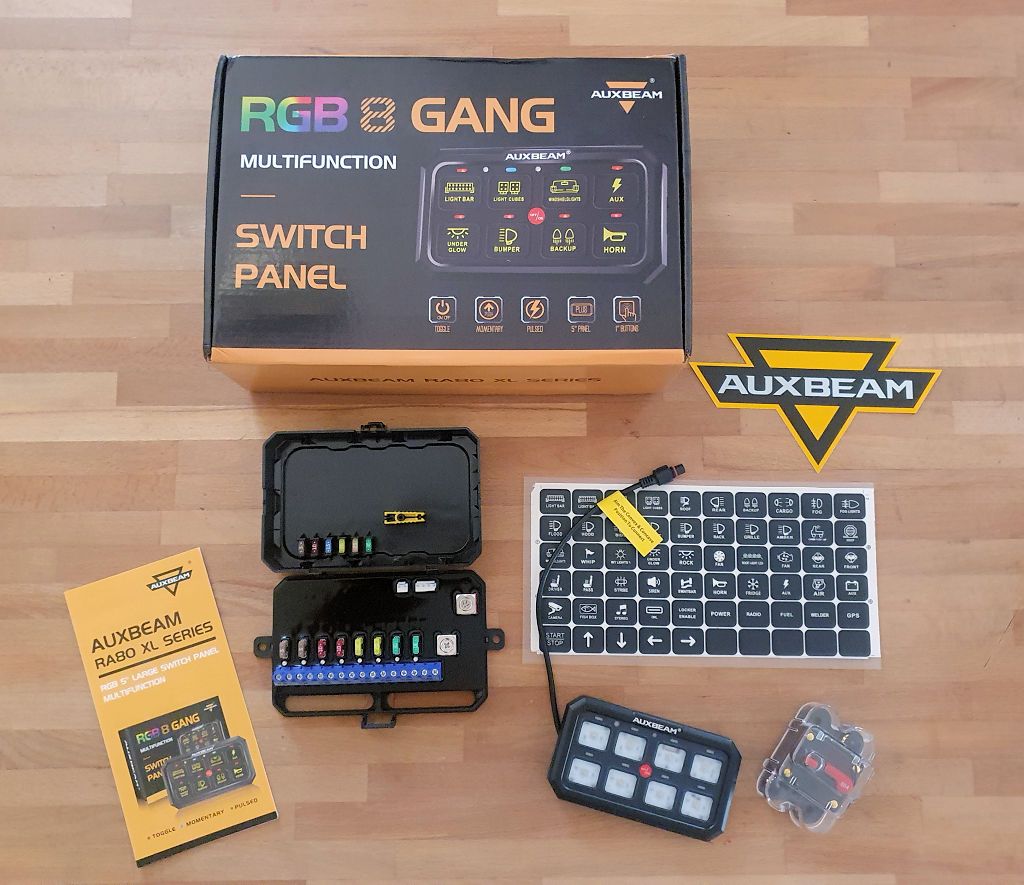
Auxbeam has just released a new 8-gang switch panel with RBG control of the panel colors and of the switch functions (ON/OFF, Momentary, Pulsed). They asked me if I would review it and I agreed. It arrived today, I opened up the package to check it out but it'll be a week or so before I get a chance to test and review it, stay tuned.

RA80XLPackage.jpg


Auxbeam has sent me a bunch of things to review recently (LED headlight bulbs, JK LED driving lights and now this switch panel) and for the record: I am not an employee of Auxbeam. I think they offer to send me things because they like the detail I put into reviews.
 
Last edited:

jscherb

Expedition Leader
I am looking forward to this review. Good to have another option in the market.
I've reviewed three other Auxbeam switch panels in the past few years and Auxbeam just asked me to do an article for their website blog which compares the features of their different panels and provides guidance on how to choose the right one for your application. I agreed to write that for them, and I'll post it here as well. Hopefully will have it done by sometime next week.
 

Forum statistics

Threads
188,030
Messages
2,901,415
Members
229,352
Latest member
Baartmanusa
Top