Battleship Jones: 2015 Tacoma DCLB Build Thread

DaVikes

Adventurer
I have 4.56 gears, and recently moved from 285/70/17 Duratracs to 34x10.5/17 KO2's (which are really 33.4"). For towing, I wouldn't go bigger than the 285's. The truck felt really strong around town with them, and needed them in the mountains. The downside is revving a bit more on the highway. The 285's w 4.56 gears result in overall gearing about 10% shorter than stock. With the 34x10.5's, overall gearing is about 5% shorter than stock. I think with 4.56's and 35's you would end up at about stock overall gearing. There is a pretty nice gearing calculator at http://www.grimmjeeper.com/gears.html.

I think the prior owner of my truck ran 35's for a while, judging from his thread on TW. Rear fender flares were trimmed, and he did a cab mount chop. I got the truck with 44k, and at about 55k I had to replace both front wheel bearings. I guess 35's would increase capability/comfort off road, but on road ride will suffer due to the increased weight.

Another tire size to check out is the 255/85/16 or 255/80/17. Just slightly taller than 285's, and narrower.
 

Adventurous

Explorer
I have 4.56 gears, and recently moved from 285/70/17 Duratracs to 34x10.5/17 KO2's (which are really 33.4"). For towing, I wouldn't go bigger than the 285's. The truck felt really strong around town with them, and needed them in the mountains. The downside is revving a bit more on the highway. The 285's w 4.56 gears result in overall gearing about 10% shorter than stock. With the 34x10.5's, overall gearing is about 5% shorter than stock. I think with 4.56's and 35's you would end up at about stock overall gearing. There is a pretty nice gearing calculator at http://www.grimmjeeper.com/gears.html.

I think the prior owner of my truck ran 35's for a while, judging from his thread on TW. Rear fender flares were trimmed, and he did a cab mount chop. I got the truck with 44k, and at about 55k I had to replace both front wheel bearings. I guess 35's would increase capability/comfort off road, but on road ride will suffer due to the increased weight.

Another tire size to check out is the 255/85/16 or 255/80/17. Just slightly taller than 285's, and narrower.

Whose truck did you end up buying?

What are your revs like on the highway with the 4.56s and 285s? I found that while towing it was either sitting at like 2,500 rpm in second gear chugging up a pass at 28 mph or screaming at 4,000 - 4,500 trying to hold some speed. I think I'd appreciate the extra grunt of 4.56s, but not sure if I'd appreciate high revs and poor MPG on the highway.

After thinking about it a bit more I'm 95% confident I'll end up with either 285/75R16 or 295/75R16s. Right now I have some 255/85s and want to move away from that size due to the limited options, particularly because most tend to be mud tires and I drive in snow enough that having something with more siping than the ST Maxx or KM2 would be greatly appreciated.
 
Last edited:

DaVikes

Adventurer
I bought it from a chevy dealer in Omaha, sight unseen (other than pictures). The dealer was pretty honest about the condition of the truck, and I'm guessing they probably didn't know that the single piece driveshaft wasn't stock, lol. The dealer got it from 2011TacoSport4x4 (TW handle). I think he got frustrated with driveline vibes and traded it in on a chevy. The single piece driveshaft he had built wasn't well built, and I had it redone, which solved some of the problems.

I couldn't quite remember the highway RPMs w 285's, so I plugged the numbers into the calculator. At 60, 2024, and at 70, 2361. With the new KO'2s, it runs 40-50 rpm's lower at those speeds. I think a stock truck would turn about 1800 and 2100, but I'm not sure.

I liked my 285 duratracs. They were good in the snow when new, and always had pretty good off road traction. As they got more than 20 k on them, I noticed that the snow traction had dropped a bit, and they had started to have more road noise/vibe more on dry roads. The new KO2's are definitely quieter than worn duratracs. I'm hoping they stay quieter throughout their life.

I get about 14 around town, and at best a little over 16 on the highway. My truck weighs approximately 5400-5500 lbs w me in it. LMK if you want to check it out. I think you would like the 4.56's. I'm doing some car camping up by Turquoise lake this weekend, won't have internet again till Sunday night.
 
Last edited:

Adventurous

Explorer
I bought it from a chevy dealer in Omaha, sight unseen (other than pictures). The dealer was pretty honest about the condition of the truck, and I'm guessing they probably didn't know that the single piece driveshaft wasn't stock, lol. The dealer got it from 2011TacoSport4x4 (TW handle). I think he got frustrated with driveline vibes and traded it in on a chevy. The single piece driveshaft he had built wasn't well built, and I had it redone, which solved some of the problems.

I couldn't quite remember the highway RPMs w 285's, so I plugged the numbers into the calculator. At 60, 2024, and at 70, 2361. With the new KO'2s, it runs 40-50 rpm's lower at those speeds. I think a stock truck would turn about 1800 and 2100, but I'm not sure.

I liked my 285 duratracs. They were good in the snow when new, and always had pretty good off road traction. As they got more than 20 k on them, I noticed that the snow traction had dropped a bit, and they had started to have more road noise/vibe more on dry roads. The new KO2's are definitely quieter than worn duratracs. I'm hoping they stay quieter throughout their life.

I get about 14 around town, and at best a little over 16 on the highway. My truck weighs approximately 5400-5500 lbs w me in it. LMK if you want to check it out. I think you would like the 4.56's. I'm doing some car camping up by Turquoise lake this weekend, won't have internet again till Sunday night.

I might have to take you up on that offer. I can't help but feel that once I'm loaded down the 3.73s might feel a bit sluggish.

How was Turquoise Lake? Never been up there.
 

Adventurous

Explorer
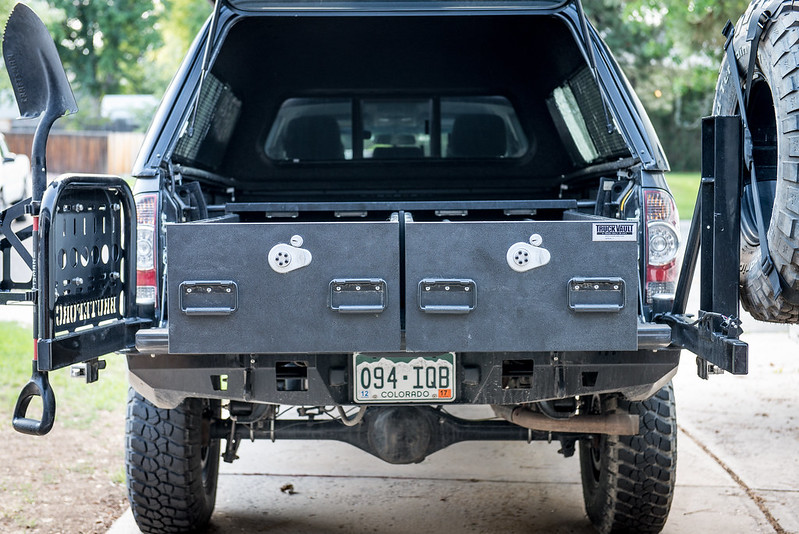
After years of contemplation and searching I finally pulled the trigger and acquired a set of TruckVault drawers for the bed of my truck. I've always had the intention of adding some drawer system to the bed of the truck, but have vacillated between building some or buying some. There are a number of good systems on the market and the price certainly reflects that.

Truck Vault
20170811-DSC_2547 by Tim Souza, on Flickr

I picked this up lightly used off of a guy on Craigslist. It is intended for the bed of a 5' long Tacoma, however, the 5' bed and the 6' bed are the same from the wheel well to the back (6' adds space in front of the wheel well). so the 5' would leave a gap at the front. This actually was kind of ideal for me as I needed a good place to carry a Hi-Lift or add a second battery/water tank. Having that protected space up front would make an ideal home for some of the larger more awkward items that I didn't want rattling around in the bed of the truck or ping ponging around in the drawers. I don't have a measured weight for the system, but he and I were able to hoist it into the bed of my truck by ourselves so I can't imagine it weighs any more than 200 lbs.

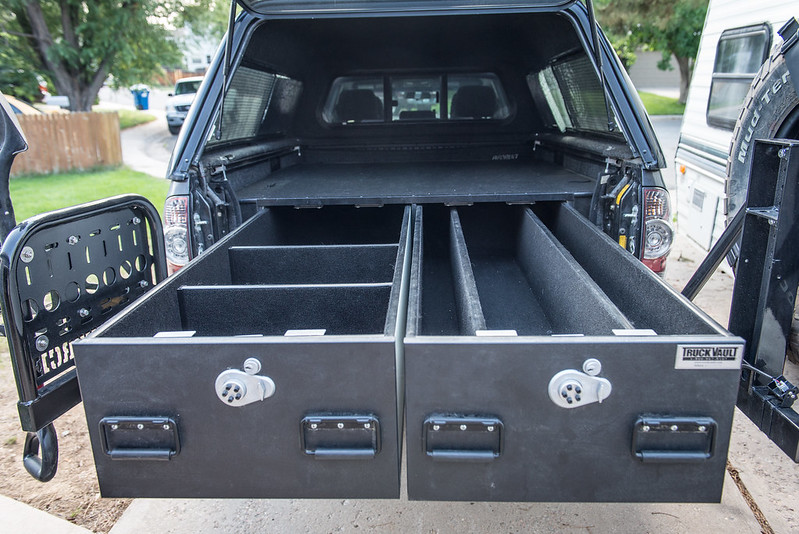
The one I got was the Magnum edition, so it adds a bit more height over the standard drawers. The Truck Vaults are more geared towards transporting firearms than camping gear and the dividers reflect that, so I will have to source or build some dividers to better separate and 5S our camping gear.
20170811-DSC_2548 by Tim Souza, on Flickr

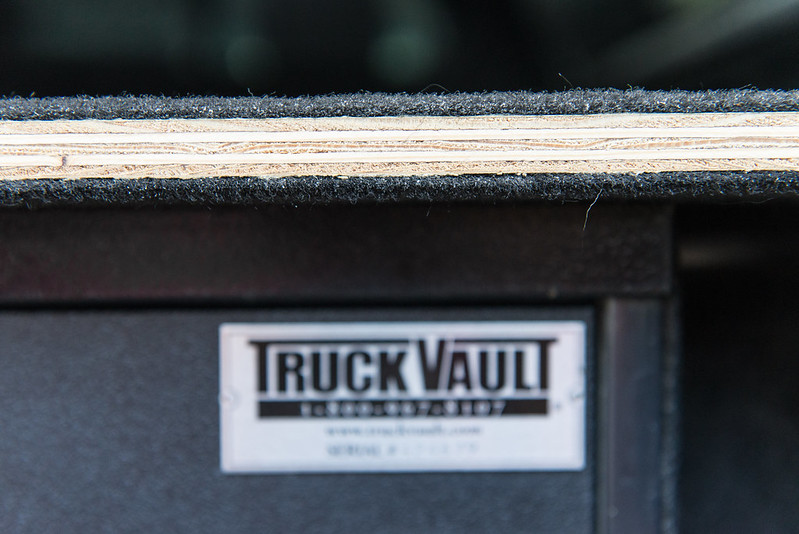
The drawers were equipped with Simplex locks which help keep things very secure; the bolt on this thing is almost as big as the deadbolt on my front door. It also has a push button lock for those times when you don't have the key on you. Drawer construction is also fairly straightforward, marine grade 5 ply plywood, vinyl outer layer on exposed sides, carpet on touchable surfaces, with edges routed for T- molding. They don't use drawer slides, rather some HDPE (I'm assuming) angle pieces are staple onto the bottom edges with a simple roller wheel on the upper back corner. Only time will tell how well this combination does once the drawers are loaded down, but it seems to be pretty okay just pulling the drawers in and out. Obviously not as smooth as drawer slides or bearings, though I'm not sure if that was a measured choice due to the weight of the drawers cause these things are heavy.
20170811-DSC_2553 by Tim Souza, on Flickr

Here's a good shot of the surface height.
20170811-DSC_2549 by Tim Souza, on Flickr

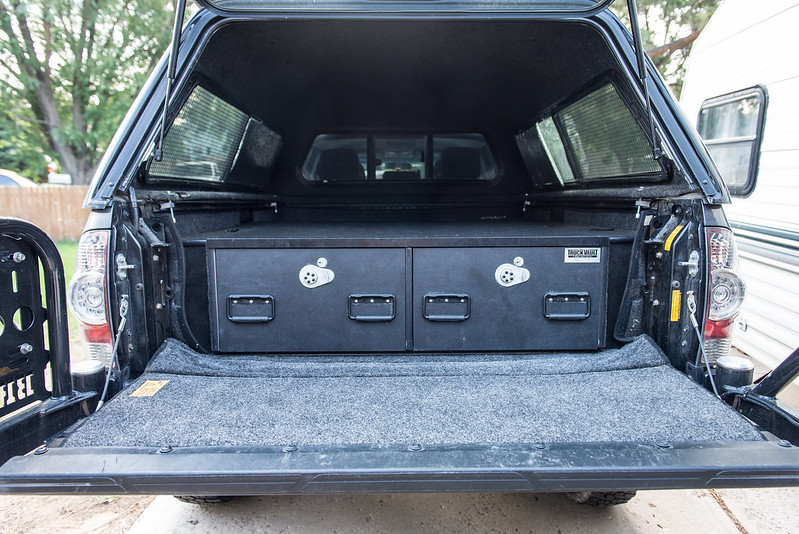
A little bit taller than my previous platform setup but the long term plan has always been to get a thinner mattress so those changes should offset each other. I was a bit surprised to see that the drawers didn't come with any provisions to tie them down. I'll be adding some turnbuckles to keep everything in place, despite them staying put solely due to the weight I much prefer the additional security in the event of a crash.

Despite the top platform extending from bedside to bedside the storage space on either side is still preserved through magnetic wings that can pull off. Good thing too cause there's some decent space down in there for miscellaneous items. The areas over the wheel wells would be a great place to store my snatch strap and tree strap. Easily accessed yet out of harm's way.
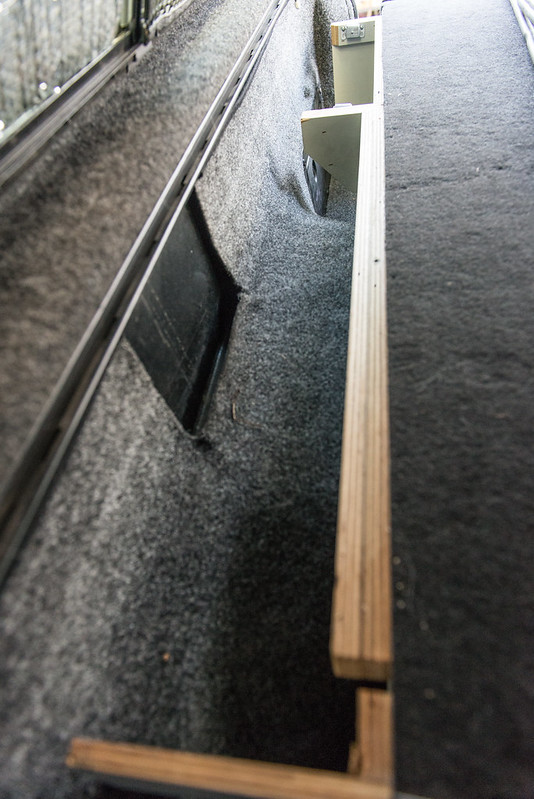
20170811-DSC_2552 by Tim Souza, on Flickr
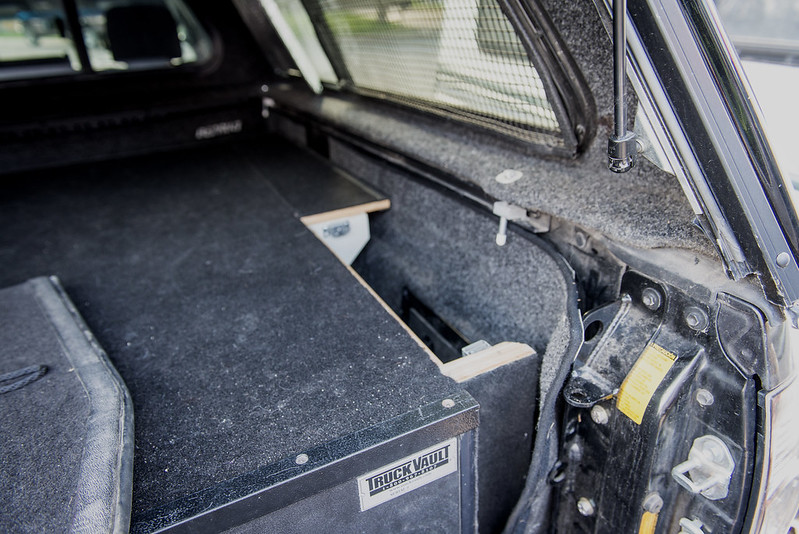
20170811-DSC_2550 by Tim Souza, on Flickr

And lastly here's now much space is left up front.
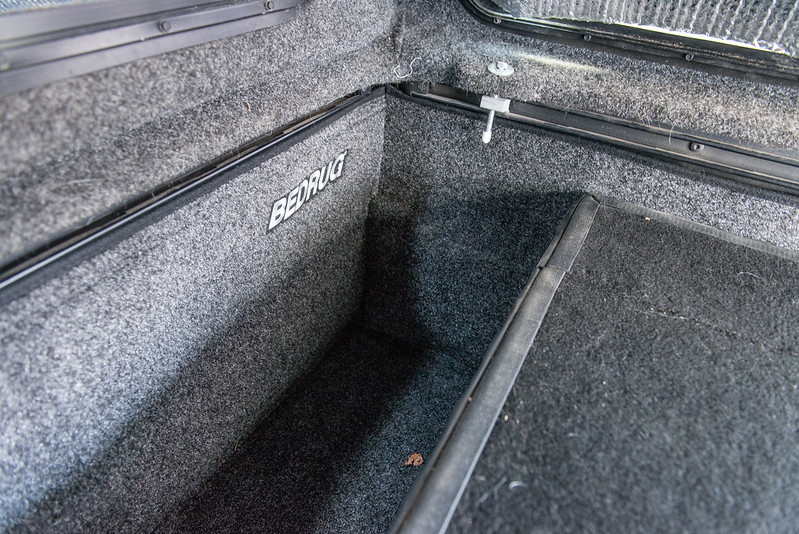
20170811-DSC_2551 by Tim Souza, on Flickr

A good foot or so that spans the width of the bed. I'll have to build a piece to span this void but thought this would make a good space for those bulky items or as a secure area for valuables if I have to leave the truck somewhere. Provided I build it right nobody would know it's there.

In summary, I would have preferred to make a set as I think I could have made some cheaper and better than what I purchased, however, that does not include my time in the equation. If I had a table saw at my disposal it would be a different story, but I don't, and judging by how much time it took to make that back seat platform a set of drawers would have been quite the undertaking. The Truck Vault offers a convenient, ready to go solution that is plug and play. Very much looking forward to getting this all partitioned and ready to go.
 

Adventurous

Explorer
TV looks good.

Having made a set of drawers for the 6' bed before, as well as three chuck boxes, three versions of the dog platform (replaces the rear seats), and numerous small containers out of plywood and with a just about top-of-the-line tablesaw, I'd happily buy pre-made products if they existed to fit my needs/dimensions. Happily! The amount of time and effort involved in every project is simply massive. And the costs, from $90/sheet for cheap, Lowes plywood, to $300+ for large drawer slides, to various expensive latches and knobs, to jigs and assembly hardware, to carpet or stains and finishes. It adds up real quick!

And even with quality tools, blades, patience and attention to detail, I still end up with lots of small imperfections. From chipping plywood, to one or two cuts being 1mm off, which then skews the entire structure. Lots of small pains in building such things.

The water tank I have in my truck will be a perfect fit for that gap in front of your TV. I have a 73L one, and it's about 9" high. I think you can go quite a bit higher, too. Let me know if you want a link to that product (there are many other options there, too).

Link me plz.

And I hear you, I was researching local CNC wood routers that could cut out my pieces but determined it wouldn't be feasible to pay the $250 for the BB plywood, $600 for the Accuride slides, then another $100-300 to have the thing bedlined in addition to the time I would invest. That being said, I'm usually super anal about such projects and would foolishly spend twice the cost of a manufactured product to have it all the way that I want it.

I was in the process of pricing out a similar concept using aluminum extrusions ala Goose Gear but the big hangup is always not having a local place to source those from. Having to get all of that stuff shipped to me would be super expensive and would again represent a R&D cost on my end that I'm not sure would pay off. What can you do.
 

DaVikes

Adventurer
I might have to take you up on that offer. I can't help but feel that once I'm loaded down the 3.73s might feel a bit sluggish.

How was Turquoise Lake? Never been up there.

Turquoise Lake is very pretty. It is also surprisingly large. We were car camping, but I've also gone by it on the COBDR from Gypsum to Leadville. It's big enough to be popular, and there are a lot of campgrounds around it. There is some dispersed camping nearby on Hagerman pass road. I'll shoot you a pm w some contact info in a bit.
 

Adventurous

Explorer
To add fuel to the fire, I met up with DaVikes last night so I could take his truck for a spin and see what I thought of a 4.56 equipped truck. Big thanks to him for handing the keys to his incredibly well built truck to a complete stranger! For those who have the pleasure, check out the topper he built as it's a work of art, seriously, it's impressive.

Anyway, the trucks in question:
His = 2011 Tacoma DCSB, 4.0 auto, Bilstein 6112's w/ 650lb coils & B110's, All Pro Expo Springs, ARB bumper & rear locker, RCI sliders, 4.56 Nitro, Warn, 34 x 10.5 KO2's, no skids, camper shell
Mine = 2015 Tacoma DCLB, 4.0 auto, Icons w/ 700lb coils, OME Dakar, ARB bumper & winch, Bruteforce std rear with swingout & spare, 3.73s, 255/85s KM2s, IFS & mid steel skids, mid-rise topper

The most noticeable difference was the road noise and tire vibes. Holy cow are my KM2s stupid loud and vibe inducing. With about 50% tread life they still have miles left in them but I don't know if my ears do after doing the back to back.

I noticed the gears in two scenarios mainly, the first was speed off the line and around town. As expected they restored a bit of the pep lost when moving to a 33"ish tire. No longer did I need to get into it as deep to come up to speed from stop lights and the shift point into 2nd felt like it was back to where it should be. The second instance I noticed there presence was when accelerating, at any speed and at any rate of speed. They picked up the slack significantly quicker and I found I didn't need as much space or planning to execute merges or passing maneuvers. RPMs on the highway didn't change a ton, they were higher sure but my main concern was getting into the "buzzy" range of the truck. I took it up to ~75 which is the fastest I ordinarily expect to travel with little issue. All in all I can see how the gears breathe some life back into a truck that when loaded down with bigger tires on it seems a bit sluggish. It was a very welcomed change. Anyone out there with a supercharged truck that wants to let me take it for a spin so I can see what boost does? :sombrero:

The other thing I noticed was the difference in suspension. Pardon my inability to verbalize suspension performance, but the Bilsteins felt, in all situations, like they have more compression damping. The suspension feel was firm but in control, in comparison my Icons are a bit more floaty and use more suspension travel for a given input. Contrary to literature, the digressively valved Icons felt like they dove a bit more during cornering with the tradeoff being increased small bump sensitivity. No conclusions on this one, just observations.
 

Adventurous

Explorer
No updates (that I can share yet) other than I have migrated all of my photos from Photobucket to Flickr and 98% of the broken links are now corrected. That was a project in itself.
 

Watt maker

Active member
No updates (that I can share yet) other than I have migrated all of my photos from Photobucket to Flickr and 98% of the broken links are now corrected. That was a project in itself.

I don't really have many posts on Expo but I do on other forums along with build threads and such. It's definitely been a project (understatement) to restore all my photos on the forums. I've have some completed but not all. Photobucket sucks!!
 

Adventurous

Explorer
It's update season!

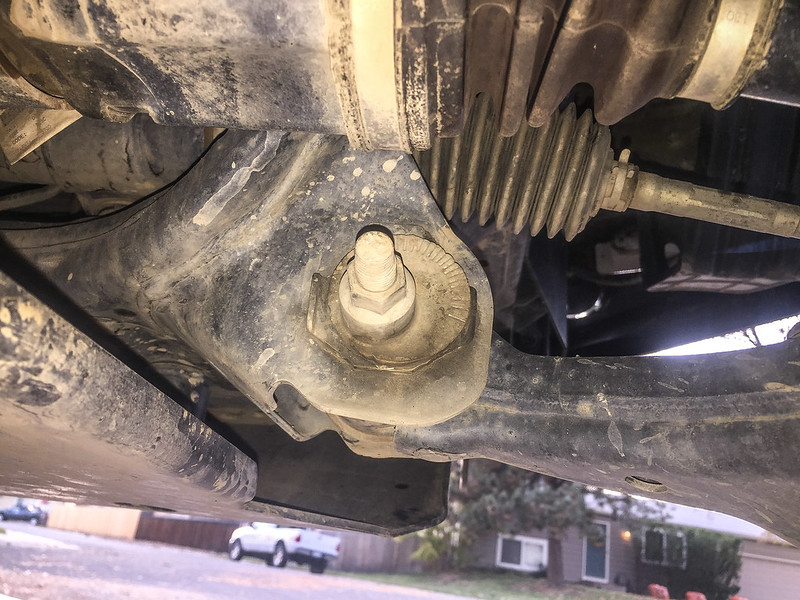
Looks like I have a trip to a fabricator in my near future. I was wondering why my tires had started to wear unevenly recently and a quick peek under the truck was all I needed. The front cam tabs on both LCAs are in the process of folding over with the passenger side being a bit worse than the driver's side. Time to have someone burn on the Total Chaos kit for me; new shoes are on the way and I don't want to kill those with a bad alignment.

Of course it's almost as cost effective to buy a welder and do the job myself seeing as how I have to do the cab mount chop here as well. If only I trusted my welding skills that much...

IMG_2774 by Tim Souza, on Flickr
 
Last edited:

Adventurous

Explorer
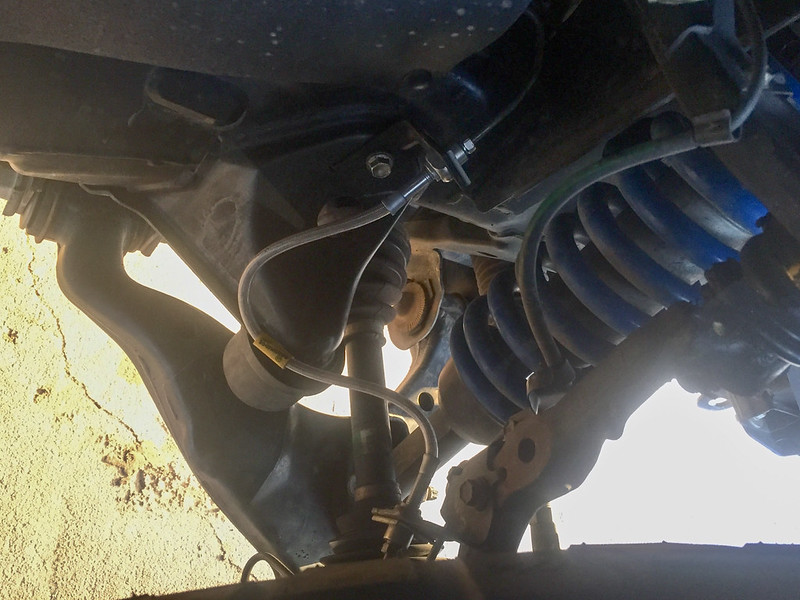
In my quest to achieve better braking performance I recently installed a set of Goodridge stainless steel braided brake lines. I chose to go with the +4" version (http://www.autoanything.com/brakes/61A3671A0A0.aspx) which was a bit of a compromise. The +4" was great for the rear and will alleviate the taught brake lines at full droop, but it is probably longer than ideal for the fronts. If I could mix and match I'd do +2" up front, +4" out back.

Installation is pretty straightforward in principle. All of the brake nuts are 10mm and my truck is new enough that corrosion hasn't set in yet. I sprayed all nuts with PB blaster anyway a few days ahead of time to make sure, I'd hate to bugger up a hard line and have to replace one of those in the process.

Fronts were easy and took ~20 minutes per. No real tricks to it, just unbolt the lines, bolt the new ones in, and have Brakleen on hand to hose down everywhere that brake fluid touched. Finished product

IMG_2805 by Tim Souza, on Flickr

As you can see, a little longer than ideal, but it doesn't rub or bind or get caught in anything when turning lock to lock, so it should be okay.

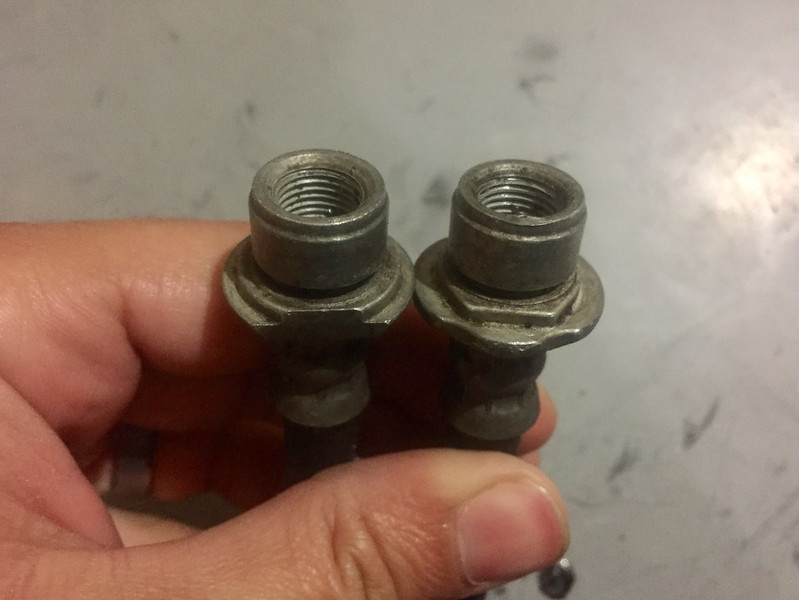
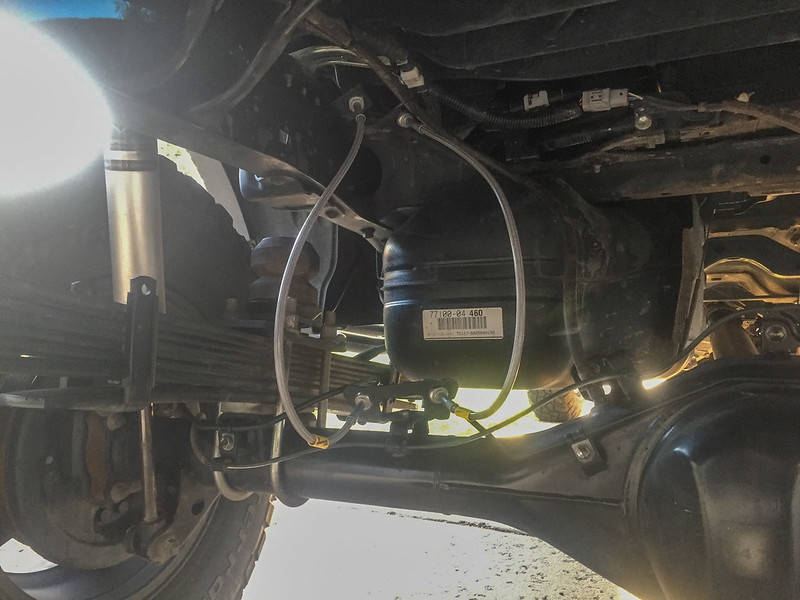
The rear lines are significantly more challenging, but only due to the end closest to the bed having very little room to work in. The spring clips were a bear to remove, just no good place to stick a screwdriver in there to pry them free. I managed to get them to rotate into a position where I could get the blade of a screwdriver on there and pop them off. Even still, wrench turns are made 1/8 of a turn at a time (a ratcheting or flex flare nut wrench could be helpful), but I found the best method was to unbolt the bracket from the frame rail so it had a little bit of extra wiggle room. Why do you need this extra wiggle room? This is why.

IMG_2806 by Tim Souza, on Flickr

The collar on the brake line nut is a different shape on the OEM lines, presumably to ensure that left goes to the left and right goes to the right. Good engineering, but sadly none of the aftermarket lines compensate for this. Grinding of the axle brackets and frame side brackets are required to open things up enough to accept the one line and still be able to install the spring clip. Hindsight is 20/20, if I was doing this over again I'd disconnect both lines at both ends, remove the brackets, and reinstall the lines so I could do grinding on the bench instead of underneath the vehicle. Live and you learn I guess, but I managed to clearance it enough to get the lines back in and the spring clips installed. Tada!

IMG_2804 by Tim Souza, on Flickr

Vacuum bleed the whole thing the following day and all went well with the exception of the rear passenger wheel which kept pulling a small stream of bubbles. I tried grease around the threads of the bleed nipple and tape, but could just not get a good seal. Finally gave up after pulling half a quart through that line and said close enough is good enough.

Was it worth it? Yes, but with caveats. My motivations going in were to get extended length rear lines in there as the OEMs are too tight when drooping out the rear end. This definitely satisfied that requirement. The other was to improve braking. Is the brake pedal feel firmer? Yes. Do the brakes seem to work any better? Maybe. They feel like they bite harder sooner with less mushy feeling standing on them. I don't have any numbers to translate that into real world performance however. I'm also assuming they deliver superior performance when the brakes start to heat up, but that's simply based on all of the high performance vehicles that use these over stock rubber hoses. Lastly, I anticipate these will last much longer and deliver better performance over their life than the stockers. It was worth the $100 to me as I want every bit of braking performance I can muster with the OEM system but it is by no means a must do kinda upgrade.
 
Last edited:

Adventurous

Explorer
Maybe I missed it, but which tires did you choose?

I will be rocking a set of 285/75R16 Cooper STT Pro. They'll probably sit in the garage for a bit until I can get the cam tabs fixed up, my front suspension redone, and the truck will be going into the body shop right before Thanksgiving to fix up the hail damage.
 

Forum statistics

Threads
188,348
Messages
2,903,633
Members
230,227
Latest member
banshee01
Top