Build - Frontier with ARE DCU topper

Josh41

Adventurer
I'm thinking of ordering an ARE DCU with Barn Doors, any advice on communicating with the dealer on getting the correct size?
 
A few comments, based on my experiences:

*) Explore the ARE site and be familiar with all of the options available. Your dealer may not be familiar with what's available. For exampe, 99% of what they do may be with guys using it for a work truck, and what we want may be different.
*) If you're going to insulate I would not get the headliner. If you are, then I would get the headliner
*) I MIGHT have gotten the tallest version, and combined it with the sloping roof design to get better MPG. But, it also looks a goofy (both the slope and the tallest version.)
*) Watch the cutouts for the taillight bolts. Mine don't match up. I should have had the dealer cut/nibble them for me to so I woldn't have to pull the topper to do it
*) The section at the rear, where the cap meets the taillights ... mine didn't have a gasket. Easily solved at lowes, but youmight also get the dealer to fill that gap if they can
*) I don't think getting the lighting is a good idea if you're going to do your own electrical setup
*) The rear windows are pretty useless. I was hoping to preserve my rearview, and that just doesn't give you a good field of view. I might have NOT gotten them and instead gotten a rearview camera that was always on to an aftermarket rearview mirror with screen
*) The windoors provide an AMAZiNG amount of ventilation. But you have to do your own screen. I would have been happier with just sliding windows.
*) Don't count on the cab/cap windows lining up very much. I will, i think, eventually do a pool noodle like thing to keep the air/water out from between the two windows
*) Popular trucks probably work ok. Our Nissans? Not so much. Make sure you inquire about the LONGER flange for the cab side of the cap ... they shipped mine with the shorter one and you're going to need/want the longer one. Maybe. (I have a KC with 6' bed, I'm not sire how it impacts your CC LWB.) But, make sure they ask
*) And have the dealer call ARE first, to make sure you can get it. Not just rely on the website and computer ordering. ARE's information is not really accurate unless you call
*) In retrospect, I might have gotten a single door instead of the barn doors.
*) And, not to discourage you, but check out the All Terrain Camper. The shell version is $9500 and about 600#, and comes with the cabover. Cabover is nice. That's about 3x what I paid for the ARE. But ... cabover popup. *drool* OVERLND does this also, at about 340# for ~$8k
*) I really like my PaintToMatch
 

sideburns

Idaho 2019 Nissan Frontier CC LWB
Looks like a great build. Long Range America has a 38gallon fuel tank for the Frontier. Once I have my Ovrlnd camper and see how bad my mileage is hit I might get one. Right now a single 5gal gas can should be enough for USA and Canada(250mi+), but I kinda doubt it with the camper. If I get a gas heater I'll definitely get one.

In my experience if you can't at least situp in bed you'll feel cramped. I had a cabhigh topper on my Dodge with a platform and not being able to situp sucked, never again.
 
I ended up at 11" high for the bed. Economically, it seems, the correct height for a table is 11"-13" above your butt. This matter because ...

I'm putting in a Lagun table. I feel like most people disassemble the table in order to make the middle bed platform out of the table. I, however, would like to just lower the table in to place. This means, because of the way the table works, I need 11-13 of clearance for the table leg to drop. Thus, 11", which is kind of splitting the difference between the upper height I had and the lower height I had. Baby Bear is just right.

Having the bed decisions made, I then ripped everything out. I put in a sheet of 1/4" to smooth out the truck bed ribs. I pulled out the carpet because it was NOT working. It was a pain to keep clean, so I put vinyl down over the 1/4". It looks bright and fresh and should be easy to keep clean. Two days ago I ordered the aluminum 80/20 from the place of the name name to make the final bed out of. It will be a single, with an aisle, and a platform the same height on the other side. Who knows when the 8020 will arrive. I'm using 20mm.

I then set out fixing the locking issue with the ARE DCU. It has a bar that goes up in to the ceiling, another that goes in to the floor, and a third that closes over the other door. All of this when you turn the handle from the outside. The key then locks this in place. But, from inside, you can't really turn the bars very easily. I'm not so much concerned with "security" that way some people obsess over it, but I would like to NOT kick the door open during the night while I sleep.

I took some coat hooks from Lowes and drilled out two holes in each of the door bars and bolted them in to place to make a kind of handle. It's now trivial to move the bars up and down to bar the doors. And, there's a little red switch inside of each door that you can flip, once the doors are barred, to "key lock "the thing from the inside without the key. So, I'm set until the aluminum arrives, as these blurry pics will attest to ...

Next up, buying some MagicMounts and breaking them apart with a hammer to make a ball mounted XL ipad mount.
 

Attachments

  • PXL_20210128_212015839.jpg
    PXL_20210128_212015839.jpg
    858.6 KB · Views: 66
  • PXL_20210128_212023350.jpg
    PXL_20210128_212023350.jpg
    911.9 KB · Views: 66
  • PXL_20210128_212027682.jpg
    PXL_20210128_212027682.jpg
    904 KB · Views: 64
  • PXL_20210128_212046540.MP.jpg
    PXL_20210128_212046540.MP.jpg
    780.8 KB · Views: 63
  • PXL_20210128_212102858.MP.jpg
    PXL_20210128_212102858.MP.jpg
    885.9 KB · Views: 63
  • PXL_20210128_212927102.jpg
    PXL_20210128_212927102.jpg
    754 KB · Views: 59
The windoors on the ARE DCU have two positions. Up until about 30 degrees open and they want to stay closed. Past that point and they want to open all the way to the top. I wanted a way to prop them open at something like a 30-45 degree angle (for rain) , as well as a way to pull them closed easier when they are all the way up.

I mounted a small hook in the window sill and on the window and then used 1/16" wire rope to make some loops ... one on teach end and a couple in the middle. I can now attach the cable loops to the hooks to hold the windoors open at a couple of different positions. If the hooks start to pull out then I'll JB Weld them in.

In retrospect I think maybe I should have used a larger cable size instead of the smallest that Lowes sold. Pulling the doors closed, via the cable causes it to cut in to your hands a bit. A larger diameter would solve that ... and be bulkier, get in the way more, etc. I think I'll probably make a leather "hand hold" about halfway up to solve that issue.

You're supposed to use a special swagging tool to attack the ferrules to the wire rope, and I'm sure my mid-span loop method is wrong also. I used a pair of channel locks. It's just a window.

Also, I'm now out of bourbon.

*) Still waiting on the bed frame parts from 8020.
*) My Magic Mount should arrive today. I'm going to hack up a magnetic mount for use with a ram mount & arm ... if the magic mount test works.
*) I'm starting to research radios. One of those cheap Chinese HAM units and a cheapo CB also. I'm thinking of a folding antenna mount between the cap and cab. I'm torn here. I don't want a "look" that has a bunch of stuff mounted in the cab. A good, cheap CB is $50 ... or I can $150 for that one all the jeep people use with nifty hand unit. Likewise the baofeng. Do I really want it just hanging out all the time? I'm likely to say yes to both, but try to "hide" them some in an out of the way place since they wont get used much. Hence the interest in a fold down antenna for the CB (and, likley, none for the HAM.)

Ham seems easy to get a license for ... but it was quite intimidating in the beginning. I wish someone had told me all the questions were online in flash cards. I feel like you can do flash cards for 3-4 hours and then pass the test.
 

Attachments

  • PXL_20210129_175709578.jpg
    PXL_20210129_175709578.jpg
    735.9 KB · Views: 52
  • PXL_20210129_180142453.MP.jpg
    PXL_20210129_180142453.MP.jpg
    648.5 KB · Views: 52
  • PXL_20210129_180211673.jpg
    PXL_20210129_180211673.jpg
    745.8 KB · Views: 48
  • PXL_20210129_180300508.jpg
    PXL_20210129_180300508.jpg
    593.1 KB · Views: 49
  • PXL_20210129_180245221.MP.jpg
    PXL_20210129_180245221.MP.jpg
    661.9 KB · Views: 53
Magnetic mounts for the HT and mic are in. They work great.

More importantly, the basic bed platform is now built. A cheapo B&D $30 jigsaw from Lowes works well in my tiny apartment condo, and cuts the aluminum well. Square corners, though, are an issue. A chop saw would have been the correct choice, but there's just no space for such things. Maybe fifteen years from now when I'm back home.

So, nine sticks of 2020 80/20 make up the frame, with three strips of 8' long aluminum drip edge for the bed slats. Cheapo nuts & bolts off of Amazon, because the 80/20 sellers charge a fortune for them. I'm waiting for another batch to come in.

You can see the table mount. It will swing out to form a table "outside", as well as swing off to the side to form a table for interiors cooking/computer work when seated on the bed bench. (30" wide.) Finally, the table will slide down to form the middle section to turn the entire thing in to a sleeping platform. Generally, people take out the leg support and then slide in the table, but, if I chop off the top of the leg then it SHOULD just "slide" down to form the bed ... if I measured everything correctly.

The major problem to solve now is flex. With no "diagonals" there is a lot of wobbly in the frame, and the table support leg kick in when the table is moved about. I think some horizontal cross legs on the floor between the upright legs should help with the legs wanting to kick in/out, especially with the table leg supports legs. I should also be able to add some "slices" of thin particleboard parallel to the tailgate area without compromising the vision. (The front and end will be left open for under area access.) The lack of a "lengthwise" supports worries me right now, but, once I add the others I'll see if its an issue. I may be able to box in the floor with more 80/20 and not loose any space ... and have a lip to keep things from slipping out!
 

Attachments

  • PXL_20210206_014516226.MP.jpg
    PXL_20210206_014516226.MP.jpg
    827 KB · Views: 58
It's great; I just park and pull out my camp chair and I'm set up!

It's been awhile since I updated. I "finished" the primary build of the backend, which finishes this phase. I'll take a couple of months break befre starting to work on the electrical.

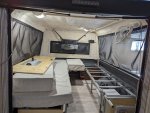
The legs have been straightened and screwed to the floor, as well as inserting a couple of new ones. A new "main" mattress went in, as well as storage cubes, cut down to height on a bandsaw. A spruce tabletop went in, with about nine coats of poly. It has metal tabs underneath where it rests on the bed supports when turning it in to a full sized bed. It swings out to provide some outside table space. The trim panels are hardboard, covered in shelf lines, with neo magnets to hold them on.

Tweaks to do:
*) Switch out the magnets for velcro. The magnets just don't hold well enough.
*) Swap the mattress for yet another new one. I can feel the bed supports .. not good! I think this means spending about $150 or more on a single, or a twin I can cut down.
*) Put a pieces of foam between the cap and cab above the window. This should allow me to keep the front window open, for ventilation, in the rain.
*) Make my magnetic window screens. The screen material is coming today, so I should get on that tomorrow.


Phase 2:
*) DC-DC charger
*) 100 Amp hour battery
*) Lights, fans, outlets
*) 12v mattress pad (which is why I'm going with 100 amp hours)
*) MAYBE a solar panel or two. Maybe.
 

Attachments

  • PXL_20210327_223849126.jpg
    PXL_20210327_223849126.jpg
    1,023.4 KB · Views: 129
  • PXL_20210327_223910074.jpg
    PXL_20210327_223910074.jpg
    722.7 KB · Views: 124
  • PXL_20210327_224030472.jpg
    PXL_20210327_224030472.jpg
    1 MB · Views: 100

Wallygator

Adventurer
It's great; I just park and pull out my camp chair and I'm set up!

It's been awhile since I updated. I "finished" the primary build of the backend, which finishes this phase. I'll take a couple of months break befre starting to work on the electrical.

The legs have been straightened and screwed to the floor, as well as inserting a couple of new ones. A new "main" mattress went in, as well as storage cubes, cut down to height on a bandsaw. A spruce tabletop went in, with about nine coats of poly. It has metal tabs underneath where it rests on the bed supports when turning it in to a full sized bed. It swings out to provide some outside table space. The trim panels are hardboard, covered in shelf lines, with neo magnets to hold them on.

Tweaks to do:
*) Switch out the magnets for velcro. The magnets just don't hold well enough.
*) Swap the mattress for yet another new one. I can feel the bed supports .. not good! I think this means spending about $150 or more on a single, or a twin I can cut down.
*) Put a pieces of foam between the cap and cab above the window. This should allow me to keep the front window open, for ventilation, in the rain.
*) Make my magnetic window screens. The screen material is coming today, so I should get on that tomorrow.


Phase 2:
*) DC-DC charger
*) 100 Amp hour battery
*) Lights, fans, outlets
*) 12v mattress pad (which is why I'm going with 100 amp hours)
*) MAYBE a solar panel or two. Maybe.

Looks awesome! Please keep us updated on this build. Also, why don't you try putting a piece of plywood down under the mattress before spending money on a new mattress.
 
So, I've got the window screens going. I also added a drawer with runners instead of drawer slides, a 100 amp hour LifePO4, a China, with a Renogy 30amp DC-DC charger. I just added a hanging bag for nighttime phones, keys, etc and yacht fan, two lights, and a charger with 3 12v, three USB and a USB-C outlet.

I've still got things apart in this photo, but you can see all of the adds.

Next up is a big project that scares me a little: a WAM winch carrier.

PXL_20221108_190911925.jpg
 

llamalander

Well-known member
The Wam winch tray is a good piece of kit--
The way they pack it, you can see that it can take a beating, or already has on the way to your door!
You probably need to trim the bumper facia to get the plastic back on, but that's doable if you take it slow.
I found I needed to upgrade my front springs afterwards, the carrier +winch were more than stock could handle.
 

hovenator

Explorer
The Wam wincher is pretty good. Here is a pic of mine.

Wam wincher w/wings, 9k Viking winch (ComeUp) with synthetic line.
 

Attachments

  • 0A6E4707-2C57-468F-A496-CAE448637A13.jpeg
    0A6E4707-2C57-468F-A496-CAE448637A13.jpeg
    1.5 MB · Views: 54
  • 57345578-C557-4A1C-883D-5B798120F809.jpeg
    57345578-C557-4A1C-883D-5B798120F809.jpeg
    1.4 MB · Views: 50
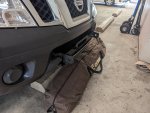
I got the WAM hidden winch mount on. It was pretty straightforward. I did have to buy a breaker bar and socket extension to get the old frame crossbar out. And those two fender bolts inside the wheelwell are a pain. And only one bolt on each side of the tow hook mount plate lined up. But, it's on.

Cutting the bumper was a pain. I tried to do a minimal job, but the mount was too far forward (I had it back as far as it would go) to clear the inside of the lower section. Which caused me to cut out too much room for the tow hooks. I finally gave in and chopped away. I made a halfhearted attempt to trim it up ... with its own problems. I'm sure it would have been much easier with the bumper off.

Next up I need a winch. I'm thinking of the Harbor Freight 9500 with wire rope for $350 ... and then replace the wire with synthetic some place down the line. Or, just go the Openroad 9500 with synthetic and wireless for $430. WHich seems about the same cost after I add the rope to the Badlands.

Just fumbling through life.
PXL_20230206_165840311.jpg
 

trasko

Adventurer
I had a similar experience on the WAM install, however mine was likely a good bit more difficult. They sent me one for a. plastic bumper Frontier when I have a chrome bumper. Ended up having to weld on some new mounts and I did an alright, but not great job. Same with trimming the bumper to fit. However looking back I'm glad I did all that. Most people don't even notice the winch (I have a front license plate mount covering the fairlead/rope area).

Regarding the winch choice: I went name-brand (Warn M800) because I figure I'm keeping the winch for my life as they are serviceable and I don't plan on getting a vehicle any bigger than the Frontier. Wiring up the winch and locating inside the bumper is enough work I don't want to be mucking with it again anytime soon. That said I think people have a lot of success with the Harbor Freight ones. I'm sure it'll be fine whichever way you go.
 

Forum statistics

Threads
188,337
Messages
2,905,689
Members
229,959
Latest member
bdpkauai
Top