Buying & Building a Medium Ambulance into an RV – The FAM-BULANCE

rlrenz

Explorer
Not getting much ambulance stuff done right now - she's in the shop for a rear brake overhaul. I was driving it on Sunday, and started smelling brakes. When I got home, I found that the right rear disk brake was dragging. I figured it was probably time for an overhaul, and parts are winging (literally...) their way here. I had some fun on Saturday, through - my wife and one of her friends had driven to a shower of some sort, and she asked me to pick her up at about 12:30. I did what anyone with an ambulance would do - I picked her up in the ambulance. She walked out and saw it sitting there with the various lights all doing their thing (no red or blue,but plenty of white lights). She asked me if I had hit the lights so she would be able to find it parked along the curb - Yup!

In other news, I've been stocking up on electrical components for the module. Blue Sea marine equipment is well made, and I picked up an AC and a DC panel, along with several rolls of marine wire. I can buy wire by the foot from a marine dealer, but they are 20 miles away in the heart of road construction, so I just bought several 100 ft rolls from an on-line supplier.

Some of my leftovers are now headed to a volunteer fire department in northern MN. I don't have any use I can think of for the IV bag heater and the Thomas suction pump, so off they went. Too good to throw away, and not good enough to keep, plus nothing similar on EBAY. I still have to find someone who needs an ambulance attendant's seat, though.
 

rlrenz

Explorer
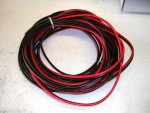
A year or so ago, my son was the train producer for the Levi's Station-to-Station presentation. Some of the rail cars in the show had a fancy LED setup for various light shows, and the whole thing was powered by 14 Gauge, 2 conductor marine cable. When the LEDs were removed after the show, he rescued the power cables from the trash, so now I have a copy paper box full of cable for ambulance wiring. That plus the new marine cable I bought should be all I need.

DSCN4463.jpg

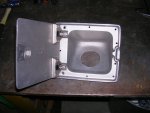
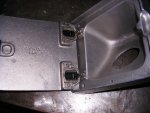
I've also found some interesting stuff on EBAY - here's a fuel fill door for a American LaFrance fire truck - it will work fine as my water fill. $10 for the fuel fill, but $12 for shipping. Note how they handle the hinges. They use off the shelf European cabinet door hinges. Good idea.

DSCN4464.jpg

DSCN4465.jpg

DSCN4466.jpg

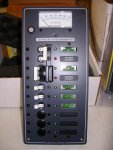
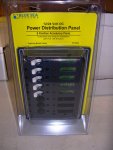
I also remembered to take some photos of the Blue Sea power panels - note that the AC panel has two interlocked AC circuit breakers so the shore power and the generator can't be accidentally cross connected. The DC panel is supposed to have a separate fuse, but I'm going to install a 50 amp main breaker in place of the existing upper breaker and use a 4" long jumper to feed the rest of the panel. Since I'm going to use this panel for the refrigerator, some LED lights, and a few 12 volt outlets, 50 amp should be more than enough for this panel.

DSCN4461.jpg
AC panel

DSCN4459.jpg
DC panel

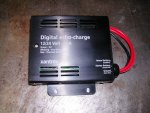
The DC panel will be fed from a dedicated deep cycle battery that will be located in an adjacent outside locker. It will sit in a marine battery box, and charging will be through an Xantrex Echo Charger. The Echo Charger charges a separate battery at up to 15 amps, and is fed from the primary batteries. The Xantrex is normally used to charge a boat's starting battery from the large house battery set, and since my primary battery consists of four automotive batteries, it should work fine. The ambulance's Vanner inverter also contains a 120 VAC battery charger, so when the ambulance is plugged into shore power, the batteries can charge at up to 55 amps. Once the Xantrex senses the main battery voltage is rising, it starts charging the secondary battery, and then drops to a float charge mode once the secondary battery is charged. The deep cycle battery may also get a solar charger as well, but that is a future project.

DSCN4478.jpg
Xantrex Echo Charger
 
Last edited:

rlrenz

Explorer
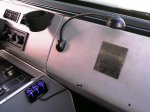
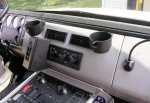
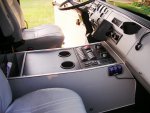
The beast is back from the shop, and it stops perfectly. I decided to finally change some things in the cab to make it more me-friendly (one of the advantages of a project like this-). I decided to make a new cover for the console that didn't have any holes in it so hardware or tools couldn't fall down into the works and cause panic and excitement, and some drinkholders to the panel as well - if you ever add drinkholders to a panel that's over electrical stuff, be sure to plug any drinkholder drain ports with some silicone caulk.... Some 1/2" MDO (medium density overlay) plywood with a coat of black semi-gloss worked fine - I'll add some black Formica when I track down some pieces that are hiding in my shop. I also added a couple of 12 volt outlets to the ambulance panel, and relocated another 3x outlet to the passenger's side so a rider can more easily plug in cell phone, laptop, NOOK battery charger, whatever. And just to remind folks that this is an ambulance, I also added a map light to the front of the cover for the blower / Wabco ABS system controller.

DSCN4507.jpg
The dash with the center cover removed. The air conditioner never blew very hard through the center ports, and when I opened it up, I found that the urethane foam collar that seals the outlet to the duct had come unglued, and the AC wasn't fully feeding the outlets. Some 3M adhesive, and the problem is now fixed.

DSCN4511.JPG
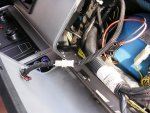
Installing the map light required that I connect the stub from the map light to a supply - I used some pigtail crimps plus a tie wrap through a #10 terminal to clamp the connections.

DSCN4509.jpg
Knowing that the panel will be removed from time to time, I decided to add a connector to the map light wiring. I tossed around several ideas, and then remember that I had some miscellaneous Whelen connectors from a lightbar. They did the job perfectly.

DSCN4506.JPG
The finished map light.

DSCN4512.jpg
The dashboard, complete with a second drink holder for the driver - if you buy the bare drinkholder from Freightliner for your own project ($11 versus $38 for the whole kit (drinkholder plus 2 screws & instructions)), the correct screws are #10 sheet metal screws, 5/8" long (I used 3/4", with the tip removed with a grinder)

DSCN4505.jpg
The finished job

Next on the list will be new cab seats. They were a compromise - the seats I wanted to use are designed for full sized semis, and wouldn't fit into the cab without my sitting to the side of the steering wheel instead on on the wheel's center. I also could have had a great deal on some new seats that were take-outs from a new truck order, but they were so high that they'd hit the ceiling of the cab. So, I went to plan B (or maybe C), and ordered new top of the line seats from Seats, Inc through my local distributor (Freightliner). These don't have to meet ambulance standards to be vinyl covered for cleanability, so I went with heavy duty cloth. They also have 15-year newer foam filling, so the end result should be comfortable. The driver's seat position is correct, but the passenger's seat is offset to the outside since it doesn't have a folding seat armrest so the attendant can more easily jump out the door at an accident - he has to settle for the armrest that's part of the door. I took a look, and there are two sets of seat base mounting holes in the truck, plus the seat base can also be adjusted side to side, so the installation can be adjusted fairly easily.
 
Last edited:

spencyg

This Space For Rent
Could you throw a tape measure on that fuel door for me? It looks like a potentially good solution for my water fill as well....

Loving the build so far.

SG
 

rlrenz

Explorer
Could you throw a tape measure on that fuel door for me? It looks like a potentially good solution for my water fill as well....

Loving the build so far.

SG

I just checked the fuel filler - it measures 8 1/4" wide, 7 1/4" high on the outside. The door measures 7 1/2" x 6 1/2". The hole for the filler pipe measures 2 1/2" diameter. The back is angled at about 40 degrees to the front face, and the depth from the mounting surface is 4 1/2".

I'm planning on installing the fuel filler on one of the compartment access doors in the ambulance, with it butting up to a hard mounted water filler. I'll add a drip-snoot to the filler so any overflows will drain outside the cabinet.

Do an EBAY search for "American LaFrance parts" - I've seen listings for more of these, probably from the same seller.

I'm going to mount mine on a rubber gasket.
 
Last edited:

rlrenz

Explorer
I've been looking at some of the stainless machine screws that hold the inner panels to the compartment and entry doors. Some of them can be pulled out with finger effort. The cause is a mixture of some aluminum corrosion along the threads, plus the screws are self-tapping machine screws. The cure will probably be through four different methods:
1. Helicoil thread inserts. Since these are going into 1/8" aluminum, I'll leave them a little high, then trim with an air grinder so I have the most thread I can get
2. Press-nuts (also called clinch-nuts). These will be used in places where the threads are so worn that a Heli-coil won't work. I have a squeeze riveter that I used on aircraft rivets that should work fine for pressing them into place.
3. Riv-nuts. I have riv-nuts from 8-32 up to 3/8" in my stock, and they should be able to handle anything that I have left, including the oversized holes from a ham-handed chimpanzee who used a #12 or 14 sheet metal screw on the side door.
4. Riveted reinforcement. If all else fails, I'll install a 3/4 x 1 x 1/8" piece of aluminum with a Heli-coil insert behind the mangled hole. I'll probably use 1/8" aircraft rivets set with my squeeze-riveter.
 

spencyg

This Space For Rent
I just checked the fuel filler - it measures 8 1/4" wide, 7 1/4" high on the outside. The door measures 7 1/2" x 6 1/2". The hole for the filler pipe measures 2 1/2" diameter. The back is angled at about 40 degrees to the front face, and the depth from the mounting surface is 4 1/2".

I'm planning on installing the fuel filler on one of the compartment access doors in the ambulance, with it butting up to a hard mounted water filler. I'll add a drip-snoot to the filler so any overflows will drain outside the cabinet.

Do an EBAY search for "American LaFrance parts" - I've seen listings for more of these, probably from the same seller.

I'm going to mount mine on a rubber gasket.

Thanks a bunch.

SG
 

Ozrockrat

Expedition Leader
Thanks for the tip on the cup holders. Saved me a few bucks. Also finding out one set of interior light is switched by the back door saved me some investigation time. Keep up the good work :)
 

rlrenz

Explorer
Today I learned that Medic Master often used Weldon for their lights. Weldon is part of the Akron Brass Company. Do a Google search for Weldon if you are looking for plug & play replacements for a Medic Master ambulance. I also saw that their catalog shows a digital package that looks a lot like what Medic Master used just before they were closed by LaFrance, so there might be some commonality in spare parts. The prices will probably be painful, though.

MNtal asked me if I'd like a hand installing my new seats - the answer was YES - primarily since seats are bulky, heavy, and cumbersome. Plus we have all tried to turn a nut in a location where we can either see the bolt, or see the nut - never both at the same time. It should be quite a change -- from 15 year old upholstery and tired foam to new state of the art seats. Anyone want some used Bostrom 910 seats? They'll probably wind up on Craig's List.

One GOTTCHA about ambulances is that the seat position is closer to the door for the passenger's seat. There isn't an armrest on the seat so the attendant can jump out faster, so they place the seat closer to the door so the door arm rest can fill in. It looks like the correct holes for the seat base are there, though, so I should be able to move the seat back closer to the center and have room for the armrest.
 

rlrenz

Explorer
Thanks for the tip on the cup holders. Saved me a few bucks. Also finding out one set of interior light is switched by the back door saved me some investigation time. Keep up the good work :)

If you want to install cupholders in the cover of a console, www.fixmyambulance.com has the ones I used - part number THM-LCH-1-DP, or search for "cup holder". They are 3 3/4" OD and need a 3 5/8" hole, which is a standard size for a hole saw (probably to clear a 3" ID pipe?). Remember to put a blob of silicone caulk in the bottom to prevent flooding the electrical equipment!

The cost is a whopping $ 3.00 each.

I went nuts trying to figure out why one row of module lights always was on, then MNtal suggested closing the side door. Problem solved, plus I was able to watch the LEDs on the load management panel and see which relay was doing things. Once I knew what was going on, it became a non-problem. Happy ending.
 

rlrenz

Explorer
If you ever want to buy a Freightliner ambulance (who wouldn't??), remove the two Dzus screws holding the cover on the fuse holder (right in front of the passenger's feet) - a lot of vehicle data is on a label on the inside of the cover:

DSCN4496.JPG
 

rlrenz

Explorer
Last week, I was ready to install the new seats I had ordered through Freightliner. The seats, made by SEATS, INC, were recommended as the upgrade to standard seats. We measured multiple times, and Freightliner even touched base with SEATS, INC to verify that they were the right seats. The measurements all agreed that they would fit.

You know where this is going, don't you...

Since I wanted a passenger's seat with armrests on both sides instead of the ambulance-normal inner armrest only, I had to move the seat in 3 inches, plus the seats were a little wider, so I added another inch. I made offset mounting brackets that would be bolted to the seat base and the floor that would give me the offset. Material was 1/4" x 1 1/2" steel flat stock, with 5/16 x 3/4" flat head Allen head bolts that fastened the adapters to the seat base, and metric 8 x 30 MM hex heads to fasten the adapters to the floor using the original weld-nuts. The driver's seat already had two armrests, so an adapter was only needed to accommodate the increased width of the SEATS, INC seat.

MNtal stopped by Thursday evening, and we dug into the project. The seats were quickly set on the relocated bases, and bolted down. We connected the air, and sat in them, and then found that the seats physically fit, except the new air ride bases on the seats were 2" higher than the old Bostrom's had been, plus the seats themselves were thicker. With no air to the seats, my head was 2" from the cab roof. My wife tried the passenger's seat, and her feet were 4" above the floor.

We thought about switching the Bostrom and the SEATS, INC air ride bases, which would give us about 1 3/4" more headroom. The we thought about slicing and dicing the Freightliner seat mounting base, which would give about 1 1/2" more head room (but still leave my wife's feet dangling - maybe a foot rest or a hassock?). At that point, about 1200 or so as I dimly recall, we gave up for the night. I turned in planning to pick up some steel on Friday so I could weld up adapters -- both for modifying the existing Freightliner base, and to make the adapters to adapt the two air ride bases.

On Friday morning, I recognized that my unconscious brain was smarter than my conscious brain, and I realized that the best and simplest solution was to install an upgraded Bostrom seat instead of trying a different brand. I presently have a Bostrom Talladega 910 seat, and it looks like the Talladega 915 would be a good replacement.

So that's now my plan of attack. Maybe next spring - I'm old enough that I'm still creakin' and squeakin' from the Seat-Stuffin experiment.
 
Last edited:

Forum statistics

Threads
187,885
Messages
2,899,585
Members
229,073
Latest member
fireofficer001
Top