You are using an out of date browser. It may not display this or other websites correctly.
You should upgrade or use an alternative browser.
You should upgrade or use an alternative browser.
Buying & Building a Medium Ambulance into an RV – The FAM-BULANCE
- Thread starter rlrenz
- Start date
rlrenz
Explorer
Well, the search for the optimal counter top still continues.
During this search, I have thought about using Corian (or equivalent), butcher block, granite, molded granite lookalikes (Silestone, etc), stainless steel, and Formica or equal.
Granite was only briefly considered - I wasn't sure how the vibration would affect it, plus it gets very heavy, very fast.
Corian and the molded granite lookalikes both have the same problem - they are WAY too expensive. After I was quoted $900 for a commercially fabricated Corian countertop, I thought about buying a remnant, and doing it myself. Unfortunately, the prices for a remnant are the same per square foot as the cost for a full sheet of Corian, plus the required adhesive would cost nearly $100 for 2 tubes, and shipping would run about a dollar per pound.
Butcher block is still possible since I can easily cut and modify it. Since this will have a sink installed, I'm concerned about water absorption. I'm also concerned about how it will do with expansion/contraction through the seasons.
Stainless steel is kind of the fall-back / default counter top material. I KNOW it will work, and that weather changes won't affect it - but - it's about as warm and "comfortable" as a slab of stainless steel. The posting I did a while ago showed a nice option that I could adapt: stainless for the countertop with a stainless backsplash, and Formica for the vertical surfaces. I would modify the photo's installation by trimming the 1" high edges to about 1/4". It would be very workable, plus fairly reasonable - the piece looks like it will cost $66, plus one case of beer for a friend to bend it. It will also be the fastest to fabricate and install.
Formica is also being considered. It's easy to fabricate, and "butcher block" can be achieved very easily. The cost would be about the same as for stainless. The big drawback (for me) with Formica is selecting the pattern - hundreds to choose from.
So, right now, the probable winner will be either stainless steel, or Formica.
The winner will be announced at a later date...
rlrenz
Explorer
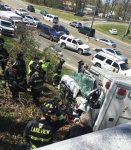
Anyone who's worked with ambulances knows that the module (the ambulance portion) is built like a brick phone booth, but this became very apparent after Wednesday's New York state accident involving a Type-3 ambulance, and a bridge abutment (my thanks to patoz for this info)
Note that the cab is gone, while the module is intact, and the end doors and side door were able to be opened.
The accident killed the patient, and the attendant broke his leg. The driver was killed instantly. I imagine the engine is in the front of the module or maybe it went back and down under, but it's sure not where it's supposed to be.
They were on a routine transfer and traveling with no lights or siren. The ambulance left the road for some unknown reason and struck the overpass wall. Judging by the front end damage, I'm guessing speed was a lot faster than it should have been.
I ran the math, and assuming that the front crumpled about 40", the impact would have resulted in approximately 98 G's at 70 MPH, and 120 G's if the vehicle had been traveling at 85 MPH


patoz
Expedition Leader
rossvtaylor
Adventurer
This alone is worth the price of admission to Expedition Portal. Thanks!!
(well, this looks stupid I know... I hit reply in response to an early post about removing a panel near the passenger's feet, to find the Freightliner info label. That's what I was referring to!)
(well, this looks stupid I know... I hit reply in response to an early post about removing a panel near the passenger's feet, to find the Freightliner info label. That's what I was referring to!)
rlrenz
Explorer
Today was a nice day - other than the haze from the Canadian forest fires. Warm and sunny, though, and I was able to take advantage of my wife & daughter's flower planting frenzy to do some exploratory surgery on the buggy. I decided to remove some of the warning and scene lights on the passenger's side to see what was going on, particularly since more wiring would be added for the refrigerator and the heater (both have to be permanently installed to qualify for a MN RV license plate).
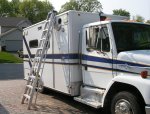
My 10 ft stepladder is just tall enough
Visibility was less than perfect - the housing for the old (and removed) IV bag heater obscructed part of the view, with the reflective insulation also hampering things.
Murphy's Law being what it is, arthritis can rear it's ugly head when there's some ladder work, and it did. My productivity was far from optimal, but I got the scene light and the warning light removed - both were Whelen 97 series. The lights were equipped with 3-conductor plugs so a fixture could be used for both backup & warning, or stop & turn signal. Thankfully, mine were just straight 50 watt bulbs, and will probably be a wee bit cheaper than a dual element bulb.
My ceiling insulation is 2" thick foam chunks, wedged in place. Some of them vibrated loose in the last 15 years or so, so I'll probably wind up using some sort of a 3M contact adhesive to stick them back in place.
My light fixtures were held in with different types of screws - the scene lights were held in with self tapping 10-32 machine screws, while the warning lights were held in with #10 x 1" sheet metal screws. The sheet metal screws are Whelen's suggested installation, but I don't care for them, so I ran a 10-32 tap through the holes and used 10-32 x 1" phillips pan head stainless screws. I added a drop of medium Loctite as well since these would probably vibrate loose otherwise. NOTE: all of the 10-32 screws I've found have a coating of Loctite on them.
And just to keep Murphy happy, one of the existing 10-32 tapped holes was stripped out. I could have added a nut by reaching through the other light cutout, but instead, I drilled out the hole to 1/4" and used an aircraft rivet-squeezer to press in a 10-32 press-nut (AKA: clinch nut).
So, a mere 3 hours later, I buttoned things up - tomorrow, I'll do the same to the driver's side. Since the driver's side doesn't have the IV bag heater compartment, I should be able to see what I have to work with a lot more easily.
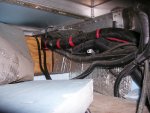
The right front corner - note the ceiling insulation pieces. The red tape on the convoluted tubing indicates that it's source is the driver's console.
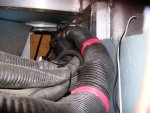
Another view - note the corner of the IV bag heater.
10-32 press nut
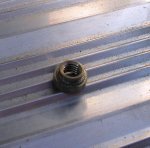
Rivet squeezer - using flat upper and lower dies it does a great job on press nuts.

My 10 ft stepladder is just tall enough

Visibility was less than perfect - the housing for the old (and removed) IV bag heater obscructed part of the view, with the reflective insulation also hampering things.
Murphy's Law being what it is, arthritis can rear it's ugly head when there's some ladder work, and it did. My productivity was far from optimal, but I got the scene light and the warning light removed - both were Whelen 97 series. The lights were equipped with 3-conductor plugs so a fixture could be used for both backup & warning, or stop & turn signal. Thankfully, mine were just straight 50 watt bulbs, and will probably be a wee bit cheaper than a dual element bulb.
My ceiling insulation is 2" thick foam chunks, wedged in place. Some of them vibrated loose in the last 15 years or so, so I'll probably wind up using some sort of a 3M contact adhesive to stick them back in place.
My light fixtures were held in with different types of screws - the scene lights were held in with self tapping 10-32 machine screws, while the warning lights were held in with #10 x 1" sheet metal screws. The sheet metal screws are Whelen's suggested installation, but I don't care for them, so I ran a 10-32 tap through the holes and used 10-32 x 1" phillips pan head stainless screws. I added a drop of medium Loctite as well since these would probably vibrate loose otherwise. NOTE: all of the 10-32 screws I've found have a coating of Loctite on them.
And just to keep Murphy happy, one of the existing 10-32 tapped holes was stripped out. I could have added a nut by reaching through the other light cutout, but instead, I drilled out the hole to 1/4" and used an aircraft rivet-squeezer to press in a 10-32 press-nut (AKA: clinch nut).
So, a mere 3 hours later, I buttoned things up - tomorrow, I'll do the same to the driver's side. Since the driver's side doesn't have the IV bag heater compartment, I should be able to see what I have to work with a lot more easily.
The right front corner - note the ceiling insulation pieces. The red tape on the convoluted tubing indicates that it's source is the driver's console.

Another view - note the corner of the IV bag heater.

10-32 press nut

Rivet squeezer - using flat upper and lower dies it does a great job on press nuts.
rlrenz
Explorer
This alone is worth the price of admission to Expedition Portal. Thanks!!
(well, this looks stupid I know... I hit reply in response to an early post about removing a panel near the passenger's feet, to find the Freightliner info label. That's what I was referring to!)
The panel by the passenger's feet covers the fuse panel. Mighty confusing - I've looked in my Freightliner Medium Class shop manuals to see what's what, and the layout doesn't really match any of the various options they show. I'm going to wind up copying the closest I can find in the books, and then use a flashlight and a magnifying glass to see if I can ID any more.
There's a label on the inside of the panel's cover that lists some of the basic vehicle data - but it's not the only location - check the driver's door jamb and the ambulance ID plate for even more data.
rlrenz
Explorer
Pat, this space is right above the passenger's front cabinet (#5), and the space is open for wiring, heating/air conditioning hoses, ventilation hoses, and Whelen fixtures. I have a similar space over cabinet #1 (behind the driver) that is used for the power cables (both 12 volt and 120 volt), Oxygen lines, suction lines, and Whelen fixtures
rlrenz
Explorer
When MNtal decided to install larger wheels and tires on his FL-50 Horton ambulance, he had leftover wheels and tires. We did some trading, and I wound up with four Alcoa 19.5" aluminum wheels, and one good tire on a steel rim for a spare. They need polishing, but with an outside quote of $60 to polish each of them, I'm going to follow Patoz's suggestion, and do it myself. I have the buffers, so all I need is a can of polish, and maybe a day of time.
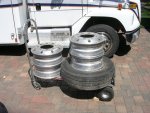
I still have to figure out installation and the trim pieces/hubcaps, but the end result will let me get rid of my stainless steel wheel covers.

I still have to figure out installation and the trim pieces/hubcaps, but the end result will let me get rid of my stainless steel wheel covers.
patoz
Expedition Leader
And don't forget the 'elbow grease'! Get lots of that to go with the Mothers Mag & Aluminum Polish.
I wish I could find two of those aluminum rims in 16" to fit mine.
I wish I could find two of those aluminum rims in 16" to fit mine.
patoz
Expedition Leader
No that won't work, besides I have a set of stainless covers, I just need to get that lug nut problem worked out. I have five new tires on steel rims (four on the dualies and one spare) so right now any wheel will work in any position, which is good for off-road situations. However, if I find a set of aluminum wheels I'll go that route and that will solve the lug nut problem, match my tow vehicle's wheels better, and look good too.
rlrenz
Explorer
Finally had a chance to get back to the buggy. The problem with living here in MN is that we tend to switch from winter to summer like mother nature flips a switch - the joke here is that spring was on Tuesday this year. This brief spring means that we go from inside projects to outside projects overnight, and hoses get brought out, the snowblower gets stored, shovels are tucked away, and lawn chairs emerge. End result, I've been a little busy.
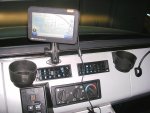
I finally had a chance today to work on a very back burner project. I bought a Rand McNally trucker's GPS for the trip from GEV in PHL back to MN, and it worked very well, but I didn't like the windshield suction cup mount. If the GPS was only supported by the suction cup, it vibrated so severely that it couldn't be read. If I let the lower edge rest on the dash panel, it was happy.
I had considered doing something with a Jotto mount, but they get real expensive very fast. Then I remembered RAM Mounts. For some peculiar reason, RAM makes mounts for every GPS in the world, except Rand McNally. Go figure.
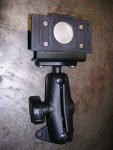
Some digging through my pile of aluminum found me the raw materials, and a trip to the milling machine took care of the rest. I cut the swivel mount from a spare Rand McNally mount, then used some 4-40 flat head machine screws to attach the GPS mounting portion to my structure. A couple of 10-32 screws installed the lower diamond mount onto the dash, and the job was complete.


Similar threads
- Replies
- 1
- Views
- 623
- Replies
- 0
- Views
- 302
- Replies
- 3
- Views
- 1K
- Replies
- 1
- Views
- 738

