You are using an out of date browser. It may not display this or other websites correctly.
You should upgrade or use an alternative browser.
You should upgrade or use an alternative browser.
Buying & Building a Medium Ambulance into an RV – The FAM-BULANCE
- Thread starter rlrenz
- Start date
rlrenz
Explorer
Thinking about it a bit, and you should be able to use the two condenser fans you picked up on EBAY as a load. The fans have a combined rated current of 17 amps and will give your IOTA a little load so you can then measure the input current. Running the math, a 17 amp load should result in a 120 volt input current of about 2.7 amps.
You can increase your meter's sensitivity by using a few added passes through the clamp meter's jaws: 2 passes should read 5.4 amps; 5 passes should read 13.5 amps. The actual current is obtained by dividing the reading by the number of passes the wire made through the jaws.
You can increase your meter's sensitivity by using a few added passes through the clamp meter's jaws: 2 passes should read 5.4 amps; 5 passes should read 13.5 amps. The actual current is obtained by dividing the reading by the number of passes the wire made through the jaws.
patoz
Expedition Leader
Thinking about it a bit, and you should be able to use the two condenser fans you picked up on EBAY as a load. The fans have a combined rated current of 17 amps and will give your IOTA a little load so you can then measure the input current. Running the math, a 17 amp load should result in a 120 volt input current of about 2.7 amps.
You can increase your meter's sensitivity by using a few added passes through the clamp meter's jaws: 2 passes should read 5.4 amps; 5 passes should read 13.5 amps. The actual current is obtained by dividing the reading by the number of passes the wire made through the jaws.
By this, do you mean making a 2, 3, or 5 loop coil and placing the notch over the same number of loops to obtain the reading?
rlrenz
Explorer
Today was a good day to chase some simple headaches, so I decided to check out my right side turn signals. The left worked fine, but the right tended to show a very dim telltale on the instrument cluster, so I walked in front to see if it was the telltale, or something else. It was something else....
The turn signal switch comes off the steering column with a couple of Torx head screws and a connector plug. I had it on the bench in a few moments. I opened 'er up, and figured out that a worn out switch was worn out, and it was time for a new switch. I knew Freightliner would have it, but with an estimated cost of about $140, I decided to check EBAY - I found one for $63 plus freight. It will be here later this week.

The turn signal switch comes off the steering column with a couple of Torx head screws and a connector plug. I had it on the bench in a few moments. I opened 'er up, and figured out that a worn out switch was worn out, and it was time for a new switch. I knew Freightliner would have it, but with an estimated cost of about $140, I decided to check EBAY - I found one for $63 plus freight. It will be here later this week.

rlrenz
Explorer
Not a lot happening on the ambulance project lately. I'm still digging through the garage sorting out a 30+ year collection of odds and ends. Some always winds up in the KEEP FOREVER collection, and some winds up in the NEVER TO BE USED collection - but it's the stuff in the middle that needs deciding.
I also figured it's about time to finally mount the truck's tires on the Alcoa aluminum rims I got from MNtal. Naturally, the $200 cost of mounting the tires on the four aluminum rims (the inner wheels will remain steel) is the end point - I need to also press in longer wheel studs due to the thicker aluminum hubs. I'm guessing about $100 per wheel, but Tune In Tomorrow! as they used to say on the old TV adventure serials (and yes, I"m dating myself...).
Then, I'll wind up as the proud owner of the take-off steel wheels, and those will go on Craig's List in search of a new home. By the way - does anyone want any stainless steel wheel simulators marked American LaFrance (19.5" wheels, 8 bolt)?
And once I get some other miscellaneous home-type projects completed, then I can start on installing the cooktop, the refrigerator, and the electric heater that will collectively let me qualify for an RV license plate.
rlrenz
Explorer
Well, I was close at my guesstimate of $100 per wheel for longer studs. Even aftermarket studs (made by Freightliner's supplier) were nearly $9 each (times 32 studs), plus 16 new nuts for the rear at $4.30, plus a shop supplies charge of $8, all totaled up to about $370, plus $75 per hour for 3 hours of labor. The end result was $600, but I have all new LONG studs so the tire chop can do their thing (quoted at $210 for the job, balance powder included).
And now, on to the tire shop!
And now, on to the tire shop!
rlrenz
Explorer
This shop is only 2 miles from me, but they're basically a small town kind of operation. They'll tackle about anything, and they tell me that thry like doing things to my ambu-buggy because its different than their usual jobs. Thankfully, they have an OTC wheel stud press.
I've reached the age when I admit there are things I just can't do anymore, and I have to find outside help - they have become some of that help. And they've found out that I will also stop off with some donuts when thry're doing work for me.
One hand washes the other -- or maybe one hand feeds the other?
rlrenz
Explorer
I recently got a chance to replace my Throttle Position Sensor (TPS). This is fastened to the side of the Williams WM540 Electronic Pedal Assembly, and tells the engine what the throttle position is. If it fails, you can idle just fine, and that's all.
Since mine probably was original to the 1999 build date of the truck, I decided to both replace it and pick up another as a spare that would be tucked into my toolbox. I ran into a GOTTCHA that made the task interesting, and worth passing on to to others with a Freightliner.
The TPS is mounted on the side of the pedal assembly, and replacement is a lot easier if the entire throttle assembly is removed for access..

The TPS mounts to the throttle pedal with two screws, while a rectangular tang slides into the throttle to operate the sensor. When you install one, you line up the tang, and slide the sensor into place - then you rotate - or try to rotate - it so you can install the screws.
Panic! It stops about 10 degrees from the needed position.
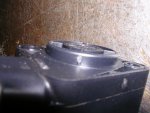
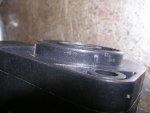
The GOTTCHA is that the throttle pedal assembly has a cylindrical bore that the sensor slides into. This bore has four small bumps (about 0.020") in the bore. The sensor has a cylindrical section that slides into the pedal assembly, and this section also has four bumps (again about 0.020"). When you try to turn the sensor to the correct position, the bumps strike each other, and you stop turning.
The trick is to keep turning until you can insert the screws. The bumps on the sensor deform, and keep the sensor aligned in the correct axis.
I verified this by looking closely (magnifier) at my removed sensor, and at both the new sensors. The old one's bumps were deformed, the new one's were not.
The end result is that the sensor works perfectly.
Old Sensor:

New Sensor:

Since mine probably was original to the 1999 build date of the truck, I decided to both replace it and pick up another as a spare that would be tucked into my toolbox. I ran into a GOTTCHA that made the task interesting, and worth passing on to to others with a Freightliner.
The TPS is mounted on the side of the pedal assembly, and replacement is a lot easier if the entire throttle assembly is removed for access..

The TPS mounts to the throttle pedal with two screws, while a rectangular tang slides into the throttle to operate the sensor. When you install one, you line up the tang, and slide the sensor into place - then you rotate - or try to rotate - it so you can install the screws.
Panic! It stops about 10 degrees from the needed position.
The GOTTCHA is that the throttle pedal assembly has a cylindrical bore that the sensor slides into. This bore has four small bumps (about 0.020") in the bore. The sensor has a cylindrical section that slides into the pedal assembly, and this section also has four bumps (again about 0.020"). When you try to turn the sensor to the correct position, the bumps strike each other, and you stop turning.
The trick is to keep turning until you can insert the screws. The bumps on the sensor deform, and keep the sensor aligned in the correct axis.
I verified this by looking closely (magnifier) at my removed sensor, and at both the new sensors. The old one's bumps were deformed, the new one's were not.
The end result is that the sensor works perfectly.
Old Sensor:

New Sensor:

rlrenz
Explorer
If anyone out there is looking for amber lenses for a Whelen 97 fixture, check out this EBAY listing -- $15/each:
http://www.ebay.com/itm/WHELEN-97-S...859711?hash=item1a314697ff:g:Q1QAAOSwFFZZd91a
http://www.ebay.com/itm/WHELEN-97-S...859711?hash=item1a314697ff:g:Q1QAAOSwFFZZd91a
rlrenz
Explorer
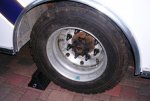
Today, I FINALLY got the Alcoa aluminum wheels switched for the steel wheels that she came with. MNtal traded me the Alcoa wheels after he went to larger wheels and tires on his ambulance, and they've been sitting waiting for the right opportunity. I had new wheel studs installed a few weeks ago, and today, I finally made it to Pomp's Tire Service. Pomp's is THE place in MSP to take your truck for tires, and they had me in and out in less than 2 hours. I may polish the wheels down the road, or not - but for now, they're mounted and checked off the list.
I'll add some baby moon hub caps & nut covers to the front after I trim about an inch off the studs, but I'm not sure what I want to do to the rears yet.


Not a biggie in the overall scheme of things, but one step forward!
I'll add some baby moon hub caps & nut covers to the front after I trim about an inch off the studs, but I'm not sure what I want to do to the rears yet.


Not a biggie in the overall scheme of things, but one step forward!
Similar threads
- Replies
- 1
- Views
- 616
- Replies
- 0
- Views
- 302
- Replies
- 3
- Views
- 1K
- Replies
- 1
- Views
- 733
