Buying & Building a Medium Ambulance into an RV – The FAM-BULANCE

Brewdiak

kodiak conversionator
I got one too - big sucker about 4' long but not super expensive. I hadn't thought about trying to do the math to figure out input:eek:utput with my cheater wrench. I know they suggest marking the lugs and corresponding mark on the wheel to match the torque up again ... but I bought all this stuff to swap my 22.5's for 20 super singles so it wouldn't have helped.

of course...i didn't have a 1" drive extension, or even a 3/4" to 1" adapter....so right now the lugs are just 'really tight' until I get those and can try to check it (still not sure how hard it will be to achieve 4-450 ft/lb even with a 4' TW)
 

rlrenz

Explorer
Mine only ran $225, so I figure it's cheap insurance. 3/4" drive with a 3/4" deep socket works perfectly, plus the wrench case even has enough room to store the socket as well.
 

rlrenz

Explorer
I finally changed my Avatar. I had been using a photo of a pizza I had in Rome -- the kind where you know the pepperoni didn't come from Hormel and the cheese wasn't Sargento. Best pizza I've ever had. I finally figured I should maybe use my buggy as an Avatar instead.....
 

rlrenz

Explorer
Maybe I'm nuts.... but I've decided to keep my external warning lights. I did a lot of searching, but finally tracked down amber LED warning lights with a clear lens. They won't show anything until I hit the switch, then I have Whelen 900 / Tecniq K90 LED warning lights. This makes the third switch on the lights -- the buggy came with clear lenses (plus a box full of take-off red & blue lenses), then I converted to amber lenses, and now "stealth" amber LED.
 

rlrenz

Explorer
Now that spring has sprung, and I've recovered from getting a new knee, I'm sorting out ambulance projects. My plan is to qualify for a MN RV license plate ASAP - every time I get new license tabs, it takes a bit of arm waving for the DMV to understand that I have a non-commercial, commercial truck. Plus, insurance is infinitely easier to track down with an RV. My regular carrier doesn't write commercial vehicle insurance, but they told me that as soon as I have an RV license plate, they can cover me.

In addition to installing an electric heater, propane cook top, and a refrigerator (all required for a MN RV plate), I also want to set up my 12 volt deep cycle battery system. After looking at batteries, prices, and my intended usage, I decided to go with a couple of Trojan T-125 batteries. Charging them will be through a Xantrex Echo-Charge unit (15 amps from the truck batteries when the truck batteries are charging), with a second Echo-Charge unit in parallel (switchable to either the Trojan batteries or the Onan generator battery). The system will also have it's own dedicated Iota 45 amp charger as well that can be used if the rig is sitting on shore power and the camping load exceeds the combined 30 amps from the Echo-Charge units.

A future solar charging system can also be easily added to the system as well.

And just to complicate it all a bit more, I decided to use marine battery switches to isolate the deep cycle batteries and the Onan battery for whatever reason. I also want to be able to combine the load side of these batteries so failure of a battery won't be a show-stopper.

There are two ways to set up a battery switch isolation/combiner system, and you need to be careful which you use. The first example lets you combine batteries:

As you can see, the battery switches in this layout disconnect the load, but allow combining batteries. Not a lot of value in this plan.
508325

The next layout allows for isolation of each battery, and also allows combining the loads. For instance, if the Onan starting battery fails, the top paralleling switch will let the deep cycle batteries start the Onan. This is the most logical approach to battery/load isolation in my application.

508326
 

rlrenz

Explorer
EUREKA! SUCCESS!

Last fall, just before winter landed with a vengeance, The Medic Master suddenly wouldn't start. I'm smart enough to know when to call for advice/help/assistance/rescue/prayers, so I called MNtal for advice/help/assistance/rescue/prayers. With the help of Google, a Cummins manual, and some of MNtal's phone-a-friends, we determined that the odds were that the fuel lift pump on the truck's 5.9 Cummins had failed.

That's when I learned that the lift pump is the most common cause of does-not-start on a 5.9 Cummins. NAPA had a Carter lift pump for a Dodge pick up with the same engine for only $135, but winter landed, and the project got shelved until spring.

Spring finally arrived, and I decided to play it safe and buy the authentic Cummins list pump (also made in China, just like the Carter pump). With a list of more than $400, and a Freightliner "fleet" discount of 15%, I picked one up, along with a dozen spare sealing washers for the banjo fittings on the fuel lines.

Murphy's law being in total control, several sealing washers were lost, never to be seen again. Not to worry - that's why I'd bought a dozen instead of the four I actually should have needed. MNtal did the work since he fit under the truck a LOT better than I did, and I chased down tools, rags, and the rest of the required components.

And Murphy retaliated by requiring that the entire fuel system be purged and primed before he would let the truck start. Eventually, the system was filled, and the truck started. A test drive showed the vehicle to have more pep than I ever remembered it having, so the old pump may have been marginal from the day I bought the truck.

The truck is now happy, the garage floor has been washed with mineral spirits, tools have been cleaned, and life is good.

And my thanks to MNtal once again!

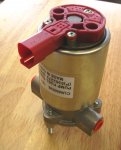
The new pump
514212

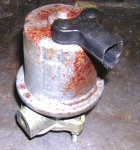
The old pump
514213

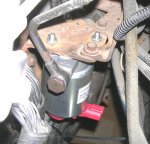
Installed
514214
 

Ozrockrat

Expedition Leader
Not only is fuel pump failure a know issue it can also result in injection pump failure. A good preventative measure is to put either a low pressure switch/alarm or a pressure gauge on the output of the lift pump. 5 psi is the minimum you ever want to see or prepare yourself for the $1700 refurbished injection pump bill.
 

rlrenz

Explorer
That's another reason why I went with a Cummins pump versus a clone. Even both the Cummins and the clone were made in China, I figure Cummins might have tighter quality control. The pump that was removed looked like the Cummins we installed, and it had been installed a long time.

A gauge or a low pressure warning light sound like good ideas-- I'm leaning toward the gauge, but a low pressure indicator light would also work - it might even be feasible to include it with the rest of the dash indicators.
 

patoz

Expedition Leader
Bob, looking at the pictures and seeing how tight that is, I imagine it was a real pain to install that pump.
 

rlrenz

Explorer
Not easy access, but probably about normal for a diesel. Probably also better than the same engine in a pickup.

I'm going to order a set of fuel filters as on-board spares. I have some gasketed marine boxes that shoukd keep them clean and dry, and since I have them on-board, I shouldn't need them (Murphy's law) as emergency parts.

As part of the project, I bought new jackstands. I hate wobbly jackstands, so I had been using 2x8x16" blocking until I could find really solid stands. I lucked out and found a pair of Owatonna Tool Company 22 ton stands at a supplier I buy from. He'd ordered them in for a customer who never came back for them, and he was tired of tripping over them, so I was able to pick up a pair for $125. Overkill? Yup. Worth it to me? Yup.
 

rlrenz

Explorer
I think I'm going to install a pressure switch and gauge. The pressure switch will trigger a dash panel indicator light, so one way or another, I should be able to find out if I have a problem.

After taking a close look at the old pump, I kinda wonder if it wasn't the original pump -- when I bought the ambulance, it only had 52,000 miles on the clock. My failure was actually pretty fortunate - it failed in my garage instead of somewhere out on the prairie. Maybe Murphy doesn't really hate me too much?
 

rlrenz

Explorer
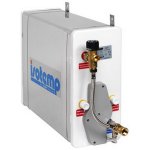
Lets face it -- ANY ambulance is gonna be smaller than we need when we're outfitting it (but larger than we want when we're parking it...). I had picked up an Isotemp 4.2 gallon marine water heater a few years ago for the buggy's water system. Retailing at nearly $1000, I got it for less than $200 because it was an oddball - it didn't have a built in engine heat exchanger, but only had the 120 volt electric heater. Because it was rectangular, I figured it would be easy to fit in -- someplace....

515608

Now, a few years later, as space is filling up, I figured that there was no place to mount a wall mounted heater, other than in Compartment 1 (directly behind the driver's seat). Compartment 1 is rapidly filling up, with the fresh and waste water tanks on the floor, and the deep cycle batteries on top of the water tanks. The top of the compartment is where the battery chargers, the AC control module, and a lot of other electrical equipment has been installed.

Thinking about it, I wasn't very happy with the idea of a wall mounted water heater next to the electrical equipment. I was prowling through a listing of surplus railroad equipment (long story - don't ask...), when I saw some Amtrak-surplus point-of-use water heaters. A point-of-use heater is installed under a sink, and provides enough hot water for a few hand washings before it runs out. They typically reheat in a few minutes. Since they store hot water, there's no delay or minimum flow like there is with an "instantaneous" water heater, plus their power load is a lot lower.

I bought one for only $75 plus postage.

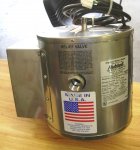
515610

The heaters were made by the Hubbell Water Heater Company, and were all stainless steel. 1 gallon capacity with a 1200 watt heater meant a reheat time to 140F of less than 10 minutes. The heater measured only about 9" diameter x 9" high (12" to accommodate the intake/discharge piping). I can stuff this in the same compartment my Onan generator is going into.

One think to remember about ANY electric water heater installed in an RV or marine application where the water supply is limited is that the heater's element MUST be in water, or the heater element will overheat and fail very quickly. An installation like the following will always keep water in the heater. Winterizing will require a drain valve in the supply drop leg.

I'm also going to use a plug on the heater's supply cord instead of hard wiring it. That way, when I drain the system, I can pull the plug as well - just in case...

515611
 

patoz

Expedition Leader
Bob, that's a nice looking little unit. Since you're not going to have a shower of any kind, it should work just fine for you.
 

rlrenz

Explorer
In order to carry propane on board, as per the requirements of the NFPA (National Fire Protection Association) for recreational vehicles, the selected compartment has to have ventilation from the top and the bottom. I'm planning to use the standard Perko marine vent for the upper vent, but I need the same 3" diameter screened collar that Medic Master used for the 3" hole on the door's inside cover. Ventmasters (www.ventmastersstore.com) has them for $2.26, so my search has ended.

Since the on-board propane bottles will be stored adjacent to the Onan generator, the air intake for the Onan will handle the required lower vent for propane storage.

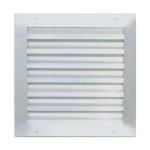
The louver I'm using is as rugged as I could find without going for something rated for prisons, but with a 35% open area, the Onan will require at least 120 square inches of louver area. It's welded construction with an internal insect screen, so it should hold up well.

517246
 

Forum statistics

Threads
188,039
Messages
2,901,524
Members
229,352
Latest member
Baartmanusa
Top