Canadian Disco 2 Build

michaelgroves

Explorer
Good to see it's going well, Rob!

FYI, Ashcroft make a "new" and improved underdrive with a 2.69:1 reduction. As far as I know, it fits to any ratio LT230. I had one fitted to our 6x6 Defender, and it was invaluable. Mainly, as you point out, for extreme low speed/control. My T-case was the 1.6, so high range was low to start with. This meant that high-crawler was usefully lower than low-stock. I would guess with your 1.2 T-case, you will find them about the same. Low-crawler is a bit insane, but really nice for manoeuvring. Also, my truck was heavy enough to need the low gearing for extra torque.

Price per his website is £1500. Then you need the linkages. (I had OBA for a whole lot of reasons, so I just used a 12V air actuator, which I think is much better in just about every respect).

I am watching your thread with interest - I think you'll be very happy with the manual box when it's done! (With my recent DII acquisition, I am finding the auto box with the TD5 hard to live with, but for no solid reasons I can identify).
 

R_Lefebvre

Expedition Leader
Big day today.

I started out getting the vent system sorted out. I used new 1/4" OD nylon industrial air hose, and connected it to the LR banjo bolts. I used industrial quick connects to Y them all together. I'll run a line to airbox and bring it inside with a bulkhead connector.

IMG_6131.jpg


I also drilled and tapped the top of the bellhousing for 1/8" NPT and installed a quick connector there as well. This will be to vent it when the wading plug is installed, and also potentially serve to pressurize it in the future. I also drilled and tapped for a 1/4" NPT thread on the bottom for a weep hole/wading plug, and filled in the existing cast hole with RTV.

IMG_6132.jpg


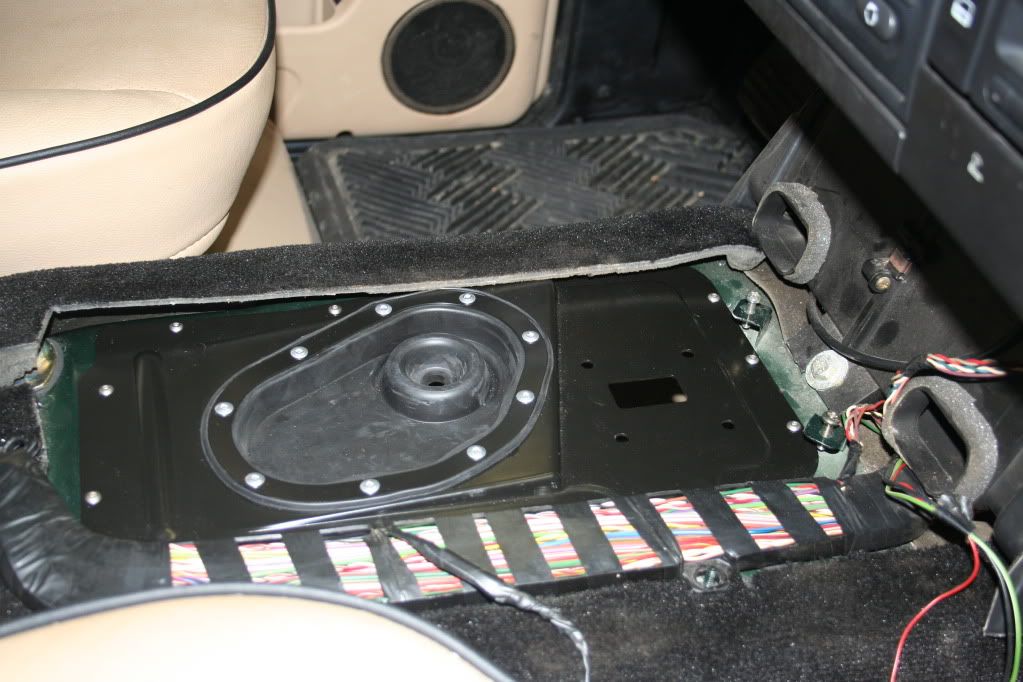
I installed the riv-nuts into the transmission tunnel. I will install the plate from the top, rather than the bottom. This seems like a more logical way to mount the plate, and allows removal to access the top of the trans from inside the truck.

IMG_6137.jpg


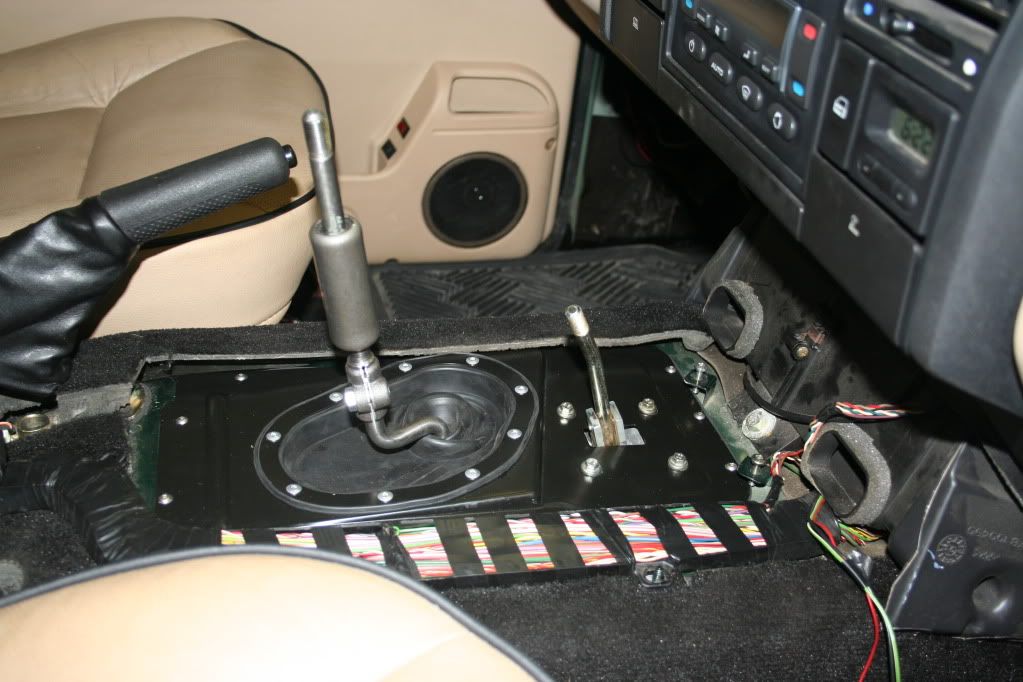
I temporarily installed the OEM R380 tunnel plate with the rubber gaiter. This fits perfectly.

IMG_6135.jpg


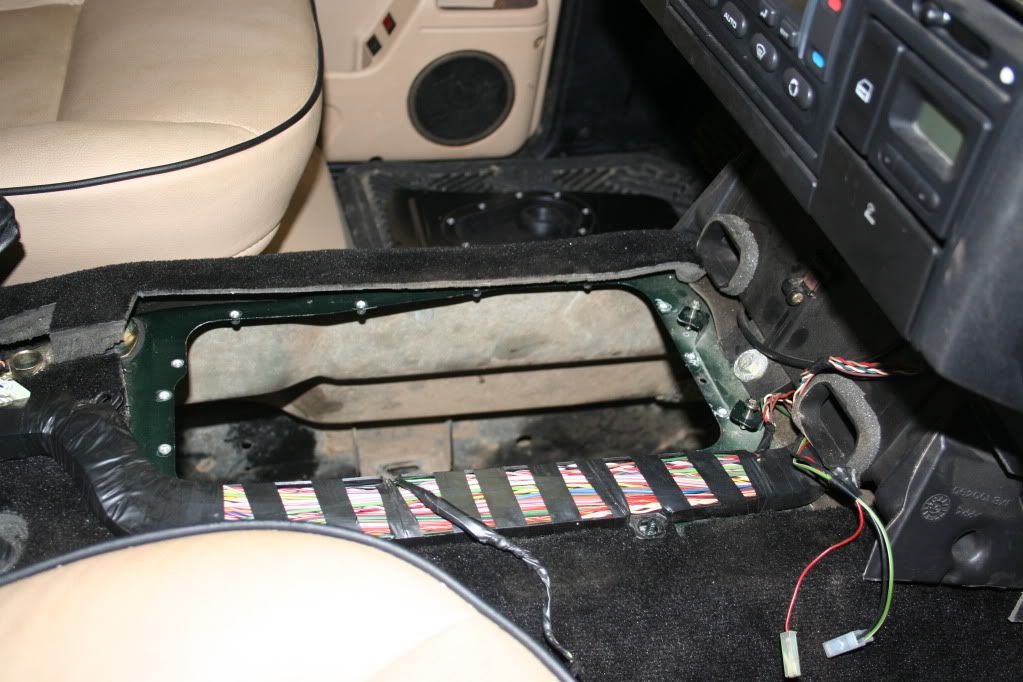
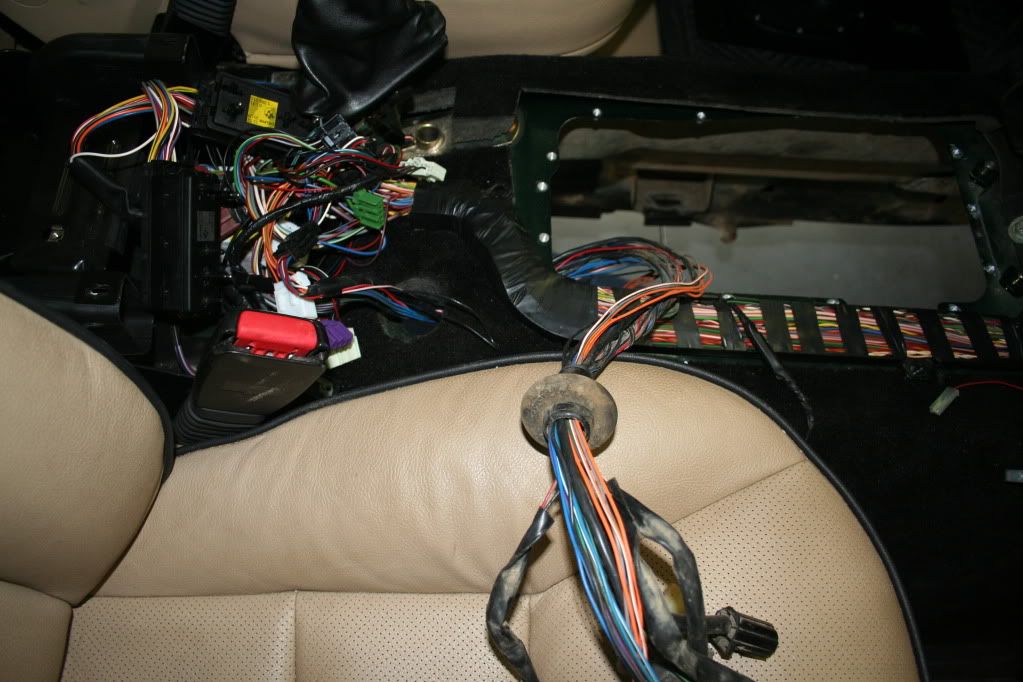
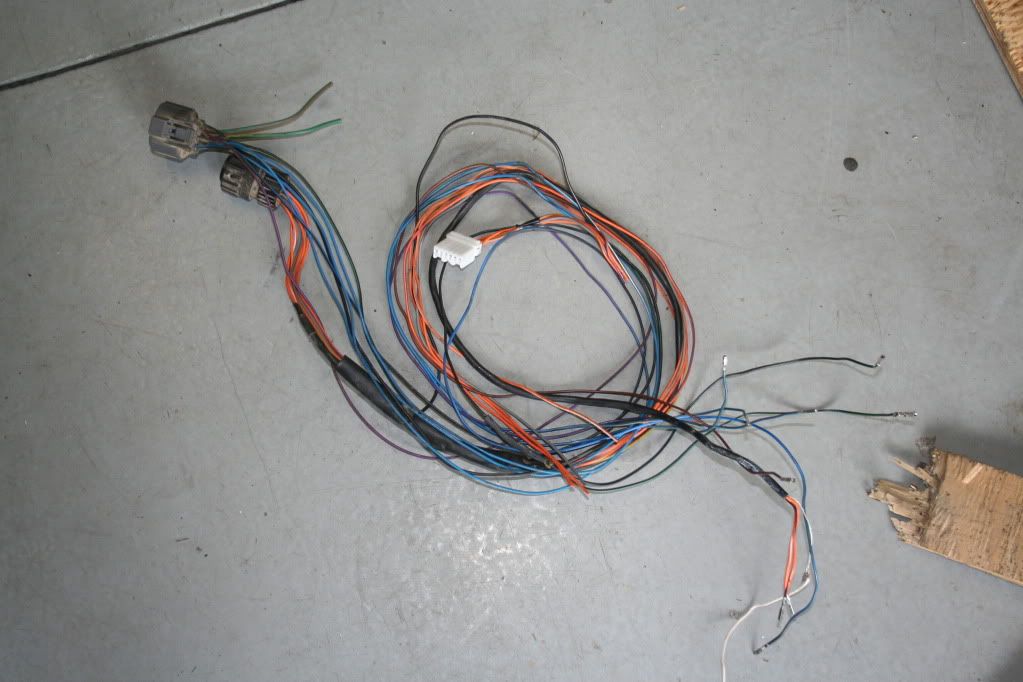
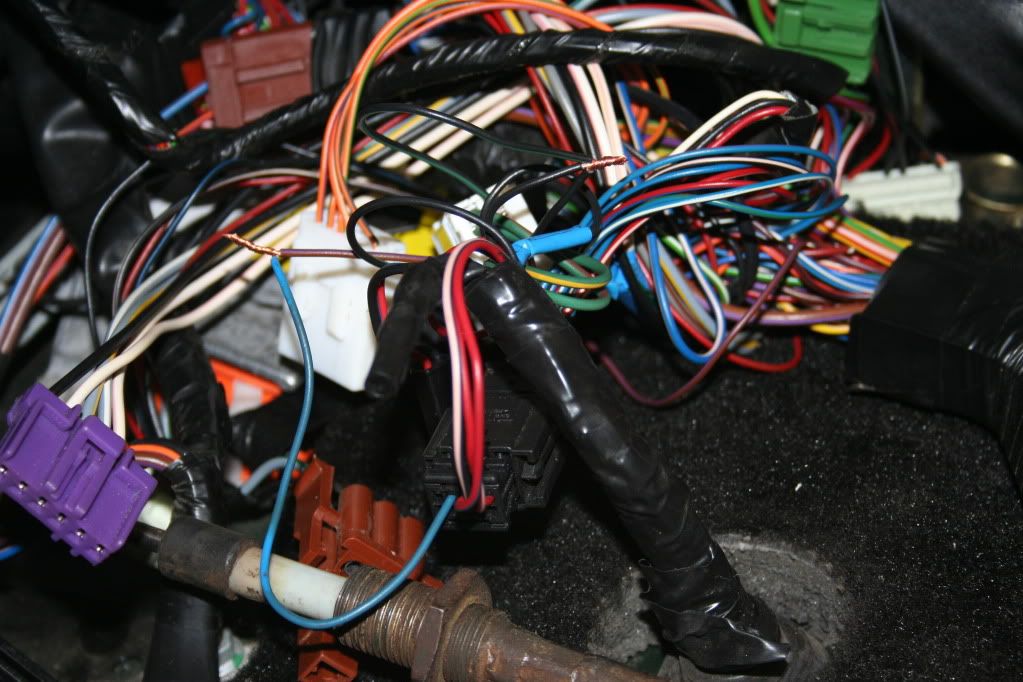
Next I tackled the wiring. I removed all the the OEM tape and sleeve and started pruning out all the ZF stuff. Basically everything had to go except the reverse switch wires, which ends up being used with the R380. I chose to remove the pins from the connectors inside the truck, rather than just cutting wires. Just because, you never know.

IMG_6141.jpg


Here you can see where I cut the Green-Yellow and Green-Brown wires closest to the transmission end. This leaves plenty of wire to hook up the R380 reverse switch.

IMG_6144.jpg


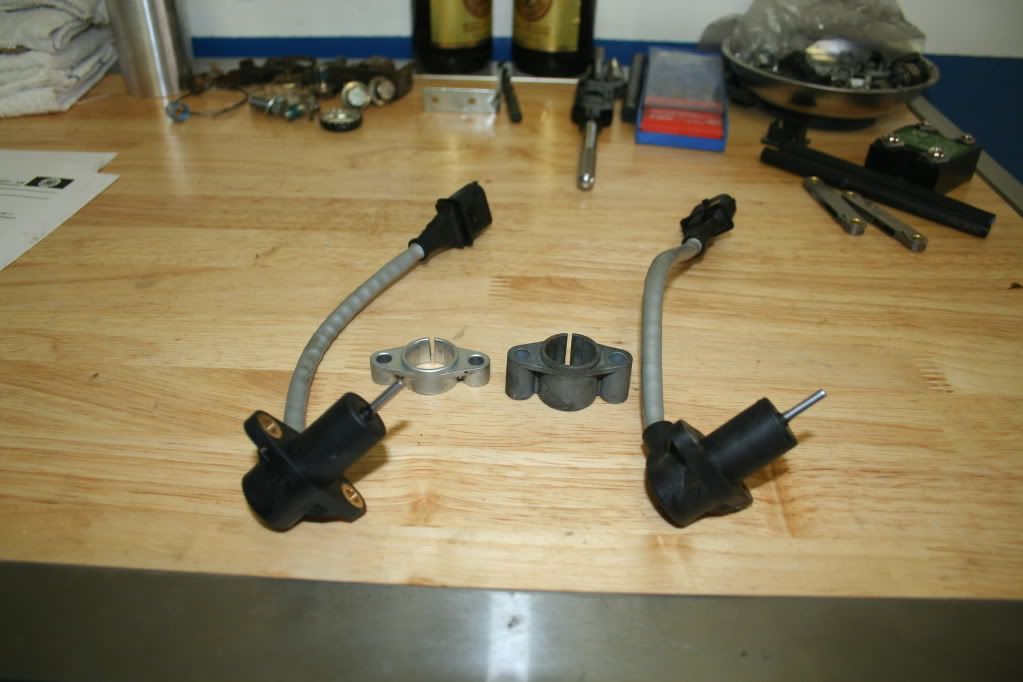
Here's a photo comparing the two crank position sensors. They seem identical, except for the included cast spacer. They have different part numbers. I'm not quite sure what's the deal here, I may carry the old one as a spare, just in case.

IMG_6147.jpg


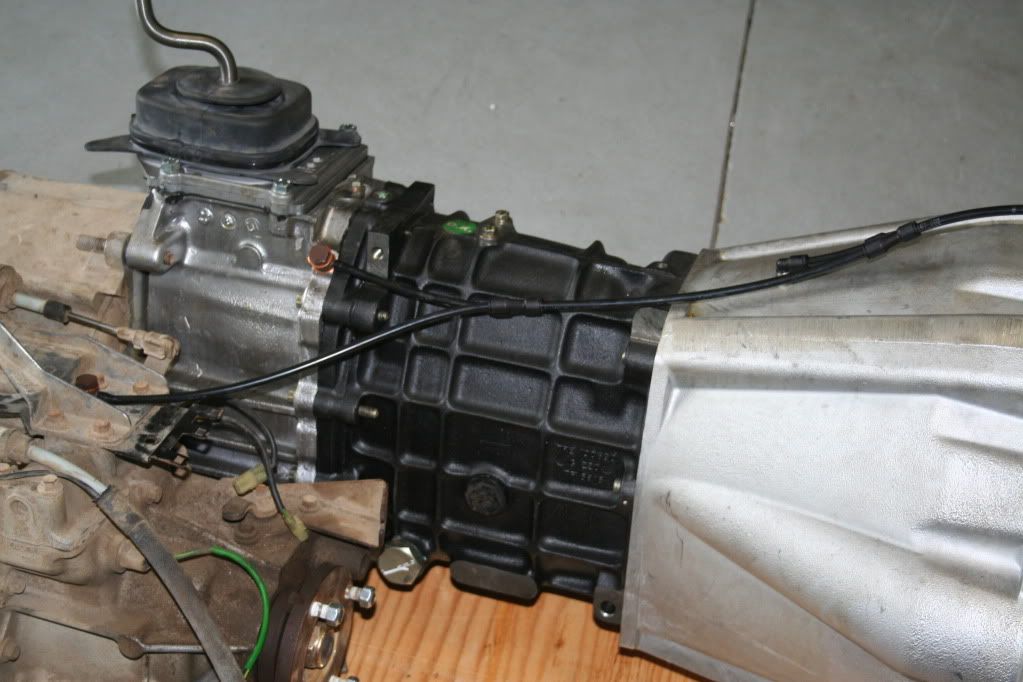
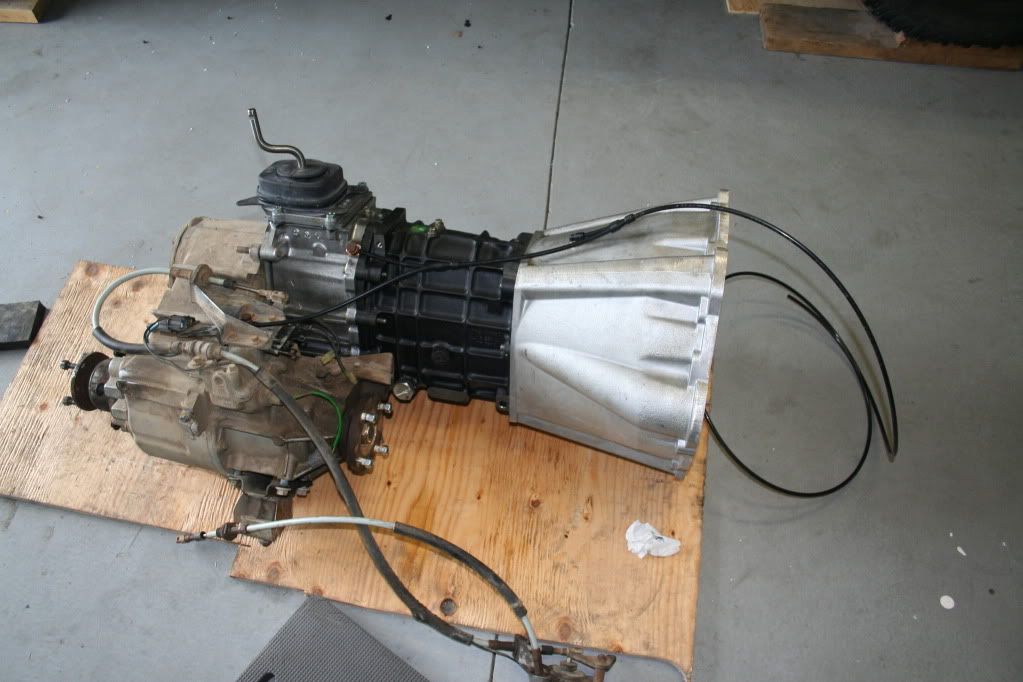
Lastly, I got the transmission mounted up. This was a PITA. I had to lift the truck to slide the trans under the truck on the floor. Then lift it high enough to get the trans onto the trans jack. But, eventually I got it done.

IMG_6150.jpg


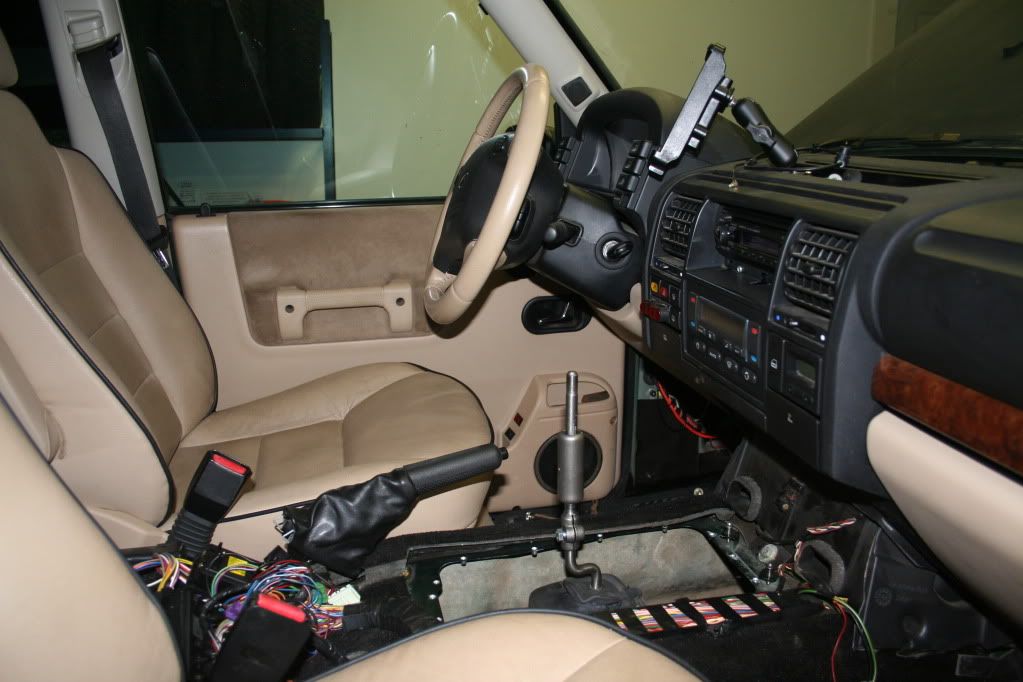
So far, the shifter position seems pretty decent. The throw is surprisingly short. You can see LR's typical attention to detail for drivability. I will probably turn myself a custom shift nob on the lathe. Just because. I'm glad I didn't make the upper shift lever myself, as the OEM piece includes a vibration damper on it.

I also started tackling the pedal box. I started trying to remove my pedal box, but it's very difficult with the engine and SLABS installed. I studied the D1 box I have, and realized I can probably install the clutch pedal onto my box, without removing it. I just need to drill holes to mount the clutch master cylinder.
 
Last edited:

R_Lefebvre

Expedition Leader
Looking at the wiring mess... I just remembered I'll need a few pigtail wires from there, to be able to connect two wires for the transmission range selector switch, to signal to the computer that the truck is in Park or Neutral. That will be necessary to allow the key to be started.

I have to decide which. IIIRC, Justin told me neutral? That makes some sense. When the truck sees that it is moving, it will "think" that it's being towed, so it won't throw a "Gear Range Implausible" code.

But, in neutral, it doesn't allow the key to be removed from the cylinder. I'll need to either leave it in Park, or gut the interlock solenoid.

This, only until I get all the computer stuff figured out.

Also just to note, I did re-wrap the wiring bundle in tape and sleeve. The rest of the wires are for the transfer case switches.
 

R_Lefebvre

Expedition Leader
I made the final decision last night to not install the D1 pedal box in my truck. Way too complicated to try and change it out with the engine installed and the SLABS solenoid block in place, etc. Not to mention the throttle cable and steering shaft that would need to be disconnected.

The shaft that the clutch and brake pedals hang from are IDENTICAL on the D1 and D2. There are minor differences to the pedal box plate and weldment, including the brake and clutch switch mounts. Even the plastic bushings for the pedal hinge points are the same.

I decided that drilling holes for the clutch master cylinder into my pedal box is easier than trying to remove it. It's fairly easy to do other than needing a right-angle drill to get in there. And and 8.5mm drill for the two mounting holes, and a 1 1/4" hole saw for the large central hole.

Drill those holes in the right location, remove the old brake pedal and shaft, and bolt up the new clutch pedal and brake pedal into the box, Bob's your uncle, simple as that.

In fact, I think I will cut down my auto brake pedal, and use it instead of the one from the 5speed D1. It's just slightly different in the location where the servo pushrod hooks up. So really, all I'm using from the D1 is the clutch pedal, return spring, and a couple bushings. One could easily buy these from a junkyard in Europe and avoid buying the D1 pedal box completely.
 

R_Lefebvre

Expedition Leader
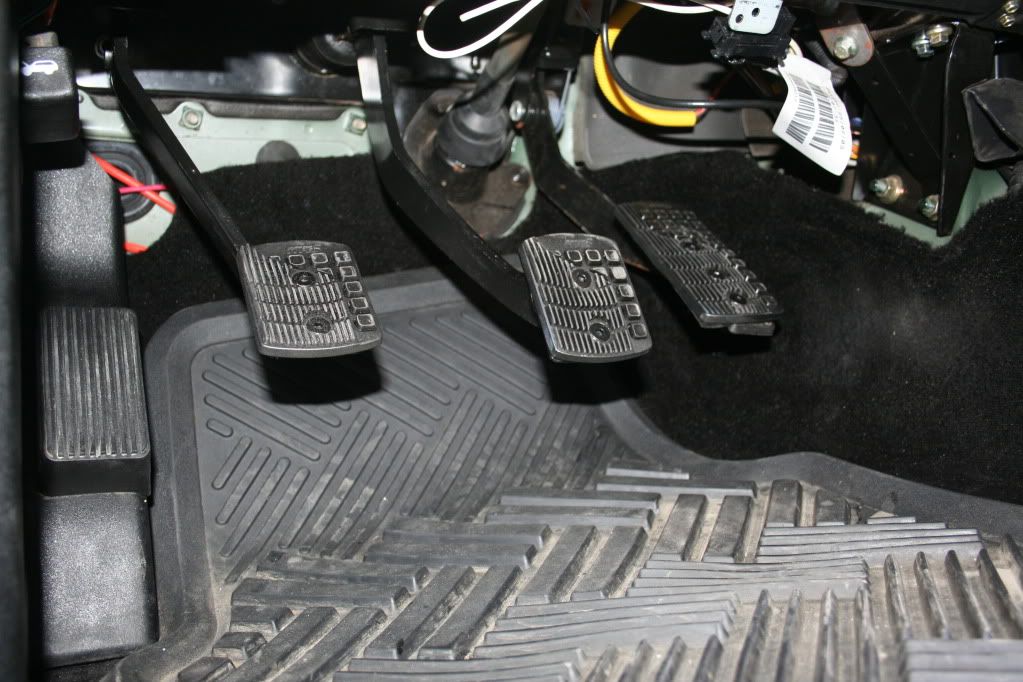
Pedals are installed finally.

IMG_6158.jpg


I also went with some ricer pedal covers. ;) I like the way they look and I wanted to move the pedals around a bit. I'm using the D1 clutch pedal, and the D2 auto brake pedal. I cut the pedals down to fit the pedal covers properly. I moved the clutch pedal over to the right a bit, to get it away from the dead pedal. By using the D2 auto brake pedal, I was able to shift it farther over to the right than I could with a D1 brake pedal. I wanted it closer to the gas for heel-toe. And, I put the gas pedal cover over to the left, closer to the brake, again for Heel-toe. There's enough space I shouldn't have a "Toyota moment" even wearing boots, but now it's possible to heel-toe.

I'm not super happy with the gas pedal mounting, which was necessitated by the way the OEM plastic fits on the lever arm. I will probably fix this up by getting rid of the plastic and using a piece of angle steel bolted to the OEM arm. I didn't even realize how bad it was until I took this picture.

The heel-toe thing is maybe stupid in a truck, but it's instinctual for me now I've been doing it for so long. Though it'll be interesting to see what it's like with the comicly heavy flywheel on this thing.

The M/C is bolted to the pedalbox, and the clutch line is run. That was the first SNAFU I've had on this project. It wasn't clear when I was ordering what was going on with the lines. Turns out I got the upper and lower line for a RHD vehicle. :rolleyes: I thought I'd have to bend up new lines, but I was concerned because the OEM lower line has a flex section built in, since the powertrain moves so much. I wanted to retain that, but didn't have a good way of doing it with the parts I could get at the local shops. Interestingly, I found out how the LHD clutch routing works. The line starts on the left side of the bellhousing, and crosses over the top of the bellhousing to the RHS. From there there is a short jumper to the RHD clutch MC. For LHD vehicles, they still use that same lower section. Then the upper pipe crosses back over the top of the engine to the MC on the LHS! :Wow1:

Wanting to retain the flex section in the line, I bent the lower pipe straight so I could work with it, and then bent it as necessary to come directly up to the MC on the LHS. I'm still not completely happy with it, as the flex section won't be as effective where it is now. I'll work on a permanent solution later.

I also rebuilt my rear driveshaft while it was out. The rubber bellows was old, so I replaced that. Got a new Rotoflex even though the old one wasn't too bad. Though I'm concerned, I ordered an OEM one from Rimmer Bros, and what I got came in a S*itpart box. Though it does say GKN on it (IIRC). I also replaced the U-joint. Good thing too, one of the journals was in bad shape. Never felt anything though.

Hopefully the Redline MTL finally arrives today, because I'm ready to put the transfer case back on and test it out.
 
Last edited:

Root Moose

Expedition Leader
Rob, once you get the beast back on the road you can address teh pedal angles and such.

If you can't heel and toe with the pedals as they are configured now that is definitely worth the effort to correct later. You can always bend the arms to get them close and/or take them apart and reshape/weld them with some steel to get them configured correctly.
 

R_Lefebvre

Expedition Leader
I tested it out, and I'm sure I'll be able to heel-toe the way it is, I just need to straighten out the gas pedal. I don't want them as close as they are in my car, because I don't want to have a Toyota moment when I'm driving with hiking boots on. I never drive the car in boots, but it's a necessity in the truck. I think the spacing is good now, even if it's a little farther than optimal in a car.
 

R_Lefebvre

Expedition Leader
The transfer case is now mounted, and the fun begins. I wanted to start it, make sure it runs before putting the exhaust and driveshafts on. But, I've got a no-crank condition now. <sigh> So the fun begins.

When I turn the key, it seems like it wants to start, the radio, etc. shut down like you expect when you crank, but there's just no crank. Can't hear the solenoid, nothing. The battery has been disconnected for a long time, about a month. Not sure if it's something with the security system? The red LED for security is not flashing. I can lock and unlock the doors, no problem.
 
Last edited:

AxeAngel

Expedition Leader
Voltmeter time. I've gone through 3 batteries recently so i feel your pain. Developed a parasitic draw since the engine swap and a battery overharging issue. If it continues alternator will be replaced

Great progress as usual!
-Sam
 

R_Lefebvre

Expedition Leader
IT'S ALIVE!!!!


The range selector switch has an additional circuit to inhibit the start circuit. It's the Park/Neutral switch, which is in addition to the WXYZ circuit that signals which gear it's in (including park). Just an additional protection to avoid starting in gear. That wire needs to be connected to GROUND, not 12V. Found that the hard way, and probably got lucky no frying something. After 12V didn't work, I disconnected it and checked it and noticed it had 1V on it and though... hmmm... grounded it...

VROOOM!!!

This isn't explained very well in the Rave.

Open headers. My neighbors love me. :)

I rowed through all the gears, checking out the clutch, etc, looking at the empty outputs from the LT230 spinning. All seems well. The 3-4 shift is a bit baulky, but I figure it's because with no inertia connected to the transmission output to keep the output shaft spinning.... I dunno, we'll see. I found it was fine if I shifted fast enough from 3-4 that the LT230 didn't stop spinning. If I shifted slow, 4 would baulk.

The clutch seems to work perfect as well. I notice in neutral with the clutch out, the outputs spin a bit. I had noticed that effect when the box was on the ground, turning the input by hand with the box in neutral, the output had a bit of drag on it, though you could hold it. Soon as I push in the clutch, the outputs stop.

Now I'll put the exhaust back up, driveshafts, and away we go.

I must have a record for dash lights though. I've got the 4 Amigos (not just 3!), CEL, and M and S. Go me!
 

R_Lefebvre

Expedition Leader
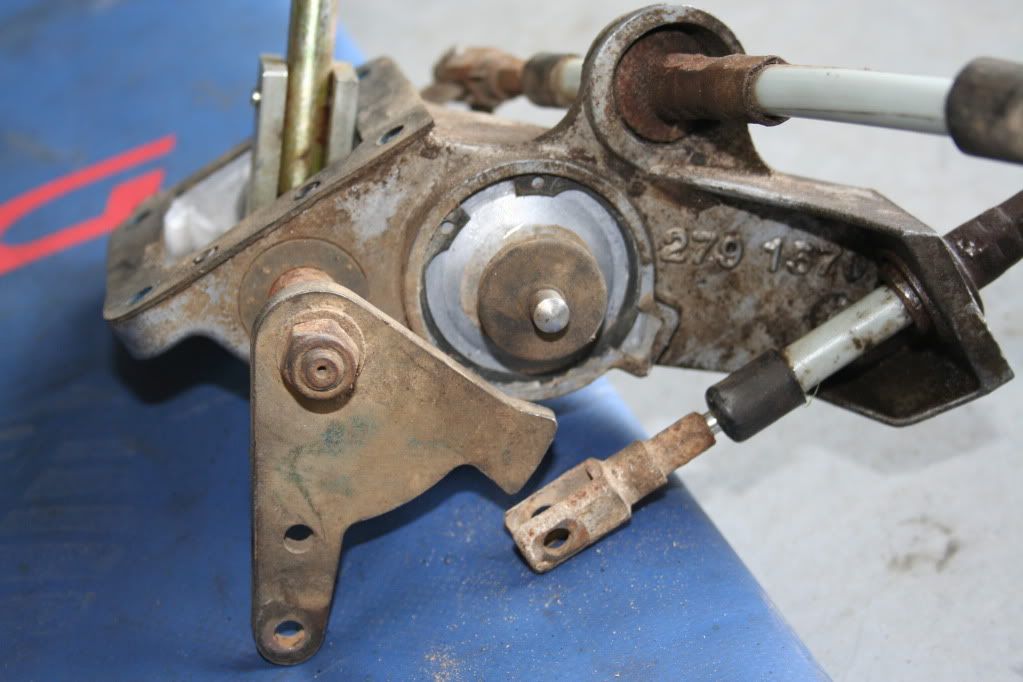
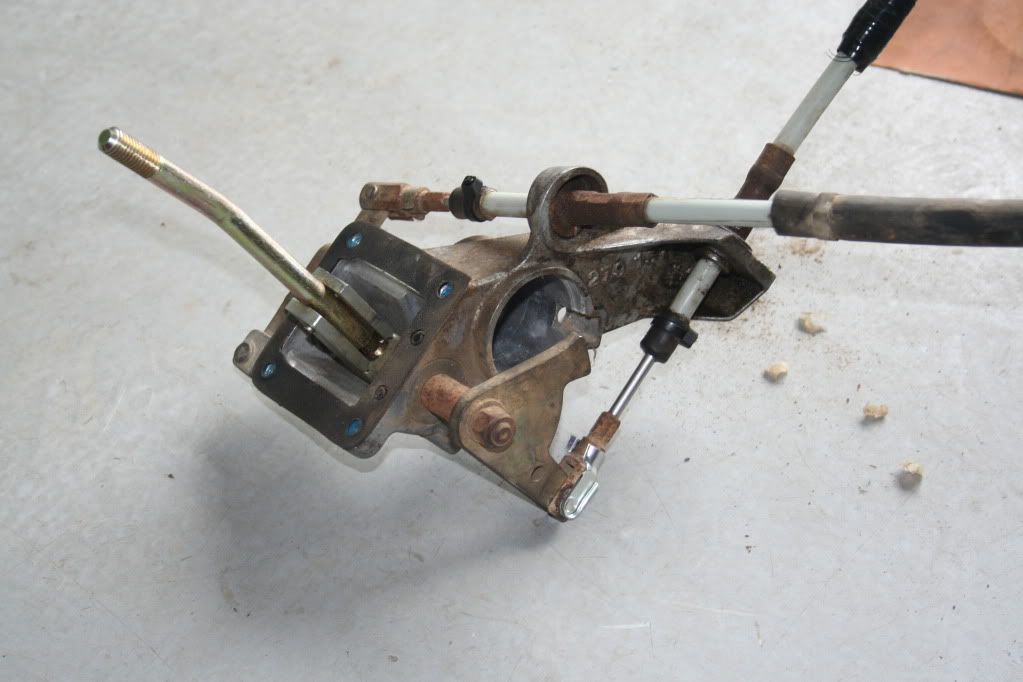
I wanted to show something here for anybody interested in gutting their hi/lo shifter solenoid. It's been mentioned before, it can fail and leave you stuck in whatever gear you're in. Or prevent you from putting the TC in neutral without the key in. Obviously you need to get access to the shifter which is somewhat a big job, but once you do:

IMG_6160.jpg


Peel off the clear RTV they used to seal the unit into the shifter casting. That reveals the C-clip. Remove the C-clip, and the unit just pops right out. You'll also need to cut the wiring, or what I did, was remove the pins from the plug, and pull the wire and pins through the hole. I also greased all the shifter linkages, and it shifts much smoother now.

IMG_6161.jpg


Done.

Here's showing the wire mods that need to be done to make the truck run. I soldered and heat shrunk these.

IMG_6164.jpg


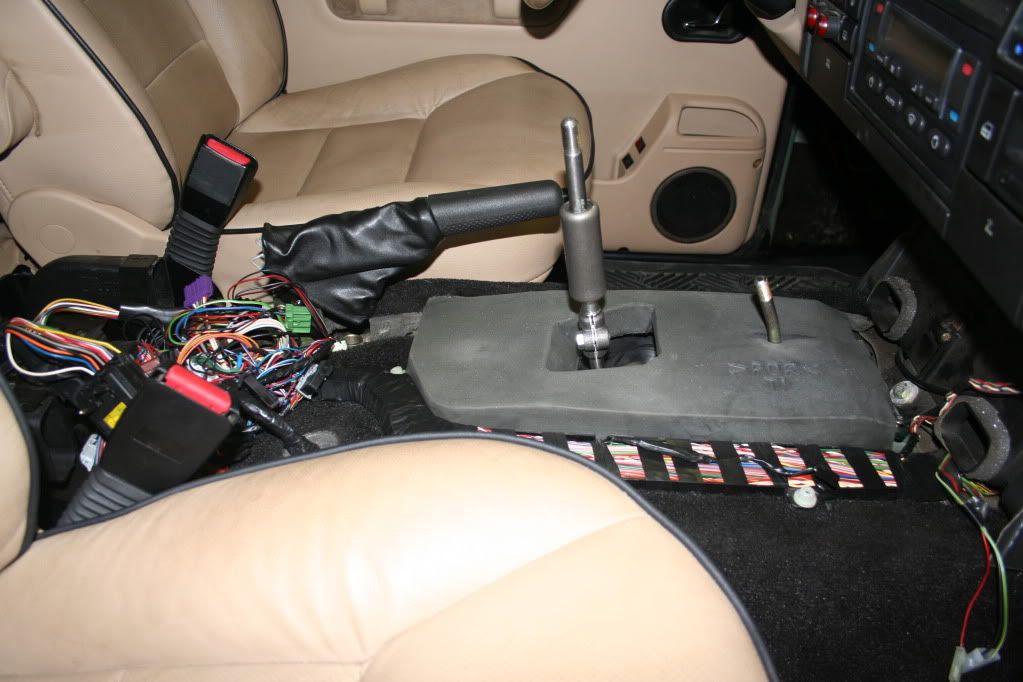
And I started buttoning things up. Here the OEM 5 speed tunnel plate is installed with screws and the rivnuts. I put the plate on top of the tunnel sheet metal. This allows the top of the transmission and Xfer case to be accessed from inside the truck, just remove the center console. It's WAY easier to make the electrical connections and work with the Xfer cables this way. It's sealed with a new OEM rubber seal.

IMG_6165.jpg


And, showing a new 5 speed OEM sound deadener pad.

IMG_6168.jpg


I also decided to remove the rear swaybar permanently, so I took that off last night. I've got the OME HD rear springs, so it's not doing so much anymore other than restricting articulation a bit.
 

michaelgroves

Explorer
It's looking very promising, Rob - nice job!


I rowed through all the gears, checking out the clutch, etc, looking at the empty outputs from the LT230 spinning. All seems well. The 3-4 shift is a bit baulky, but I figure it's because with no inertia connected to the transmission output to keep the output shaft spinning.... I dunno, we'll see. I found it was fine if I shifted fast enough from 3-4 that the LT230 didn't stop spinning. If I shifted slow, 4 would baulk.
Sounds like the syncromesh isn't 100%. If you shift slow, with so little inertia, the output slows a lot, and the syncro has to work. Shift really fast, and they slow down just enough to sync naturally? Proof would be in the downshifts.


The clutch seems to work perfect as well. I notice in neutral with the clutch out, the outputs spin a bit. I had noticed that effect when the box was on the ground, turning the input by hand with the box in neutral, the output had a bit of drag on it, though you could hold it. Soon as I push in the clutch, the outputs stop.
I think the output spinning is harmless - just a bit of friction between the shaft and the free-wheeling cogs. It goes away when the clutch is disengaged and the input shaft doesn't turn.
 

R_Lefebvre

Expedition Leader
The syncro's should be 100%, as they are brand new. Also might take a bit of time for the additives from the Redline MTL fluid to work in. I think it's just that when the outputs stop turning on a slow shift (I had it in low range also), and the input stopped turning with the clutch disengaged. So if the dogs aren't lined up and both shafts are stopped... I'm sure it'll be fine when the truck is rolling. The box in my Focus is similar.

I've never had a box that shifts perfectly because I've never owned a Honda so... :) I figure as long as I never buy a Honda, I'll never know what I'm missing. ;)
 

Forum statistics

Threads
188,194
Messages
2,903,698
Members
229,665
Latest member
SANelson
Top