Canadian Patrol GQ build up

Abitibi

Explorer
Hey guys,

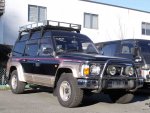
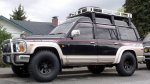
Here's my truck, my amazing truck! (It's a Nissan after all..!) It's a right hand drive (RHD) 1993 Nissan Safari GQ (Patrol Y60) 24 volts with the 4.2L diesel and 5 speed tranny. It came with factory rear locker, front and rear a/c with beer cooler, 7 seaters, large cargo roof rack and a few other little extra (heated fuel filter...).

It started as a spoiled Japanese truck that never saw any kind of offroad for the first 17 years of it's life. I imported it on my own in February 2010 with only 75,000km (46,000 miles) on the clock. Since then it's got a rude awakening!:wings:

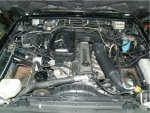
I was lucky enough to get an un-modified truck, best platform to get my dream started! So the modifications started, and the fun! But before any mods took place and covered the basics; changed all fluids, filters and belts, replaced the headlight for lefties and took care of anything that needed it. (Picture 1).

Mod #1
I replaced the 31's on stock rims with BFG M/T 255/85r16 (skinny 33's) mounted on Procomp rims. Now I have traction! Love that low squatting look but that won't last long, 3-4" lift is getting ready to be mounted... (Picture 10)

Mod #2
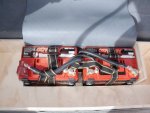
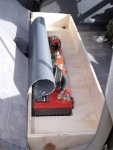
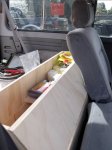
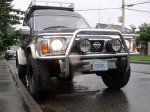
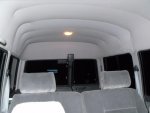
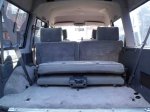
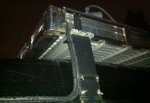
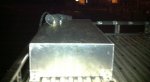
Replaced/relocated both batteries with two Odyssey 34-PC1500 that punch out a nice 880cca each and also act as decent deep cycle unit (AGM so safe to run inside the truck). I used about 10m of No. 1 battery cable to reach the new location behind the rear passenger's bench. I finished this project by building a holding/storage box for the batteries. At the same time I installed a secondary 24v fuse panel inside the engine bay at the left of the firewall. (Pictures 2, 3, 4 & 5)
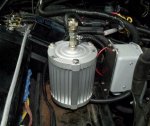
Mod #3
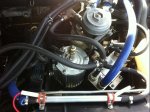
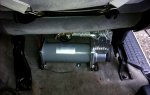
Installed a TRABOLD remote (bypass) oil filter where the right battery used to be. I forget the specs but I believe the bypass filters down to 0.1 micron. Cartridge should be changed every 24,000km (15,000mi), the OEM filters every 3 years and the oil (synthetic) some crazy numbers (over 300,000km - 185,000mi)! Regular oil analysis will tell me how far fetch or accurate those claims are...
(Picture 6)

Mod #4
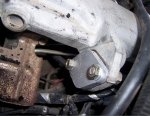
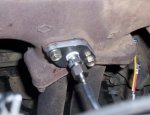
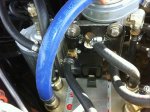
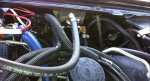
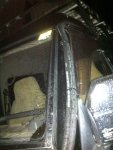
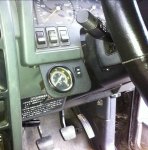
Removed the EGR, blocked it's original intake location and used a blocking plate at the exhaust manifold to insert my pyro probe until it gets relocated once the turbo goes in. One picture shows all the crap I was able to remove!
(Picture 7, 8, & 9)
 

Attachments

  • Urban Matador 7.jpg
    Urban Matador 7.jpg
    412.2 KB · Views: 289
  • Twin Odissey.jpg
    Twin Odissey.jpg
    99.4 KB · Views: 189
  • Storage lower level.jpg
    Storage lower level.jpg
    91.7 KB · Views: 162
  • Storage upper level.jpg
    Storage upper level.jpg
    93 KB · Views: 149
  • EGR gone.jpg
    EGR gone.jpg
    104.6 KB · Views: 125
  • Trabold.jpg
    Trabold.jpg
    89.4 KB · Views: 138
  • Batteries gone.jpg
    Batteries gone.jpg
    100.7 KB · Views: 162
  • EGR left over.jpg
    EGR left over.jpg
    92.9 KB · Views: 142
  • Pyro probe.jpg
    Pyro probe.jpg
    93 KB · Views: 128
  • Muddies.jpg
    Muddies.jpg
    96.2 KB · Views: 266
Last edited:

ExpoScout

Explorer
Looks good. I'll be looking forward to seeing the lift installed.

I have a soft spot for Nissan diesels. Both my scouts have SD33-Ts.
 

Abitibi

Explorer
Part 2

Mod #5
Removed rear a/c and 3rd row bench. It just got it the way of the cabinets/drawers to come... Before and after pictures (1 & 2)

Mod #6
Chopped the front bumper's ends. More for look and slight better approach angle. It's only until the new tubular bumper with winch goes in. (Picture 3)

Mod #7
Converted truck to run on WVO (wasted vegetable oil). On my veggie set up I'm using the stock 90L tank for my veggie and installed a secondary 60L tank for the diesel as I still need to use diesel on start up in the morning and shut down (purging the lines from veggie at the end of the day). Total of 150L of fuel available, good for road trips!

I started by mounting a 24v fuel pump to assist pushing the veggie to the IP. It's a Walbro FRP-16 24v.

Next was installing a heated Racor fuel filter where the right battery used to be. Next to it I mounted a 26 plates heat exchanger (HE) to increase even more the fuel temperature.

I mounted my supply 3 way valve against the Racor bracket so everything is all close together and also close to the IP. Once the oil gets hot it has very limited distance to travel to the IP and less chances to loose heat.

Final heating stage is a 12v 32amps Vegtherm inline heater with a sensor (thermostat? attached to one of my injector lines) to control the heat (On at 70 celcius, Off at 90) this way I don't have to run the Vegtherm as much (high amps), mostly just to get thing warmed up quicker in the morning and then as a backup to ensure the oil is always nice and hot. The 3 way return valve is mounted against the right fender, seemed like it belonged there.

Finally I mounted my ghetto fuel tank on the roof. It will find a better spot at some point but I had this tank in my garage and doing this way allowed me to get going on veggie right away. My future options would be to mount it underneath or build a 10L tank and mount it inside the engine bay. Not decided yet and not too high on my priority list anymore. The vent hose on the tank will be changed from a straight out to a 90 degree to keep it lower profile.

So how does it work?

Start the truck on diesel, drive for 5min. Coolant warms up the heated veggie filter and HE. Switch to veggie (3 way switch inside the cab). Supply valve turns on, blocks the diesel alloying veggie instead and also powers on the inline heater. Return lines turns on, blocks diesel from returning to tank and allows veggie to loop back before the inline heater. This way the hot oil doesn't get wasted by going back in the wvo tank and gets immediately recirculated in the system.

For shut down at the end of the day I switch to the 3rd position (purge) on the switch inside the cab. Supply valves turns off (allows diesel), return valves stays on (loops left over wvo back to the IP until it's fully flushed by the diesel). This way I don't end up sending wvo back into the diesel tank.

I'm now paying $0.05/Liter or $0.40/gallon, I also recycle wasted veggie oil (I get it from a locale Japanese restaurant once they're done cooking with it). And finally I pollute a lot less. Makes me a Happy Camper!

(Picture 4; heated Racor fuel filter for veggie oil)
(Picture 5; supply valve)
(Picture 6; return vavle)
(Picture 7; diesel fuel line going up where the snorkel will mount)
(Picture 8; diesel lines making their way to the roof mounted tank)
(Picture 9; diesel tank mounted on the roof)
 

Attachments

  • Shorty bumper.jpg
    Shorty bumper.jpg
    88.6 KB · Views: 127
  • Rear AC upper removed.jpg
    Rear AC upper removed.jpg
    47.5 KB · Views: 106
  • Cargo.jpg
    Cargo.jpg
    94.2 KB · Views: 106
  • WVO heating system.jpg
    WVO heating system.jpg
    101 KB · Views: 88
  • Supply valve.jpg
    Supply valve.jpg
    109.5 KB · Views: 69
  • Return valve.jpg
    Return valve.jpg
    112.6 KB · Views: 65
  • Diesel fuel lines.jpg
    Diesel fuel lines.jpg
    92.2 KB · Views: 75
  • Fuel lines and roof tank.jpg
    Fuel lines and roof tank.jpg
    97.9 KB · Views: 102
  • Roof diesel tank.jpg
    Roof diesel tank.jpg
    105.3 KB · Views: 78

Abitibi

Explorer
Part 3

Mod #7
I mounted a onboard 24v Viair compressor under my seat. Best part is that while running it's identical to those massage chairs sold for a couple thousand$! Lovely bonus massage! Put a gauge for the tank pressure and power on/off conveniently by all the other switches.

Still need to mount my 2 gallons air tank. It's all ready and I've got a good place to mount it under the truck. Just need to mount it and run the lines. One going to the rear for endless air supply (tires...), another line for a air horn and finally another one for the front locker to come. (Picture 1 & 2)

Mods to come shortly:
1) 3 1/2" custom aluminum snorkel and air filter housing.
2) 3" lift (using custom made drop boxes).
3) LED reverse light (VisionX).
4) Front/rear tube bars and sliders.
5) Warn 8274
6) 24v-12v 50amps converter (Solarconverters.com)
7) Triple HID LightForce on front bar.
8) LED spot/flood light (remotely installed on magnet).
9) Air horn.
10) Replace as much carpet as possible with rubber, install sound deadening material and possibly some neoprene insulation.
11) Water/meth injection (project currently underway).

Mods to come sooner than later:
1) Rear cargo drawers and cabinets.
2) Turbo, A2W intercooler and 3" full exhaust.
3) Front locker.
4) etc.

So far the truck has performed extremely well on all the offroad trails I've put it through but the lift won't hurt. It loves to run on veggie and it's been a blast to drive since I've got it. :smiley_drive: (love this icon, it's got the shifter on the same side as mine! - Right hand drive...)

Cheers,
Mr. D
 

Attachments

  • Compressor.jpg
    Compressor.jpg
    98.8 KB · Views: 91
  • Compressor gauge.jpg
    Compressor gauge.jpg
    102.4 KB · Views: 115

Abitibi

Explorer
I hear you majorpayne, diesel are the way to go, especially when they start crawling on trails!

ps. Can anyone tell me how to post full size pictures instead of those thumbnails and how I can insert them along the post where needed instead of having them all at the end?

Cheers,
Mr. D
 

RonapRhys

Adventurer
When I want to post I use something like Flickr or Photobucket to host and then use their provided links. Both can be used for free, so it works pretty well.
 

CanuckMariner/Nomad

Love having fun 😊 in the 🌞 by the ⛵ and the ⏳
....
I'm now paying $0.05/Liter or $0.40/gallon, I also recycle wasted veggie oil (I get it from a locale Japanese restaurant once they're done cooking with it). And finally I pollute a lot less. Makes me a Happy Camper!....:costumed-smiley-007

Nice rig Abitibi, but your doing even better financially...$0.05/L * 3.78L/gal = $0.189/gal (not $0.40/gal)!!! Any restaurant using veggie oil can help you via 5 gal tubs of theused stuff. Just filter and treat properly before using it. And don't foget to change out your fuel system tubing (rubber gets eaten by that stuff) and seals.

Targa88 (Colin) was looking at one some time ago but decided not to go for it.Too bad as it would have been a great expedition rig:costumed-smiley-007
 

Abitibi

Explorer
I'm better with trucks than math! This is my 2nd truck running on veggie for the last couple years, couldn't see myself going any other way now!

I'm pretty lucky with my oil (pure canola), get it from a Japanese restaurant changing their oil every other day and I cold upflow filter it. Haven't had any issues aside from a better running truck. I'll try later to post a build up thread on the other wvo rig I built (Mitsubishi Delica L300)... It was a sweet truck!

Cheers!
Mr. D
 

Abitibi

Explorer
Hi

Mod. #8

I installed a reverse light on the truck last night. It's a VisionX LED flood work light that comes out around 400 lumens.

I mounted it inside the truck as I could see how tempting and easy it would be to steal the light. I cut some of the tint and built a foam surrounding cage to cut the reflection and glare. Wired it to come on reverse with an override so that I can use it for setting up camp (or blind tailgaters...Oups)
d179e1fe-3918-c721.jpg

d179e1fe-2575-8e7c.jpg

d179e1fe-233f-ffe0.jpg

d179e1fe-236d-8c34.jpg

d179e1fe-23d9-5d9a.jpg


So far works great, I just need to make the foam cage wider to make better use of the flood pattern of the light, easy done.

Mod. #9
I got going with the insulation process, started by some sound deadening on the doors and panels. Takes mostly care of the low frequencies. A good friend found some interesting 1/2" neoprene for proper insulation. If I figure a good way to crack the headliner without making a mess I'll start the 2nd part of the project.
d179e1fe-35fa-8c51.jpg

d179e1fe-361b-218a.jpg


Mod. #10
I continued on previous projects by installing a 2nd fuel gauge for the new diesel tank and another one for the pyrometers.

The pyro probe is mounted on the exhaust manifold where part of the EGR used to enter.

I'll be building a better gauge pod at one point but for now I simply cut and shaped some 1/4" plastic using heatgun. Ran the wires through the dash where the pod will take place. For all electrical work I'm having amazing help from my buddy Jay, thanks mate!
d179e1fe-3882-6cf4.jpg
d179e1fe-3893-87e5.jpg


Cheers
Mr. D
 

RMP&O

Expedition Leader
Man I love this truck! Super awesome Patrol, the best for overlanding. In fact in my opinion this model (LWB high roof) is one if not the best platforms out there to do up an overland truck.

Great mods by the way, I am watching/reading. Keep it coming! :)
 

Abitibi

Explorer
Just a little update...

The gauges and switches are now mounted. The reverse switch is a on-off-on so that it comes automatically with the stock backup lights or can be left on when the truck is not running for setting up camp... Or off all together so you don't blind people behind you as you backup. Works great!

d179e1f9-80cf-5d31.jpg


And the gauges until I work something different...

d179e1f9-8115-ae10.jpg


Love that truck!

Cheers
Mr. D
 
Last edited:

Abitibi

Explorer
Everytime someone tells me I'm driving on the wrong side I just tell them I'm actually driving on the right side... gets them confused for a few seconds.

No, no issues driving. I actually prefer it but we're having a lot of grief from the Canadian Dealership Association who sees us as a threat to their profit and the government just follow the carrot they dangle in front of their nose... sucks.

Cheers!
 

Forum statistics

Threads
190,457
Messages
2,927,743
Members
234,008
Latest member
zhukoveli
Top