Mattersnots
Adventurer
At risk of being known as "that toilet guy". I thought I might share some of the pointers I've learned using the composting toilet for many years.
My original review on the portal is here but the pictures are missing for some reason. You can see the whole story with pictures on my blog here.
This is the material you want to use. I bought this at home depot. I think it was 12 dollars for 3 cubic feet. This bag will last one person two years or more depending on usage.

Some folks have had luck with the coconut fiber but there was no comparison in my opinion. The coconut is difficult to break up, and caused the toilet to smell. I only carry one brick with me as a backup because it's so compact.

My biggest complaint with these toilets is how they don't mix all of the material. It's a round agitator path in a square compartment.
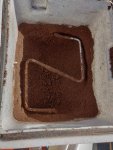
This reduces the efficiency and takes up valuable composting real estate. I spoke with the owner of Natures Head and he said it needs to be there for the toilet to work properly. When asked why there weren't any fingers or spikes on the agitator he said it was just because of liability. Those of you that use one of these know that when it starts getting full it becomes difficult to get the agitator bar into the material. In other words you can no longer crank the handle. I'm currently trying an experiment. I put these hose clamps on the agitator to see if it breaks up the material better.
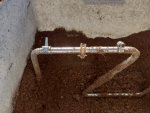
Always leave the agitator in the vertical position. If it's horizontal and you drive the compost compacts and it's much more difficult to turn. When dumping the toilet, always break up the material in the bottom of the toilet and circulate it with the new compost. If you don't do this moisture can stay in the unused part making it more difficult to mix and rotate. If you need to extend the toilets use before dumping you can mix in the bottom. This can extend the time before dumping up to a week for one person.
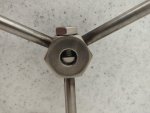
When it does start getting full and more difficult to turn I found the set screw on the handle wants to come loose or just doesn't hold. I pulled my allen key out and hit the end with the grinder so now the part on the agitator axle is flat and flush rather than rounded.
And now the worst part. That darned pee tank. It's disgusting and not fun to deal with. I experimented with removing the dump tank in my FirstRoamer. It worked out so well that I've expanded that model in the latest camper. Notice in this shot the black hose comes out the bottom replacing the pee tank.

That hose goes to an 8 gallon "yellow" tank underneath. Ignore the powered step wiring in process....
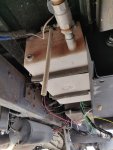
This tank is drained using an electric ball valve.
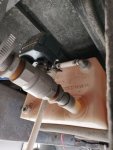
At the end of that hose is a regular garden hose adapter. You can then choose how to get rid of your yellow tank contents.
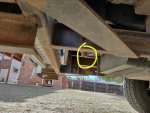
Hope this helps someone. Composting toilets are amazing. For those of you who are on the fence between the standard black tank system vs this one read up on it. Far as I know most folks who installed composting toilets would never go back.
My original review on the portal is here but the pictures are missing for some reason. You can see the whole story with pictures on my blog here.
This is the material you want to use. I bought this at home depot. I think it was 12 dollars for 3 cubic feet. This bag will last one person two years or more depending on usage.

Some folks have had luck with the coconut fiber but there was no comparison in my opinion. The coconut is difficult to break up, and caused the toilet to smell. I only carry one brick with me as a backup because it's so compact.

My biggest complaint with these toilets is how they don't mix all of the material. It's a round agitator path in a square compartment.

This reduces the efficiency and takes up valuable composting real estate. I spoke with the owner of Natures Head and he said it needs to be there for the toilet to work properly. When asked why there weren't any fingers or spikes on the agitator he said it was just because of liability. Those of you that use one of these know that when it starts getting full it becomes difficult to get the agitator bar into the material. In other words you can no longer crank the handle. I'm currently trying an experiment. I put these hose clamps on the agitator to see if it breaks up the material better.

Always leave the agitator in the vertical position. If it's horizontal and you drive the compost compacts and it's much more difficult to turn. When dumping the toilet, always break up the material in the bottom of the toilet and circulate it with the new compost. If you don't do this moisture can stay in the unused part making it more difficult to mix and rotate. If you need to extend the toilets use before dumping you can mix in the bottom. This can extend the time before dumping up to a week for one person.
When it does start getting full and more difficult to turn I found the set screw on the handle wants to come loose or just doesn't hold. I pulled my allen key out and hit the end with the grinder so now the part on the agitator axle is flat and flush rather than rounded.

And now the worst part. That darned pee tank. It's disgusting and not fun to deal with. I experimented with removing the dump tank in my FirstRoamer. It worked out so well that I've expanded that model in the latest camper. Notice in this shot the black hose comes out the bottom replacing the pee tank.

That hose goes to an 8 gallon "yellow" tank underneath. Ignore the powered step wiring in process....

This tank is drained using an electric ball valve.

At the end of that hose is a regular garden hose adapter. You can then choose how to get rid of your yellow tank contents.

Hope this helps someone. Composting toilets are amazing. For those of you who are on the fence between the standard black tank system vs this one read up on it. Far as I know most folks who installed composting toilets would never go back.

