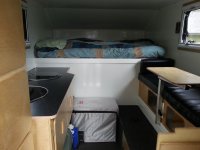
CPT (Composite Panel Technologies) Slide In Camper Shell Build, AKA "Yes, Dear, I think this will definitely be my last one...."

NOPEC

Well-known member

Part 2 - Cabinetry

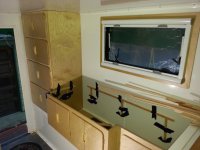
Once I had played with and changed around the cardboard mock up of the inside cabinetry, it was time to get going on it. As I mentioned before, I chose to work with wood just because of familiarity. I certainly under stand the not insignificant weight gain with it but I have done my best to keep the weight modest.

Stating the obvious, the cabinetry is the most important (and longest and hardest) part of this build out and I will just deal with it in this post.

The wood I used was mostly 1/2”(10 mm) Baltic birch for the cupboard faces, 1/4” (5 mm) for the cupboard shelves and hardwoods for the cleats.

Because of the limited space for storage with the regular cab truck, there has to be considerable storage in the camper. I have tried to keep it low but the reality is that there is only so much space in an 8 foot camper.

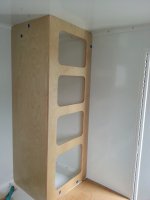
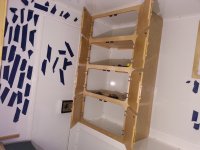
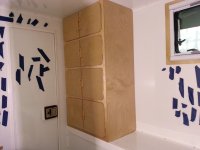
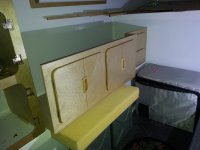
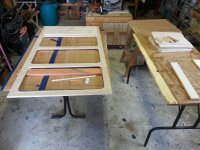
The cabinets were build with only two sides, sharing the other two sides with a neighbouring cabinet or a wall. Cleats were used exclusively to attach everything, all glued with Sika 221. I cheated a bit with the cleats by using small galvanized finishing nails to hold everything in place, along with painter's tape, while everything cured. I used wood glue and lots of clamps to hold the cabinets together during set up.

There was a combination of cubbie hole openings and actual cupboard door faces. The door faces were made with descending opening sizes so that cutouts from one opening could be used as a door face on a smaller cupboard opening.

The cabinetry went well and the only limiting factor was my skill level. The plywood has a very thin veneer and most mistakes were with the chipping or delamination of the various cuts, mitigated somewhat by at least one initial coat of the finish (oil based “Minwax Satin”) before cutting the plywood.

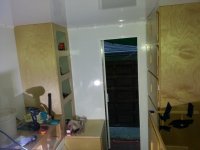
Here are some photos of my progress to date.

20231020_161157.jpg

20231010_122101 (2).jpg

The cupboard handles were made by sawing a wooden drawer pull in half and then inserting the two pieces bilaterally into the face of the cubpoard doors. A bit of fiddling around but fun. I reused a bit of the painters tape, being cheap and all....

20231103_165149 (1).jpg

20231103_164956.jpg

A lot of time was spent gluing cleats to the FRP so that no screws were ever put into the interior walls or ceiling. The floor has a layer of structural aluminium near the surface so it takes and holds screws really well.

20240129_162517.jpg

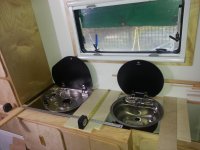
The kitchen was the most complicated so it came last.

20240123_170430.jpg

20240129_162558.jpg

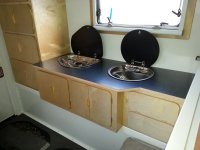
Doing a mock up for the counter top was a bit of a physcolgical boost, especially in the middle of the winter. It felt suddenly that there was to be life after cabinetry.......

20240203_155119.jpg

The Arborite was just as inspring!!

20240213_110028.jpg

I am pretty much finished the build now so I will get Part 3 of this thread out quite quickly. Once the cabinetry was done, thing went way more quickly!!
 
Last edited:

rsmccull

New member
Beautiful work, I'm really enjoying watching your build. Question for you: with the rubber floor covering, did you use adhesive for the floor cleats (between cleat and rubber) or just use screws for them down into aluminum?
 

ChasingOurTrunks

Well-known member
Thanks TT. Indeed, it is beautiful, when you get it right...:)
And get it right you did!


Great build. I think your use of CAD (cardboard :p) was more than just a pun - that's a brilliant way to do a buildout like this and I'm surprised I don't see that more often. Great idea.

I see on CPT's website that they reckon these are only about 500 lbs dry - that's pretty great. Do you have a sense of a final weight, or do you have a target that you are aiming to stay under?
 

NOPEC

Well-known member
Beautiful work, I'm really enjoying watching your build. Question for you: with the rubber floor covering, did you use adhesive for the floor cleats (between cleat and rubber) or just use screws for them down into aluminum?
Thanks for the compliment and good question on the floor cleats. Initially, I used both glue and screws for the floor cleats but that was before I drilled the hole through the floor for the vent in the propane locker. After seeing the profile of the aluminium/foam/aluminium core, I was impressed with how thick (a fat 1/8th to 3/16s inch) the aluminium top and bottom plates were on both sides. The top plate held a screw extremely well so I quit using glue, of course, after I had done most of the cleats....
 
Last edited:

NOPEC

Well-known member
Beautiful work, I'm really enjoying watching your build. Question for you: with the rubber floor covering, did you use adhesive for the floor cleats (between cleat and rubber) or just use screws for them down into aluminum?
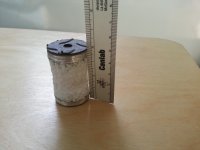
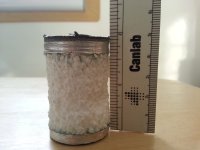
Further to my last reply to you, just FYI the CPT campers orginated from mobile, truck based ambulances so I am guessing that the robust floor in my unit is just a continuation of that standard. The floor strength and the ability to secure equipment, gurneys, etc to it, would be vital in the design of these units. I didn't mention it before but the surface flooring is also very thick and appears very tough, again needed for the abuse that these units would get during daily real world use. Here are some pics of the core I cut in mine.

20240501_075217.jpg

20240501_075239.jpg
 
Last edited:

NOPEC

Well-known member
And get it right you did!
not

Great build. I think your use of CAD (cardboard :p) was more than just a pun - that's a brilliant way to do a buildout like this and I'm surprised I don't see that more often. Great idea.

I see on CPT's website that they reckon these are only about 500 lbs dry - that's pretty great. Do you have a sense of a final weight, or do you have a target that you are aiming to stay under?
Thanks for the response COT. You are right, the "CAD" for me was invaluable. Many of our initial ideas were actually pretty goofy and with the full size model, these got nixed before I even lifted a tool.

The camper is light nodoubt. I thought it was more like 700 lbs but I just don't know. When we loaded it at the factory, the initial lift was with a forklift and then about 6 of us had no trouble at all lifting it and moving it into the proper position in the pickup box. I weighted the truck and camper the other day and with two of us, half a tank of fuel, 10ish pounds of propane and 50 lbs of water, it weighed 3510 kgs or around 7700 lbs. We haven't outfitted the camper yet with all of our "stuff" but I was very happy with this number which puts us at a little less than 3K lbs lighter than our previous larger rig which in fairness, was a lot more truck and camper than this current set up. "To lighten the load and shrink the footprint" were two key objectives with this build. I would guess the final dry weight of the camper alone would be ballpark 1100/1200 lbs including the fridge and propane tank, minus jacks. Other than the plywood cabinets, things are generally pretty lightweight and the components are fairly minimal.
 

ChasingOurTrunks

Well-known member
Thanks for the response COT. You are right, the "CAD" for me was invaluable. Many of our initial ideas were actually pretty goofy and with the full size model, these got nixed before I even lifted a tool.

The camper is light nodoubt. I thought it was more like 700 lbs but I just don't know. When we loaded it at the factory, the initial lift was with a forklift and then about 6 of us had no trouble at all lifting it and moving it into the proper position in the pickup box. I weighted the truck and camper the other day and with two of us, half a tank of fuel, 10ish pounds of propane and 50 lbs of water, it weighed 3510 kgs or around 7700 lbs. We haven't outfitted the camper yet with all of our "stuff" but I was very happy with this number which puts us at a little less than 3K lbs lighter than our previous larger rig which in fairness, was a lot more truck and camper than this current set up. "To lighten the load and shrink the footprint" were two key objectives with this build. I would guess the final dry weight of the camper alone would be ballpark 1100/1200 lbs including the fridge and propane tank, minus jacks. Other than the plywood cabinets, things are generally pretty lightweight and the components are fairly minimal.

That's an exceptional total camper weight for a rig this size, in my opinion. I'm on a mid-size rig and I'm not too far below that myself, and the fact is a bigger rig = more material to box it in = more weight, so that's another testament to your design, materials, and build.

Very cool rig - will be following this one closely and am excited about the possibility of another Canadian contributor to this space on the market too. Thanks for being our guinea pig!
 

rsmccull

New member
Thanks for the pic. I knew the floor had aluminum in it, but didn’t have any idea it was that thick. Did you tap the holes in the floor for the cleats, or just use metal screws for the cleats?
 

NOPEC

Well-known member
How did you run the wiring?
Gator70
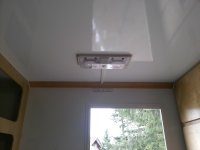
Wiring was all surface. For the runs to lights, I used white click together track to enclose the wire which worked really well. The double sided tape that it came with seemed of pretty good quality but I backed it up by caulking all of the edges. I had to cheat a piece of hollow trim at the back ceiling in order to get a couple of runs of wire from the driver's (power) side to the passenger side and to get power to the fixture you see in the picture. You can also see a short piece of the ceiling run track. Everthing else was enclosed in various diameters of split loom cable and snaked in along the inside edges of the various cupboards, nothing too fancy.

20240501_180522.jpg
 

NOPEC

Well-known member
CPT Camper Build - Part 3 and Final

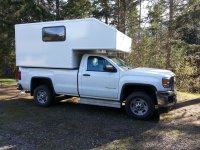
I am pretty much finished with my build, all but a few trim bits are left and one last circuit I am still designing but it can wait.
20240419_165951.jpg

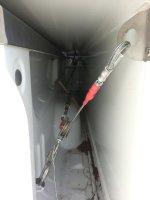
The only big thing left that I am considering is through bolting the camper to the truck bed. My “thinking inside the box” :) pulley/spring turn buckle tie-down system is working really well, especially now I have added a single horizontal spring turnbuckle (bilaterally). My only issue is that if something went sideways with the external exhaust part of my Propex furnace (highly unlikely), I would still have to lift the camper to gain access to it but that is definitely doable, if need be.
20240510_063932.jpg

As I have mentioned before there were two main objectives of this build. We wanted to keep it as simple and light as possible without giving up too much of the basic comforts and we also wanted to maintain the thermal advantage that the composite panels give us by limiting the number of holes we create in the envelope.

For example, there are no external lockers. We ordered the shell with a smaller than standard door and have only installed two fairly large Arctic Tern windows high up and quite far forward, directly opposite each other. We will use a dedicated, portable DC fan (Caframo) which will take the place of any roof vent/fans, using the AT windows for intake and exhaust during ventilation with the single window louvre protecting us from all but the worst weather. We are very comfortable outdoors and we don't actually live or spend a lot of time in the camper so don't feel hard done by with a slight shortage of amenities. This clearly is our vision and it is certainly not going to be everyone's cup of tea, especially when compared with some of the amazing builds here on ExPo.

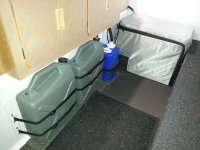
Everything was designed to be simple, accessible and low. On the floor there are 2x 26 litre water containers, a 10 litre “grey water” container, a 42 litre Snomaster chest fridge/freezer, a 20 lb horizontal propane tank in a dedicated locker, a Propex HS2211 forced air propane furnace, a Thetford Porta-Potti and a considerable storage locker (“considerable” being relative in an 8 foot camper :))


20240428_165633 (1).jpg

Water(potable/grey)

The Reliance water containers can either be filled in situ or removed. A Whale brand immersion pump sits on the bottom of one of the containers and is bundled with the water line, a small diameter breather line and the DC power cord. This “bundle” lifts up to facilitate removing and/or changing out the jugs. The nice thing about this system is that it is “on demand” and low pressure so Nalgene type tubing can be used for water lines and the portability means I can simply take the various components inside while not using it in the winter. With the porti-potti having it's own water supply, 52 litres of potable water is lots for us.

As far as grey water, we initially considered a split drain system from the sink, with one line going outside to something like a collapsible jug and when required, another going to the tank inside. But it was just too much faffing around for little benefit. 10 liters of grey water is easy to manage using a portable sink which sits inside the permanent sink which we use for clean up and dishes . We use all biodegradable soap and are fine with dumping our basin on road surfaces out the door. If we are somewhere we need to retain our grey water, we have that capability, although limited.
20240428_165855.jpg
Of course with the composite panels, everything has to be attached by using a glued on backer into which you can put a fastener (at least that is how I did it, using either wooden cleats (hidden) or gel coated fiberglas (visible)).

Camper's Single Fuel Source

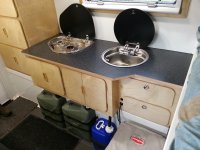
Propane just works for us so a two 2 burner stove top and a Propex furnace were used. This my second Propex furnace and so far, they have been flawless. This one had a digital thermostat that I was a little intimidated with initially but now I really like it.

20240428_170215.jpg

The fancy European Dometic drop ins with glass tops are a bit excessive but we thought we deserved them!!
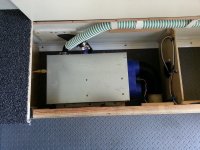
20240419_165413.jpg
The Propex model HS2211 is a bit larger and heavier than the HS2000 model but is more heavily insulated and for me it was an ideal furnace for this type of installation. The green and white hose is just for protecting the combustion air hose which has a separate air intake and doesn't share the hole for the exhaust. The area above and beside the stove is storage. You can see the part of the furnace cover in the photo below.

Right next to the furnace there is the dedicated sealed propane locker with floor vent. I used a 6 inch round black marine screw hatch on the top of the propane locker to give quick access to the shut off valve.

Other than for safety, where I live there are a lot of big lakes and rivers that have vehicle ferries and it is a requirement to have all propane shut off before boarding them so the hatch makes compliance very easy.
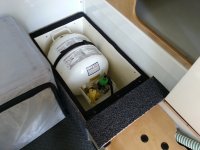
20240419_165640.jpg

I was a little concerned about the furnace exhaust pipe going out of the camper through the foam shell wall as I had no experience with composite panels. I built my own system using a a combination of a 1” silicone/Fiberglas sheath over the entire length of the SS flex exhaust pipe and in the area where it went through the wall, I doubled up the thickness of the insulation by putting the exhaust pipe into a reinforced, pre-formed silicone engine turbo coupling which I order in the shape (45 degrees) and diameter (1.5”) to give a nice snug fit. I made a custom Fiberglas cover plate on both sides, filled any remaining gaps with Rockwool and screwed it together. I sealed everything up with Hi-Temp Permatex. It works very well.
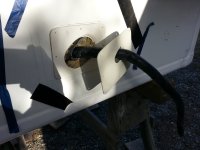


20240319_170115.jpg

The key was to practice making the “one shot only” angled hole on one of the discarded composite window cutouts, before the actual "performance" . A sharp hole saw using a extra long pilot bit was the ticket. Slow and steady, it came out perfect.

"Bathroom"
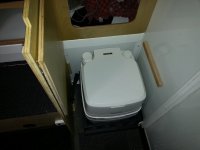
20240428_165720.jpg
OK, its a Porti Potty that has a semblance of privacy if you manipulate the highly engineered folding enclosure in a certain way..... But really at this stage in our lives, it just ain't that big of a deal.....

Electrical

Again really simple. I did splurge and use a BlueSea Distribution panel, just because I like BlueSea circuit breakers so much. Instead of dedicated switches, I use the breakers as both a switch and a fuse. Everything else is pretty straightforward. LiTime 100AH “Mini” LiFePO4 battery, GoPower monitor, Victron MPPT solar controller, Renology 175 watt flexible panel (I didn't use a gland on the roof, I just cut off the MC4 connectors and replaced then with a lug and then bolted them through the roof into the interior using a couple of 1/4” brass extended height toilet retention bolts. Not too sexy but no big hole and I got to minimize the length of the leads to exactly what I wanted.

Box Score

Camper Shell - $15K $CDN (insert favourite line here about CDN/US $ difference...)
Stuff – Roughly $9CDN
Rough estimate on dry weight of finished camper - 1100 - 1200 lbs
Time to build – About 6 months with lots of competition from “life in general”
If I had it to do over, what would I do differently? - Really, pretty much nothing except perhaps, make less dumb mistakes......
and very important;
The trucks name is "Blizzard" and the campers name is "PLECA" (Perfect Little Expedition Camper, Again) (tiny little dig from someone..)

So that is it! Time to get on with the summer!!
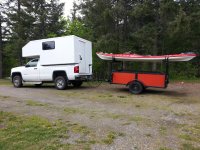
0.jpg

PS - One's photo allotment gets chewed up pretty quickly on these bigger threads so if you want to see something specific, I probably have more or better photos on various stages of the build. Let me know. Cheers
 
Last edited:

Forum statistics

Threads
188,205
Messages
2,903,758
Members
229,665
Latest member
SANelson
Top