Cummins Canoe (A Stepvan Story)

PlethoraOfGuns

Adventurer
Sometimes a peak under a skirt is a little too revealing.

Weld in some new bits!

Sent from my SM-G950W using Tapatalk

Haha, when I get in and under these old girls, I always hope for the best but plan for the worst. It seems the rust is only really bad around where the fuel tank is. Guess a lot of road crud got caked up in there and it never dried out and stuff. Curiosity drove me to dig deeper into this mess. Took the back bumper off and removed the rear shocks to get a better look.

IMG_20200728_103336 copy.jpg
Going all out I think. Lets remove all 20 body mount bolts.

IMG_20200728_114037 copy.jpg
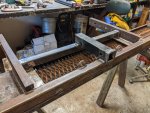
Took some scrap metal...

IMG_20200728_115139 copy.jpg
And made this thing...

IMG_20200728_135104 copy.jpg
Which, according to the theories in my head(not the conspiracy ones, but the mechanical ones), will securely hold the steel rod centered and in place on top of a hydraulic jack so we can safely lift the body off the chassis little at a time to get up on blocks. Gosh, this thing is scary being up on jack stands like that!

IMG_20200728_165957 copy.jpg
And having the body up on blocks will make it easier to work on chassis.
 

PlethoraOfGuns

Adventurer
The undercarriage carnage continues.

IMG_20200731_102548 copy.jpg
The chassis between the shackles for the rear leaf springs was reinforced with smaller c-channel inset into the main chassis rails. Moisture got in there and did terrible things.

IMG_20200731_104434 copy.jpg
Needle scaler and air chisel worked wonders on removing the flaking rust crud. The steel under the rust was in better shape than I had originally thought.

IMG_20200731_162418 copy.jpg
The rest of the chassis looked like this.

IMG_20200731_163618 copy.jpg
And cleaned up very well.

IMG_20200731_203636 copy.jpg
Unfortunately, in the rear, widthwise under the rear barn doors, part of the aluminum body substructure did not fair so well. The plastic insulator that is supposed to stop the aluminum and steel from corroding with each other, was basically gone. This will require extra attention.
 

PlethoraOfGuns

Adventurer
To save the chassis from any further doom, we decided to clean and paint it. Ordered a product called Rust Bullet. Got 3 quarts and their cleaner they call metal prep.

IMG_20200729_085044 copy.jpg
While we wait for paint to get here, lets give this rear bumper some attention.

IMG_20200729_090044 copy.jpg
Pulling the rubber bumper condom off came off too easy. Several of the self-taping screws broke off. Nothing a lil heat can't take care of.

IMG_20200729_090331 copy.jpg
With these out, we can drill and tap the holes for some stainless steel bolts later.

IMG_20200729_090849 copy.jpg
This thing was a rusty mess. But just surface rust.

IMG_20200729_101232 copy.jpg
The welds were atrocious. I guess as a bumper step, it's ok, but we got it out and up on horses, so we're gonna fix it right. Maybe retrofit this for a tow hitch as well?
 

PlethoraOfGuns

Adventurer
Lots of welding going on while we wait for chassis paint.

IMG_20200729_113808 copy.jpg
Did a few cover passes to fix those booger welds.

IMG_20200729_161120 copy.jpg
Little bit of reinforcement here.

IMG_20200729_170954 copy.jpg
More welds there.

IMG_20200729_180014 copy.jpg
Even a hot spicy one for good measure!

IMG_20200729_184644 copy.jpg
And voila! Got ideas for a hitch receiver and I ran with it. Just had to weld in a piece of square tubing to support the one end of the receiver tube and weld a bunch more stuff and boom, class whatever hitch receiver.

IMG_20200804_112129 copy.jpg
Bumper seemed too bland.

IMG_20200804_122931.jpg
So I welded on some random hooks. Not sure, maybe they will come in handy some day.
 

Attachments

  • IMG_20200729_184644 copy.jpg
    IMG_20200729_184644 copy.jpg
    2.8 MB · Views: 471
Last edited:

PlethoraOfGuns

Adventurer
Bumper is good, but we're thinking the van chassis could use some reinforcement.

IMG_20200803_120242 copy.jpg
Welded up these diagonal brackets in hopes that it will stiffen up the bumper mounts, which are just 3/8" steel plate welded vertical to the chassis rails.

IMG_20200804_125323 copy.jpg
And then it started raining, a lot. So good time to wash stuff!

IMG_20200803_175601 copy.jpg
First we sprayed everything down with the metal prep spray. Super nasty stuff with acid, where goggles and such, don't be a hero.

IMG_20200803_184116 copy.jpg
After 20 minutes of letting it eat away at stuff, hose it off with water and let it dry.

IMG_20200804_131520 copy.jpg
All ready for paint!
 

Bikersmurf

Expedition Leader
I feel your pain... there were 7 years of contractor grime in my Ambo when I started. I didn't have a pressure washer handy, so I used a hose, bucket of soapy water, and a broom. I've never worried about the leftovers from it's life as an ambulance... the 7 years of mud, electrician, landscaper, and other use were more of a concern. Even super-bugs can't survive that long. :D

Looking forward to seeing what you do with the blank slate. Also how you fix up your frame. Mine doesn't look as bad, but I still need to drop the fuel tank. I've got a spare fuel tank I'm planning to prep on the shelf before I drop the original one.
 

PlethoraOfGuns

Adventurer
Haha, this rig ain't all that bad. I'm pretty sure it was just used as a delivery van for a bakery all it's life. But boy, the piles of rust and debris underneath is piling up on the driveway the more we clean and prep for paint.

I can't wait until I get to sit inside the back and start building the good stuff! Gotta get this vehicular maintenance and upgrades done first. Luckily, my fuel tank is in great shape. Just need new straps, rubber, and sending unit. Stupid frame though. But I think all the work will pay off in the long run.
 

PlethoraOfGuns

Adventurer
Well, hurricane season is coming to an end, but it got us this time...

IMG_20200803_151311 copy.jpg
Wind was gusting, didn't think it was that bad, but was apparently bad enough. Blew the rig off the jack stands!

IMG_20200803_151426 copy.jpg
Nobody got hurt, and the collapsing jack stands added cushion to the falling mass of metal.

IMG_20200803_162106 copy.jpg
Only damage was a dent to the front crossmember under the engine. It's very thick steel, thank goodness.
 

PlethoraOfGuns

Adventurer
Waiting for chassis to dry and such. Got plenty more to do.

IMG_20200805_133626 copy.jpg
Ordered some new jack stands. I don't think the old ones are salvageable.

IMG_20200805_142800 copy.jpg
While we wait, lets see what's in here.

IMG_20200805_143136 copy.jpg
Ah, just as I suspected, an open differential. We'll have to remedy that with something a bit more fun!

IMG_20200805_161913 copy.jpg
We can also check what the deal is with the transmission not going into 5th gear. It's probably the famous NV4500 5th gear nut that backs off...
 

Bikersmurf

Expedition Leader
Waiting for chassis to dry and such. Got plenty more to do.

View attachment 611604
Ordered some new jack stands. I don't think the old ones are salvageable.

View attachment 611605
While we wait, lets see what's in here.

View attachment 611606
Ah, just as I suspected, an open differential. We'll have to remedy that with something a bit more fun!

View attachment 611607
We can also check what the deal is with the transmission not going into 5th gear. It's probably the famous NV4500 5th gear nut that backs off...
Freaky

I’m glad no one was hurt... and there was no damage to anything significant.
 

PlethoraOfGuns

Adventurer
Tore into the transmission. Oh boy, lots of questions and head scratching.

IMG_20200805_164049 copy.jpg
The 2wd versions of the NV4500 are fixed yoke, and have no nut holding the 5th gear on the main shaft. So that will never be a problem.

IMG_20200805_181153 copy.jpg
Looking carefully around the other side of the tail shaft area I notice some odd things. Some things are missing. We're missing quite a bit of parts. Like all the parts for 5th gear.

IMG_20200805_175222 copy.jpg
This transmission is supposed to come with overdrive from the factory. Taking the top cover off tells more of the story. It seems like overdrive was never here. Why could that be?

IMG_20200805_181110 copy.jpg
The shift fork for 5th/reverse is complete. But the shift rod engagement thing is missing, along with the shift shaft, and 5th gear shift fork, and gear collar, and even the synchronizer ring for 5th. I have a NV4500 in my Jeep, so I have something to fall back on and check.

IMG_20200805_181026 copy.jpg
Holes and such where parts are supposed to be. Everything with transmission is fine, just missing parts. I guess if we throw the right parts in, the overdrive will work.

unnamed.jpg
So we spent a lil bit of time looking back and forth at parts diagrams and such and guesstimated what missing parts we needed. Ordered. Hopefully when they come, they go back in easy and it all works right. Fingers crossed.
 

PlethoraOfGuns

Adventurer
Time for chassis paint! Got the Rust Bullet and ready to go.

IMG_20200807_112217 copy.jpg
I'm like a real Michelangelo!

IMG_20200807_193724 copy.jpg
This stuff looks pretty good. I't's a little bit thicker than POR-15.

IMG_20200810_085437 copy.jpg
Did the rear bumper, and it all seems to work fine.

IMG_20200810_164534.jpg
And finally did the chassis. Wow, what a difference.
 

PlethoraOfGuns

Adventurer
Some more painting and prep work.

IMG_20200810_122709 copy.jpg
Cleaned and prepped all these body mount spacers now that the body is off of the chassis.

IMG_20200810_125303 copy.jpg
Went easy on this. Just decided to screw some screws and through em up to paint.

IMG_20200810_152250 copy.jpg
Just a few coats of spray paint, nothing fancy, nobody will even ever see them.

IMG_20200812_083659.jpg
And we got some sweet drivetrain stuff! 4wd anyone?
 
Last edited:

PlethoraOfGuns

Adventurer
Tearing into the rear axle. Might as well since the fuel tank is out!

IMG_20200820_144538 copy.jpg
It's been many years, and many coats of paint since these axle shafts have been taken out.

IMG_20200820_154248 copy.jpg
Gotta love the 14 bolt axle. Makes it easy to modify, especially for those that don't know what they are doing!

IMG_20200820_160709 copy.jpg
Out with the old spider gears.

IMG_20200820_161452 copy.jpg
In with the new Detroit Locker.

IMG_20200820_162637 copy.jpg
Good thing for a big old vise to hold your 80 pound differential while you torque all the carrier bolts.

IMG_20200820_181552 copy.jpg
All back together! Hopefully it all works...

IMG_20200821_153943 copy.jpg
Didn't forget to reinstall and seal the axle shafts back in before we filled it back with oil.

IMG_20200822_184342 copy.jpg
Even sanded and painted the differential cover.
 
Last edited:

Forum statistics

Threads
188,489
Messages
2,905,617
Members
230,502
Latest member
Sophia Lopez
Top