DIY Composite Camper T100 Expedition Vehicle Build

UPDATE

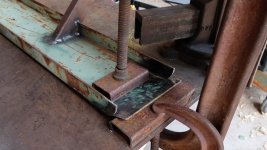
I built a rear bumper out of some scrap steel.

1.jpg

The Bumper is 1.5x6 inch C-channel and I welded on some 1x2 rectangular tubing to make mounts that bolt onto the stock bumper mounting points.
3.jpg

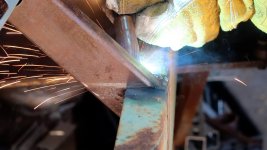
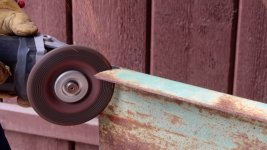
I notched the ends and bent the face of the C-channel around the notches to create a curve on each end. Then I welded the seams and grinned them smooth.
2.jpg4.jpg5.jpg

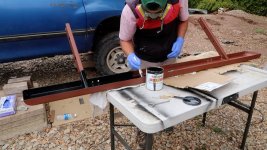
I sanded it down and coated it in Rustolium rusty metal primer and Stop Rust enamel.
6.jpg

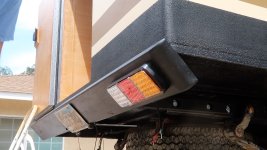
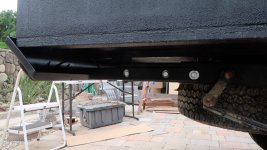
It bolted on as planned and I mounted tail lights, license plate, and a back up camera.
7.jpg8.jpg

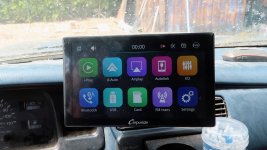
The back up camera was supposed to be a simple plug and play install, but of course I turned it into a much bigger project. I didn't want the screen bouncing around when I was driving and I didn't want wires hanging all over the dash, so I built my own sturdy mount and ran the wires behind the dash and tied them into the cigaret lighter wiring instead of plugging into the cigaret lighter. I've never had a screen in my vehicle before. It should be nice to see directions and hopefully the camera will be a good replacement for the review mirror.
9.jpg

And as always, here is the video if you want more details.
 

ExpoMike

Well-known member
Nice fab on the bumper but I think you are going to have issues with the lights being at a downward angle. One might be from a legality point of view (not sure being pointed downward is legal also the license plate not being clearly visiable) but the bigger issue is going to be visibility. LED's tend to be much more directional when it comes to seeing the light emitting from it. You will get some reflective lighting but it will not be very bright to other drivers. It will be even worse for those with higher vehicles (like lifted trucks, semis, those with long hoods).

I understand the wanting extra clearance on the back but I would consider squaring up the bumper to the back of the camper.
 

RJ Howell

Active member
I welded mounting points on the camper subframe that bolt to each of the 6 stock bed mounts.

I'm thinking 6 circuits. It's probably more than necessary, but I figure I might as well have fuses instead of just using buses to distribute the power in different areas.
You access those from under or inside the cabin? I welded in two L brackets so I can easily reach (much old then ya). The two mid-ship's I did became an issue when removing the cabin.. Have to adjust a bit.. Thinking turn-buckles right now, frame to frame..

Ya, 6 circuits seems over a bit for me as well. I agree, why not setup for it.
Have you decided circuits yet?
I'm seeing : Lighting, refrigerator, USB powering stations (4) and a main DC station for power to anything. Lighting I figure carries my power ceiling vent. Maybe one for an inverter? Never needed one and may now (or near future).
Curious what you're thinking.
 

RJ Howell

Active member
The lights you bought & list on the YT site are the ones you are using now? I know you had an issue with another..
Did you swap the truck out to LED lights? Typically you add a LED without doing all they rapid flash? I'm having an issue sourcing analog tail lighting that will work for me.
Curious as I'm looking now.

By the way... Nice job on the bumper!
 
Nice fab on the bumper but I think you are going to have issues with the lights being at a downward angle. One might be from a legality point of view (not sure being pointed downward is legal also the license plate not being clearly visiable) but the bigger issue is going to be visibility. LED's tend to be much more directional when it comes to seeing the light emitting from it. You will get some reflective lighting but it will not be very bright to other drivers. It will be even worse for those with higher vehicles (like lifted trucks, semis, those with long hoods).

I understand the wanting extra clearance on the back but I would consider squaring up the bumper to the back of the camper.
Hind sight is 20 20 ?

I definitely expected the lights to be more visible, but like you said the LEDs are way more directional than I realized.
I did check and there is no law saying that the license plate has to be vertical in this state, but it is probably just asking to get hassled. I was expecting to relocate it when I got around to building a swing down entry step, but maybe I'll get to it sooner. ?

Thanks for the input
 
The lights you bought & list on the YT site are the ones you are using now? I know you had an issue with another..
Did you swap the truck out to LED lights? Typically you add a LED without doing all they rapid flash?
The ones linked on the video are the ones that worked and I am running now.
The turn signals do rapid flash. I realize it's not correct, but they still seam to convey the message "I'm turning".
 
You access those from under or inside the cabin? I welded in two L brackets so I can easily reach (much old then ya). The two mid-ship's I did became an issue when removing the cabin.. Have to adjust a bit.. Thinking turn-buckles right now, frame to frame..

Ya, 6 circuits seems over a bit for me as well. I agree, why not setup for it.
Have you decided circuits yet?
I'm seeing : Lighting, refrigerator, USB powering stations (4) and a main DC station for power to anything. Lighting I figure carries my power ceiling vent. Maybe one for an inverter? Never needed one and may now (or near future).
Curious what you're thinking.
I access all the mounting bolts from under the truck along the outside edge of the frame rail. Without the bedsides hanging down in the way they are actually pretty easy to get to.

Circuits: water pump, fridge, storage compartment(lights), Ceiling(lights and small fans), Toilet fan.
I will probably add another for USB outlets and maybe a water purifier if I go the UV light style.
I'll continue to cary a small plugin inverter and probably continue to NOT use it ?
 
Anybody have a suggestion for a water purifier?

I used a LifeSaver jerrycan for the past 7 years and like it, but want to plumb a bigger tank with a pressurized water system. I haven't found anybody that makes a comparable filter for this kind of application.

So far my best options seem to be a big filter setup from ClearSource with their new .02 micron filter https://amzn.to/3qD9neS

Or something with a pre-filter and UV light like this product from Guzzle H2O https://www.guzzleh2o.com/products/stealth
 

RJ Howell

Active member
Just as a reference, I buy my drinking water. Often wondered why folks pay so much for filters.. I'm also not full-time. month to 2 month adventures a couple times a year or several shorter runs. Haven't seen a need.
You peeked my interest again and found this using your .02 micron statement.
Solo 5" water filter.
Really doesn't state gallons per filter.. that are $38 a hit. One is included @ the $100 price tag. This one gives me a possible reason to buy one but I still thing Wifey won't play..
That is a .2 micron filter. The one I listed is a .02 micron filter. The difference is the .02 should filter out bacteria and even viruses. The LifeSaver Jerry can is a .015 micron filter but the .02 by ClearSouce is the best I could find for an onboard system.
My motivation for doing filtered water is based on traveling abroad where the tap water isn't potable. During our 500 day trip to Panama almost all the water we drank was tap water filtered through the lifesaver jerrycan. Occasionally we would source water from a river, lake, or well, but it was really nice not to have to constantly buy bottled water.
 

RJ Howell

Active member
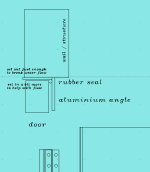
A little better drawing here. I think you set your angle beyond the door. I'm thinking forward and door within the angle. Thoughts? My hatches are much smaller than yours & thinking 3/4" PVC board for them.

Screen Shot 2023-06-14 at 8.02.02 AM.png
 
A little better drawing here. I think you set your angle beyond the door. I'm thinking forward and door within the angle. Thoughts? My hatches are much smaller than yours & thinking 3/4" PVC board for them.

View attachment 783013
Sorry, RJ but I'm not sure exactly what's going on in the drawing. Where is the hinge? and is this a cross section from the side or from above? I'm not visualizing how the door will function based on the drawing.

If I understand, than you are correct that I set the angle beyond the door. It would be preferable to have the door within the angle, but I couldn't find angle in the right dimensions for me to do that and I didn't want to pay for larger angle and have to cut it down to size.
 

RJ Howell

Active member
Sorry, RJ but I'm not sure exactly what's going on in the drawing. Where is the hinge? and is this a cross section from the side or from above? I'm not visualizing how the door will function based on the drawing.

If I understand, than you are correct that I set the angle beyond the door. It would be preferable to have the door within the angle, but I couldn't find angle in the right dimensions for me to do that and I didn't want to pay for larger angle and have to cut it down to size.

You have it pretty close! Most of my angle is too big.. You should be closer and take advantage of some of my years of stock. LOL and would be happy to share.

GAYqgIZm.jpg
3nlCAmPm.jpg
36TOTWNm.jpg


Side hinges on these and bottom hinge on the flip down (going between two of these on the rear wall).

I have a friend with a TIG, yet thinking maybe just Sikaflex the corners? I want to cover the screw heads anyway.. Any suggestions other than for those corners? Really want his 'bath-tubed'! No water, no dust!
 

Forum statistics

Threads
188,015
Messages
2,901,189
Members
229,411
Latest member
IvaBru
Top