Dreaming of a Perentie Turning an ex ADF 6x6 into an expedition vehicle

carts

Adventurer
Role Cage

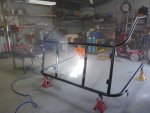
I have put a role cage on the 6x6 the living quarters had role over protection built by the ADF. It is immensely solid and was made from Aluminium the side supports are 25 mm plate. I had a few reasons for building the cabin role cage and some I have listed in a previous post. I was of the opinion that when you build something its best to do it right so I have used 40 mm nominal bore tube for the role cage. The tube is mid wall thickness which means it is 4 mm wall thickness. The tube here in OZ is colour coded so the one I used is red for those that wanted to know. When I received the tube I ran the callipers over it and checked its bore size and wall thickness. I even took photos of every measurement in case I am ever asked to prove what its made from.

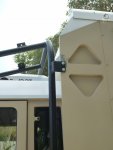
The hopes that go from one side to the other are made out of a single piece of tube with no welds on them. The cross bracing that will ultimately hold the tool boxes has been cut with a curve in them and welded so as to maximise strength. The tree lifters are clamp bolted one side of the clamp is welded to the tree lifter. They are all 40 mm nominal bore tube. To ensure that the system works as a whole the cabin role cage is bolted to the living area role over protection.

The cabin role cage is attached to the chassis using High tensile bolts and a combination compression joint and plate on plate arrangement. To ensure that the tube of the chassis didn’t collapse we made spacers to insert in side these had rod welded to them so that we could hold them in place whilst bolting them in place.
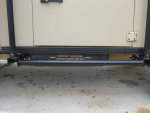
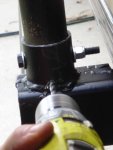
The side steps are all part of the mounting structure to the chassis and are made from the same tube used elsewhere on the role cage. The hoops are inserted into larger tube and bolted again by High tensile bolts. A hole has been drilled into each of the mounts this is an inspection hole as the code says you need to have a hole greater than 5 mm as an inspection hole.

I will give more updates as time and the adult supervision allows
Thanks and by Cart’s from WA
 

Attachments

  • RC paint top coat 1.jpg
    RC paint top coat 1.jpg
    381.2 KB · Views: 50
  • RC side step 1.jpg
    RC side step 1.jpg
    387 KB · Views: 52
  • inspection hole.jpg
    inspection hole.jpg
    323.5 KB · Views: 47
  • RC to ROP join.jpg
    RC to ROP join.jpg
    343.3 KB · Views: 56
  • role cage 2.jpg
    role cage 2.jpg
    579.7 KB · Views: 64
  • roll cage 1.jpg
    roll cage 1.jpg
    575.8 KB · Views: 62

tuesdayfox

New member
But is it legal? I have been pulled over by cops for my external roll cage and I got away by telling them it's a over engineered roof rack (as the roll cage does have a basket on top)

Sent from my Nexus 5X using Tapatalk
 

carts

Adventurer
But is it legal? I have been pulled over by cops for my external roll cage and I got away by telling them it's a over engineered roof rack (as the roll cage does have a basket on top)

Sent from my Nexus 5X using Tapatalk

That's a great question,

As far as I can find from the ADR's most of them deal with internal roll cages and for that see this document (https://infrastructure.gov.au/roads...ating_and_Occupant_Protection_1Jan2011_v2.pdf). The external are harder to find information on, so I used the guideline that say that the bar work should not extend past the mudguards of the vehicle and the bump/nudge bar should comply with vehicle manufactures spec if built after 2000 (something like that read it awhile ago and had a quick look in my library but couldn't find the spec/legislation fast so moved on). As mine was build before that and it had passed inspection I believe it is ok. We have built it so it is all within the vehicle profile. Currently its licensed as a light truck and I was going to have it inspected after I am finished so it can be listed as a motor home the vehicle registration cost is a lot lower.

If it passes then I will know its legal. I do not anticipate any problems a lot of light vehicles have ROP here in the west as external and as you say the difference between a well built roof rack and a ROP is only in the name ;-)

thanks for the reply
regards
Carts from WA
 

carts

Adventurer
Landy Chassis

Hi all I was PMed about the landy 6x6 chassis
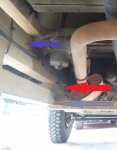
I have added a picture looking forward at the passenger side just were the cab attaches

chassis 6x6 arrows.jpg

The chassis is fully hot dipped galvanised box tube or RHS if you prefer that term.
In the image the red arrow points to the section that I have mounted the roll cage to. The dark blue arrow indicates the upper section of the chassis and in effect is a double layer of the lower box with the light blue being the lower section (there for there is the equivalent of 3 box sections). The top section and the bottom are 40 mm apart and into this gap is welded the support structures and interconnects for the ladder rack chassis type.
All cross members are reinforced dependent on the duty they have and as you can see some are in different positions such as the drop down one shown.

All in all it is one of the strongest constructions I have seen and the galvanised dip slows the corrosion down.
Hope this helps with the understanding
Regards
Carts from WA
 

Jitterbug

Adventurer
An extra bit of info; this is from the military manual for the 6x6 (let me know if you want a copy and I can share the dropbox folder)

Screen Shot 2016-08-04 at 1.08.25 PM.jpg
 

carts

Adventurer
Tool Boxes on Roof

I have now installed the tool boxes on the roof of our truck
they are recycled from when she was a troop carrier. The boxes were next to were the gunner stood to get through the machine gun turret.
The space provided I am sure will fill up quite quickly. They will also shade the cab and provide some additional protection for the roof top ac.
It will be challenge but I will try and constrain my self to these two boxes for spare parts and mechanical tools. That's excluding recovery gear of course.
I know that the weight will be high but in relation to all of the other things we have located low this is minor I hope.

thanks for reading
will update further as time and the adult supervision will allow
cheers Carts from WA
 

Attachments

  • tool boxs front.jpg
    tool boxs front.jpg
    553.2 KB · Views: 46
  • toolboxes on roof.jpg
    toolboxes on roof.jpg
    447 KB · Views: 46

carts

Adventurer
table that folds down to be part of the bed

We have designed the sleeping area to also be the table and seats.
We spent some time looking at table lift systems as we wanted 300 mm of lift.
Most of the ones we were looking at were for yachts and seamed to all have air assist legs.
We were less interested in these as we did not want a failure to mean a bad nights sleep.
So we came up with a design that used an over center arrangement of leavers.
My Step father then proceeded to build it and nutting out all the issues on the way through.

Basically we used two pieces of box tube one that can fit into the other so that the table doesn't twist.
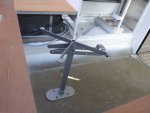
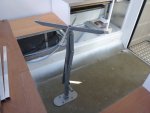
Then one leaver are that bushes on an other that lifts the from the bed position to the table position, once over center the whole thing is self supporting. To lower you just pull on the handle thats added to the leaver and it lowers. Very little effort required to operate.

To ensure that its all stable we built a reinforcing system bellow the floor so that the table bolted to some substantial parts of the vehicle.

all in all I am extremely happy with the outcome.

more to come as time and the adult supervision allows
cheers Carts from WA

table reinforcing.jpg

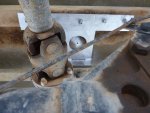
Table reinforcing just above the center bearing for the drive shaft
These two images are of the table support in the Up position (Left) and Down (right)
 

Attachments

  • table stand down.jpg
    table stand down.jpg
    375.6 KB · Views: 32
  • table stand up.jpg
    table stand up.jpg
    366 KB · Views: 33
I have now installed the tool boxes on the roof of our truck
they are recycled from when she was a troop carrier. The boxes were next to were the gunner stood to get through the machine gun turret.
The space provided I am sure will fill up quite quickly. They will also shade the cab and provide some additional protection for the roof top ac.
It will be challenge but I will try and constrain my self to these two boxes for spare parts and mechanical tools. That's excluding recovery gear of course.
I know that the weight will be high but in relation to all of the other things we have located low this is minor I hope.

thanks for reading
will update further as time and the adult supervision will allow
cheers Carts from WA

I love watching this build, what beast the 6x is. I recently spent a few weeks with the Aussie Army boys in Hawaii and they had a few 6x with them for mobile mechanic and armorer vehicles. I was absolutely amazed of the performance of this thing with the low range box; it really just crawled over everything, the approach/departure and lateral angles were amazing.

They carried a ton of weight in those things and would modify them to lower the CG by putting some of those external boxes like you have on the roof down low in front of the first axle behind the cab. Of course they had to cut the body area out but it was worth it. Not sure if they are the same boxes as the turret stand as they still had those in the cab but they mounted boxes in that frame area in front of the 1st rear axle and those things were stuffed full of fluids, parts, recovery gear, etc... Might be an option for you as I am not sure what the work would entail. By the looks of your project, I don't think there is anything you can't accomplish.

anxiously following the thread!

E
 
I had the opportunity to play with one of these that I imported for a client last week. The final gearing on the 6x6 is quite low, with a top speed below 100kph. do have plans to change that @ all?

Matt @ KLR is prepping one of the double cab 6x6's to send over to me and we decided to install 3.54 diffs. Hopefully that will be the silver bullet for highway use here.
 
Last edited:

carts

Adventurer
I had the opportunity to play with one of these that I imported for a client last week. The final gearing on the 6x6 is quite low, with a top speed below 100kph. do have plans to change that @ all?

Matt @ KLR is prepping one of the double cab 6x6's to send over to me and we decided to install 3.54 diffs. Hopefully that will be the silver bullet for highway use here.

Hi Dividing Creek
They are slow. As frequently touted all vehicles are based on compromise, I am planning on spending more time on dirt/unsealed roads than sealed ones so I am not planing on changing the diff ratios. We are building a rig for a year long holiday that if we like it will then be a move to travelling around the world slowly ;-)

There have been a number of people who have changed the diff ratios on forums including Jitterbug (Dave) who had a 6x6 build on this forum (I seam to remember him doing that but I could be wrong). If we were going to use the vehicle like we currently do in flogging the guts out of our Disco to get out into the bush and then slowing down to enjoy the week end and flogging it back to the big smoke then we would have to do something.

How are you finding the Right hand drive are you going to change it over and if so how are you handling the Isuzu manifold exhaust shift?
regards
Geoff
 

Forum statistics

Threads
188,368
Messages
2,906,162
Members
230,117
Latest member
greatwhite24

Members online

Top