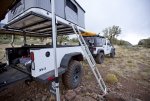
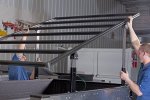
Dstock's M101A1 build... or the reality, I needed a new project!

dstock

Explorer
croix,

Interesting point you make, I was messing around with it a bit last weekend, and had the tabs clamped tightly against the side bars and it appeared to work without binding but I will delve into this further. I am loosely basing this off the the Xventure2 trailer which appears to have only one pivot point but I only have images online as a reference.

I will do some more investigation, and there is no reason I couldn't bolt them on to allow the pivot versus welding them. My vertical tubes are 44" apart and total lift will be 18 inches. The 1 1/4" tube for sure won't be bending!

Thanks for pointing this out!
 

dstock

Explorer
Quick Update

As croix correctly pointed out, if I had welded the tabs on to the rack side bars, the vertical tubes would bind at a certain point. To mitigate this issue, I bolted the tabs to the side bars which helped a lot. I can now get slightly more than halfway to my upper most point of travel, which is a difference of about 14 inches from full rest to the top.
While not perfect, this will allow the tent to be raised to the top of it's travel in 3 steps. One end to the halfway point, the other end to the top, and then the first end from the halfway point to the top. This should still be fairly easy and only add a few seconds to the lifting process. I'm not interested in using longer tabs, but that would be another way to get more lift height in a single move. Since I have spring loaded pull pins, this should an easy process.

Here's the new setup for the joints, I need to get some additional spacers for the heim joints and have left things a little loose since I still have to take everything apart to weld up the rack.

i-hgX7W5h-L.jpg


i-84ccjsw-L.jpg


I may also get knobs on threaded studs for where the tabs attach to the rack, welding a nut on the back side, so then I can snug or loosen them as needed for elevating or travel.

Spring loaded pull pins with lockout:

i-skmxxmx-L.jpg


So much for keeping it simple although it's been fun to figure out! Thanks croix for getting me there quicker!
 

croix

Observer
Longer tabs could get you there, but I think that would leave a lot of room for movement going down the road. Shorter tabs and one extra step seems like a good compromise. Glad you got it worked out.

-croix
 

dstock

Explorer
Longer tabs could get you there, but I think that would leave a lot of room for movement going down the road. Shorter tabs and one extra step seems like a good compromise. Glad you got it worked out.

-croix

That's exactly what I was thinking regarding longer tabs. Thanks again for the help!
 

XVENTURE TRAILERS

Supporting Sponsor - XVENTURE Trailers
Elevating Rack System

Hi D, I just looked through the thread and your build caught my eye. How are you designing the Horizontal Linear Bearing for your rack?
 

dstock

Explorer
Hi D, I just looked through the thread and your build caught my eye. How are you designing the Horizontal Linear Bearing for your rack?

Hi there, not to be ignorant, but I am not sure I know what you are referring to?

The upper joint is a 3/8" bolt through the side tabs with a nylon locknut, although I plan to use a thin nylon washer between the tabs and the side bars of the rack to prevent binding. I may use a knob with a threaded stud instead of the bolt, allowing me to loosen the tabs when raising and lowering, and tighten for travel.

Adding a bearing at this pivot would certainly be better for long term, for sure something to consider. Open to suggestions!

Thanks.
 

XVENTURE TRAILERS

Supporting Sponsor - XVENTURE Trailers
You definitely need the ability for each vertical to tray attachment point to pivot, and you are on the right track there. However with an elevating rack system when the rack is level, you have a distance between the front and rear set of vertical support beams. When you lift one end of the rack the distance between the front and rear vertical elevator beams lengthens up to 3".

A Horizontal Linear Bearing provision allows the attachment point of one set of the elevator beams to slide to accommodate this phenomena. Unless you plan on lifting both the front and rear ends of the rack simultaneously, which is not recommended, you must have a Linear Bearing Provision.

Frankly this is the tricky part about designing a proper Elevating Rack System for an overland trailer. So I was curios as to how you had planned to address this. I spent a substantial amount of time developing this solution and always like to see what other inventors.

Look at the rear elevator attachment points you'll see that silver coupler. This is our current Horizontal Liner Bearing
BaseCamp CS-2.jpg

This shows our first rev of bearing where the attachment point at one end slide. You can't actually see it. BUt I provided this image so you can understand how the distance between the front and rear set of vertical elevator increases when lifting.
Rack Elevated-5.jpg

Lifting both end at the same time means;
- the entire weight of the payload is lifted at the same time. Lifting one end at a time reduces the lift load by half.
- you must have 2 people to lift plus then you have to have someone to set the height clamps.

Theres a lot more to doing an elevating rack properly for a trailer but this is the basics.

Hope this helps you.
 

dstock

Explorer
Thanks Markimus, this is helpful.

It was actually a couple posts back that member croix pointed out the horizontal distance issue when raising the rack which is why I decided to bolt both ends of the tabs as opposed to welding the tabs to the rack. The increased pivot allowed by the bolting of the tabs and the heim joint, which gives me enough horizontal length increase to raise one end of the rack halfway to it's final destination. I am then able to raise the other end to the final height, and then come back and raise the first end from the halfway point to the final height. It's an extra step of course, but will only take a few more seconds, however, with two people it shouldn't be much of a bother. Total travel is only about 14 inches.

Great design on your trailer, wish my budget would allow for an Xventure!

Thanks.
 

XVENTURE TRAILERS

Supporting Sponsor - XVENTURE Trailers
Thanks for the compliments.

So the next consideration is that after you lift or lower the rack, and have provisioned for the changing elevator spread, you'll need to be able to lock the slides at all 4 points from being able to move forward or back when in transport. Otherwise the rack will not be sound especially when off road or in high speed accident avoidance maneuvers.

Next is we have to address how this rack will absorb the kinetic energy produced on the left to right axis. If the rack vertical beams are rigid like when steel is used, your rack will destroy your trailers cargo bed or at a minimum crack all the welds. Read this, "When you need to elevate the rack to accommodate ATV's or Motorcycles, it's easiest performed with 2 people. Pull all 4 retaining pins, unlock the racks rear left and right Linear Bearing brakes. Elevate the rear end first, then have a helper insert the pins at the desired height. Repeat for the front end while standing on the storage cabinet lid. Remember to retighten the Linear Bearing Brakes.

I find standing on the tailgate is best when elevating the rear and lift from the center of the racks cross bar. Stand on the Storage Cabinets lid when doing the front end. If you are by yourself, a small scissor jack and piece of wood works great to lift each end.

If you elevate the rack to its maximum height, we recommend cross-strapping one end of the tray to the exterior tie downs as shown in this image-set. You want the rack to have a little sway left to right when carrying a heavy load like a Roof Top Tent, Awning, and additional cargo. The rack systems Elevator Beams have been engineered to provide that. Ensure that if you need to cross strap, only do one end of the rack.

The sway we've engineered into the elevator system relieves the left-to-right axis kinetic energy caused when off-roading on severe terrain or when cornering at high speed. The slight bowing the beams provide is necessary so that those forces don't break the rack or trailer, which is common with rigid welded assemblies.

The Elevating Rack System provides support for payloads up to 1000 LBS. However, we do not support traveling with that much weight on the rack as it will raise your center of gravity and create a dangerous hazard. Keep it at a maximum of 400 LBS when in motion.

And If you are going pack that much weight overhead, ensure you top off the water tanks. This will provide a 200LB counter balance at axil height".


Can you attach an image of how you have mounted your vertical elevator tubes to the trailer?
 

dstock

Explorer
Thanks for the info. Pics are in the thread. I have no intention of traveling around with the rack elevated, it's purpose is to allow use of our annex with our RTT.
 

XVENTURE TRAILERS

Supporting Sponsor - XVENTURE Trailers
Trust me, those weld at the top of the cargo bed securing the elevator tube to it are going to crack in a jiffy with only a tent on the rack at the lowest position. I'd make a strap that you can bolt through the shoulder of the bed. Same with the base of those tubes. Use hardened bolts and good brackets not welds. Theres no way for the energy to be absorbed in a severe jolt other than to crack the welds or bend the tubes otherwise.
 
Last edited:

dstock

Explorer
Thanks, I was considering a strap as well.

Granted I am not the first to come up with this design as I am following many other builds on here who have gone this same route without issue, however, I do like to over engineer things and will likely do so here as well.
 
Last edited:

XVENTURE TRAILERS

Supporting Sponsor - XVENTURE Trailers
It's 125 lbs on a lever that is traveling 65-80 MPH on highway and being thrown left to right off road. Those forces change that 125 pounder into a completely different animal when braking at speed. Don't lose sight of that. Anyway, just trying to help. Sounds like you have it figured out.
 
Last edited:

film842

Observer
Just stumbled across your thread and wanted to say thanks for posting the process. I'm currently looking for an M101 and my plans are very similar to yours so what you've done so far is going to be very helpful.

Hopefully when you're done and you start using it for camping and so forth you post your impressions. I'm particularly interested in how the M101 will do in mild to medium off road use. I had been concerned about weight, but now I'm not. I like the idea of all that room.

Keep it up and thanks again.
 

Forum statistics

Threads
188,185
Messages
2,903,534
Members
229,665
Latest member
SANelson
Top