p1michaud
Expedition Leader
DIY Roof Rack/Basket
Just last weekend, I finally installed my Roof Basket that's been in the making since December 2005. :Wow1:
First a bit of background. I had been debating the pros and cons of a roof basket for along time. So this December I was over at my friend's place who has a welder, chop saw, a few grinders and a nice garage to work in. We were discussing various ideas for small projects and mentionned that I was thinking of building my own roof basket for the Tacoma. We looked at my metal pile (left over from previous projects) that was building in his garage and figured that I did not need to buy hardly any material with what I already had. No to mention he was happy to see my pile of junk leave his garage!
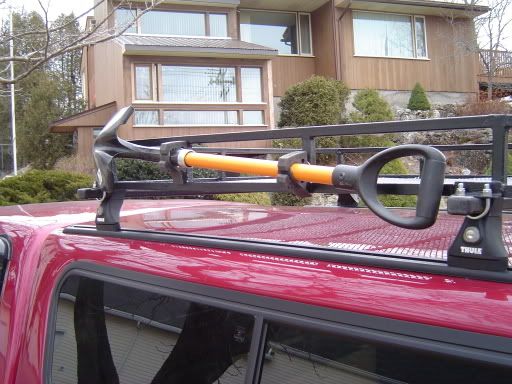
So I started doing some research and figured that I wanted my basked size to be 52" long by 44" wide. Attached is a .pdf file of what I came up with. In the desing of the basket, I had incorporated brackets for aux. lighting front and back, Hi-Lift mounting points and shovel mounting clamps using a pair of Quick Fist rubber clamps. The material I had was 3/4" square tube by 1/8" thick and 3/4" angle by 1/8" thick. It's heavy I know but the price was right (read free). I was originally going to use the "kennel" flooring but when I got on the phone and started talking to the sales rep, it was going to cost me $45 US for 3 sheets of material and $68 US for shipping then I had to drive 2 hours to pick it up and pay anohter 15 % to bring it in to Canada! So, I decided to use 3/4" expanded and flattened metal instead. I got a sheet for about $55 CDN.
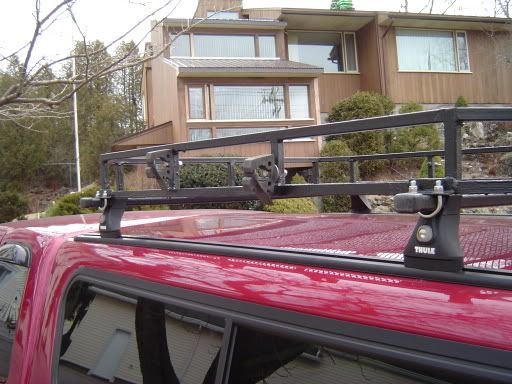
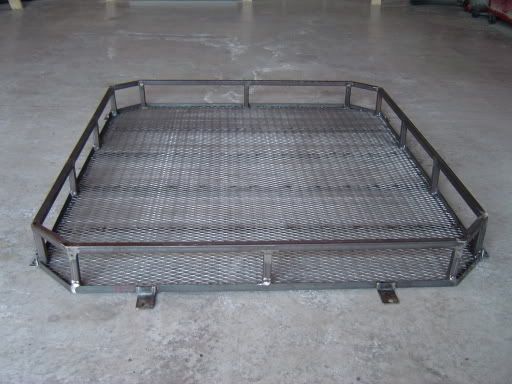
Since we only gather in my friend's garage on Thursday evenings when we can, I have been picking away at fabricating this thing since December of 2005. I first cut the bottom part and tacked it together. Then I cut upper part of the roof basket and tacked it all together. After trying to make sure everything was lined up I welded the whole works together. Next I trimmed the expanded metal to fit and welded that in place as well. Then I finally cleaned up my nasty looking welds with a grinder. Who needs to know how to weld when you know how to grind! :hehe: The last phase prior to installation was to finish the basket. I had some DIY roll in bed liner that was left over, so I used that to cover the metal. By using a roller it resulted in a nice textured finish. Finally the roof basket was installed to my existing THULE roof rack using four U bolts.
All in all the DIY roof basket creation of mine turned out really well and I could not be happier. I can install and remove it relatively easily by myself, it looks pretty good, I've got room for a Hi-Lift, shovel, aux. lighting, other supplies as necessary and best of all it cost less than $100 CDN!
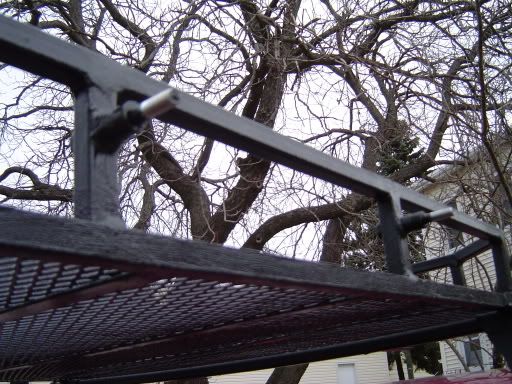
I did picke up a few things if someone else is thinking of building one. If I were to do it again, i'd use thinner material (i.e. 1/16" range) because it's relatively heavy at approximately 45 lbs. I'd make sure that the tabs you install for the aux. lighting are stout. Mine are a bit too thin and cause the Lightforce 170's to vibrate way too much and they are light weight. I'm going to cut the brackets off and replace them with thicker, beefier ones down the road. What else can I say? I'll be more than happy to answer any questions or post up more pics if anybody wants to see more.
Cheers,
P
Humm, I can't get the pics to load as attachements properly. Time for plan B! Sorry for all the pics!
Picture of rack after welding, before painting:
Aux light mounting tabs:

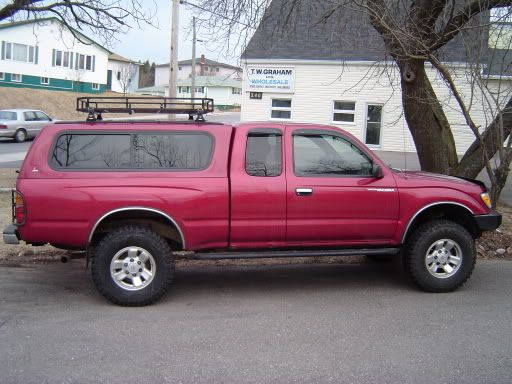
Picture of rack on truck, various angles:


Just last weekend, I finally installed my Roof Basket that's been in the making since December 2005. :Wow1:
First a bit of background. I had been debating the pros and cons of a roof basket for along time. So this December I was over at my friend's place who has a welder, chop saw, a few grinders and a nice garage to work in. We were discussing various ideas for small projects and mentionned that I was thinking of building my own roof basket for the Tacoma. We looked at my metal pile (left over from previous projects) that was building in his garage and figured that I did not need to buy hardly any material with what I already had. No to mention he was happy to see my pile of junk leave his garage!
So I started doing some research and figured that I wanted my basked size to be 52" long by 44" wide. Attached is a .pdf file of what I came up with. In the desing of the basket, I had incorporated brackets for aux. lighting front and back, Hi-Lift mounting points and shovel mounting clamps using a pair of Quick Fist rubber clamps. The material I had was 3/4" square tube by 1/8" thick and 3/4" angle by 1/8" thick. It's heavy I know but the price was right (read free). I was originally going to use the "kennel" flooring but when I got on the phone and started talking to the sales rep, it was going to cost me $45 US for 3 sheets of material and $68 US for shipping then I had to drive 2 hours to pick it up and pay anohter 15 % to bring it in to Canada! So, I decided to use 3/4" expanded and flattened metal instead. I got a sheet for about $55 CDN.
Since we only gather in my friend's garage on Thursday evenings when we can, I have been picking away at fabricating this thing since December of 2005. I first cut the bottom part and tacked it together. Then I cut upper part of the roof basket and tacked it all together. After trying to make sure everything was lined up I welded the whole works together. Next I trimmed the expanded metal to fit and welded that in place as well. Then I finally cleaned up my nasty looking welds with a grinder. Who needs to know how to weld when you know how to grind! :hehe: The last phase prior to installation was to finish the basket. I had some DIY roll in bed liner that was left over, so I used that to cover the metal. By using a roller it resulted in a nice textured finish. Finally the roof basket was installed to my existing THULE roof rack using four U bolts.
All in all the DIY roof basket creation of mine turned out really well and I could not be happier. I can install and remove it relatively easily by myself, it looks pretty good, I've got room for a Hi-Lift, shovel, aux. lighting, other supplies as necessary and best of all it cost less than $100 CDN!
I did picke up a few things if someone else is thinking of building one. If I were to do it again, i'd use thinner material (i.e. 1/16" range) because it's relatively heavy at approximately 45 lbs. I'd make sure that the tabs you install for the aux. lighting are stout. Mine are a bit too thin and cause the Lightforce 170's to vibrate way too much and they are light weight. I'm going to cut the brackets off and replace them with thicker, beefier ones down the road. What else can I say? I'll be more than happy to answer any questions or post up more pics if anybody wants to see more.
Cheers,
P
Humm, I can't get the pics to load as attachements properly. Time for plan B! Sorry for all the pics!
Picture of rack after welding, before painting:

Aux light mounting tabs:

Picture of rack on truck, various angles:


Attachments
Last edited:

