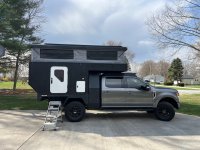
F250 flatbed camper build

ITTOG

Well-known member
Originally, the actuators (Progressive Dynamics) were all on the outside (two on back, two up on the sides as far forward as they could go before the cabover). But had problems with them malfunctioning (seems like they were getting water in them, as well as not having a lot of side-to-side support).

I switched to heavier duty Firgelli actuators, and moved the front ones to the interior (which also helps get them out of harms way from tree branches, etc). The rear ones, I installed in the same place as before, on the back. The rear ones are really only carrying 5% of the weight, so are just there mostly to stabilize things. I also added gas struts all around, to help reduce side-to-side motion, and reduce some of the weight off the actuators.
But I did the switch last fall, so all these photos are the new Firgelli actuators.

Mounted the new actuators with two mounts on the body, to stabilize it further.
If one of the rear ones fails, I can just remove it, and the roof will still work. If one of the front ones fails, I can swap in a rear one. So feel a bit better about this setup.
Also have them setup running off of 110v AC, rather than direct 12v. This is so that if my 12v system is out of commission for some reason, or my camper batteries dead, I can always plug the actuators into the truck 400w inverter, and get the roof down/up as needed.
Good idea on adding the redundancy on the actuator.

thanks! really tried to take advantage of every square inch of space, making custom drawers that go all the way to the back walls, and take up as much of the cabinet interior as possible. Also like how the latches turned out. Had to use slam latches in a few locations, due to how the aluminum extrusion layout had to be, but for all the kitchen ones I used a simple elbow latch that click in when the drawer closes, and is pretty natural to open right when you reach in to pull the drawer open.
What wood are you using to make your cabinets and drawers.
 

ExpoMike

Well-known member
Nice interior layout and build. I wish other companies would take a lesson from you and increase the roof height over the bed area. Yours looks nice and roomy and not tight, unlike our current Northstar and previous FWC.
 

PDX_Jay

Member
Good idea on adding the redundancy on the actuator.


What wood are you using to make your cabinets and drawers.
using mostly baltic birch ply - although a few bits and pieces of other misc scraps I had laying around to save money. Cabinet structure is 10 series 80/20 (as you can see on page one of this thread) and just have 1/2" baltic birch panels to cover it.
 

PDX_Jay

Member
Nice interior layout and build. I wish other companies would take a lesson from you and increase the roof height over the bed area. Yours looks nice and roomy and not tight, unlike our current Northstar and previous FWC.
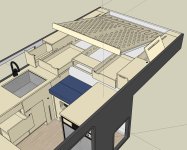
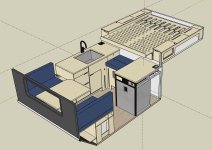
Yeah, really like being able to sit up in bed. Originally, was going to have storage under the bed (about 5" deep) similar to how FWC does it, but I was going to have drawers pull out for the front section. However, after doing some trial runs in the camper without the underbed storage, decided we preferred the extra head room, and being able sit up / hang out in the bed space, without feeling cramped. Really feels like legit added space for the camper, and not just sleeping space only.
Here's what the original design was going to be... kinda fun to look back now - stuck pretty close to it, although a few things changed as we went along.


camper 6.jpg


camper 7.jpg
 

Forum statistics

Threads
188,005
Messages
2,901,031
Members
229,355
Latest member
BDM66
Top