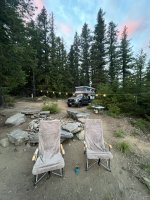
F250 flatbed camper build

PDX_Jay

Member
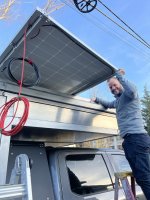
900w of solar now installed! used some 15 series 8020 to create a solid crossbar system for mounting (the panels are pretty big, so were feeling a bit too flimsy for my liking without support). Pretty happy with how it turned out, and should provide a bit more shading for the roof in the summer time (panels have a gap to allow airflow underneath). Went with parallel config for wiring, opting to prioritize the benefit of better partially shaded performance. However, ran all the cabling to the back together, so that I can easily switch them to series if I change my mind later. The charge controller on the Yeti Pro 4000 can handle it either way.


72d78040-e441-4324-8271-d291d51dd76f.JPG IMG_2461 Large.jpeg IMG_2457 Large.jpeg
 

PDX_Jay

Member
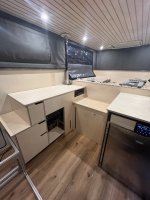
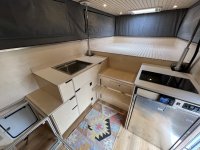
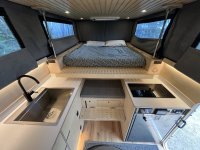
Making a bit more progress on interior.

IMG_2559 Large.jpeg
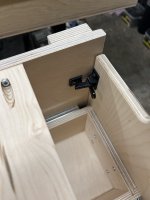
Came up with my own latch system— as I didn't really like the look of slam latches for the kitchen drawers, didn't want the push button latches as if you forget to push them back in before you drive, they won't be secured, and the RV Labs locking drawer latches are expensive, and stick out from the drawers which isn't great in a tight space.

Using a handle cutout and an internal elbow catch seems to work well - we'll see how it works long term. If I really don't like them, I'll just pull off the drawer faces, and make new ones with slam latches instead.


IMG_2537 Large.jpeg
 

dstefan

Well-known member
Very nicely done set up!

Can you comment on your experience with bison in building the camper? I have heard some issues from some people in working with them or getting the result they were looking for.
 

PDX_Jay

Member
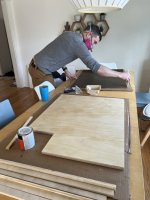
opted to go with formica countertops - first time attempting a formica glue-up, and didn't go to badly. Had to take over the dining room, as my tiny garage is unheated, and too cold for the contact cement (truck is parked on the street, and I have an old one-car garage where i have my tools setup). So had to open all the windows in the house, run an electric space heater, and try to get the job done fast.

IMG_2597 Large.jpeg

IMG_2603 Large.jpeg


Also have the dinette benches mocked up - Still need to make some adjustments to the 80/20 framing underneath that supports everything, but everything going as planned. Wish I'd gone with a shorter Tern Overland window now, but far too late for that decision :) It'll be okay, just will need to make some sort of "fence" that I can drop in place if we have the dinette in bed mode, as otherwise it would be easy to roll into the window, and if the shade is down, damage that.

IMG_2607 Large.jpeg

Overall though, pretty happy with the direction things are going. Still haven't even started on the heating/plumbing, so a long way to go still - but visually it's at least looking like a camper now.
 

WW Cyclist

Member
Amazing build so far. Love your attention to detail. Just curious if you have thought about GVWR on your F-250. I have a very similar build on a F-350 and I'm about #800 shy of my GVWR dry.
 

Attachments

  • as she sits.jpg
    as she sits.jpg
    899.7 KB · Views: 44

PDX_Jay

Member
Amazing build so far. Love your attention to detail. Just curious if you have thought about GVWR on your F-250. I have a very similar build on a F-350 and I'm about #800 shy of my GVWR dry.
nice truck! Is that the long wheelbase? Hard to tell with the Bowen bed on there. Mine was a short bed. Definitely going to be pushing up close to the GVWR on this. I guess I'll find out when I finish building, and can weigh the thing. Tried to keep weight reasonable as I built it. Framed everything I could in 10 series 8020, rather than 15 series, used 1/4" plywood wherever it wasn't required for structure (so walls are just the pink foam insulation, with 1/4" ply on them). Countertops are 5/8" ply, although have big cutouts for the sink and stove. Ceiling is 1/4" ply, with 1/4" strips Cabinets mostly aluminum extrusion, with 1/2" ply on the facing, and drawers are 1/2" ply with 1/4" bottoms. Battery system and water are obviously quite heavy - but mounted against the front of the camper, as far forward as possible without putting them into the garage. In the end, it's still heavy - just hoping I can slide in under GVWR (attempted to calculate weight of everything ahead of time, and it's gonna be close) . Also will be redoing the suspension once I know final weights, so I can get suspension built that prioritizes handling the camper on the truck full-time.
 

PDX_Jay

Member
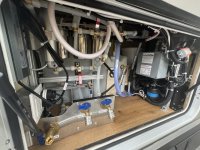
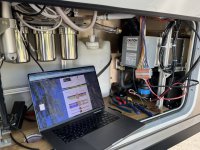
Quick progress report - got the water system and heating system in, and a quick 2-night camp trip to test it all out.
IMG_4213 Large.jpeg
Main features of system:
- ability to fill 30 gallon freshwater tank from clean pressurized source (aka my garden hose)

- ability to use my water pump to ALSO fill the freshwater tank from a non-pressurized source (flip 3 ball-valves horizontal, and the system can now pull water from a bucket on the ground, or a stream, through my filter setup, and into my freshwater tank)

- when 3 ball valves are in normal vertical position, the system is in "normal" mode, with pump pulling water from the freshwater tank, through the triple filter, and out to the sink/exterior shower

- Rixen heating system, provides instant hot water to sink/shower, as well as heat to the camper (vent on floor, under dinette, and in cabover)

- Rixen can heat from both the gas furnace (mounted under flatbed, behind rear storage box, pulling directly from truck's fuel tank) or via 110v AC power - with the Goal Zero Yeti Pro providing plenty of power. Probably will only use this option when I've got excess battery reserves/lots of sun for solar recharging. But 8kWh of battery and 900+200w solar means this is a legit option, if I don't want to burn gasoline.

- Graywater is a 5 gallon jug, with a valve on top that allows me to choose whether the sink drains into the jug, or down under the truck. Also includes an overflow, so that you can't overfill the jug, and it simply drains under the truck. Quick disconnects so that you can easily remove and dump the jug.

- LED backlight for the jug, and for the main freshwater, with a momentary switch inside the camper, allows you to quickly glance and see your fresh/gray water levels.
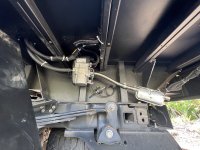
IMG_3822 Large.jpeg
above: furnace is mounted behind the flatbed's rear storage box (which I removed for the install). I've never washed this section, and in a year of hitting dirt roads, this area still seems clean, so don't think I'll have issues with it getting covered in mud... but I'll keep an eye on it, and install a shield if necessary (it's all weatherproof of course)
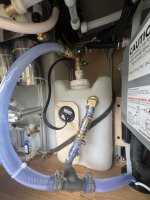
IMG_4214 4 Large.jpeg

IMG_3824 Large.jpeg
above: wiring up the Rixen system


PDX_Jay

Member
Amazing build so far. Love your attention to detail. Just curious if you have thought about GVWR on your F-250. I have a very similar build on a F-350 and I'm about #800 shy of my GVWR dry.
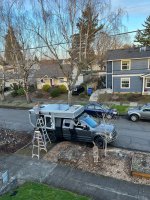
Just realized I could have given you one other piece of info - I weighed the truck w/flatbed, but before camper. With a full tank of fuel (58 gallons), me, my wife, some basic camping gear for a couple of nights, we were at 4,520 lb front axle, 3,700 lb rear axle.
After we put the camper shell on there (no buildout at all, just an empty box with the poptop), we were 4,500 lb front axle, 4,840 rear axle (so 9,340 total).
So add 250 lbs of water, 350 lbs of battery/electrical/solar. That puts me at basically 10,000 lbs right there. Probably going to be right up against the 10,800 GVWR of the F250 tremor with the rest of the build.

Seeing as the F250 and F350 tremors are identical, other than the door sticker, I'm not too worried about it, as I'm going to be putting in custom rear leaf springs and properly valved shocks.
 

IdaSHO

IDACAMPER
Looking at your most recent photos, you are already engaging the factory overload pack.
If you like the ride height and handling currently, Id leave it as is.

If not, Id invest in a proper leaf pack designed for the weight you are sitting at loaded/wet. (y)
 

PDX_Jay

Member
Looking at your most recent photos, you are already engaging the factory overload pack.
If you like the ride height and handling currently, Id leave it as is.

If not, Id invest in a proper leaf pack designed for the weight you are sitting at loaded/wet. (y)
Planning on a proper leaf pack. Was looking at Deaver or Alcan - need to do some more research though.
 

ITTOG

Well-known member
I see you have linear actuators near the cabover on the outside and inside of the camper. Is that truly the case or were the outside actuators moved inside and some of the pictures are out of order?

Sent from my Pixel 9 Pro XL using Tapatalk
 

ITTOG

Well-known member
By the way, great job with the interior. All the drawers are really nice.

Sent from my Pixel 9 Pro XL using Tapatalk
 

PDX_Jay

Member
I see you have linear actuators near the cabover on the outside and inside of the camper. Is that truly the case or were the outside actuators moved inside and some of the pictures are out of order?

Sent from my Pixel 9 Pro XL using Tapatalk
Originally, the actuators (Progressive Dynamics) were all on the outside (two on back, two up on the sides as far forward as they could go before the cabover). But had problems with them malfunctioning (seems like they were getting water in them, as well as not having a lot of side-to-side support).

I switched to heavier duty Firgelli actuators, and moved the front ones to the interior (which also helps get them out of harms way from tree branches, etc). The rear ones, I installed in the same place as before, on the back. The rear ones are really only carrying 5% of the weight, so are just there mostly to stabilize things. I also added gas struts all around, to help reduce side-to-side motion, and reduce some of the weight off the actuators.
But I did the switch last fall, so all these photos are the new Firgelli actuators.

Mounted the new actuators with two mounts on the body, to stabilize it further.
If one of the rear ones fails, I can just remove it, and the roof will still work. If one of the front ones fails, I can swap in a rear one. So feel a bit better about this setup.
Also have them setup running off of 110v AC, rather than direct 12v. This is so that if my 12v system is out of commission for some reason, or my camper batteries dead, I can always plug the actuators into the truck 400w inverter, and get the roof down/up as needed.
 

PDX_Jay

Member
By the way, great job with the interior. All the drawers are really nice.

Sent from my Pixel 9 Pro XL using Tapatalk
thanks! really tried to take advantage of every square inch of space, making custom drawers that go all the way to the back walls, and take up as much of the cabinet interior as possible. Also like how the latches turned out. Had to use slam latches in a few locations, due to how the aluminum extrusion layout had to be, but for all the kitchen ones I used a simple elbow latch that click in when the drawer closes, and is pretty natural to open right when you reach in to pull the drawer open.
 

Forum statistics

Threads
188,178
Messages
2,903,418
Members
229,665
Latest member
SANelson
Top