From Build To Adventuring... A 1950 Dodge B2B Pickup Story

GoldiesGarage

Well-known member
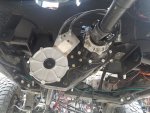
Now that we have the engine where we want it. It was time to give this 2WD transmission the ability to power both the front and rear axle. Not knowing very much in this category we went with the tried & true (So we read) Divorced NP205 with driver side drop (Ford Transfer Case). The plan is to have a short intermediate shaft and then 2 regular driveshafts for the front and rear axle.
20180406_150822.jpg
We built our transfer case mounts from scratch. Some tubing, 4 big bolts, Large angle steel, and a set of bushings. We used a control arm type method. So far no problems.
20180317_145001.jpg
We used JB Fab shifters. Not sure if it's the T-Case or shifter or the shifter alignment but sometime it works great then sometimes it doesn't want to shift at all.
20190428_153237.jpg
We had to cut through the factory Dodge cross member since the driveshaft wanted the space. We bought a large diameter pipe/tube cut it and bridged the two pieces back together.

One positive aspect about having the Divorced T-Case is that we took advantage of being able to lower the t-case compared to it married to the Trans. So we have way better driveshafts angles. With an UP there is a down which came into play with the Custom Long Arms Suspension, But that's a future post...
 

GoldiesGarage

Well-known member
Before we bolt the cab on we had to give it some love.
20180407_172920.jpg20180407_181014.jpg
The toe board is made up of 2 pieces and we welded them in. After we looked at it from the inside of the cab, we realized we put them on backwards...Oh well.
20180408_180353.jpg
There were some holes in the floor. What we did was welded some more 1/8 diamond plate steel to the underside of the floor. It did two things, sealed the floor and added some strength. We painted it all with POR-15.
20180408_180412.jpg
20180408_184346.jpg20180420_174941.jpg
20180421_190316 60.jpg
 

Attachments

  • 20180408_180357.jpg
    20180408_180357.jpg
    1.3 MB · Views: 23

Cabrito

I come in Peace
I can't wait to see the finished product.

Was the diamond plate added to the pan for additional strength or stronger mounting points?
 

GoldiesGarage

Well-known member
Awesome progress thus far. Can't wait to see more pictures.
Thanks, here are some more progress pictures.

I can't wait to see the finished product.

Was the diamond plate added to the pan for additional strength or stronger mounting points?
Diamond plate was added for floor strength. We didn't want to patch the rust in the floor. When in the cab, you can't even tell there is diamond plate on the other side. As we intended.


Dealing with the last of the fire damage, we tackle the AAM 9.25 Front Axle.
Replaces the U-Joints, the Hubs, and all the Ball Joints. We needed more torque for the ball joints. We had to add a 4 foot piece of tubing on the end of the ratchet.
20180425_163950 60.jpg
20180425_161036.jpg
Ish is keeping the axle from rotating and jumping off the Jack stands. While I use all my might to get this thing seated.
20180425_163933 60.jpg

20180427_185201.jpg
All good again.
 

GoldiesGarage

Well-known member
Now for everyone's favorite part... WIRING...

Did I mention this is our 1st Off-Road build and our1st time playing with Fuel Injection or anything with ECUs/computers.
20180428_112739.jpg
With the research I have done, I know you have to turn off VATS. We bought the HP tuners software to delete VATS and some other codes we will not need.
20180428_141332.jpg
We decided to buy a stand alone wiring harness from Speartech. Since we are just getting our feet wet in this endeavor.

Besides wiring everything up right, I think the second hardest thing is making a clean and functional install. I will say, future Eli is not happy with the install.
 

ExpoMike

Well-known member
Seems kinda odd but Deboss garage on YouTube did the same thing with his Duramax into a 60’s Chevy build.

Even Ford Explorers from the late 90's to mid 00's have the engine offset to the passenger side a little. Also common in vans to allow more footwell room for pedals.
 

GoldiesGarage

Well-known member
I personally do not understand why it is a big deal having the engine to one side or the other versus the center. I know, centered would be ideal. It comes down to what is most important for occupying the given space. For me, the Steering is more important than the engine for the driver side space due to it being in a fixed position & limited shaft angles. So the engine had to be fitted where it could. Am I missing something that I should be aware of?
 

ITTOG

Well-known member
I personally do not understand why it is a big deal having the engine to one side or the other versus the center. I know, centered would be ideal. It comes down to what is most important for occupying the given space. For me, the Steering is more important than the engine for the driver side space due to it being in a fixed position & limited shaft angles. So the engine had to be fitted where it could. Am I missing something that I should be aware of?
To be honest it probably doesn't. It is just unique. It probably matters about as much as a sideways engine and front wheel drive. I was just taking a dig at the Ford exploder. Sorry if you took my comment personal. That wasn't intended.
 

GoldiesGarage

Well-known member
I'm a logical type person. With comments like "odd" I was trying to figure out if future problems could occur. Personally, I couldn't think of one besides passenger header clearances. Thought, you guys knew something I didn't. We are not the first people to do something like this so if you have some knowledge to drop, please post it. I love learning new things I can use on other builds. This is build # 2 for us and this 1950 Dodge B2B is LEAPS & BOUNDS better then build # 1.
 
Last edited:

GoldiesGarage

Well-known member
20180501_160542.jpg

With the front axle rebuilt and installed, we needed to be able to stop this pig. Brake lines are next on the list. We put the truck on my trailer so we could measure for all the brake lines once. Not so far away is a small shop F & L hose. They had everything we needed. My brother measured out 36 inches of Stainless steel lines would be needed per side on the front. We also bought some of the copper alloy brake lines. Got all the lines measured and cut. I had the guy do all the flaring. I hate doing the flaring with the cheap auto parts store flaring kit. As you can see we did all the work in the parking lot.
20180504_085755.jpg

20180504_090326.jpg

20180504_091036.jpg
 
Last edited:

Forum statistics

Threads
188,346
Messages
2,905,921
Members
229,959
Latest member
bdpkauai
Top