From Freightliner ambulance to RV - we hope!

rlrenz

Explorer
Having your front lightbar painted was the only option other than removal. Your ambulance probably used the Whelen 4000-series lightbar, which is well over 15 years old, and obsolete. Unless you had a supply of new gaskets, the 4000 could be difficult to re-seal after the original factory installation was opened for bulb replacement or other repairs. New lenses for the 4000 are pretty limited to red and clear - when you can even find them. I have never seen amber lenses offered for sale by anyone.

FYI: removing or installing a front lightbar is often a giant PITA if you have a walkthrough which can really limit access to the center two bolts.

In my own case, GEV totally removed my front lightbar, and plugged the resulting holes - the outer holes received a small light, and the inner were received a snap-in plug with some white paint..

DSCN4307A.JPG
 

rossvtaylor

Adventurer
Hi rlrenz, we'll certainly be removing our light bar - that's trash and it's in the way of our planned over-cab rack. I haven't yet torn into the light bar, but if you have an tips for removing it that would be great. I'm sure I can figure it out, but if you've "been there, done that" I'll gladly learn from you.

I'm in Japan until the 29th, so won't be getting any work done on our rig until I'm back. But then, full steam ahead. In the mean time, I love seeing these little lifted and modified Jimmy 4x4s over here. As one who always wanted a Suzuki Samarai (maybe because of my childhood memories of my dad's old CJ4), I think these little things are cool. I didn't want to draw too much attention to my picture taking, so I didn't get close-ups. But there's an impressive amount of undercarriage work on these... aftermarket anti-sway bars, shocks, hidden LED lights, added tow/recovery points. Nice little rigs. The yellow license plates here signify vehicles with small displacement engines - fewer than 2000cc I believe.

Screen Shot 2016-06-10 at 8.33.40 PM.jpgScreen Shot 2016-06-10 at 8.34.43 PM.jpg
Screen Shot 2016-06-10 at 8.35.18 PM.jpg
Screen Shot 2016-06-10 at 8.34.10 PM.jpgScreen Shot 2016-06-10 at 8.36.05 PM.jpg
 

rossvtaylor

Adventurer
Well, I didn't think we'd get anything productive done with our rig, while I'm in Japan. But, I had some time to wander the local home center store and look at appliances and shower wands. Since many of the bathrooms and kitchens here are small, the scale works for some of our vehicles. They have these cool little two-burner cooktops with a small center broiling/baking tray (it's the little door in the center).

Screen Shot 2016-06-11 at 9.42.38 PM.jpg

Well, we're not getting one of the cooktops. But, always thinking (that's scary, sometimes) I went to the other section where they carry cookware. I remembered seeing mention of small baking trays, as a possible option for creating a recessed emergency light replacement. Those little broiler/baking trays are small... hmmm, might the cookware work? What do you know, they have tiny shallow bakeware in both stainless and aluminum. Size looks close... note measurements... they're metric, of course.

Screen Shot 2016-06-11 at 9.41.49 PM.jpgScreen Shot 2016-06-11 at 9.41.30 PM.jpg

I took photos, then went back to my hotel. I have no phone data coverage here, so I looked up the installation instructions for my Whelen 9E lights and the opening is... drum roll... well, it's 8.7 inches wide, by 6.45 inches tall. Convert to metric and that's 221mm wide by 164mm tall. So, it looks like these are darn close... large enough to be sure they'll cover the opening, but not so big that they require much cutting or look garish.

I ended up buying the 4 aluminum ones they have on the shelf, and ordering 6 more. Those will be here (I'm in Goshogawara, Japan) on Wednesday, and that will give me enough to replace the 8 side lights and the 2 rear white scene lights.

Screen Shot 2016-06-11 at 9.44.02 PM.jpg

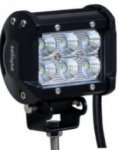
I'll most likely mount them, with good sealant of course, using some small sheet metal screws in the side walls of the pans, so they catch the backside of the skin and trap the pan in place. After we paint the box, and the pans, I'll caulk around the pans so that rolled lip ends up more tapered. I think they'll look fine, with lights inside them. Wires, through grommets, will power an LED light in each pan. They won't be totally recessed, but they won't protrude a ton either. I'll probably go with one of these, off Amazon - decent ratings and affordable:

Screen Shot 2016-06-11 at 10.04.27 PM.jpgScreen Shot 2016-06-11 at 10.11.03 PM.jpg

From a purely stupid "that will probably look better" perspective, the wider 6.5-inch lights would probably look better. :) But, I think the smaller (cheaper) ones will give plenty of light - enough, that we'll most likely switch these in pairs so we don't have to have all 4 on at once, if we don't want that much light.
 
Last edited:

rlrenz

Explorer
To remove the lightbar, you will have to remover all the lenses (which may now be painted in place...). Then, dismantle the guts -- remove the rotators and wiring (be sure that the lightbar is turned off first). If you see anything that looks like a 5/16 - 3/8" bolt head, remove it as well (there may be two, located probably 2' out from the center of the bar). Since the most common mounting for the Whelen 4000 lightbar is with carriage bolts that slide in a channel on the rear of the light bar, you will probably have to get into the space behind the lightbar & warning lights to remove the outer bolts: To do so, remove the front warning light on each side, and the nearby scene light - this will give you access and viewing room to get at the light bar bolts. If you see a nut behind the bar's location, remove it. Once you have removed a total of 4 bolts or nuts, the bar should be free, and can fall onto the roof of the truck (unless you have padded it first...). Whatever wiring you had will be sticking through the center of the bar through about a 1" hole. Pull some of this wiring through, then cut it off. I suggest folding each wire over about 1/2", then sliding some heat shrink over it. You may also crimp a pigtail splice over whatever wiring there is. Poke it back through the hole, and screw a blank plate over the hole, or use a hole plug similar to what is used when an old radio antenna hole is plugged in a police car, and plug the two outer bolt holes with whatever.. Now, go into your electrical panel and disconnect the wiring that feeds the lightbar - if you can't find it, at least you have totally capped off the lightbar-end of the wiring.

If you just have rotators (lights withing rotating mirrors, usually about 50 watts each), you will probably find 4-6 rotators with some reflecting mirrors - each pulls about 4 amps each, so there may be 2-3, 14-12 gauge lines feeding the rotators. There will also be another pair of wired to each side of the lightbar for the side warning lights. There do not rotate, but just have a reflector, and are connected to your AF6016A Whelen 4-post ambulance flasher, along with the side and rear warning lights. The AF6016A flasher handles 4 different warning light groups, and can switch form bright to dim, and from primary (all warning lights, including the cab) to secondary (just the box warning lights). Th primary lighting usually is interlocked so the truck must be in DRIVE before they will operate - once the truck is in PARK,t he system defaults to secondary)

6016.JPG

Also, you will usually find 5 DOT clearance lights on the top of the bar. These can be replaced by small LED clearance lights.
 

rossvtaylor

Adventurer
Thanks, Bob, for the great and very detailed help with that. I really appreciate the time you took to write up the procedure.
 

rlrenz

Explorer
Removing the front light bar is always a PITA, but depending on your module's construction, it can be a BIG PITA, or only a normal PITA. The job is worse if you have a walk through with the AC equipment directly over the walk through, and if you have a high cabinet up front, that can also complicate things, as in my own case -

DSCN4615.jpg

DSCN4617.jpg

Hose line evaporator.jpg

The high cabinet with the drop down door originally held the IV bag warmer - it now holds paperwork, insurance data, registration, etc. It also provides access to the AF6016A flasher that's bolted on the rear of the cabinet's rear panel. The module's AC evaporator is on the front of the module, next to the IV cabinet. The AC evaporator positioning really limits access to the lightbar wiring.
 
Last edited:

rossvtaylor

Adventurer
We don't have a walk-through, but with the pass-through window and the overhead Hoseline system our space looks just like that. Thanks, Bob!

Ozrockrat, I felt a bit like I was hijacking your thread with my suspension questions. So, I moved back here. :)

Also be very particular to get the alignment of the flange/ujoint mounting face at as close to exactly the same angle as the input yoke on the diff. (for some reason there is a heap of people think you need to try to align the driveshaft and the diff to as close to a straight line as possible.

Makes perfect sense, thanks! I understand that some trucks have a single drive shaft and some have a split shaft. Ours is split (2 piece), as I'm guessing yours is. Did you need to put a spacer between the chassis and the drive line's center support bearing? The local place suggested it might be necessary, to reduce angles and keep the shaft more aligned (and to keep the shaft's end-to-end length the same).** But we have maybe an inch between the center U joint and the exhaust pipe. Of course, since that big pipe crosses underneath the truck, to no apparent benefit (except exhausting on the "non-scene" side), I see us moving it at some point. If we don't, a rock will...

** And, I may have totally misunderstood this part of their suggestions. There was a lot to absorb.
 
Last edited:

Ozrockrat

Expedition Leader
I didn't play with any spacers under the center support bearing. Eventually I am hoping that putting transfer case in will eliminate the need for the 2 piece driveshaft. That would eliminate the support bearing and 2 UJoints as failure points. But again if you do put a spacer in there you will need to change the diff angle to get that face to face alignment between the output flange on the intermediate shaft and the input yoke of the diff.

There are some excellent videos on YouTube of shaft alignment that highlight the importance of this alignment. There is also a lot of information in the Allison manuals. Give me a yell if you need any scanned.
 

rlrenz

Explorer
Ross, from your description, it sounds like you may have a Medic Master ambulance. They were made by American LaFrance until 2008, when ALF shut them down as part of one of their re-organizations. ALF themselves closed down in 2013. At that time, they were owned by Freightliner, and the killer for ALF was apparently that the high value they had kept on their parts inventory didn't reflect that many of the parts were for obsolete trucks, with minimal sales.

If it is a Medic Master, don't worry about parts - they're all standard to ambulances. Latches on drawers and cabinets were sourced to Southco, air conditioning to Hoseline, lighting to Weldon and Whelen (and Peterson for marker lights), flooring was Lonseal, and the list goes on. Check www.fostercoach periodically - they always have interesting things in their closeout/surplus section. I've also asked them if I needed something that wasn't listed, and in many cases, they did have it.

There will be a label in Cabinet #1 (directly behind the driver) that tells who made the ambulance (it may be on the side of a partition), and also check the labels adjacent to the air conditioning evaporator. They will document the results of the formal sell-off full load test on the electrical system, and also the vehicle's gross weight, etc.

And if you have a kind of speckled gray interior laminate on the walls, I'll bet that it is Wilsonart 4142-60, Gray Glace (vertical grade) http://www.wilsonart.com/grey-glace-4142.
 
Last edited:

Ozrockrat

Expedition Leader
On checking out that website rlrenz posted I noticed something that may help your splitting the house and truck battery packs. Most of the Ambo's I have seen have a Schotty diode either as a battery isolator or to stop feedback from select appliances. These are a great bit of kit and if you have one it is an ideal to use for your charging of the house batteries. Not a "smart" isolator like some of the kits but what it does is provide diode isolation at a very small voltage drop (.2 v). The one in this photo example is actually for the alternator charging circuit but the ones in my Ford ambulances were appliance isolators only.

Schottle diode.jpg
 

rlrenz

Explorer
You'll see isolators used in ambulances when there are provisions to charge something else from the ambulance electrical system, such as portable 2-way radios. The reason is so there's no chance of the equipment being charged trying to charge the ambulance when the engine is shut down.

In my own case, I'm going to use Xantrex Echo Chargers to keep the deep cycle battery and the small starting battery for the Onan generator charged. Each Echo Charge unit is rated at 15 amps, and Xantrex told me that I could also use two in parallel to have a 30 amp charger. I'm going to use a SPDT selector switch on the Onan Echo Charger so I can combine it with the deep cycle battery charger if I need to for a 30 amp charge.

Since the primary load on my deep cycle batteries will be the refrigerator (4 amps when running), and the ceiling lights (all LED - 8 amps total), I should be in good shape.
 
Last edited:

rlrenz

Explorer
By the way - if you are trying to track down any Medic Master components / parts, let me know. I have an ever-increasing stash of Medic Master stuff, and I've figured out suppliers for lots of pieces. I'm up to my elbows on Southco cabinet / drawer locks - I wound up with a lot of 75 pieces from the ALF bankruptcy sale, and other things pop up from time to time.
 

rossvtaylor

Adventurer
Oh, I wish I were home! Of course, to see my wife and daughter. But, you guys are giving me ideas that I can't act on.

Oz, thanks for the scanning offer. I'll let you know when we get to that point. I found a Spicer video online, which might be one of the videos you're referring to. A little desktop demo unit, which was very informative.

And Bob - Yes, it's a Medic Master and we're keeping the great AF logo on the back. Thanks for the info, and for the part sourcing offer too.
 
Last edited:

rossvtaylor

Adventurer
Here's our plan to mount those recessed light pans into the outer skin of the ambulance box.

Screen Shot 2016-06-18 at 6.28.59 PM.jpg

If we drill the holes in the right spots, the threads will grab the back of the skin for a pretty secure installation. We could also use pop rivets, as I guess the swelling of the rivet barrel would also do the same thing. But, I'm leaning towards stainless pan-head screws. We'll bed the pans in sealant, to keep water out, and then fillet the edges with RTV so it looks less like the rolled edge of a baking pan... which, of course, it is. :)
 

patoz

Expedition Leader
I like the idea of screws better, that way if all doesn't go as planned it will be easier to remove and regroup. If you use Aluminum colored RTV it may blend in better and look more like it's part of the pan.
 

Forum statistics

Threads
188,296
Messages
2,905,079
Members
229,959
Latest member
bdpkauai
Top