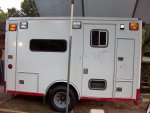
From Freightliner ambulance to RV - we hope!

rossvtaylor

Adventurer
I like the idea of screws better, that way if all doesn't go as planned it will be easier to remove and regroup. If you use Aluminum colored RTV it may blend in better and look more like it's part of the pan.

Yes, we like the screw idea better as well. Pop rivets are lower in profile, but they don't expand evenly on the back side so we think screws will be more secure. And removable, without drilling. Our plan is prime these pans, then to install them with wire grommets and pigtails protruding, then to paint them along with the box. Once painted, black, we'll RTV around them with black compound so it looks more like a gasket and blends in. If we were going to leave it white, though, I like the aluminum RTV option. After we're done, I'll install the lights. And, of course, post pics of the process.

Had I not found these pans, in the close-to-perfect size, I was headed towards bending and welding some simple pans with angled rear walls. It would have been a pretty easy bending and welding project, but still... we have enough to do that I'm happy to pass on any extra work, if I can find something that will work well. Here's what we were thinking of (forgive the cheesy drawing - I hope you get the idea).

Screen Shot 2016-06-18 at 10.04.18 PM.jpg
 
Last edited:

patoz

Expedition Leader
That is similar to what I was thinking of doing, but since you only have 2" of depth to work with, and the holes the Whelen lights are mounted in are not perfectly rectangular (mounting tabs in each corner), that meant a whole bunch of modification to the body and fabrication of the pans, so I put it on the back burner and just installed basic warning lights so I can get it to the DMV and get it registered as an RV Trailer.

HPIM1440.JPG
 

rlrenz

Explorer
It looks like a good plan - but remember, you can't paint over RTV since it's silicone. When I had to seal some penetrations on a radio shelter, I used 3M body seam seal dispensed by a caulking gun. It stays flexible, but it can be painted. It probably doesn't have much strength compared to RTV, though.

You can "tool" fresh RTV with a wet finger, or a finger dipped in Isopropanol alcohol. It night be worth installing masking tape around the area you plan to seal so you can limit the size of your bead. I suggest using a small bead since bigger often equals messier.
 

rlrenz

Explorer
Hey, Pat - you can always leave the halogen lights for use when and if needed, then add some surface mounted LED floodlights. That's the same solution that I'm going to use as well. I have a pair of LED floodlights already installed in a recess on each side (they replace 500 watt quartz flood lights) that I'm planning to upgrade to a larger version, but I'm definitely leaving the halogens.
 

patoz

Expedition Leader
Hey, Pat - you can always leave the halogen lights for use when and if needed, then add some surface mounted LED floodlights. That's the same solution that I'm going to use as well. I have a pair of LED floodlights already installed in a recess on each side (they replace 500 watt quartz flood lights) that I'm planning to upgrade to a larger version, but I'm definitely leaving the halogens.

Bob, I have four of the Rigid LED 65º DC Scene Lights, so I'll probably just mount two on each side in between the Wheeling lights, and call it done. I may also get two more for the rear.
 

rossvtaylor

Adventurer
It looks like a good plan - but remember, you can't paint over RTV since it's silicone. When I had to seal some penetrations on a radio shelter, I used 3M body seam seal dispensed by a caulking gun. It stays flexible, but it can be painted. It probably doesn't have much strength compared to RTV, though.

You can "tool" fresh RTV with a wet finger, or a finger dipped in Isopropanol alcohol. It night be worth installing masking tape around the area you plan to seal so you can limit the size of your bead. I suggest using a small bead since bigger often equals messier.

True beans! That's why we plan to paint first, then run a bead around the edge. The tape's a good idea and I've used that before, but I hope to not have a lot of excess... it just looks bad. I'm pretty good with a caulking gun and I plan to cut the nozzle the right width and then (holding it close and at the right angle) put a nice even bead into the crevice. If I hold the nozzle right, and stay tight, it will give a decent 45-degree fill bead. And, since it's going to be 7 or 8 feet up the side of the rig (and black on black) I think it should look fine... from the ground. Haha!
 

rossvtaylor

Adventurer
They look like blocks of cheese

Haha! Yes, they're cute little blocks, aren't they?

I had to cross the street to look more closely. I thought they were wood. They appear to be aluminum and they're about the size of a large pack of gum. Cute little blocks, you...

Now your rig has manly blocks, Oz!
 

scooter421

Adventurer
Hi Ross, I am enjoying the build and updates. I am on board following along and a little jealous of the some of the cool features your rig has. In particular....CRUISE CONTROL!
 

bobrenz

Observer
When my son was driving my Freightliner back from Philadelphia, he'd covered about 300 miles, then commented that it would be nice if it had cruise control -- I told him that it did have cruise, but the switches were on the dash instead of on the steering wheel. He snorted, then flipped the switch, and we had cruise...
 

rossvtaylor

Adventurer
GREAT... Scooter, you had to bring up the cruise control thing again. Don't you know to let a sleeping Oz lie? :)

Bobrenz, I guess your son is 4 times smarter than I am. Because I think I made it 1200 miles before figuring that out! And, yes, Pat it works best when turned on!

I'm heading back home from Japan in the morning, so we hope to make some progress on things soon. I've got tires and wheels laying in the wood shed and a Sawzall on standby.
 

Forum statistics

Threads
188,349
Messages
2,903,651
Members
230,227
Latest member
banshee01
Top