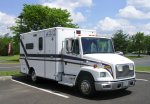
From Freightliner ambulance to RV - we hope!

scooter421

Adventurer
Oh man a milling machine, welding equipment, Flagstaff......just a little jealous. If I could afford to insulate my shop and put in a lathe, mill etc. my wife would never see me!
 

rossvtaylor

Adventurer
Pat, thanks for the tip and the link - interesting reading. Especially the parts about using a log in place of a rear tire... or chaining a section of wood to a tire for traction/hole-filling. Wow!

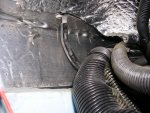
As far as my more mundane weekend went... I pulled off a few of the side lights and was pleasantly surprised to find that our rig is insulated with blue foam board between the studs. I've read that the insulation varies on ambulances, but we seem to have gotten lucky in this respect. The foam seems to be about 1.5 inches thick and there's a layer of that mylar bubble wrap over it. No wonder our box has seemed to stay cooler than expected this summer, retaining the nighttime chill.

Here's where I stopped. Trying to get the front light bar off. Now I see why another forum member (I read it but can't remember who, sorry!) just cut his down the middle. I'm about to do some cutting, too, though more localized.

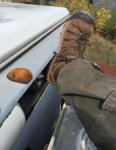
First, to remove the covers/lenses from the aluminum extrusion. They slide in little slots, which were a bit gummed and bugged up. They took some persuasion to slide out...
Screen Shot 2016-09-11 at 8.50.19 PM.jpg

There are 4 bolts, captured inside a slot in the back of the aluminum extrusion. Two of the bolts pass through in places where they were easy to access from the front light openings.
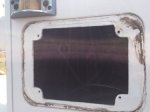
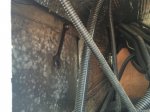
Screen Shot 2016-09-11 at 8.51.18 PM.jpgScreen Shot 2016-09-11 at 8.50.56 PM.jpg

Of the two center bolts, I could barely get to one around the driver's side of the AC stuff.
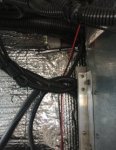
Screen Shot 2016-09-11 at 8.51.46 PM.jpg

But, bloody Hell... I could not contort and force and curse my way to the other bolt, which I presume is equidistant on the other side. So, I'll cut a section out of the light bar, in that spot, one evening this week and get at it that way. :smiley_drive:
 

FDM2012

Adventurer
It may have been my pics that you saw of where I cut mine off last month. Maybe not,,,,?? Either way, I think
it made a difficult job much easier.

Besides, I like tearing stuff up like that!!
 

rossvtaylor

Adventurer
It may have been my pics that you saw of where I cut mine off last month. Maybe not,,,,?? Either way, I think
it made a difficult job much easier.

If that was you who slit it from end-to-end, right in the middle of the channel, then yes - and thanks to you! Seeing what was in there helped me, right up until I couldn't get to that last nut. And now I know exactly what to do to free mine. It won't be an end-to-end job, but I'll cut V notches top and bottom, near where the remaining bolt is, and see if I can break it apart right there.
 

rlrenz

Explorer
When you work to remove a module-mounted light bar, you realize very fast that this must have been the first thing they bolted to the module - before anything else went in, so they had great access...

My own light bar had been modified by Medic Master so they could use a standard bolt for the inner bolts, but even so the electrician who removed it commented that it was a bear to get to>

DSCN5365.JPG
 

guidolyons

Addicted to Gear Oil
Are the bolts fixed to the mounting bracket or do they slide in a slot/track? Can you drill or grind the head (or whatever the attachment point of the threaded stud) off the bracket?
 

rlrenz

Explorer
When GEV removed my light bar, they plugged the inner holes with some snap-in plastic plugs, and added some clearance lights in the outer holes.
 

rossvtaylor

Adventurer
Thanks guys. The bolt head is captured inside a slot in the extrusion. That slot, sadly, is covered with a rounded cap (as shown in Bob's picture, above). I got three bolts out, but that fourth bolt is tight enough there's no budging this thing. But, since I know where the bolt is I will just need to cut there. That will leave me with 5 holes - 4 from the bolts and one, in the center, for the wires. Those wires will get re-purposed for future lighting on the rack, which will bolt (in part) where this light bar was. I don't expect to have any exposed holes when I'm done, but if I do I'll keep those plugs in mind.

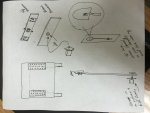
While I'm sharing my plans for this part of the rig, here's what's going below it on either side of the box. Use your imagination to make up for the clarity of my cheesy drawing... and pretend you're standing in front of the truck looking back. The mats are 5-foot sections of PSP / Marston mat. Once done, in this space, we'll have two mats on either side. They, in turn, will be be secured with a shovel on one side and a pulaski tool on the other. The screw-in tube section, at the bottom, will have a round plate to compress the mats and keep them from rattling or being removed. The tab at the top will pass through a slot in the shovel blade, or a chain link welded on the pulaski, and a padlock will keep them from wandering off. Having the handle pass through the tubescrewinthingy® will prevent those from being unscrewed. I hope that makes sense...

2016-09-13 11.15.11.jpg
 

rossvtaylor

Adventurer
Side note.. do any of you have Whelen 97 (the single, bottom screw style) side or scene lights on your ambo? I've got 4 clear lenses, looking for a new home.
 

rlrenz

Explorer
When GEV removed my light bar, they covered the holes as shown in the photo - they suggested a GEV plaque for the center wire hole, and I agreed. A couple of marker lights took care of the edge holes.

close up.jpg

With access being through the cutouts for the emergency / scene lights, any hardware on the front lightbars is a royal PITA to get to. The combination of urethane foam insulation plus the reflective insulation really limits visibility, and as much as anything, it becomes work-by-feel.

DSCN5342.jpg

And in case anyone believes that ambulances are perfect (!!!), you can see that apparently one of the mounting holes didn't line up, so a little file-machining was required to adjust the fit.

DSCN5365.JPG
 

patoz

Expedition Leader
Ross just for the record, those Whelen lights with the single bottom screw are the 9E series and not the 97 series, but they are the same size.

I rotated your picture for you, and that does look like a pretty good plan to me.

2016-09-13 11.15.11.jpg
 
Last edited:

rossvtaylor

Adventurer
Thanks, Pat, for the pic fix!

Thanks, also, to two fellow Arizonans with MDT ambo rigs... because of Ozrockrat and Scooter, I've got three of these that will be arriving next week... :)

Screen Shot 2016-09-14 at 6.13.07 PM.jpg
 

patoz

Expedition Leader
That looks like a bumper for the RG31 MRAP truck. Yes, I cheated and I'm looking at the ebay page. :)

Since you are getting three of them, I'm guessing one is for the front, one for the rear, and one to cut up for modification. Or are you getting one for each of you?
 

Forum statistics

Threads
188,181
Messages
2,903,485
Members
229,665
Latest member
SANelson
Top