You are using an out of date browser. It may not display this or other websites correctly.
You should upgrade or use an alternative browser.
You should upgrade or use an alternative browser.
From Freightliner ambulance to RV - we hope!
- Thread starter rossvtaylor
- Start date
Ozrockrat
Expedition Leader
That looks like a bumper for the RG31 MRAP truck. Yes, I cheated and I'm looking at the ebay page.
Since you are getting three of them, I'm guessing one is for the front, one for the rear, and one to cut up for modification. Or are you getting one for each of you?
One each, couldn't buy the steel for the price of these and sharing the freight made it an even better deal. And Ross has kindly (foolishly??) volunteered to make up the mounts for all of us. I might have to step up from paying for favors with beer to wine?? Maybe even the $10 a bottle top shelf stuff. :Wow1::beer::beer:
rossvtaylor
Adventurer
At least for Oz's rig, it's easy... he's got the exact same truck and the same Warn M12000 winch that we've got. So, I'm just the Guinea pig. It's a good role for me!
Ozrockrat
Expedition Leader
Bevan, for that kind of deal you might even have to hit the cellar and the shelves hidden in the back!
Ok you twisted my arm. If he does a good job he gets Australian wine. If it's a soso job I 'm sorry he only gets Californian stuff. Really bad job and he gets the reject Allison transmission fluid I used to flush the Tranny.
rossvtaylor
Adventurer
Ok you twisted my arm. If he does a good job he gets Australian wine. If it's a soso job I 'm sorry he only gets Californian stuff.
I guess it's a soso job for you, then! 😜😜🍷🍷
scooter421
Adventurer
I'll match your $10 Oz, we'll get him the good stuff! I may request shackles on mine, I'm hoping for straight and centered! Unless I cut holes in the bumper I am going to lose my front tow hooks!
Ozrockrat
Expedition Leader
I'll match your $10 Oz, we'll get him the good stuff! I may request shackles on mine, I'm hoping for straight and centered! Unless I cut holes in the bumper I am going to lose my front tow hooks!
I'm just wondering what the Russian hackers tasked with checking Ross out are going to make of his good deed in welding up our bumpers, his penchant for being rewarded for favors with alcohol and his deplorable taste in wine.
Scooter I am figuring that the big shackle point beside the winch will replace the tow hooks but it would be fairly easy to cot holes and box them in for access if needed.
shortbus4x4
Expedition Leader
Just remember no vino until the job is done.
rossvtaylor
Adventurer
I'm laughing out loud... Really. Deplorable, huh? You caught that? 🍷
No offense, my good friend, but I haven't really found an Australian wine that I like. I got to spend a few weeks there, teaching, and I asked for many recommendations... Might just be the style. My favorite wines actually come from Argentina and Chile. And they are relatively cheap. Good for you guys!
The reality is that I like building and cutting and welding. So I'll enjoy every bit of this. I'm happy to put in tow hook locations, but I also think that big pin on the front will be plenty. I actually already had the barstock to put some shackle mounts on the front of my bumper. And I was also going to reuse the three-quarter inch U bolts from my lift. But I think that big pin will be all I need. It looks pretty darn beefy!
scooter421
Adventurer
Shoot, cheap and good wine? We may learn a lot in this venture Oz! I believe you are probably both correct in that the pin in the front of the bumper would be sufficient. Once they come in and we get a good look at them it will all come together. Right now, I am simply having visions of grandeur!
Last edited:
Ozrockrat
Expedition Leader
Having used my front tow hook with a chain to move some 40' containers around this week I do appreciate just being able to slip the chain over and the absolute bolted straight to the chassis strength. But I am a great believer in the less stuff you touch the less you break (maintenance induced failures). If its good enough for the US military it will probably stand up to anything I can do to it.
scooter421
Adventurer
Very true guys, I imagine a picture does not do it justice. Once I am standing in front of it my vision of what's wanted or needed will likely change.
rossvtaylor
Adventurer
This weekend was filled with work and business stuff, and a little progress on the rig. Less progress than I'd hoped, but we're getting close to being ready for paint... and that is my most pressing goal here, at the moment.
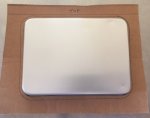
If you'll remember, months ago, I bought a bunch of small baking pans while in Japan. The little aluminum pans were the closest dimensions I could find to the scene and emergency light cutouts. I didn't want to just put a flat plate over them, so we're taking out the scene lights and will put LED floods into the newly installed recesses (AKA, baking pans...)
First up, make a template.

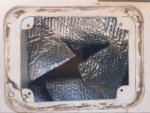
With the new cut line marked, over the existing light hole, you can see how close these are. I really didn't want to make them bigger than necessary.

Because there wasn't enough clearance for a full-length jigsaw blade, in some of the openings, I shortened one so that it didn't hit the interior cabinetry.

And, with a few popped into place you can see what they look like. And, yes, they look exactly like baking pans set into the side of the box. But, I think that once they are painted and I've put on a fillet of black sealant around the edge it will look just fine... especially, once the new lights are installed in them (with a branch guard).


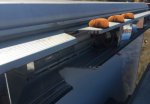
Back to the front... in our last episode, I had removed 3 of the 4 bolts holding the light bar on. There was no way I could access the 4th bolt/nut from the inside, though. Since the light bar had been painted white, it was essentially trashed and I was okay with cutting it. I measured 38 inches in from the passenger side (the distance I'd measured from driver's side to the other inner bolt) and cut a V.

Counting on getting close to the remaining bolt, and using the work hardening of aluminum to my advantage, I pried on the end. Bending is a good sign!

I got pretty close, so was able to flex the end forward and back enough to break it off - this saved me trying to cut closer to the box's skin, and risking cutting into that.

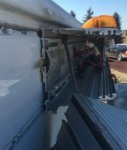
And, finally, the last cuts. The bolt is a carriage bolt and I cut the V close enough to see it. I did two horizontal cuts, slicing off the sides of the bolt head, and the remainder of the aluminum extrusion came free.

And, I made one additional cut in the center of the back, over the door. As you can see in this pic, we're leaving the two outer red lights in place - those will get wired up as brake lights. The two inner cut-out recesses will be two more baking pans for LED floods, for backing and rear area lighting. And the center cutout, where there was a third emergency light, is for the little Warn winch (seen, barely, sitting on the roof).

I toyed with putting the winch low, into the bumper, and having an overhead boom... but then thought, why not just put the winch up there? I'll repurpose the original hydraulic lift pushbutton controls to run the winch, as those buttons are perfectly located in the right rear door. Putting the winch up here allows us to use it for hoisting the tire carrier into position, or lowering it to the ground. It can also be used for lifting things into the back or, through the inside access door I'll install, we can use it to pull things into the back. By running the cable into the box, through that plywood you see in the opening, it can pass through a pulley/snatch block on the floor (towards the front) which will redirect the pull. Perfect for elk season.
If you'll remember, months ago, I bought a bunch of small baking pans while in Japan. The little aluminum pans were the closest dimensions I could find to the scene and emergency light cutouts. I didn't want to just put a flat plate over them, so we're taking out the scene lights and will put LED floods into the newly installed recesses (AKA, baking pans...)
First up, make a template.

With the new cut line marked, over the existing light hole, you can see how close these are. I really didn't want to make them bigger than necessary.

Because there wasn't enough clearance for a full-length jigsaw blade, in some of the openings, I shortened one so that it didn't hit the interior cabinetry.

And, with a few popped into place you can see what they look like. And, yes, they look exactly like baking pans set into the side of the box. But, I think that once they are painted and I've put on a fillet of black sealant around the edge it will look just fine... especially, once the new lights are installed in them (with a branch guard).


Back to the front... in our last episode, I had removed 3 of the 4 bolts holding the light bar on. There was no way I could access the 4th bolt/nut from the inside, though. Since the light bar had been painted white, it was essentially trashed and I was okay with cutting it. I measured 38 inches in from the passenger side (the distance I'd measured from driver's side to the other inner bolt) and cut a V.

Counting on getting close to the remaining bolt, and using the work hardening of aluminum to my advantage, I pried on the end. Bending is a good sign!

I got pretty close, so was able to flex the end forward and back enough to break it off - this saved me trying to cut closer to the box's skin, and risking cutting into that.

And, finally, the last cuts. The bolt is a carriage bolt and I cut the V close enough to see it. I did two horizontal cuts, slicing off the sides of the bolt head, and the remainder of the aluminum extrusion came free.

And, I made one additional cut in the center of the back, over the door. As you can see in this pic, we're leaving the two outer red lights in place - those will get wired up as brake lights. The two inner cut-out recesses will be two more baking pans for LED floods, for backing and rear area lighting. And the center cutout, where there was a third emergency light, is for the little Warn winch (seen, barely, sitting on the roof).

I toyed with putting the winch low, into the bumper, and having an overhead boom... but then thought, why not just put the winch up there? I'll repurpose the original hydraulic lift pushbutton controls to run the winch, as those buttons are perfectly located in the right rear door. Putting the winch up here allows us to use it for hoisting the tire carrier into position, or lowering it to the ground. It can also be used for lifting things into the back or, through the inside access door I'll install, we can use it to pull things into the back. By running the cable into the box, through that plywood you see in the opening, it can pass through a pulley/snatch block on the floor (towards the front) which will redirect the pull. Perfect for elk season.
Similar threads
- Replies
- 1
- Views
- 765
- Replies
- 0
- Views
- 566
- Replies
- 0
- Views
- 686
- Replies
- 5
- Views
- 2K

