Gas Cans 05 TundraBeast Build. Another build for the Big Guys!

GasCan

Observer
After our second child we needed another vehicle .... believe it or not ... for the nanny. I wanted a rugged 3rd vehicle to venture out to the mountains for skiing. Her husband had a construction company so she always drove hand-me-down pickup trucks.

Along came Toyota red tag days ... timing was perfect. Originally I was thinking a Tacoma, but being 6'4" I couldn't fit in it comfortably. We had kids, so we wanted leather....so we got a Limited.

Nanny only lasted a year before we decided to change our child care arrangements so the Tundra spend most of its days siting in the driveway while I spend most of my time diving my leased, family functional M3 sedan. The Tundra is in the background.


But when the weather turned bad, I drove the truck. When it was time to head to the ski hills!!... I drove the truck.

The only mod I had done, was put on a RollBak cover. In the winter of 2008 we moved to an acreage and were thinking of trading it in for something smaller but both my wife and I manage to drive the Sienna into the ditch during a snow storm and both times we used the Tundra to pull it out. So we traded in the Sienna for a Subi WRX!( I know. ****** was I thinking moving to an acreage and trading in the truck).

Now that we committed to the Tundra the so called genie was out of the bottle....so to speak.

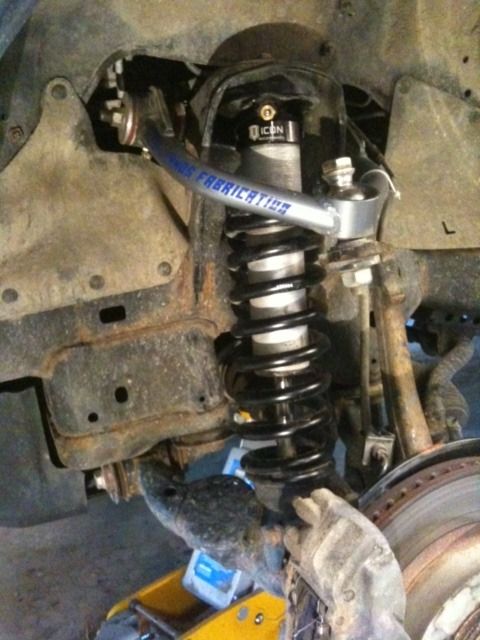
Did a lift kit. Went with a ICON stage III kit which included coilovers, tuned rear shocks and a 3-leaf add-a-leaf pack. Also put in a front diff drop and Total Chaos upper control arms.


Since this was the dedicated winter adventure truck I put Nok studded tires on the factory wheels and ordered some GY Silent Arm 275/70-R17 tires on ATX Mojave wheels from the TireRack. I was a little hesitent to commit to the 285s.


More to come.

GC
 

GasCan

Observer
Since I did so much hard core off roading(ins sarc) I figured I needed a front locker.... I already had a rear limited slip (more on this flawed logic later). But a locker was beyond my tech capabilities, but an air compressor I could do. I picked the spot on the passenger side engine bay. Kinda wanted this spot for a second battery but figures that might be better in the box.

Put in some risers and some NutSerts in the fender and made a platform.


GC
 

GasCan

Observer
While in Costco I see this 10,000 lb Champion winch with multimount cradle. I think it was $399. How could I go wrong. I got some extended cables and ran it off the back 2" receiver.

Then while trying to recover badly stuck F250 down in a ravine I managed to get myself stuck. Managed to self recover buy winching myself further down the ravine and using the extra traction my snow chains to make it out. In the end it was obvious I needed a front mount. But I didnt like the current aftermarket options. I felt they put the winch too low on the front reducing my approach angle. So I made my own. This was my first serious welding project on the truck.

Had to reverse the mounts on the power steering loop to get some more room. Mocked up some 2.5" x 2.5" 1/4 tubing.


Cardboard pattern for the main bracket. Ties into the two frame recovery points.


Tranfered the pattern onto a piece of 6" x 4" rect tubing, and cut it out with a plasma.


Found two unused mounting point on the frame just outside the body mount. Not sure what they are for....assembly jig I am guessing.

So I extended the mount to them and made a couple more brackets.


Tacked it all together.


Took it out and burned it together.


Added some bracing to prevent warpage.


In the end, it weighs 46lbs.


I am pretty pleased with this mod. I think it really works well for an overland vehicle.... but in the end I ordered a Brute Force Fab bumper, so when it gets here this will likely go. :^(
 

GasCan

Observer
In 2014 I decided the family summer vacay would be a road trip to Alaska, and I would be calling on the Tundra to get us there. Ordered a CVT Rainier RTT, and set to work on a rack.

I wanted the tent to sit high enough so I could get an action packer in and out from the side, and I wanted to be able to close my rolling cover. Hindsight I probably should have got the Denali, and put the rack hight up to the level of the cab roof.

Notice the rusted to ******** bumper.


Bit of a mock up. Made 3 hoops 1.75" .120 wall bent 20* and 70* on both ends. Two pieces of 1"x2" made the side rails. Made some tabs that indexed in the stake pockets. I drilled thought the top of the 1" x 2" so the tubing would pierce the top and lock it in place.


Making plans for my table holder!


Fabed some light mounts for some 1x6 LEDs and ran the wire inside the tubing!


Can never have enough counter space! Taking refuge from the rain. Along with some chi com traction board action footage....levelling the truck!


GC
 
Last edited:

wrenchMonkey_

Adventurer
For me, and what I've learned, its always best to go with the smaller CLR (center line radius). You can always make bends more gradual, but cant make them tighter. Both the dies I use are 180* and both 1.75" and 2" are 6" radius.
 

GasCan

Observer
One of the biggest (and most expensive) upgrades was the lockers and re-gear. At first I was only going to put a locker in the front.

There is a bit of a hill to get up to my house and in the spring the packed snow from the tire tracks turns into a band of ice. I decided to leave the truck in 2wd, put one rear tire on the ice and the other on the dry pavement. Came to a complete stop and tried to get going again.... and to my surprise I started rolling backwards down the hill. Crp. So I knew it was gonna be locker front and rear. First did the rear, then the front. When doing the front I decided to re-gear the front and rear...which was a bit of a fiscally painful back track, but its done.

The one thing I did address was the switch panel. There is no room for switches behind the change pocket because an obstruction...I think its the vent going to the rear.

So I added some offset buy gluing 2 sheets of 3/8" PVC together and hollowing them out, then covered them with 1/8" sheet. This provided enough room for my front and rear light switches. Removed the centre section from the original swith panel and screwed them together.


I still have some room for a couple extra switches. Probably side flood light mounted on the roof rack.

Unfortunately after removing most of the centre section of the original panel, it has lost some of its rigidity and dosnt clip into place as tight as it used to. Thinking of adding a screw or two.

GC
 

Forum statistics

Threads
190,431
Messages
2,927,509
Members
233,917
Latest member
gp01
Top