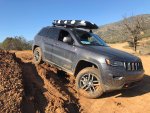
Halley - '17 WK2 Trailhawk Overland Build

bobholthaus

Observer
I bought one from Australia and it will be here Tuesday. With the exchange rate, it only cost me about $35 more than US! Bill is a great guy.


Sent from my iPhone using Tapatalk Pro
 

2180miles

Endurance Adventuring
So, I accidentally bought a new toy this week in order to have it for the trip to Canada. I've flown a drone before a time or two, but owning one now is a whole different ballgame. It's the DJI Mavic Pro, shoots 4K and 12 megapixel still camera. The photographer in me hoped for more for still shots, but the size of it is roughly the size of my standard dSLR/lens combo, so it'll live comfortably in ALL of my camera bags.

I had some time today to play around with it and the WK2 in an open lot... really excited to get some footage of the lakes in Banff/Jasper National Parks in a few weeks.


bobholthaus

Observer
I hate when I "accidentally buy a new toy"!!

Can't wait to see your Banff footage!


Sent from my iPhone using Tapatalk Pro
 

2180miles

Endurance Adventuring
Making the final push for projects both big and small in the Grand Cherokee this week. We leave Thursday July 27th (9 days as of writing this) for our month-long trip through Canada, which I’ll detail in a day or two both here and in an in-progress trip report elsewhere on the forum.

Next up for the Trailhawk: LED Reverse lights.

I’ve always liked having an auxiliary set of reverse lights on the Wrangler, and though the factory ones on the WK2 are as impressive as the headlamps, I wanted something I could switch on at any time, and looked sleek. While I wish that I could have used more Black Oak LED products for this, they unfortunately don’t offer a single-row unit for flush mount, instead as of this point only a 2x2 which wouldn’t work for my space. Because of this, I turned to Rigid for their flush-mount version of the SRM reverse light kit that I run on the TJ. Easily purchased on Amazon Prime, they cost about $150 for the kit. Picking a day that my friend Topher from our overland group could help me install them, I drove up to his newly built barn on the North Shore of Mass and we got to work.

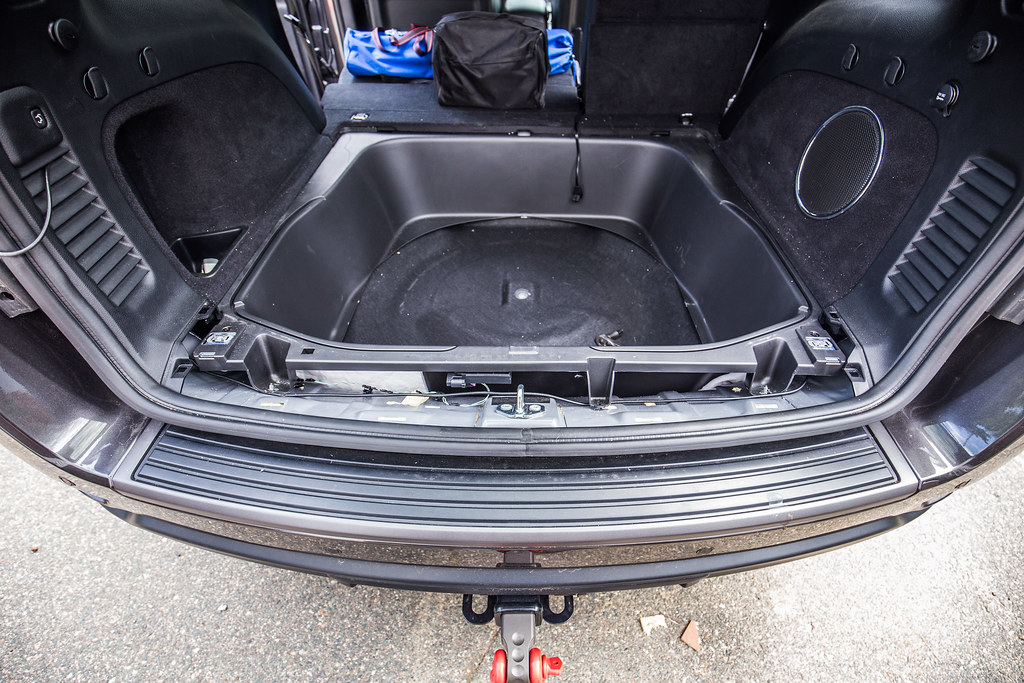
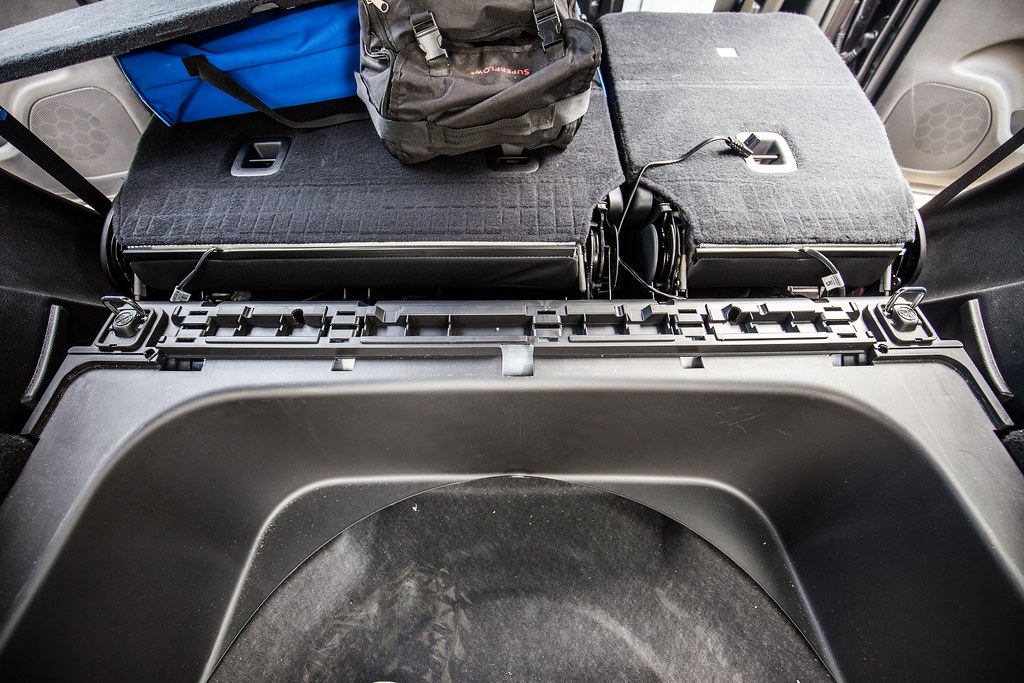
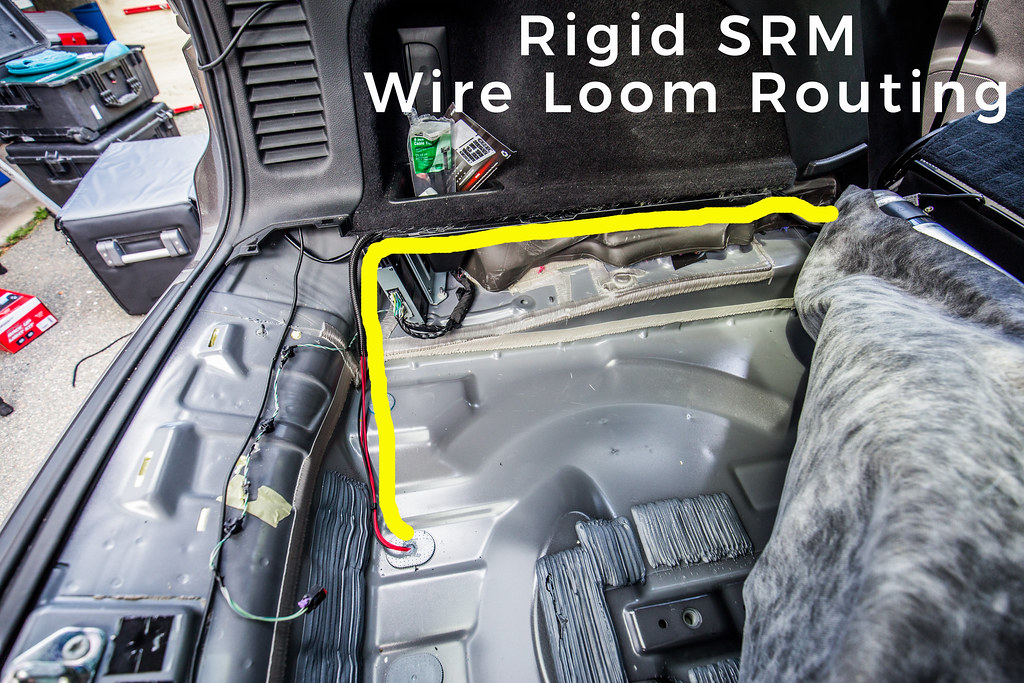
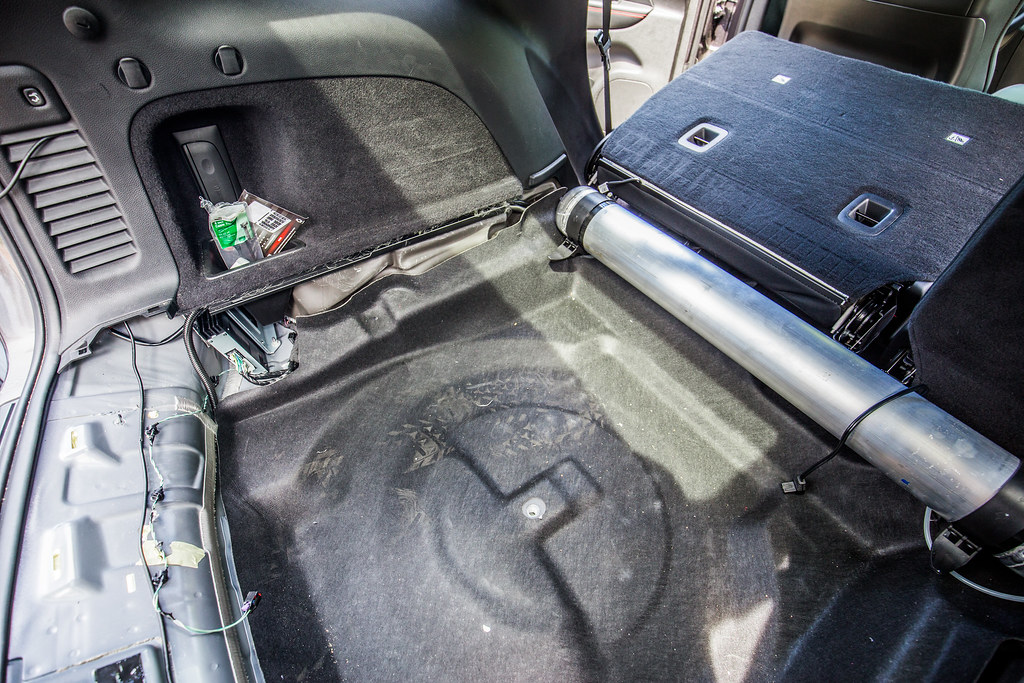
First up was to remove the interior trim from the back of the trunk. I started by taking out the rear deck piece, and then removed the spare tire and its accessories. After unbolting the two tie-down mounts (8mm nut) from the rear-most trim piece, I popped that out to gain access to two bolts that hold the spare tire surround to the body of the Jeep. Those are a 10mm nut in the rear, then by folding the middle bench down I removed the snapped-in floor level piece to gain access to two Phillips head screws that hold the front of the tire surround in place. At that point I had free access to fold back the sound-deadening floor mat that lives under the spare tire, and got my first great view of the space I had to work with for wire routing.
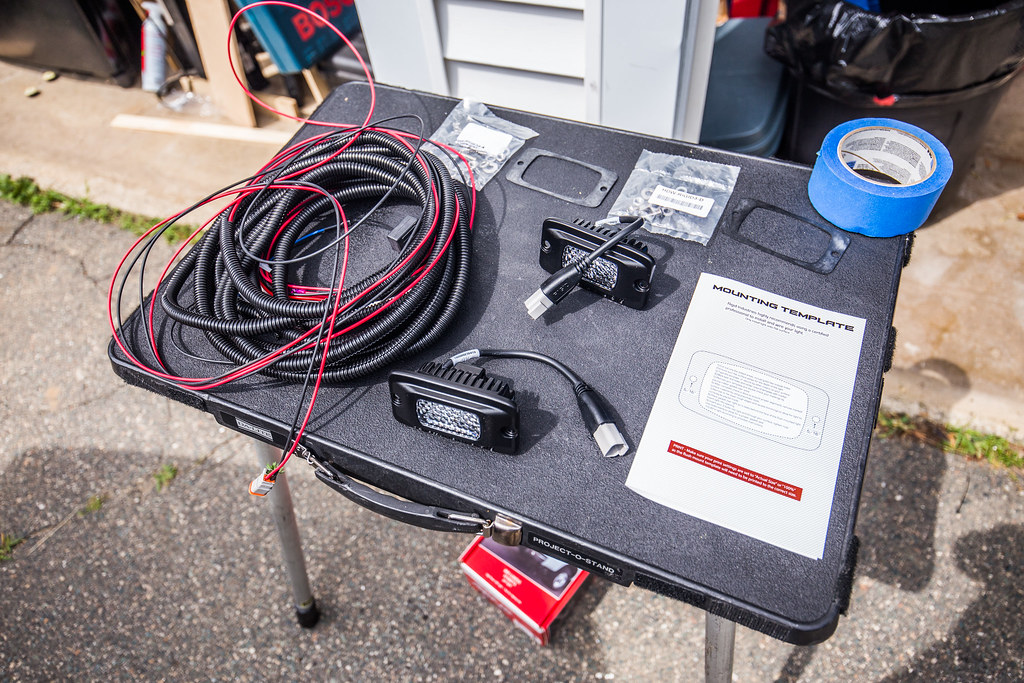


Rigid SRM Reverse Kit by 2180miles


WK2 Trunk Space by 2180miles


Remove Floor Transition Piece by 2180miles
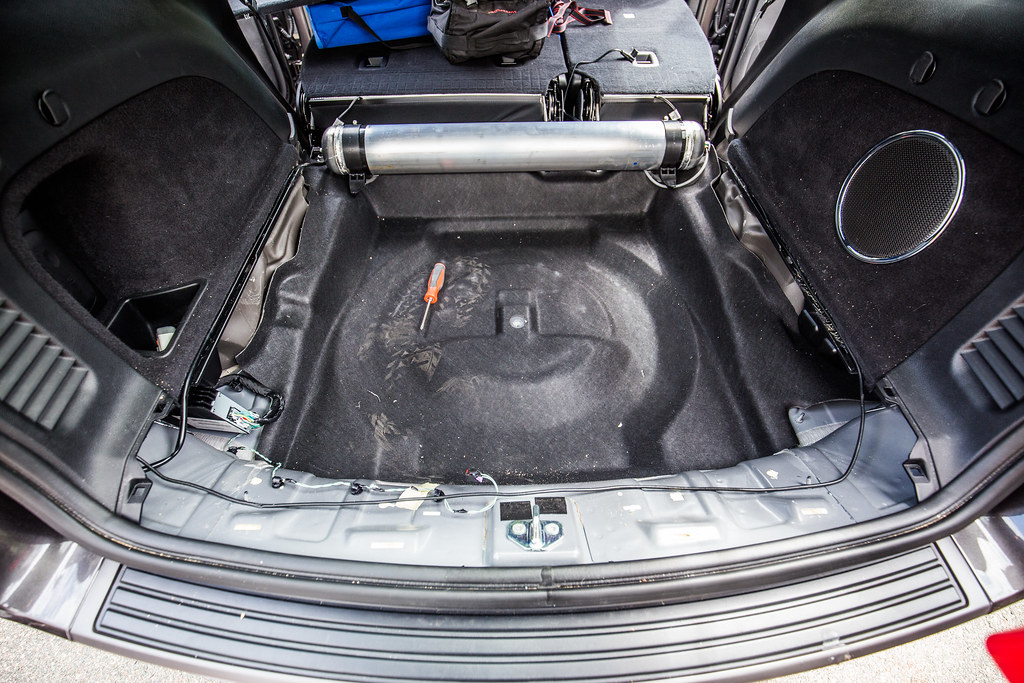

Empty Trunk Space by 2180miles,


I’ll point out the suspension’s air tank up behind the rear bench there… kind of neat to see.

Comparing the trunk space with the vast amount of space underneath the body, I looked at three plugs that were towards the back of the vehicle. Utilizing a step-bit, I drilled the left-most one out to the width to accommodate the 4-wire harness that the reverse lights utilize. Once it was drilled out and cleaned up, I placed a grommet around the immense wire harness (seriously, props to Rigid for including what must have been +20’ of wire loom on this kit for those huge pick-up truck installations) and installed the grommet to the new hole in the Jeep’s floor, leaving enough slack underneath to allow the pre-made harness connections to reach the left and right sides of the rear bumper.

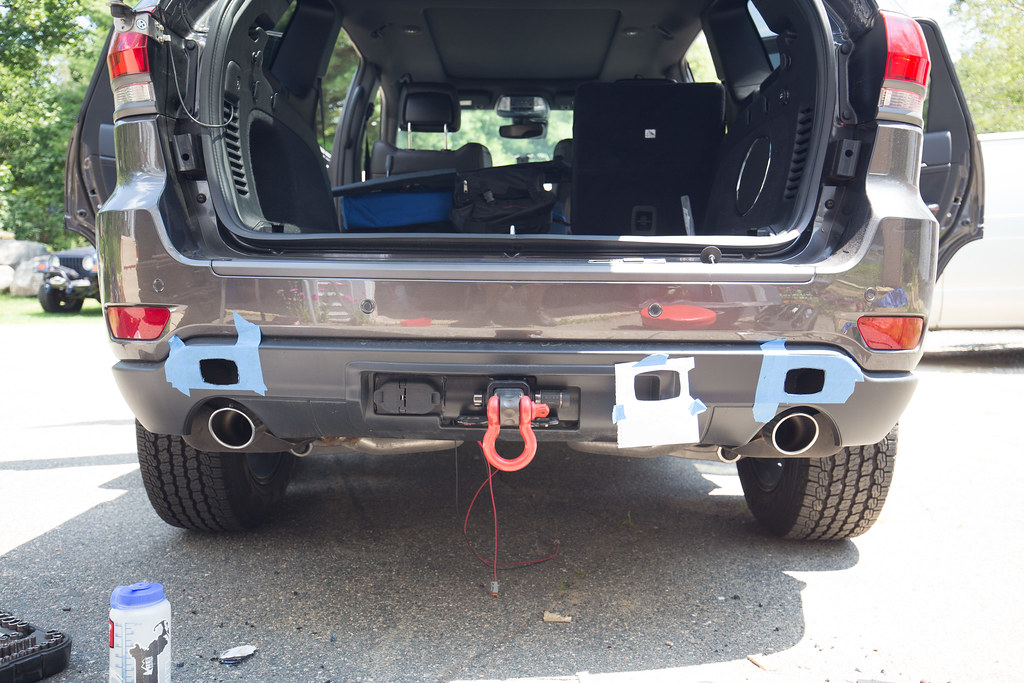
Next up was figuring out where the lights were going to go, though unfortunately with the WK2 there aren’t many options. The steel bumper/crossmember runs almost the entire width of the tailgate, leaving only 6” on either side of it (above the tail pipes) before running into heat shield. That settled that pretty quickly, the lights would live wide on the outside… probably better anyway, and where I had originally intended, but just so any future people know, there isn’t much room for options.

Covering each area with painter’s tape, Topher cut out the stencils and I applied them to the bumper, checking for center and level as I went to try and get it as close to perfect as possible the first time. I used my Dremel cut-off wheel (obviously a favorite tool in this build) to cut out the rough rectangular shape, then a sanding bit to shape it to the light itself. A couple test-fits and some additional sanding allowed the lights to slide in effortlessly and wiggle around a bit, leaving me with the final task of drilling the mounting holes in the lights final position.
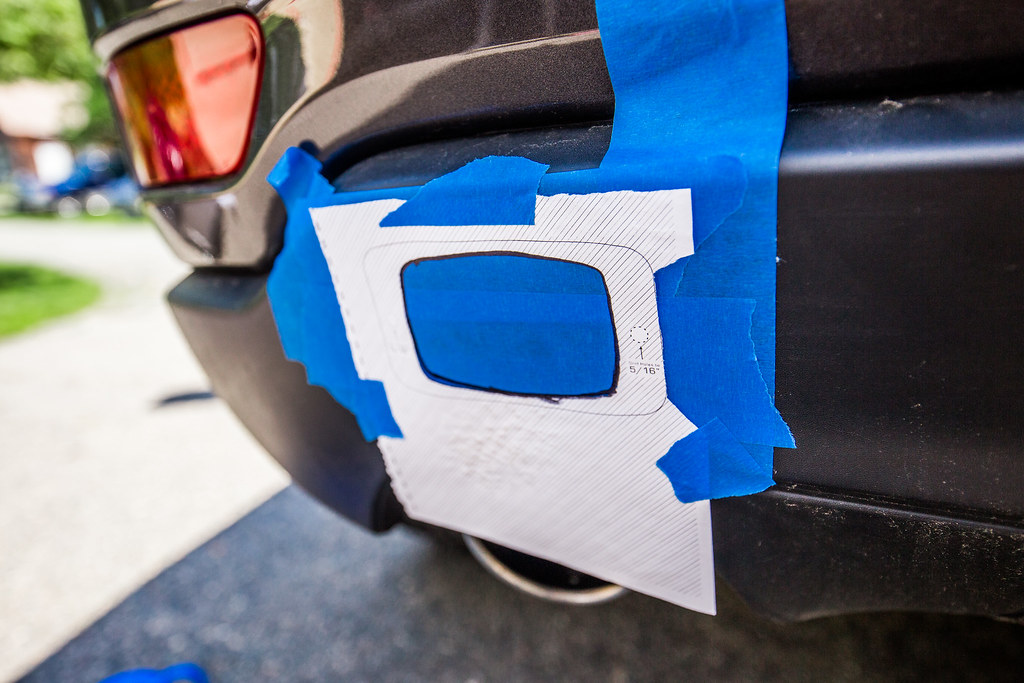


Rigid Template 2 by 2180miles


Rigid Template Cut Out by 2180miles


Rigid Template Rear Cut Outs by 2180miles


Rigid SRM Test Fit by 2180miles


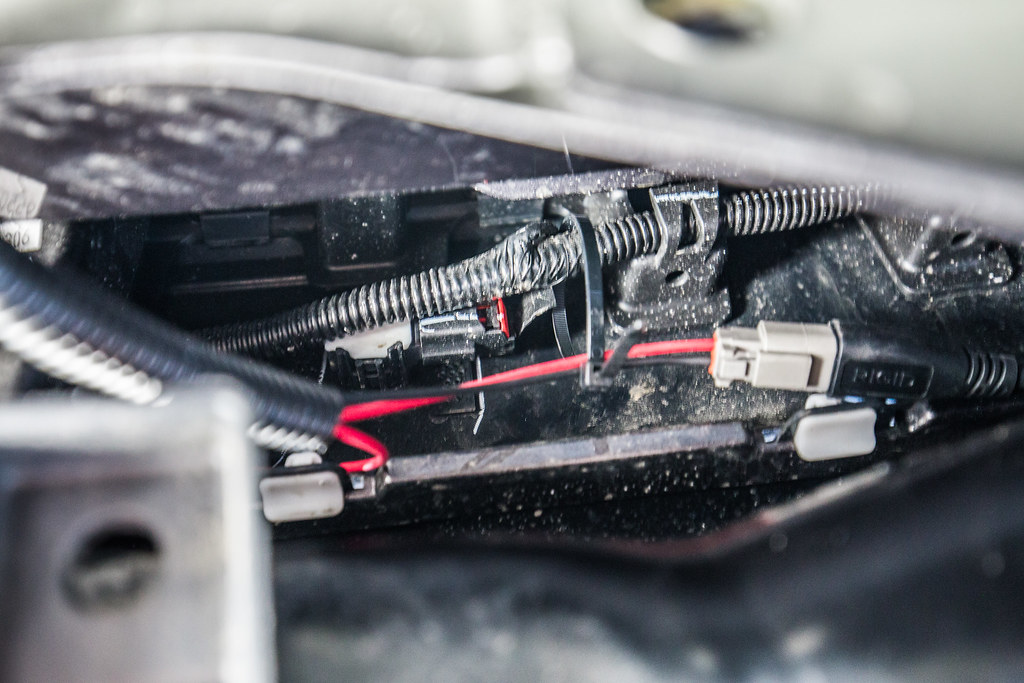
Topher had to meet with the new barn’s General Contractor, so I took some time to clean up my wire looms both inside and out of the vehicle. After finalizing the lengths needed for the water-tight connectors to reach the light fixtures on each side, I used some of the plastic wire-wrap Rigid included to get from the hole in the floor to the rear bumper where I zip-tied it to the existing trailer-wire harness. I cleaned up the runs on both sides to the lights, then worked on the inside of the vehicle to route them.

I followed along the lines of the Black Oak LEDs 30” bar on the roof, using the wire wrap once I was out from underneath the flooring carpet (not wanting it to bulge unnecessarily) then ran the loom to under the rear bench where I could again tie it into the electrical control panel.

At about that point, Topher came back and we were able to, albeit with some frustration, mount the hardware. I wish I’d triple checked my cut region when making the holes, as even a half-inch further outside on both ends would have allowed me to get the hardware in without issue. As it was I had to tape a loc-nut to a stubby wrench to hold the nut in place on each inside fastener. Lesson learned for next time, I guess…. Save yourself the struggle and triple check your measurements even after you’ve double-checked them.

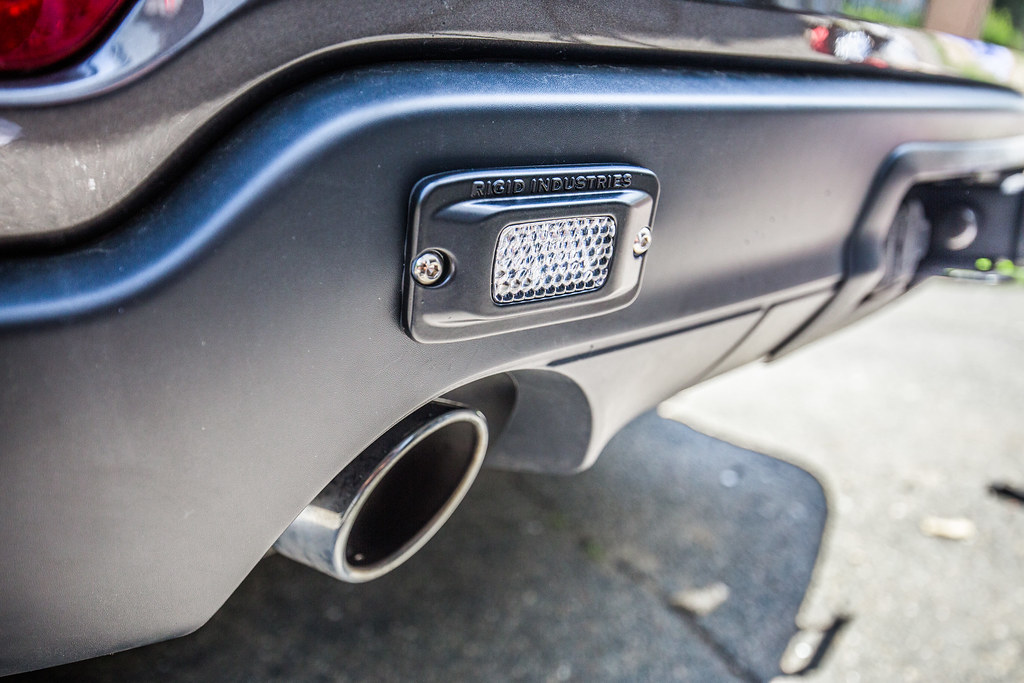
Tightening them down securely, we checked to make sure the included grommet around the light had seated well, which it had. No issues with fitment or flushness with the plastic bumper, and the lights are nicely faced down a bit to illuminate the landscape behind the vehicle. I tied the wire into the control box, and tested the dash-mounted reverse light switch, finding that they worked brilliantly.

Total time on the install, including hanging out with his new puppy for a while and grilling burgers: about 3 hours.
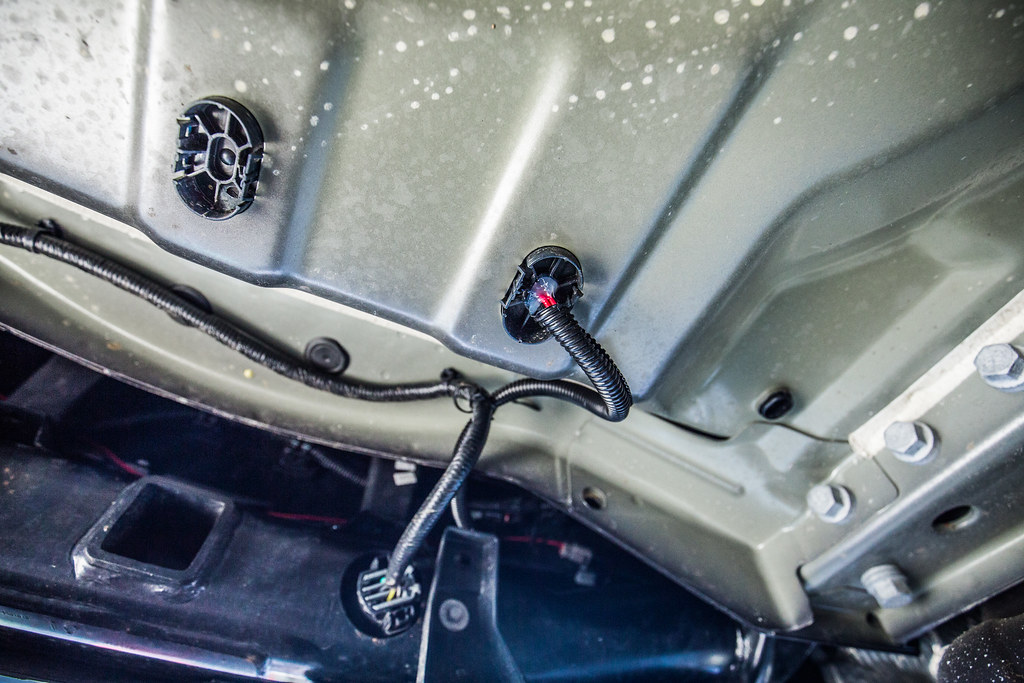


Under Trunk Wiring by 2180miles


Rear Bumper/Crossmember Wiring by 2180miles


Trunk Grommet + Sealant by 2180miles


Wire Routing by 2180miles


Partial Trim Reinstallation by 2180miles
 

2180miles

Endurance Adventuring
They'll serve well for auxiliary reverse lights and diffused pattern floodlights in working situations or while setting up camp. As an additional feature, I've tied them into a solid-state strobe controller that's also in the fuse panel box. I've run strobes on the back of the Wrangler for years and have used them in many, many, many situations, so I figured where this Grand Cherokee will see lots of time out and about across the country and in remote areas, it should have at least some set of strobes in the back.

For those wondering why, it's situations like flat tires or breakdowns on the side of the highway for my own safety, but I've also stopped a dozen or more times over the years in all kinds of New England conditions to bring attention to other broken down motorists until the police arrive… they're just good to have.

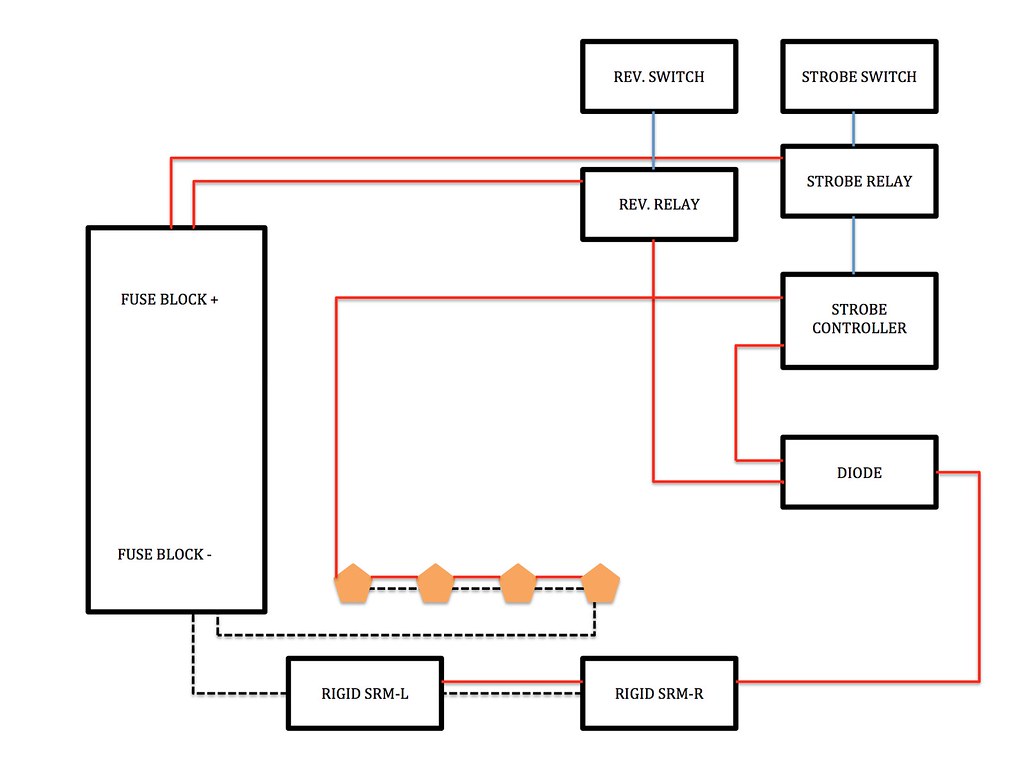
I've attached a wiring diagram for how this is being done, two independent switches on the dash powering the same lights without having any kind of voltage feedback upstream to the switches. Pretty neat, but a standard use of a diode in a 12v system. The orange pentagons are there to denote 3/4" strobe heads I might someday integrate as well, though I'm unsure.

I'll get night photos and videos of these functions soon, but for now here are the final daylight installation photos and wiring.


Strobe/Reverse Wiring Diagram by 2180miles


Rigid SRM Flush-Mount by 2180miles


Rigid SRM Flush-Mount by 2180miles
 

PirateMcGee

Expedition Leader
So, I accidentally bought a new toy this week in order to have it for the trip to Canada. I've flown a drone before a time or two, but owning one now is a whole different ballgame. It's the DJI Mavic Pro, shoots 4K and 12 megapixel still camera. The photographer in me hoped for more for still shots, but the size of it is roughly the size of my standard dSLR/lens combo, so it'll live comfortably in ALL of my camera bags.

I had some time today to play around with it and the WK2 in an open lot... really excited to get some footage of the lakes in Banff/Jasper National Parks in a few weeks.


FYI drones are banned from recreation use in Canadian Parks

Nice writeup on the reverse lights!
 
Last edited:

2180miles

Endurance Adventuring
FYI drones are banned from recreation use in Canadian Parks

Nice writeup on the reverse lights!

Hey Pirate-

Thanks for the heads up. I've already written my application to the Superintendent of National Parks for permission to fly while I'm there :) just waiting to hear back.

Appreciate the kind words re: the write-up!
 

PirateMcGee

Expedition Leader
Nice! Curious what you hear back.

Did you tap directly into the factory reverse wiring/trailer wiring for power or does the factory wire trigger a relay with the power coming from the battery?
 

2180miles

Endurance Adventuring
Nice! Curious what you hear back.

Did you tap directly into the factory reverse wiring/trailer wiring for power or does the factory wire trigger a relay with the power coming from the battery?

I'll be sure to let you know.

As of now, they're strictly independent of the factory system. Where I had to use a diode for combining the strobe/constant on abilities, I didn't want to have to fit in another diode at this point to get the factory harness to trigger them as well. If I get around to doing it eventually, or find a need, I'll likely tie into the trailer wiring since It'll be right there. Only downside is that then I'd need to have that system be outside the vehicle... not a huge deal, but still something I've got to consider. It could be tucked up inside the rear bumper, though, so wouldn't be obtrusive in any way.
 

bobholthaus

Observer
2180: I want to put a lightbar behind my grill and have it go on with my high beams. There is a guy on another forum that talks about opposing relays. But I can't get him to explain exactly what that means. Have you thought of a lightbar yet, and what you will tap to have it trigger with the high beams? Thanks.


Sent from my iPad using Tapatalk Pro
 

2180miles

Endurance Adventuring
2180: I want to put a lightbar behind my grill and have it go on with my high beams. There is a guy on another forum that talks about opposing relays. But I can't get him to explain exactly what that means. Have you thought of a lightbar yet, and what you will tap to have it trigger with the high beams? Thanks.

Hey Bob-

Sorry for the delay in getting back to you. I'm not sure what he means by "opposing relays", but I think you'd want to tap out of the OEM high beam harness/relay to the relay of your light bar. The other option, though maybe a little less ideal, would be to cut the high beam wiring to the headlight itself and splice that to a relay for the LED bar. I can do more research to try and find out how thei OEM hb's are set up to see if it'd be easy enough to tap a second relay out of them.

In regards to your last question, I do already have a 30" single row Black Oak LED bar installed. (You can get 10% off an order with them by using the code "2180miles" at checkout) If you haven't already, take a look at my write-up on the installation back on page 8 on this thread. I have never tied a light bar or aftermarket fog lights into my high beams, nor auxiliary reverse lights into the factory reverse harness. I much prefer to just have independent control of them.


- Ryan
 

2180miles

Endurance Adventuring
Wrapped up our club's QB-5 Overland trip on Sunday night. My girlfriend and I are currently headed west across Canada towards Banff (I'm writing this from the Trailhawk's passenger seat at 110 km/hr) and beginning a write-up on the adventure itself. More photos to come, but here's a teaser.

Oh, and the Jeep performed flawlessly.


QB-5 Overland Group by 2180miles
 

bobholthaus

Observer
Hey Bob-

Sorry for the delay in getting back to you. I'm not sure what he means by "opposing relays", but I think you'd want to tap out of the OEM high beam harness/relay to the relay of your light bar. The other option, though maybe a little less ideal, would be to cut the high beam wiring to the headlight itself and splice that to a relay for the LED bar. I can do more research to try and find out how thei OEM hb's are set up to see if it'd be easy enough to tap a second relay out of them.

In regards to your last question, I do already have a 30" single row Black Oak LED bar installed. (You can get 10% off an order with them by using the code "2180miles" at checkout) If you haven't already, take a look at my write-up on the installation back on page 8 on this thread. I have never tied a light bar or aftermarket fog lights into my high beams, nor auxiliary reverse lights into the factory reverse harness. I much prefer to just have independent control of them.


- Ryan

Ryan: thanks for the reply. Because the high beam is only a shutter moving, the old way of just tapping the high beam circuit to power my relay won't work on my GC. If I could easily find the circuit that moves that shutter, that would be ideal. But from other forum threads, it's buried in a harness somewhere that isn't very easily accessible I believe. His opposing relay used the logic of the oem fog lights turning off with the high beams, and then using that to turn ON the light bar, when the fogs go off. As I don't feel like putting in switches in the cab of the vehicle, this logic is a little harder to wire. On my Wrangler, I have my lights wired so that in "auto" mode they go on with the high beams, or manual mode turns them on manually. It allows me to use my light bar in everyday driving! Once you have that ability, you don't want to go back. I'll see what I can find and keep posting.

I just got finished with 5 days of camping in SWern Colorado. The GC did flawlessly.
4f0da77d0f658806c556e6da490673a3.jpg
d1d926f1ebaebabbf542cd312a3e628f.jpg
b6511c8346fd149a4e7a7989810d8f38.jpg
b515042e990ebe224b8c447f3cb9193a.jpg


Sent from my iPhone using Tapatalk Pro
 
Last edited:

jenstyler

New member
Super impressed with your build so far. Cleanest and best thing I could find! Hell of a deal too, I paid about 1,000 over you and picked it up 5 days after California got them. Gotta love negotiating.

Everything you're doing is pretty much everything I'd like to do to my '17 Trailhawk.
I currently live in the SF Bay, and make regular trips all over Cali/Nevada. Between Tahoe winters, plenty of forest roads/trails, and deserts - I've got plenty to explore.
I'd like to attempt the Rubicon next year once I get the winch and nudge bar installed.

Currently waiting for Chief to ship my winch mount and nudge bar to get the ball rolling on my project. Expecting it in a couple weeks.
Need to finalize a winch choice. Electric clutch is a must as you mentioned, can't get to the winch easily.
I'm going to check out your LED guy, looks like a solid choice.

I may go with a RIPP supercharger after the warranty is up. But that's about 5 years from now.

On my to-do list:
  • Winch/Winch mount
  • nudge bar
  • rhino rack pioneer rack (keeping the box and the existing Thule clip on bars, I like being able to take it on/off easily. Plus I already had the bars and didn't feel like spending another 400 for crossbars).
  • awning for roof rack
  • Light bar (might mount to rhino rack)
  • lower light(s) on nudge bar
  • rear/side lights
  • vhf/uhf radio install (currently using handhelds)
  • ram mount for ipad
  • switch pod (I'm thinking installing in the center console under the climate controls, otherwise driver side dash)
  • rear bumper maybe? This is probably a last thing that I'll do, but thinking of a rear bumper with a fuel/water can and tire carrier to free up some space in the interior.


15994516_10154809934310692_4807873607002494479_o.jpg
 

Forum statistics

Threads
188,028
Messages
2,901,395
Members
229,352
Latest member
Baartmanusa
Top