Herbie's Chevy Astrolander/ZMB Build Thread

Herbie

Rendezvous Conspirator
Rock-n-Roll, baby!

:victory: Who's ready to Rock-n-Roll?

AQZ3XEZ5M3R01QNVL_lhvLbZh7IiLkHTHFiD3abiKOIA8uB9PsWNxmQy8I5uswyKIa378ss0Lp0jF_F7zPICEnbuTVb-V4IGf7y-Jb7AQNDVMIV1KfPKcEQaCZibj3yQ6b_nZmtI0YB_omO-zatbgsfL3pmKmtDRaOcbIHGaDZHtFfDUvoqyMjq62atx7YJMIJNlIOId49Ba7FWAWT8apfEOCNKQbqTCO5V5sEaTb0NqROahwdadN1FRzRl27plY7YZwEW_2J3AMW-G8vqvmM1H8wU8zgCh1Tym_ow2bNm6PMoFnMTvUGmpS7vj4YnldtQaXI9EpWePqeNGGfSRQerMhS5EcYfudvpWd-xCfqiRsndQ1LaRw4YniYsnGApNjqWBWnavMqYcPhF4rWUNY-d_FgJ1bdDc0QYSxAoOhLcTjwfzkHV0uQ52LHn4gU_MRsOC6f1snvrvPq2t_Cm85HSfabN-5nOpfg_SI5IHCQs99u7vZYaHxOzXj4G0CXDWzWLkAklMhZ4U9coUyQMZNAALGRDgOyp7bWC25uZ58D31JDJwxqrIPKf4q-Byu9uh66JQv5H20V5Z72HUUqgY4jqTeItOmxRjfag3CsF_ls0wkteiIaCQIJ1HersHZeWQcG_UyamF7UTALr5KRmpV3H7-7_VC8e6fA8lmb1ZdJxCIuDJ8=w600


I'm nearing completion on my project to replace my $100 craigslist conversion van bench/bed (that was never flat) with a Westfalia-style Rock-n-Roll bed.

q6ghYqbL5H87BnDDvyzlL7o1G0S6DotFgMPtOsaCkSG4L0J6uEyX1KYvyFvUikWcoFUUrQ2q29_gwRONSubtioooqvHGqPS4CHRQLngqFiDyzInFgnsreEPODlgYYOAAnUwOJmRJFyI5rL3e1eDTNVFWl-Lb-O5oUxaSWVNxnQ_GXPoiUG0S7QJXuS0wsb7sZoNWhPo2vYeNNHHColXs7wNiCyGtl9ruvsY2gT6rNK1tNJl7dFkL5gpN2ArQk69B4e-rN5sb6XG-i9RgkXZuSM0plP5WhdB_XUmVgNrAU4dKFHYiDOx4e-jL3T5fpW5zgq0bEaZ-CZGarHX0MQ1WdrWMCbsL4qD5qq0SBJsZaGUZYoS39UkqtEXf5vtNwFD69qfwIWY9PMyFWjcT-W9co45yFIROAiGb7m3IFSMf3L42TVuWe6aqzesHUIQ2xAM4Q1rjywF3zuCH7VoitMif3UjuvBzeGqIHvXGJCh0BWyqR27oXo4VTUHMWnHK0iHNb9I6eNJ9FliqHobSw2deR04b8VI9XisYYkD989iwi0v_wDAu6vvxcThjFsYM6ZH1ecqIsAP_Zm_IjpOHgbrUmnj8_zt-cgvjEMmNwdVPSFRgJaAXd5ZTk0Q-HR46OTzoLkO_o-BqlGDYQN-llbYqq7ehzHLZQWyFEbF4bZEtVtndpoyc=w600


I used reproduction Westy bed hinges, but since my little girl rides strapped into the back seat, I didn't feel comfortable building the box/bed system out of plywood. (Especially since we don't have a rear firewall to tie into like the VW vans.) Instead, I fabricated (mostly from scratch) a frame from steel tube. Since safety was a concern, I harvested the top of the seat-back from my conversion van seat, since it had all the punched holes and hardware necessary for a full (removable) headrest system. It took a lot of fiddling with the box dimensions to get things tall enough to fit my 12gallon water tank underneath, but to sit low enough for the Astro's relatively low overhead clearance.

e5kaRxlMNNkTQ3JvuS4ac64KnAHY8v4jv8FpSP1AmGXHy-h_gbGo5yDUBdUrMZnJW6bOTZ6bonx5SY_2OugGST1UZFfX2veRecWH6IOE3quGzY3F169PV0pZtPDzIb027obNCjIVmYwODUDC78QJj4i15d2KUGw6PSX5AVoJOjXTWZsfiazl4jQWdZhCnWj2r1JD6BKt0Z1HpGzjRW15IKyo0pw7f0TFcKZ2qT446A3TqHTYdfsMQjQTGIhsSTuGO7YXJCoy4KQbT7oW0GyUNoZ609PBS6AVEHbddfavY9Q1qdxKXvKsr7x6XQ3eHAj3GF5TUdcie2cBsMpoerq8jKBn4tD9tAhQtb-1TNVHIjlUsL2LqQq1Jbx7dXuiIMhyGViTfR7I_PhI6PD2kbGcRns4v4OU4ETcbOoUTGsMHmQ3B-60wTwdeFJ-E0MwGIn-xDSIdWnhhlDoZgMhwFIpn_R8jf9qLlnBDL2Clhyf19KLbBy5OkcIeHjbAgBhy_Sg-XtISU0U_GwxpfcQVN2KSXpvwSuAgQ-d_gKdyhTYy1mFPLTbS30xT6Cki4uPBr_MuaRZOe1YAlzi9VbyWT45O2oMAFcjRzWj8exV1P40lN8112gAdoUf24ZJfMvVZUOY4HABR0hNaT-RhjzbERWWehALAs_HutzyR5-s8SGB7ZX6XfY=w600


Seating surfaces are 1/2 birch ply (same as my cabinet), and I trimmed the back of the seat (covering the headrest system/innards) with a nice 5mm (Poplar?) surfaced ply. All the wood just got 2 coats of wipe-on polyurethane. Since we don't have a rear firewall/bulk-head for the bed fold back onto, and since having a perfectly flat sleeping surface is one of the driving forces of this build, I designed adjustable supports into the frame. The black piece with the two bolts catches the seat back, and is slotted so it can be raised/lowered to make sure the back portion of the seat levels out perfectly. The rear extension platform (instead of the VW engine decklid) rests on the same black bracket at the forward edge, and on adjustable legs at the rear. The angle of the seat "bottom" can be adjusted by shimming the support brackets.

IXzQz8sAEH18Sy0vlIvibEJ5eYzSvOlHjp6XThRSQThYM_52K1nqY1vrLP8TPxdpFzcqXPLt0dZ3pfa_c2Xj0qK4SCP4mZx_-GJI1MpnIIY-vAIGiaaPb6T8XXWHU9Yrq1SZEajI8CCCT2G_HUecWmNRwfNAWa_5Y_564-3AgEsHj-9tdVbU30vfvRXSeqoCmQW0USbPzfiVqhFMPGnGsjJK1vdApB-4Ge8oqWN4VGTok6jbaH_Hbc3Mwk91IfKrTxlUVC3PI6lYMWtHjMOOfylgnelw-HqYnTbk7bgi7e6xtmWR_BgCUlJkjw1apXNbCYR3zV8rRRi-8qmHJ_QStLH4IbVR1cFbW5sZHlKxb9vExKkwSnKyacMHjBjK40Mi2n6ejLHspPQbCXYEd27OlIJCenVRmZEdxEeT_AfbuX76D_r3b5XQ2LO5O3o2m2LSYQTS_Ugfgv0eoZB525goqlVIrsrCNqozuxL-H7BfonvUfrCi-ORU9QCO3FjtDgc7unzxiwD0I378NhZ1pp0qjHljY-y6ZgaeZVMvuuTwzh3wEAeD0_qP0T-hibpeFQ2ukzT4UpOwdMqkDy-Jvob6zRt9hRrp-IfgdUIxVz70wF1CSKMb1Zjmge3NW9_xC95EtTr5ZDcuQ76AKVNkwE4wuRf07AMMqClT-Z2sTQL6G_nscJ8=w600


With a Rock-n-Roll type bed, it's necessary to keep the frame "locked" into seat mode so that things don't fold back in an accident. I used a hotrod "bear claw" trunk latch that works perfectly.

Still left to do:
I've rebuilt my "water pump" box to fit against the new seat, but I need to finish re-plumbing to the (reoriented) water tank. I've got an Ikea foam mattress I'll be cutting for the seat/bed cushions. I'm still deciding how I want to upholster the cushions, but I may stray from the "All DIY" approach and just order zippered slip covers from one of the many inexpensive internet retailers that will make them to order. (I don't mind sewing, but that's a lot of work that needs to be done accurately and I'm running out of time/energy for this particular project.)
 

Herbie

Rendezvous Conspirator
A little more Rock-n-Roll

The Rock-N-Roll bed is "done". Or at least, "done enough to sleep on". :wings:

It took a bit of a push, especially given the near record-setting heat and humidity we suffered through for the Labor Day weekend, but we're at a point where we can sleep on the new bed system. Between that and a few other odd jobs, we're good to go for camping next weekend!

MJWjZmrHMk63VenRyFFDHXgJxpASBIETmIX77Wu2NedK1mPAwYShZlc78lcfWNYQPrL6mB45XNXGjNx_bcG87ZVQOmDlFjXh4SYjpnCjjZiBIEVqSCOcktj68NYy42HMGZViGatgAyK87FMLUo-PBwzQzSU2-EOd84RNXNg0XSMz1jb3d3NoxgTIQKGZnjWR_oSrCmT-xE_LSKK7o5_IhUqU16LzkM5MPbbiuYKDV5m4ialk1b5Xup0qwqbEgXXyA23DjCu453kUqH4-s1qkluOPJoQ5s8S9uWRWDQdf7K38SOW36lsGCnBUz0nW8N9Z1WmVRD6n6yUiUno4a40XgPffaq5W0NKmeZKUfPZRW9GXsZ6ZBpXaNdc8vEwBijsfAjHtxB7qZg7AB_TKpjLCl9t61Rfbg05QJTDyNhISdIO6_EwBFoZaxqAoK-3Sry7vbRNTPR79ioh1cipgmnx0BpFAtoZugadubN9Ol0XHLuk__enHUWrtIjbEpGas7QN-xn9uJNJKifyj_kmPNpvVjTyyhP06Qqqcab2S2ND1na4wb4GjwtRHjWteUkdA5xuWZa0pqqoC5dNNhHXNHMnNNgfBxDNHCCTjLdTfp3JH6witx_8UBXhpoDTc0h-bIYLvVFUyM-AiJRqfFuRvPYi9t-GNFaajxDWaMg=w600


The main work was sorting out a new rear extension platform which takes the place of the rear engine deck-lid in the VW vans. I used a similar platform with our original "conversion van" bed, but the dimensions changed just enough that a new unit was needed. As I mentioned in the last post, the platform rests on the same adjustable crossbar that the seat-back folds onto, this ensures that the two platforms mesh evenly, with no transition "hump". You can also see a couple of metal plates in the picture below - these limit the platform from moving forward. Since the platform is "floating" (so as to be easily removable), it could technically be pushed forward where it would interfere with the seat reclining - these straps keep it perfectly positioned so that the seat drops down flush.

You can also see that the seatbelts have been re-installed, the water tank has been re-plumbed, and I finally undertook the simple task of marking the sight-gauge for 3/4 and 1/2 full.
ksPOZnsXaZBVVGBKHYO6gKlhEiIdv1GpUyQCwWYIwWV_GgHqp7F9364KhGZDfDI5ph986HLYQ006QaSdjDGPaj2zQwzPsryI-PEPtcUKMBA2spXH4YieuyP0H5r5v8nANeZLUFfeG8OP6n0ouSdHpZaGNx1-85hsPguIL-TIumj7O_jb-CzhcQHiJBZ3P3-hCuXZ0FPR4rNCr5vTbK-haewWEeoW5-8AJJbWoAEsvfmnV9Fbj1H00PEXqWcuT5mgO7YX1AFGVdT4KOq0Y8UUqNtLXQ_mYz2GHRGL-_NL8keqmHKtBEVUqbCcOJPDrponmoQ7YXScvtYlcAnrgMZqIch26vUQyjU9T63P-R1Z2ZCa827RR6X0GzCjjbLO4meGYV3jACvW1nC6XqwnMocER2R4GzhabZBGt18EBI3ifAYYOjkxQ72n1iJ4n-HovMzZN_SKfkJyljEhtVvJhIeb6eED6UcpUjNs8l6Ybvk_4LsN0GgEynQZIF0GpN4leBUaDA0Pc-bm3B4Spbt5VMZk_Z8UZ38IZpfzMpQZIILYXsxtD5k-wUT4VdSpyOjxFjljdZHdesKmqwYod2PkoQpp9QgXH8aPCyiDLt2oscFhtky4rGxEL4_RajnwLwcn8ZFSUhhWGnYjHmllCg1yOlq0jsCr59knJTTTZQ=w600


Also, reason #426 why I love my van (and why I built the bed base to be open back-to-front):
Being able to transport 8-foot plus long stuff inside the van. In this case, I've got the old awning from our donor van.

YI-LC830uxA_MZASH2Ghddl_oyn_uNGm4ZHl-dWSTi0esyHI_AiZAnemIOLY0a0UdJi4Z01xFV5oUorjpgNW10uwwJ4wQmFRmfyK5Ti4hWY-8RyHWTsJqZZUqCpestBGaZbg3h-yYhyxYtZIptphwDOU8FuTQEtU39sJRp00nxhGNvEohhUUCwSmQZQw0g75vzGlg9FUn7p_ubfhr0qVUGH9vSU-iJX2ihJXXVuf0LD5ICfALIzAVhUJzBQKKN9cHK6H7dSqYl8lthtU63vIgetzH3uUA_LObgYBwXwi669L7ch7Plr6h0Y1YDyIvBMmyjunB5Yqv-x2JD0RRxJukbcq3bzY2Fr56azc0i-SIPGyq1p1llSKYg9HyJ_om37dpoh4UFPM66ni4onxbLkH3_-XBAsWjrAkWRHDA_3D4Oa2nXUlinsIKTrR3v0QC4rze7-p1b9Dlte3ZLHWUcQWUTIse_vlxLq_J6PLwSxLZRtPaYlsUmdl7FL6Je6P-St1UYQRQVHQ38ot4mjulVVxH_IE0NmbcfnsFn-9FZSXVLpwAS-oSGYZJAWeO-eSW0KmT-z2lez1abq_2dlNpXVzN_VfcwKtEjsrDbbOMX7RIpdxgmqlwE4Stb3EpnUR_YAoLLoJCMvo1E0uA2d9w5fwtRxol0x5M_3u7g=w600


The other necessary change to finish the bed project was to get an even mattress. As I've mentioned previously, the old conversion-van seat had two different foam densities, plus the seat-bottom section was sprung, while the back was rigid, this meant that each of the three parts of the bed had a different "sink". Now that the bed platform is perfectly flat, I've also topped it off with a single foam mattress, cut into three sections. This is another budget solution, an Ikea Lycksele Lövås futon mattress. This was pretty close to the right size, so there wasn't too much waste. One surprise, not advertised on the site, is that the mattress is "divided" into a long and a short section (presumably to fit their futon frame). Fortunately, the split was in a place convenient spot. At the moment, the cushions are just (somewhat loosely) wearing the recycled covers from the conversion-van seat, but new zippered covers are next on the list.

iqaBqou40AvaySAtnmvomiNlxFUCKG0ISxoJNExH7U1Wtzb0PfmGaJbvtMEbwC1aeDqTfTK-_6P7HOlCfRaYwgRigBDID_ss6dpWDnw_IH8wPvCjrT88VPsiGmQi4ZX81n9Ji9BtpNWfjzLMeGHdjIwP4Yq1hPi1yAg15ZHexjSe5ygYn28GwX7_cUQcjJ7dZo3n9jdOrPsJoNczsFtrDLg1uDGkPgNPby8aAH7JbdIzcfvtu21dBSb77UkHsbnaHpfXP1Utf-ZHD6rmuDulOYQcHehYwKh36oQUZiEYbq-txihSqZDZohFw8hWr1cooi5Q4I-mB1c36ZfqFhfieaOKItpwuHljNoG2hPJqcEiEWs1Aoev44whDYNAZ7cIL1cMDakgS3e_WFAGuMWZBoNWDv8qoOyzMtjcgjSTO_k3BpdJ2o234ZQNy-7qPRxXFIYlh4uRwJTypxB-uL3vl6lNadyw8iNQHVZ28LHkq4aqq6oJCPEqzzEaSkBI8eG2K6luzhWVu4F7dz9CADjmoEr2vqKhsuD4M5J5hDlIC4dHtkBf16Ww2sW3cpLoobuGkaUgXzihWOZKFZrQ6mD7I4uWnKH4I7q9fzEe-p438pcGJtfZ3y06qSt7T8M9S3cplSoeHgOQV9ncMmitebgSGg1Ghtw6MFwA9nMw=w600


I had time to complete a couple of other minor projects that don't merit their own post, but are worth preserving. First was to whip up a couple of adjustable straps and to drill the bed platform so that I can safely sit the chuckbox on the rear bumper. The slim and slightly angled nature of the bumper means just resting the box here can be a little precarious. I bent up a couple of hooks so that the box is held back and won't tip off the end of the bumper. I won't typically use it this way, but occasionally I just need quick access and don't want to setup a stand or move the box to a table. At least now I have the possibility of prepping a quick meal off the "tailgate" of the van.

yNIpIgT2mUWm1mGnbhLUisi6dA0jD6QCAgLZLTxUiLLcH-lFC9H4j6vjUUIOFasjKLknbiucfTzz9OaHCPbkqQ6K1kLaiv4tt6SRm6Mn5jFqGoFYb5SmaWtUpEJDcPrvnt2m0_2bGd9KfWiBxZzrh1v_RA2It1jFcPkVz8OWOxM1y7wkJYmtWuW-omiuFdwgHPk0xSKjp_Yvr3k2ZK9GoP0V2rNC9pAM8qKOf4UGLfCbmN24lgWHAVVx56MxAsWH4UMBtwjPfLlNNp4mmgLah4sVIQjsrrnoCqttyTX0qKiB6PqfJXh6gPkxes7GvW0Udv0nkwyNDbkpJJscqx_PO_VAEC-U3OX7axFGapq6IfPTxwf87Y-M5VbgR8iNKUoyAV-tpvqrf76nuAkPEvuSuCqvk-JPNAAk-jURRx3AwzuDRkGjwNzHcUPIRMnU16705NWcGZRuobtZAMNTq2QG9zo5-rmkun3EgX33mSfIWlj_Gdo4_I08R-_k6_AjiuQdjyGwIbWuz4C7Zl0uMwh9H5c3RRBKX90_lQa3oQ8PjzpTnwiG62ejPBoTSv4cqbkNG52vjcFqMu6sMzfC_7r_VwkBa79bVk9VWqKNcMGzP8RBKIO9kjN8HuTp4UO2qsoOcPie4NEocRBp7sbJ7NbHC86FxVjdgsDuOvaonYWE5kHU5_4=w600


Just a quick detail from a project that will be covered in more detail in an upcoming post:
What do you do if your "precision" stainless steel fender washer fits the threaded portion of a bolt, but not the un-threaded shank portion? Enlarging holes in thin material is always tricky, and damn near impossible on something round that you can't easily clamp. Even on the slowest setting of my drill press, I could never drill this somewhat hard stainless without the bit catching and whipping the washer out of whatever clamping system I could devise. This is the right way to do it, especially if you only need to enlarge the hole a smidge: Using a table clamp and a long-jaw C-clamp, the washer is pinned at the corner of a slot in my welding table. Then, I use a tapered hand reamer to slowly remove material until the washer fits the shank of my bolt. Zero-percent chance of snagged washers and a perfectly round hole*.

dAMlDnAfTfmJjiPmiEliqmPhQx436FyTWNo1VzJRZ5PACBc2klprYW10Bwlk2lfXXFrp0iZVUXdn_zSFmntJ077tgNa8vb6wAOoQJtNKGZp4yWxQf5JDGQq2E-COFLQ24uByvRBD576Uv8AXGfhFMeTYLRP3AlBTlGKNpXaWyfq8wwrChsX8uUKPMrmXp7adgV8ySfQoPPUKbuZyVOopf6Yu7KZd6TTjuvLUHj4ulvcm40y-9FN2FXF3Twjt43U_Bq_hkXyJkSP9zG2dAUNMqlbmEy-cyFukgCLUmjcbsMvckFXPDUo4AjbVHYMngcFsvHz2srbYFu2juCsrx_G_by5I1eqMU7ek6hCxs9sKIL0JyZ2O9WeQLjrTFFsRUq8Li8VbfmbJP0rStFQuh9UK2oC97uEYHnN1XvBItzyZaLmIdt29gI59HKOV7XKv1UnjzJ2q8VxtCKcHagZqk0iFb_bozO4vt1lmhSmALmepY-iCyDk1AWA3T6lcXzD-yyotckVNIoUHZx4MUx7iDpj46svMNRwBV5SsHNumWwvTvETSRUkxWOsZiU5Mo-EXvDKpRyZ7INe107ZYIu49WdK0_3s7QGsFFmk8qRQ29OjqcDklXWjWgIhI4wmTODePFV5lU5JLAN9OpGeC_NW_oPv0ThVnEeWGnuB5hA=w600


* Machinist-geeks know that a "regular" 2-flute twist drill bit actually makes a triangular hole in thin material.
 
Last edited:

Herbie

Rendezvous Conspirator
On Board Air, Part 1

So we spend a lot of our time in the van out in the desert. A lot of those trails have pretty badly washboarded roads, and I know that the best way to smooth those over is to air-down my tires. Yet sometimes, I don't. I just grit my teeth and listen to everything rattle. Why? Because I dread the hassle of airing back up. It's not that it takes that long, but the whole process of fetching the portable compressor out of the back box, popping the hood to connect the battery clamps, airing up, and then reversing the process just to try to deal with a too-hot-to-touch compressor does make me think twice before grabbing the deflators. And that's dumb.

Ergo, time to simplify that as much as possible. I scored a hard-mount version of my Viair 400-series compressor from a friend at an event swap-meet, and I scored a nice air tank off eBay for about half of normal price. Today's project is to get ready to mount the tank.

iqEvknSmU1G1I9-MtPMBCYC-3EWtzXj_5dik24yXO0_Du_Sw9m7cZrrYVCG7wO5cFV6z9kjc1gl5UCc1Oz1SinPl_YGVZVvwYn7Qbd9C5GmGc3lcwg4Vly27lmhT36X3gu8B-A0QtAc=w400


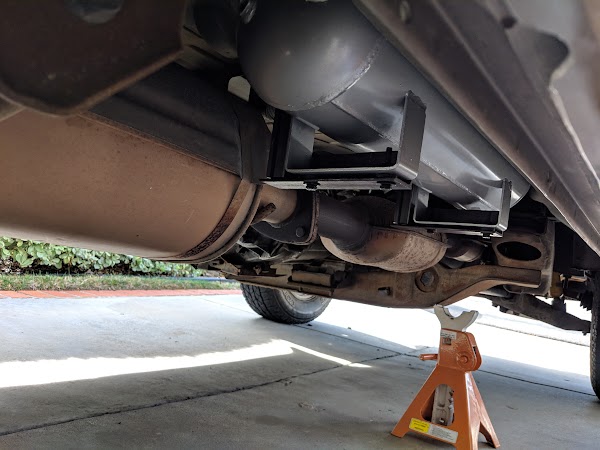
After a lot of lying under the van, I chose this spot - this is the recess under the body behind (inboard) of the entry step. It's long and skinny, and just about tailor-made for the Viair 2.5gallon tank. Towards the top-end of the photo you can see two captured nuts in the body "frame rail". Not sure if these serve a purpose on older or 2WD vans, but on mine they're un-used, so I took them over for my purposes. I happened to have the right metric thread bolts in my collection of things I've removed from the van over time. Towards the bottom of the photo (forward end of the frame rail) you can see that I added a pair of riv-nuts for a second bracket.

bywRuVdOuhC09JvsilqxOmVztfOBv8Of3yszRCjRn5q2YaDeqs3GQVh8PFUQDeH-SXmZE2svt7zVHZ_ag2w_hX76bx0Lcmyvx58TU0mdyEhUYK_4P4Pr4ICx9B8Yr2G_57vuDEK0E5U=w600


I used some 2" angle iron for the body-side, and 1.5" angle on the tank-feet, with 1" square tube connecting them. You can see from how the mount sits on the tank that just about half of the tank will fit up inside that space. If I could have found a 5" diameter tank, I think the entire thing would have fit into that recess.

Dv5-qQZueValwdLkzt-meFNmGvVBl3dZdh1CucpDmK81PzoyV0lgr2PySIDMsYVgStK5k9j5V-gJIM_Pv6fiC3huCujsJyDBgdqisXSNCSX8_tQvyFE5jVnrE4Vf1ALyLZjfILRtsrs=w600


Here's a low-angle shot of the brackets test-fit.

QeHsk6heCNabckHSLbY0aY2Sc4B4YJHB9bt9P3zbxpvXcWgZbTPj47CGhvw5qzvJ1rZWOoBcwHAmXEHTO0lzJo26jHvTj8NoF3kip2Ud4BtVNSXFW9rzv7-vsjzBYTpkaZV3GuEdO7k=w600


And here's a shot level with the body of the van. Can you see it? Nope, it all tucks up into that space really nicely, so very little risk of damage there.

UslTPPWSzaIHtHgu-kF8ev_3nZINtWlwr6ivZv6bN2bEaeAbFgc7BHb8WuMnIGDAG4auVMbjVwNTlczDDGVkjyLVS0FCdKwpjDkBhoqMHc4HzYVeMbiTybuPJZLJFkJ5jRvcTIHVfBA=w600


Brackets finished welded and primed. I'll finish paint this week, and I hope to be able to get the tank and compressor mounted sometime after Thanksgiving (though I'm headed out to go hiking on Friday). Compressor looking like it will get mounted in the rear near the spare-tire mount, there's an out-of-the-way spot up there.

Stay tuned for more!
 

downhill

Adventurer
The problem with almost every seat, bench, dinette conversion to a bed (that I have experienced) ends up being either a horribly uncomfortable seat, or a PITA to convert, OR a horribly uncomfortable bed. Some manage to hit a perfect trifecta and are bad on all counts. Even the most expensive custom coaches seem to be this way,...just stupidly bad ergonomics. I think the home build is the only hope.
 

Nesquik

Observer
If any astrofans can find the time- can someone measure the distance from the back of the 3rd row of seats to the back of the front seats?
 

nobodyhome

Adventurer
Outstanding choice Herbie; Viair is the defacto standard for offroad OBAs, IMHO.

Which pump did you go with? The tank will let you get away with a lot so you can run a real fast pump with lower duty cycle. Any thoughts on using air pressure to provide water pressure, or do you already have a water pump?
Also, make sure to get a gauge on it (I like the in-cab one best) and a pressure relief valve.... not sure how the heat of the muffler will affect air pressure...?? no clue.
Can't wait for the next update bud!
#astrolife
 

Herbie

Rendezvous Conspirator
The pump is a 400C. I've been using a 400P for several years with good luck, so I was pretty sure this was a decent choice. Already have the pressure relief valve. Trying to decide how to do the pressure gauge - I'm not sure I want to deal with routing an airline to the cabin, so I may either tank-mount it or have an "upstream" gauge mounted as part of my quick-connect tire filling kit so I can at least see the pressure then. Since I don't have air lockers or plan to use an airhorn, I'll leave the pump switched off most of the time and just flip it on a few minutes before the ends of trails, etc.
 

nobodyhome

Adventurer
Right on, sounds like fun. On my Jeep, I mounted the pump inside the cab (had a big truck box in the back) to protect it from the world. Then, I ran hoses to quick disconnects in front and one in back. I T'd off the front line to run a real small line through the floorboard and into the gauge through a simple rubber grommet. It came with the constant duty OBA system I got and I tell you it was perfect for my application... AIR LOCKERS! For you, mehh don't really need it if only using for tires.

There's a bunch of pics on your latest post that aren't loading on my computer, anyone else getting the X of death??
 

Forum statistics

Threads
188,342
Messages
2,905,812
Members
229,959
Latest member
bdpkauai
Top