Herbie's Chevy Astrolander/ZMB Build Thread

Railvan

Adventurer
"The problem, if not covered in my thread, but definitely covered elsewhere, is that it's a tough fit. The Astro is wider than all the normal truck axles, and the 4" passenger side offset makes it even harder still. I think a wide-body full-size Jeep Dana would fit (with a lot of custom work to the perches, etc.), but I've not found much else. The 6-lug Durango axle would probably fit, but the Chrysler 9.25 isn't really any more stout and there's still no locker available there. I *think* a GM 8.6" 10-bolt from a van might be the right width, but I don't think they have the pumpkin offset, and that'd make it a hard fit past the fuel tank on an Astro."

No idea what you want to spend, but might be worth calling Dynatrac just for info on what a custom axle would run you. They can build something to fit your van, and heavy duty enough to never worry about it again.
 

Herbie

Rendezvous Conspirator
Well, I'm WAAAAY overdue for an update to this build thread!

Water System Upgrades

It's time to revisit one of the oh-so-sexy topics of van and camper building: Water Supply.


The fresh-water system on the Gandalf-the-Beige has gone through a couple of evolutions that I've failed to document. Since I just did a little cleanup on that system, I figured it was a good time to finally pen an update. You can catch up on the original installation here.

So the original installation was, overall, pretty satisfying. The water tank held enough for our needs (12 gallons, enough for 3 people for a couple of days minimum), was securely mounted, and relatively simple to use. Filling was a minor hassle, but a livable-chore. The system was good enough that when I rebuilt the sofa bed to use a Rock-n-Roll mechanism, I included the original tank in very much the same way:

Over time, though, I wanted to address a couple of issues. The primary one was weight balance. Construction on the camper facilities for the van had concentrated a LOT of weight on the driver's side. The house battery, fridge and toilet cabinet, and water tank all lived there and it created a noticeable port-side list (in addition to being bad for handling, etc.)

Secondarily, I was on a push to refactor some of the storage in the van to optimize things for how we were using them. I wanted 100% of our clothing and toiletry items to be accessible from inside the van living space without opening the back doors. Similarly, I wanted to have access to tools from inside. (This was driven by a horror story from a friend who had a failure of the rear-dutch-door latch while all his tools were buried just under the bed platform and only accessible with the dutch door open.)

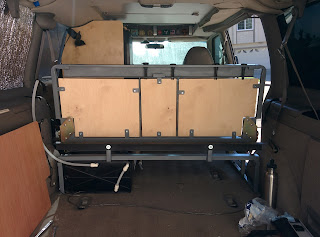
With those two motivators, it was time to revise the water system. Step one was to find a suitable tank for the available space. This Icon 12 gallon tank is 12" x 12" x 20" and fit well in the right rear corner without taking up too much of the valuable cargo space behind the bench. I built a 3-1/2-sided box which would mount to the van's hard points and allow me to secure the ~100lbs of water + tank safely. This box doubles as support for the rear bed platform. Ideally, I would still have been able to mount this weight forward of the rear axle, but I was desperate to preserve the under-seat space for accessible clothes storage, so this is definitely a bit of a compromise location.


Continued Below...
 
Last edited:

Herbie

Rendezvous Conspirator
Relocating the water tank freed up the original space for more storage under the bench seat. Most of this has been dedicated to the custom-sewn luggage I made, with a bit left over for drawer that allowed me to keep the tools safely stowed. The drawer latches to the sofa bed frame to keep it from sliding aft in the rare condition when I don't have the rear cargo space filled with stuff.


The "drawer" is fully removable, with handles on both sides so that I can carry all my tools to wherever they're needed.


And, per the design spec, the tools are accessible from inside the passenger cabin if I unlatch and raise the seat of the Rock-n-Roll bed.


The Rocket water pump from the original installation was dead reliable and simple, but I got tired of hand-pumping for almost a full minute to fill a pot of water for pasta or washing up, so this time I added an electric pump. The 1.2GPM Seaflo pump has so far been a good compromise to promote water efficiency, but I admit that I do long for a bit more pressure at the sprayer. Maybe a future upgrade... The water fill cap is a marine angled boat deck-fill neck plumbed to the tank fill nipple. Getting the fill neck connected to the tank was a challenge - RV/Concession water tanks usually have a 1-1/4" fill neck, and most marine deck fills seem to have a 1-1/2" OD. My solution was to use some 1-1/4" corrugated water tubing and stretch it over the neck of a beer bottle while waving a heat gun at it. This stretched it just enough to fit over the 1-1/2" fill neck.


Having the deck fill right at the back door makes filling the water tank a snap - no more climbing into the back of the van to slide the fill tube under the bench seat! I can just slide the mattress forward a bit, unscrew the cap, and insert the water-fill nozzle. On the right hand side, you can also see the vent line that runs up through the D-pillar trim plastic. Water sloshes a bit when we're off-road, so I wanted the exit of the vent line high enough we never have to worry about spill-out. This was occasionally a problem with a short (~6") vent line on the old tank system.


After painting everything, I'm really happy with how this looks and functions. The left-side of the rear bed platform can still be removed when I need to haul large cargo. At the top you can see the un-trimmed vent line exiting the top of the D-pillar. This was eventually cut to length.


I removed the original water-pump mounting box in favor of a simplified arrangement for a spray head. The black switch toggles the power for the water pump, and the sprayer hangs on a stainless spring clamp.


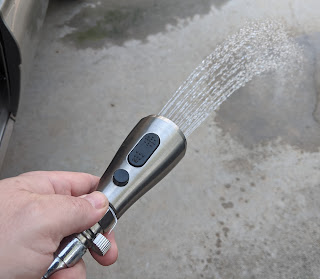
For the sprayer, I wanted something compact and simple, but I did not want one of the ubiquitous plastic hand sprayers that requires holding down a lever to keep water flowing. Therefore, I combined this pull-out faucet head with this inline shut-off valve. The valve is easy to operate one-handed with your thumb and the head offers both a spray and aerated flow settings.
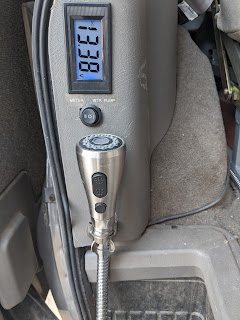

This final view of the rear cabinet shows how things existed from ~2018 to 2020. Just underneath the deck-fill neck you can see the Shurflo inline strainer that helps keep any crud out of the water pump. The drain line normally just coils up into that space, but is long enough to let me drain the tank past the bumper when needed. (It also doubles as a backup to let me gravity-feed water from the tank if the pump ever fails.)
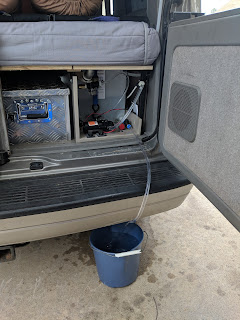


Due to some other work going on near the rear of the van, I finally got motivated to do a little clean-up on the plumbing in the water cabinet. I flipped the water pump to have a cleaner orientation for the output of the strainer to the pump input, and generally tidied up some of the connections. This also gives a better view of the deck-fill connection and cam-strap that holds the tank down. Upcoming work will take advantage of having cleaned up that access area on the right-hand side.
 
Last edited:

BritKLR

Kapitis Indagatoris
Good looking set-up! Not sure how cold it gets in the winter where you are, but how do you completely drain the system to reduce the chance of a frozen pump/lines or will you add a winterizing valve?
 

Herbie

Rendezvous Conspirator
Good looking set-up! Not sure how cold it gets in the winter where you are, but how do you completely drain the system to reduce the chance of a frozen pump/lines or will you add a winterizing valve?

Cold isn't a problem here, but everything is inside the envelope of the van, which helps. The drain line on the rear of the tank is the low spot (especially if I nose-in to my sloped driveway), so completely draining the system is just a matter of uncoiling the drain hose past the bumper and opening the valve.
 

Alarri

New member
Amazing Project... I read it in full.

In one day. :giggle:
.

Congratulations Herbie, you are a genius and very hardworking...??????
.
Saludos
AA
 

Herbie

Rendezvous Conspirator
Thanks much. More updates coming - as soon as I get a couple more things wrapped up, I'll do a writeup on a refresh of the rear lift. My original lift springs were overloaded and starting to sag, which lead to busting a rear shock. A fix for those two issues begat more changes, which I'm still sorting out.


astro-sbnf.JPG

Other than that, though, it's been nothing but smiles getting to play with this van!
 

RVflyfish

Fishing is life. The rest is details.
Notwithstanding that I have a lifted AWD Astro of my own, just the fact you used ‘begat’ in a post has me subscribed.
 

Forum statistics

Threads
188,358
Messages
2,903,704
Members
230,227
Latest member
banshee01
Top