Home made rooftop tent for XJ

MHead

Adventurer
Next installment - more sombereo

Here's the sombrero setup.

First thing that is done is to unzip the sack shown in the post above. After this the sombrero just rolls out. Picture below shows it rolled out.

attachment.php


At this point a 18' long 1/4" diameter fiberglass rod is inserted into sleeves at either end of the arc, just exiting the sack. These sleeves are about 2' long. Once inserted the rod is naturally bent into the correct arc. Next the sombrero is secured to the rod via about 7 velcro tabs. Picture below shows the form after this is done. (The rod is transported in the same way as the tent rods, by wrapping around from one side of the roof rack to the other.)


attachment.php


Now all that remains to do is lift the sombrero and open the jeep rear hatch. Once the hatch is open the sombrero is fully supported. The left and right wind flaps are attached just above the jeep tail lights via velcro tabs that are attached to jeep using the screw that secures the tail lights. Picture below shows the attachment. Also shows the sleeve where the rod enters. Note that I've made a wood splint that snaps over the jeep hatch strut. This addes a little extra support, but must be removed prior to closing the hatch.

attachment.php


Last picture is sombrero seen from ground level looking up. You can see how the fiberglass rod is attached. There is a 4" skirt around the sombrero to give better shade at low sun angles and to cover the zipper. Also note the strap across underside of the jeep hatch. This strap is actually two, one from each side, that are velro'ed together in the middle. These are closed to keep somobrero from blowing up off the jeep hatch.

Speaking of zipper... this foreshadows the next feature, casita. That's it for this installment. Next installment I'll give a dimensioned sketch and bill of materials.


attachment.php
 

Attachments

  • IMG_0665.JPG
    IMG_0665.JPG
    138.1 KB · Views: 2,071
  • IMG_0666.JPG
    IMG_0666.JPG
    138.4 KB · Views: 2,049
  • IMG_0670.JPG
    IMG_0670.JPG
    128.1 KB · Views: 2,043
  • IMG_0664.JPG
    IMG_0664.JPG
    188.9 KB · Views: 2,067
Last edited:

MHead

Adventurer
Next installment - sombrero sketch and BOM

Here's the last of sombrero.

I constructed the sombrero from much lighter material than the roof top tent. The roof top tent material is simply too heavy to roll. Here's the link.

http://www.rochfordsupply.com/shop/...last_All_Weather_Fabric_600_x_600/index.html#

In addition I used velcro, tent sealer, and zippers mentioned in the tent bill of materials above.

Here's a rough sketch

attachment.php


The sketch is approximately correct. Acually I used the sketch to estimate how much material would be required, then sewed appropriate bits together to provide more than enough for the overall shape. Then I measured the distances shown onto the material on the ground and then placed a garden hose as a spline thru the measured points. Did a little seat-of-the-pants adjusting prior to final cut.

Once I had the top and edge skirt sewn and had the whole thing mounted, I cut cardboard pieces to model the 'wings' that come down to the top of tail lights. These became patterns for cutting the wings. Zippers were added as an afterthought once I decided to build the 'casita', which will be featured in a subsequent post.

No, I have no plans to make any covers, tents, or any of the other features to sell. I've got a day job...
 

Attachments

  • tailcover.jpg
    tailcover.jpg
    48.3 KB · Views: 1,953
Last edited:

winkosmosis

Explorer
Very creative.

I think you should look into 1" lift shackles for the rear, to level it out when loaded. I'd say to get 1" lift leafs, but I've never seen such a thing.
 

MHead

Adventurer
Very creative.

I think you should look into 1" lift shackles for the rear, to level it out when loaded. I'd say to get 1" lift leafs, but I've never seen such a thing.

I purchased 'heavy duty' leafs a number of years ago and the jeep stopped hitting the rear bumb stops. I'm happy with my lack of lift. Maybe someday I'll get the bug for big tires. But lift isn't all good and I've not yet been shut out of somewhere I wanted to go because of tire size.

But thanks for the suggestion!
 

MHead

Adventurer
How much money do you have into the construction of the tent?

I think I built the tent for under $200. There's a bill of materials several pages back. You can follow the links to prices. Of course I didn't include the roof rack in the $200 since I purchased the jeep with it on top. It's expensive if you have to buy the rack.

And if you have to buy special tools then it's even more. I managed to sew the material with a inexpensive sewing machine but it wasn't fun. And I am fortunate enough to be able to use the welder where I work so I could make the 1" square tube assemblys discussed in the previous posts.

If you have to buy the rack then the cost gets up towards what a commercial roof top tent would cost. I have mixed emotions about these. In a rain they look easier to put up/take down. Otherwise it's about even. But they don't allow transport of a lot of cargo so that's a negative.

Mike
 

MHead

Adventurer
how well has the canvas you used held up to the sun?
Canvas supplier says it is for outdoor use such as boat covers. My experience is limited since I only set up the tent when I'm using it. It doesn't get the day on day exposure a boat cover would. So no complaints so far, but no really long time in the sun either.

Mike
 

MHead

Adventurer
Somewhere above I mentioned the zip-in sides for the 'Sombrero' at the back of the jeep. When zipped we call the result 'Casita'.

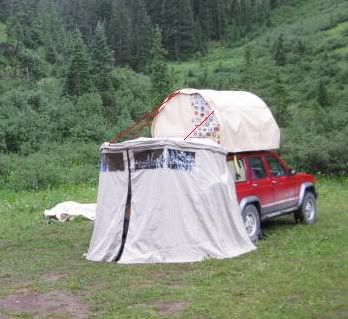
Had occasion to use Casita on a recent trip to Ouray. We had afternoon thundershowers and evening mosquitoes. The picture below shows the Casita set up. Casita consists of two large panels that zip into the Sombrero and stake to the ground. There is a third smaller panel that connects between the back wheels to provide wind and bug blockage beneath the vehicle. There are two aluminum poles that add support to the sombrero so it can carry the added weight and wiind loading of the casita sides. All these roll up for easy transport. It's less than a 5 minute setup. The zippers are very fast. Most of the set up time is staking.

There are 3 zippers. There is one at the top of each of the two panels. These attach the panels to each side of the Sombrero. Zippers start zipping at the vehicle and zip out to the centred gap shown in the picture. The third zipper zipps ends of panels together, beginning at the top and decending to the ground. This zipper provides the door. We also carry a bit of outdoor carpet to provide a floor.

The upper zippers can be zipped back without opening the door to provide a little ventillation for cooking.


attachment.php


The idea with Casita is that it provides at least a little dry wind-proof space so that we can escape and cook in bad weather conditions. The picture below shows that we have access to all the kitchen components that are seen in the posts above. We can operate the stove without much concern of igniting the tent since there is good clearance.


attachment.php


Last picture is a view looking upwards from jeep bumper towards rear of Casita. You can see one of the support poles. There are two transparent plastic windows so you don't feel so confined inside.

attachment.php


We were really happy with the performance. Didn't get wet one night and, although there are gaps here and there under the jeep, it kept the mosquitoes out acceptably well. There were clouds of them outside but we only killed one or two inside.

Next project is to create a mosquitoe net that can be zipped in place of the panels. This for good but buggy weather.
 

Attachments

  • IMG_1382.JPG
    IMG_1382.JPG
    56 KB · Views: 1,654
  • IMG_1381.JPG
    IMG_1381.JPG
    34.1 KB · Views: 1,649
  • IMG_1392.JPG
    IMG_1392.JPG
    72.9 KB · Views: 1,651
Last edited:

MHead

Adventurer
Travel log

Might as well keep up the travel log nature of this post a little.

Here's the jeep up high in the San Juans of Colorado. Ouray is a paradise of roads to drive.
attachment.php


Top of the hill!

attachment.php


Plenty of high country.

attachment.php


And here's tossing an alternator in the parking lot of a NAPA in Gunnison CO. Alt died up in Crested Butte but we had enough battery to make it back to Gunnison where we could get parts. Stopped at WalMart and purchased a battery charger and extension cord. Stayed in a KOA with power where we re-charged the battery in case we had to try to get to a jeep dealer in Grand Junction if the problem turned out to be in the wiring harness. First try was of course to replace the alternator. Luck was with us and problem solved. Even more luck since there was a nice car port for sale in the NAPA parking lot which made the 3 hour repair more pleasant. And we were on our way. And not nearly as bad as last year when we smashed trans cooler lines and lost all the trans oil and we were stuck all night and Sandy had to hich-hike to Silverton... but that's another story!

attachment.php
 

Attachments

  • IMG_1273.JPG
    IMG_1273.JPG
    74.2 KB · Views: 1,652
  • IMG_1526.JPG
    IMG_1526.JPG
    74.8 KB · Views: 1,654
  • IMG_1525.JPG
    IMG_1525.JPG
    62.8 KB · Views: 1,644
  • IMG_1594.JPG
    IMG_1594.JPG
    55.1 KB · Views: 1,651
Last edited:

AZBaobab

Observer
Wow... Just Wow... :Wow1:
I recently got myself an XJ, and this is an inspiration!

Just a thought: have you considered replacing the "sombrero" with a sleeve that zipps up to the edge of the tent? Using the same hoop as you currently have, it would cover the same area, and you could use the same walls of the "casita". The advantage would be that you wouldn't need the tailgate to hold it up, and you'd have a covered 'passageway' between the "casita" and the tent for less cooperative weather.

Not sure if that makes sense, but I'll see what I can scratch together in MS paint...

EDIT...
Here we go. Sorry for the pic mutilation... :eek:
Run lines/fiberglass poles as shown by the red lines, and cover w/ another piece of canvas.
Sleeve.jpg
 

MHead

Adventurer
Wow... Just Wow... :Wow1:
I recently got myself an XJ, and this is an inspiration!

Just a thought: have you considered replacing the "sombrero" with a sleeve that zipps up to the edge of the tent? Using the same hoop as you currently have, it would cover the same area, and you could use the same walls of the "casita". The advantage would be that you wouldn't need the tailgate to hold it up, and you'd have a covered 'passageway' between the "casita" and the tent for less cooperative weather.

Not sure if that makes sense, but I'll see what I can scratch together in MS paint...

EDIT...
Here we go. Sorry for the pic mutilation... :eek:
Run lines/fiberglass poles as shown by the red lines, and cover w/ another piece of canvas.
Sleeve.jpg

"You wouldn't need the tailgate..." You know I've thought a lot about how to get from the back to the top. Presently you have to take the casita walls off and roll the sombrero. It's not a major pain in dry weather.

As you've observed, the tailgate is the problem. I hadn't thought about supporting sombrero by any other means than the tailgate. But what you describe could be done.

The first thing that comes to mind is that I often use the sombrero for lunch and it is really convenient to hold it up with the tailgate. It is really fast to put up and take down this way. Most of my camping is desert so wet weather isn't a common problem. So the added complexity of setup seems not to be worth the gain of wet weather protection at first thought.

But I've always assumed the tailgate would be the support and the idea that it might not is just outside the box. So I'll think about it for a while. Thanks for the suggestion.

By the way, ARB has a roof top tent that folds open from front to back. You enter by climbing a ladder set about the middle of the folded out floor. So the floor takes the place of the sombrero. There are zip in sides. The Earthroamer mod'ed jeep uses a similar approach. Of course these are fabulously expensive and complicated compared to my few rods and some material. And a roof rack.

Thanks for the idea!
 

Forum statistics

Threads
188,309
Messages
2,905,294
Members
229,959
Latest member
bdpkauai
Top