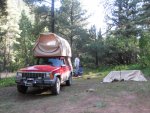
Home made rooftop tent for XJ

MHead

Adventurer
Somewhere above I mentioned that I'd talk about the bug netting.

The roof top tent is basically open to bugs without special efforts. They can always fly in at the bottom of the tent even if both ends are closed. I purchased a bug net designed to be suspended above a cot. I do not remember the exact source but it was something like

http://www.campmor.com/outdoor/gear/Product___86662

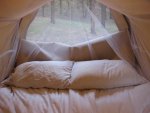
The net attaches to the inside of the canopy and can be seen through the open flap in the picture below.


attachment.php


This net wasn't very expensive. It was basically a rectangular box with the bottom open. In the picture below you can see the seams of the rectangle top at right and left. It turned out that the rectangle was wider than the 4.5 feet width of the jeep rack. I simply sewed 3 Velcro pads at each end of the canopy and at the appropriate points on the rectangle top to give the proper draping. By lucky chance the rectangle was just slightly shorter than the length of the canopy so it was easy to get it stretched lengthwise.


attachment.php


Here's a closer picture looking out of the front panel. The netting simply stuffs between the rack edges and the inside of the canopy making a bug-proof seal.

attachment.php


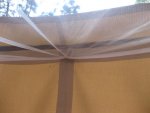
Below is a picture of the Velcro attach point at front panel center. There are two similar points out of the picture to right and left. Setup is easy. I simply leave the bug net on top of the bed when I collapse the tent. Once the tent is erected I get inside, zip the end panels in and then just re-attach the bug net by pressing the tabs on the net against the Velcro pads.


attachment.php


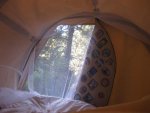
Picture below is looking out the door panel at the rear of the vehicle. Entry or exit occurs between the bug net and the roof rack. There's plenty of net so this isn't a problem although the net sometimes gets tangled and one or two of the three rear tabs get pulled loose.

attachment.php


Well that's it for the bug netting. It works well, doesn't weight much, and keeps the mosquitoes off. It's optional and I don't take it along on desert trips.

Next edition I'll show the bug net for the Sombrero.
 

Attachments

  • IMG_1630.JPG
    IMG_1630.JPG
    91.9 KB · Views: 3,177
  • IMG_1631.JPG
    IMG_1631.JPG
    44.3 KB · Views: 3,084
  • IMG_1632.JPG
    IMG_1632.JPG
    55.5 KB · Views: 3,062
  • IMG_1633.JPG
    IMG_1633.JPG
    47 KB · Views: 3,043
  • IMG_1634.JPG
    IMG_1634.JPG
    43.8 KB · Views: 3,058
Last edited:

BIGdaddy

Expedition Leader
Somewhere above I mentioned that I'd talk about the bug netting.

The roof top tent is basically open to bugs without special efforts. They can always fly in at the bottom of the tent even if both ends are closed. I purchased a bug net designed to be suspended above a cot. I do not remember the exact source but it was something like

http://www.campmor.com/outdoor/gear/Product___86662

The net attaches to the inside of the canopy and can be seen through the open flap in the picture below.


attachment.php


This net wasn't very expensive. It was basically a rectangular box with the bottom open. In the picture below you can see the seams of the rectangle top at right and left. It turned out that the rectangle was wider than the 4.5 feet width of the jeep rack. I simply sewed 3 Velcro pads at each end of the canopy and at the appropriate points on the rectangle top to give the proper draping. By lucky chance the rectangle was just slightly shorter than the length of the canopy so it was easy to get it stretched lengthwise.


attachment.php


Here's a closer picture looking out of the front panel. The netting simply stuffs between the rack edges and the inside of the canopy making a bug-proof seal.

attachment.php


Below is a picture of the Velcro attach point at front panel center. There are two similar points out of the picture to right and left. Setup is easy. I simply leave the bug net on top of the bed when I collapse the tent. Once the tent is erected I get inside, zip the end panels in and then just re-attach the bug net by pressing the tabs on the net against the Velcro pads.


attachment.php


Picture below is looking out the door panel at the rear of the vehicle. Entry or exit occurs between the bug net and the roof rack. There's plenty of net so this isn't a problem although the net sometimes gets tangled and one or two of the three rear tabs get pulled loose.

attachment.php


Well that's it for the bug netting. It works well, doesn't weight much, and keeps the mosquitoes off. It's optional and I don't take it along on desert trips.

Next edition I'll show the bug net for the Sombrero.

having just deployed about 80% of our camping setup at the meet and greet down at fiesta island. I have to say, long deployment times and "setting up" times, are my goal to eliminate.

I think the amount of stuff that needs to be shifted and moved, as well as setup, would drive me nuts, with your rig's setup.

I dig that you get out as often as you do though, and I like the attempts at solutions for 4 person camping in a smaller rig. So many builds here on the portal are for 1 or 2 people. I have a family of five, so 80% of what I read here really doesn't apply.

thanks for putting up all the info. :victory:
 

MHead

Adventurer
Yes, I understand about set up. The trick with camping is to have as few things touch the ground as possible. For 2 people there's very little comes off the Jeep. Yes there's a little setup required to get the canopy on top up and to get the sombrero up and to zip in the casita walls in bad weather. But total setup time is still about 15 minutes of two people's time. 4 people take substantially longer since there is more stuff on top to take down and since the extra 2 people have to set up a tent and install bedding.

Setup for 5 must be a trick when 3 are children (and virtually useless for camp chores)!
 

BIGdaddy

Expedition Leader
Yes, I understand about set up. The trick with camping is to have as few things touch the ground as possible. For 2 people there's very little comes off the Jeep. Yes there's a little setup required to get the canopy on top up and to get the sombrero up and to zip in the casita walls in bad weather. But total setup time is still about 15 minutes of two people's time. 4 people take substantially longer since there is more stuff on top to take down and since the extra 2 people have to set up a tent and install bedding.

Setup for 5 must be a trick when 3 are children (and virtually useless for camp chores)!

ah...I see. with 2, I could see how setup would be quicker. Due to utilizing the rear seat for storage, right?

and you are correct...our beloved little ones (haha, we actually DO like them) stay strapped in for a few minutes while we make sure camp is the way we want it. That way we're not dealing with that, too..haha!:elkgrin:
 

RocKrawler

Supporting Sponsor
What type of sewing machine did you use & do you recommend it or a different model? Was it something you had done before or did you just jump into it for this project?
 

MHead

Adventurer
What type of sewing machine did you use & do you recommend it or a different model? Was it something you had done before or did you just jump into it for this project?

I've used two sewing machines. The tent was actually done on a friends ordinary small sewing machine. I don't know the type but it was mostly plastic and folded metal. I'm guessing it was about $300. The tent material is the heaviest of the materials used. The little sewing machine did OK but it took two people to sew, one to operate the machine and one to handle the material.

The Sombrero and Casita (see what these names relate to by reading the previous postings) are a good deal lighter and would have sewn more easily on this small machine.

As the project progressed I didn't like borrowing so I purchased a used industrial-capacity machine off Craig's list. Paid $250 for it and had to put another $200 into it to get it going. This Chinese machine would usually sell for about $800 or maybe a bit more so I didn't save a huge amount. Sombrero and Casita were sewn on this machine. The major advantages are 1) didn't have to borrow so I could leave it set up and 2) the machine came built into a table (as most of this type are) so there was a good deal more surface area to lay the material on. The small machine I borrowed of course was designed just to sit on a table and so the sewing surface was above table top.

No, I had no sewing experience prior to starting the tent.

But the best advice I have is not at first to worry about what sewing machine. Borrow something or buy an inexpensive machine from Craig's list. The most important thing is to just get a project design, purchase materials, and start going forward. You'll be surprised how far you can get if you just try. Yes, if you come to a point where the sewing machine simply won't work you'll have to respond. But picking up initial project momentum, and maintaining this momentum are the most difficult parts.

Mike
 

flyn2er

Observer
Been wanting to something with the back of our XJ. I like what you did with the place. Do you have any build pics of your cargo area?
The next feature is the "sombrero". No I didn't name it. I have a friend who invents names. But they are nice to refer to these things.

First a couple of pictures of the sombrero in action:

attachment.php


attachment.php


The sombrero refers to the circular canopy that extends out from the back of the Jeep. I've spent some time building a kitchen into the back of this jeep. The sombrero is built to make the kitchen experience pleasant. Mostly it keeps the sun off and provides a shady cool spot to make lunch. But it will also keep a gentle rain off and helps in a wind. I've pictured it at night above to make the point that it also provides a good deal of light reflection which helps when working in the kitchen under simple lantern lights.

Sombrero is attached to the rear of the roof rack and is quickly and easily deployed. The perimeter is stretched by a fiberglass rod similar to those used in the roof top tent. Vertical support comes from the jeep Cherokee rear hatch. Cherokee has a perfect rear hatch for this. It is big enough to support a large sombrero without poles and just happens to provide a high center point so that rain won't puddle.

If it happens that the wind is steady from some direction the jeep can be parked pointed into the wind. In this case the triangular sides of the sombrero and the sombrero top provide a modestly wind-free bubble. Really nice if the wind is cold. Unfortunately the sombrero as shown in the pictures doesn't do very well if the wind is gusting around.

That's it for this installment. Next I'll show how it is attached and some close ups of features.

Mike
 

MHead

Adventurer
Been wanting to something with the back of our XJ. I like what you did with the place. Do you have any build pics of your cargo area?

Hmmm.. guess I haven't put up any info about the actual kitchen cargo area. Seems like I did at one point, but earlier pictures in this thread simply disappeared one night off the Expedition Portal site. Anyway I'll take a couple more and do a sketch. This will take a week or so....

Mike
 

Hill Bill E.

Oath Keeper
I like it! So does your friend who comes up with the names call your XJ the "Chuck Wagon"?:coffeedrink:

Great build! I'm working on making my XJ more 'extended trip friendly', and I really like the 'Sombrero' and 'Casita' ideas!

In bad weather, we have backed 2 XJ's together, and ran a tarp over both hatches, creating a dry area to sit/cook.

Be nice to have something that works with one rig.
 

XJCamper

SE Expedition Society
This is an amazing thread. Very impressive. Looks to me like you could stay out for quite a while.
 

zjsheller

Observer
Very clever. Great inspiration for the zj. I do lots of offroad camping and currently have a little trailer that works great, but sometimes it's nice to go a little shorter. This set up looks great!! Thanks for sharing!!
 

MHead

Adventurer
Navigation

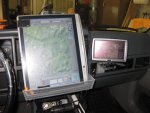
Here are navigation features just to give some ideas...

attachment.php


Long distance navigation depends on the usual GPS navigation. I have a Garmin Streetpilot 7200 which I really love.

https://buy.garmin.com/shop/shop.do?pID=6389#sp7200

It's been discontinued but I really like the large touch-screen display. I made a bracket for it which attaches to the strong rail within the dash that supports the lower dash section. It is in a good position over in front of the passenger. First it must be below dash level according to CA law (and a good idea) and second I always have a passenger and so it is easy for them to operate it as we travel down the road. The Garmin mount rotates so the screen can be seen by the driver (as shown) or rotated to be useful to a passenger/navigator.

Guess I won't bother showing the mount since you can't purchase the Garmin anymore. But the point is that these type devices are really great for long distance navigation. Great for points of interest like markets or gas. Really a must have. This is what gets the first 500 miles done.

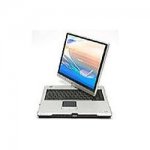
For close-in off-highway navigation there are nothing like topographic maps. It is really great to have a sense of the lay of the land. This is accomplished by the laptop shown. The laptop is a pen-based Toshiba which responds to the touch of a special pen and has a really tricky screen arrangement. Here's a picture:

attachment.php


The screen rotates 180 degrees from the familiar lap-top position, then closes, with the effect of placing the display visible on the top of the lap-top. From here it can be operated with the pen. The first picture shows it in this position.

For software I use DeLorme TOPO 7.0

https://shop.delorme.com/OA_HTML/DELibeCCtdItemDetail.jsp?item=30465&section=10047

Guess I'm behind the times since 9.0 is now available. In 7.0 you can download and display lists of geocache positions so this setup makes finding them like shooting fish in a barrel. It also makes finding campsites or locations in the dark a lot a lot easier as you might imagine.

This software also supports an external USB GPS antenna. These plug right into the lap-top USB port. The software will automatically show the proper map and mark the current location.

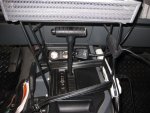
The laptop is held in position by a light duty wire rack.

attachment.php


This is made from 5/16" steel rod which I bent appropriately and welded to 1/8" thick X 1/2" wide steel plates. There are two such plates, one on each side of the shifter console with bolts thru the console to threaded plates which I added within the console. There is another plate at the top to which the grey tray is bolted. I found the tray at a Bed Bath & Beyond store. It is some sort of drawer organizer.

attachment.php


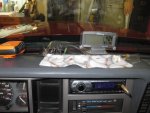
The lap-top is held against the dash at the top. This is accomplished by a length of bungee-cord and a plastic strap. The bungee cord has small coat hanger hooks at each end which hook into the existing vents on the XJ dash at each side of the vehicle. The clear strap on the bungee goes between the lap-top body and the screen. There is also a cloth strap which goes between the lap-top and dash to keep the lap-top from abrading the dash on bumpy roads.

attachment.php


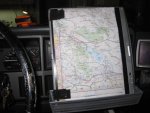
All this fancy stuff is still no replacement for paper maps. I've found these sort of devices great to tell you where you are and to guide you to a destination, but paper maps are still better for picking the destinations in the first place. On the highway the lap-top system is normally off. In this case I've made some clear straps to hold good ol' paper.

attachment.php


It's really nice to see the big picture all at a glance on the paper. Sometimes the GPS boxes don't make the best decisions although I have to admit they are incredible.

Overall the arrangement works pretty good. The lap-top is secure and has never pitched off or done any acrobatics. The drawback of course is loss of access to heater/air conditioning controls which isn't a big deal, and loss of A/C flow from the vent back between the seats. In really hot weather we have to take the lap-top off so that people in the back seat can get a little cooling. A/C works ok with front seaters however.

Finally, you can also see the SPOT device I carry. Not really navigation but this gadget makes me a lot less nervous about taking remote back roads in just one vehicle. I don't have any ideas that the 911 feature will work in a timely manner for remote critical events, but the Help feature I'm sure will get someone out in a day or two to assist with mechanical failure in my XJ. I've gone a lot thru the mechanical but at 254K there's always an electrical heart-attack that can bring me to a halt.

So this is the next installment of the roof top tent. Maybe next I'll have a detailed look at refrigeration.
 

Attachments

  • IMG_5028.JPG
    IMG_5028.JPG
    176.6 KB · Views: 926
  • toshibaR10.JPG
    toshibaR10.JPG
    5.6 KB · Views: 906
  • IMG_5037.JPG
    IMG_5037.JPG
    194.3 KB · Views: 918
  • IMG_5038.JPG
    IMG_5038.JPG
    211 KB · Views: 914
  • IMG_5039.JPG
    IMG_5039.JPG
    172.1 KB · Views: 909
  • IMG_5040.JPG
    IMG_5040.JPG
    176.8 KB · Views: 917
Last edited:

Forum statistics

Threads
188,364
Messages
2,903,771
Members
230,227
Latest member
banshee01
Top