Introducing Miss Rubi, a 2012 Jeep Rubicon Unlimited

08Silverado

Adventurer
Wow very nice indeed. I have an H4 Cibie conversion on order from Daniel Stern. I'll be using the Narva 100/90W bulbs and also using a custom SMS harness. I have considered buying some Grote buckets and installing some Cibie parabolic beam units for auxillary. Do you think they will have similar output as the KC lights you installed?
 

08Silverado

Adventurer
Thanks for the reply crawler my cibie H4 headlights and harness should be here pretty soon once I get those installed I will see about getting my auxillaries figured out. If I understand correctly the cibie H1 auxillaries would basically be a second set of high beams to project more light correct???
 

Hilldweller

SE Expedition Society

crawler#976

Expedition Leader
Yeah, they can be used as an auxiliary fill, and that's what the HID's do for us as well. I have them wired into the dimmer switch via relay, or they can be run alone on a on/off/on switch.

Cost wise, the KC's are selling for $340.00 or so a pair, so you have a point of comparison on the $$$.
 

UpTheCreek

New member
Wow, really love your JK! That color would sway me to getting orange, I think it's a perfect shade. Love all that you've done, really well thought out and executed!

Being a Ham, I'm especially interested in your antenna mount and such. Have you had to do anything as far as bonding goes? I am researching to set up HF in my LJ and have read that it's difficult to get rid of noise. Don't think that translates to a JK though. In case I missed it, can you throw up a photo of your antenna mounted on there?

Great Jeep! The new JK's have piqued my interest with that new 3.6! :victory:

Thanks and 73!

Howard (KK4CHM)
 

crawler#976

Expedition Leader
http://www.expeditionportal.com/forum/attachment.php?attachmentid=102551&d=1338239365

...shows the mount for the Larsen NMO 2/70.

It's just a piece of 1.5" x 0.125 steel bent in a vice, attached to the spare tire mount using longer bolts. Once I had it fitted, I shot it with Duplicolor rattle can bed liner.

I didn't bond anything on the Jeep, and since the intitial install, have brought the SWR into the 1.7 range, and the radio works well as is. Simplex reports show great reception/transmission to the left, right, and rear, with slightly less range to the front. For what we use it for, it's fine. My wife and I have worked simplex on 146.46 out to 20 miles.
 

UpTheCreek

New member
Looks great, nice job. 1.7 is good enough, I wouldn't bother trying to improve on it either. HF is going to be a different story on my LJ, but I found a real guru that has a TJ helping me out via email. We'll see what kind of results I get!

Thanks for the reply!

Howard
 

crawler#976

Expedition Leader
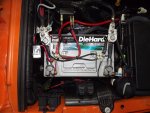
Replaced the stock 600 CCA battery with a Sears DieHard Platinum Group 34M. It's an 850 CCA, 135RC Marine battery that should provide the winch with good power.

To get it to work, two short 1 gage cables were made with stud to post converters on one end.

I'm please with it. It cleaned up all the extra wiring for the KC, H4 headlight conversion, and winch.

g34m.jpg

All of the accessories are now on the top studs, including the winch.
 

toddz69

Explorer
Yup, it's the re-branded Odyssey.

Sears doesn't sell the G34R Odyssey that would drop in with no need for cable extensions. It also doesn't have the accessory studs, and I really like that feature of the DieHard. And, the Sears battery was nearly $100.00 cheaper too boot.

http://odysseybatteries.com/battery/pc1500rt.htm

Cool - thanks for the info, Mark. I have an Artec battery tray waiting in the wings for an Odyssey/Platinum battery when the current Optima bites the dust (it's 6 years old so I imagine it won't last a whole lot longer).

Todd Z.
 

crawler#976

Expedition Leader
In trying to keep additions to the Jeep light weight, we went with the aluminum version of GenRights rear bumper. At 20 Lbs, it's one of, if not the lightest bumper available. Formed and welded of 3/16" plate, it's plenty stout too boot. The tow points are either water jet or plasma cut from 3/4" steel, and each are bolted to the frame in three places and also attach the bumper to the frame. Six additional bolts ensure this bumper is NOT coming off easily. The bumper was scuffed hard with a Scotch-Brite pad, cleaned and de-greased with alcohol, and coated with Duplicolor Bed Liner via rattle can. I've used it on sliders with good results.

Once all the holes needed for mounting were marked, center punched, and drilled with a step bit, I completely installed the bumper prior to removing it for paint. I found the supplied directions made it very difficult to install. The nut plates are under the tow points, and were difficult to line up.

To facilitate installation, I attached the bumper with the two bottom bolts, then placed the frame rail nut plates into position thru the holes for the tow points. Once the bolts for those were started, I slid the tow points thru the holes and bolted them up thru the holes drilled into the frame. This was much easier than trying to put the nut plates and tow points in before sliding the bumper into position.
 

Attachments

  • genright aluminum bumper.jpg
    genright aluminum bumper.jpg
    128.5 KB · Views: 60

redthies

Renaissance Redneck
What's the deal with the tire/wheel swap? I didn't see it mentioned anywhere. I had an '05 Rubicon in "impact orange". Great color for a toy.
 

Forum statistics

Threads
188,069
Messages
2,901,847
Members
229,415
Latest member
Gatofoamball
Top