Introducing the “NEW” Alu-Cab Canopy Camper

burritofan

New member
My dealer is installing the Front Runner Flat Tank (FRFT) to my ACCC on a 2013 Tacoma Access Cab Long box tomorrow. If possible do the FRFT mounting before the ACCC goes on the truck. Yes, it does fill that space pretty damn good. For my application, the frft outlet on the bottom will come out the passenger's side of the accc through a spigot for gravity flow. I will use the frft for outside duties and extra water capacity (maybe even shower use) Also, I will be able to easily fill the Septor 20L water can in place, the Septor will serve my inside accc water needs (morning coffee-:)

The fill cap area has "just" enough room to get my hand in there to unscrew it and about 1/2" clearance above the top of the fill cap after you unscrewed it. Keep in mind the panels in the fill cap area on the accc are slightly different on a 5' accc to the 6' models. (do a quick search) The YouTube guy installed his FRFT on a 5' box and commented he had to relocate his fill cap to the front flat side (check comments below his video). I will not have to relocate my fill cap location on my 6' accc FRFT install. YT guy installed his frft with the accc on the truck - so it is doable.
It looks like it may be a small effort to get a fill hose into the fill hole - but I figure in time I will find an appropriate hack for that as well. Hope this helps.

Link to the FRFT that I used-

Any updates or photos on how this came out? I need to maximize the inside space and I think you have the right idea.
 

SoyBoy

Member
Any updates or photos on how this came out? I need to maximize the inside space and I think you have the right idea.
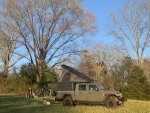
I have yet to post a photo on this forum. I will have to school myself on the matter.

I am in no rush to set it up and I will be taking my time with the inside of the accc.
BTW - I changed the swing of the rear barn door and so far I am perfectly happy with my decision. Offers easier access to the camp side of the vehicle which is typically on the p side.

What I do know ATM is that the 50 litre Luna fridge will be going in the very back of the box on the passenger (p) side. It just fits...
My two Septor 20 litre Jerrys (one fresh one grey) will be going on the very front p side.
The induction cooktop will live above the water cans.
The 2 - 110 amp lithium batteries will be on the very front d side. Red Arc Manager 30 a/w 2000 watt inverter likely be installed above the batteries.
My somewhat comfortable chair will be midway - d side
A 15" w 22" long 30" tall drawer system will be in the very back d side.
I figure there will be a full width 18" counter across the front of accc.

I have sat in the accc with props in place and sense there is enough room in the aisle. (16")

I have a bit of experience in that over the last 3 years I traveled and mountain biked in Canada and the USA for 15 months total while I designed and built out a Transit Van. Lots of the stuff I am using in the accc has been pilfered from the van for temporary or maybe permanent use in the accc.
 

burritofan

New member
I have yet to post a photo on this forum. I will have to school myself on the matter.

I am in no rush to set it up and I will be taking my time with the inside of the accc.
BTW - I changed the swing of the rear barn door and so far I am perfectly happy with my decision. Offers easier access to the camp side of the vehicle which is typically on the p side.

What I do know ATM is that the 50 litre Luna fridge will be going in the very back of the box on the passenger (p) side. It just fits...
My two Septor 20 litre Jerrys (one fresh one grey) will be going on the very front p side.
The induction cooktop will live above the water cans.
The 2 - 110 amp lithium batteries will be on the very front d side. Red Arc Manager 30 a/w 2000 watt inverter likely be installed above the batteries.
My somewhat comfortable chair will be midway - d side
A 15" w 22" long 30" tall drawer system will be in the very back d side.
I figure there will be a full width 18" counter across the front of accc.

I have sat in the accc with props in place and sense there is enough room in the aisle. (16")

I have a bit of experience in that over the last 3 years I traveled and mountain biked in Canada and the USA for 15 months total while I designed and built out a Transit Van. Lots of the stuff I am using in the accc has been pilfered from the van for temporary or maybe permanent use in the accc.

Thank you for this info. I have a short bed Tacoma and I'm trying to maximize the ACCC inside space in order to fit two 29" MTB's for temp storage when I need to leave the bikes and truck alone for extended periods of time. I wound use the usual hitch hauler for 95% of the time and transporting the bikes. I would prefer to use the AluCab water tank but I think doing the FRFT mounted (Like the YouTube guy) on the front side of the bulkhead will be key to giving me every cubic inch inside possible. How has your water tank setup worked out for you so far? any advice?
 

SoyBoy

Member
Thank you for this info. I have a short bed Tacoma and I'm trying to maximize the ACCC inside space in order to fit two 29" MTB's for temp storage when I need to leave the bikes and truck alone for extended periods of time. I wound use the usual hitch hauler for 95% of the time and transporting the bikes. I would prefer to use the AluCab water tank but I think doing the FRFT mounted (Like the YouTube guy) on the front side of the bulkhead will be key to giving me every cubic inch inside possible. How has your water tank setup worked out for you so far? any advice?
I have yet to do any real traveling with the Tacoma. As I have the 20 litre can inside the accc I will use the FRFT for outside water use (maybe shower) and extra water storage if need be (more of a back up). I also did it to buy myself premium inside space. The Manager 30, Inverter and other electricals will likely make great use on the driver's side of that space. Pro tip - Install the frft before you install the accc.

Because I was spoiled having my bikes inside the van - I will have a hard time having them hanging on the back - so I will probably not be bringing them as much. Also if they are hanging on a hitch mount - you will have to move them each time you want to access the back of the accc and to me, that will get old real quick. All that and easier theft, beat up with all that cantilevered bouncing around and how god awful grungy they will get.
 
Last edited:

burritofan

New member
I have yet to do any real traveling with the Tacoma. As I have the 20 litre can inside the accc I will use the FRFT for outside water use (maybe shower) and extra water storage if need be (more of a back up). I also did it to buy myself premium inside space. The Manager 30, Inverter and other electricals will likely make great use on the driver's side of that space. Pro tip - Install the frft before you install the accc.

Because I was spoiled having my bikes inside the van - I will have a had time having them hanging on the back - so I will probably not be bringing them as much. Also if they are hanging on a hitch mount - you will have to move them each time you want to access the back of the accc and to me, that will get old real quick. All that and easier theft, beat up with all that cantilevered bouncing around and how god awful grungy they will get.

I'm using a "Hitch Swing" from Yakama that has been working great to get the bikes out the way when needing rear access. I have a fiberglass shell right now.
My ACCC is currently on order from @seekoutbeauty new company Tiny Rig Co. They're instaling/wiring the whole setup for me. Just trying to figure out this dang water tank solution before the camper gets mounted.
 
Last edited:

Mtpisgah

Active member
I am using a Kuat pivot swing out with a 1up rack. It is great for general camping and access to the rear of the camper. The issue we have is when actually driving Offroad, the Kuat rubs really easy. I need to figure another way to mount the bikes as this is not sustainable. I have seen a guy mount them on the door, debut I do not really like that idea. Keeping the bikes inside is not much better since we will have to remove them every time we want to get in, and they will do not fit well with our build.
 

Attachments

  • 8D82645B-D719-4117-86F6-4902937CF428.jpeg
    8D82645B-D719-4117-86F6-4902937CF428.jpeg
    1.5 MB · Views: 83
I have a 6ft bed Nissan Frontier. I’ve been interested in grabbing a canopy camper, checked the dimensions, and everything seems to be spot on since the bed is nearly the same dimensions as a Tacoma. However, they don’t make a Fit kit for the frontier and none of the dealers seem interested in trying to make it work. Can anyone shed some light on the fit kit and if it would be easy to provide small modifications to? Or any suggestions on a dealer that is willing to work with me? The Tacoma campers from AT overland, FWC, and Vagabond all seem to fit the 6ft bed frontier fine, the only difference being the door system on the Alu cab.
 

wackyhacky76CO

Active member
I have a 6ft bed Nissan Frontier. I’ve been interested in grabbing a canopy camper, checked the dimensions, and everything seems to be spot on since the bed is nearly the same dimensions as a Tacoma. However, they don’t make a Fit kit for the frontier and none of the dealers seem interested in trying to make it work. Can anyone shed some light on the fit kit and if it would be easy to provide small modifications to? Or any suggestions on a dealer that is willing to work with me? The Tacoma campers from AT overland, FWC, and Vagabond all seem to fit the 6ft bed frontier fine, the only difference being the door system on the Alu cab.

I didn't put mine together/install it myself, but you may want to check out the Alu-cab instructions for the different fit kits they have and how they work. They are all published on their website (link below). They won't give you dimensions obviously, but you could certainly better understand how the rear door system/fit kit is installed on the truck and whether you could adapt a kit yourself.


wackyhacky76CO

Active member
Okay I have stumped myself w/ my wiring again & need some insight. My installer had hooked up the camper brake light by connecting the purple & pink wires from the camper harness into the taillight. The purple was tied into the taillight wiring and the pink was ground to the chassis. Upon hooking up my electrical panel (into my house battery system) I unhooked the pink ground wire from the chassis b/c I knew it had to be tied into the negative buss to make everything in the camper wiring harness work. I then extended the existing wire from the tail light into the camper to be tied back into the purple wire in the harness. So in summary, I have the purple wire from the camper harness running into the taillight, I have the pink ground from the harness tied into the negative buss, and the rest of the harness into my fuse block. All the camper lights & USB ports powered by the camper harness are working correctly, but this scenario has left me without the brake light working? What did I do?
 

abenteur_co

Member
Okay I have stumped myself w/ my wiring again & need some insight. My installer had hooked up the camper brake light by connecting the purple & pink wires from the camper harness into the taillight. The purple was tied into the taillight wiring and the pink was ground to the chassis. Upon hooking up my electrical panel (into my house battery system) I unhooked the pink ground wire from the chassis b/c I knew it had to be tied into the negative buss to make everything in the camper wiring harness work. I then extended the existing wire from the tail light into the camper to be tied back into the purple wire in the harness. So in summary, I have the purple wire from the camper harness running into the taillight, I have the pink ground from the harness tied into the negative buss, and the rest of the harness into my fuse block. All the camper lights & USB ports powered by the camper harness are working correctly, but this scenario has left me without the brake light working? What did I do?

I had a very similar set of issues documented earlier in this thread. What you did was take your negative from your camper brake light since it is tied into the main camper harness and tied it into your house battery negative while leaving the camper brake light (correctly) connected to your truck positive (the purple wire that is tied into your truck brake lights). That broke the camper brake light circuit.

To fix you can (i) cut the camper brake light negative (I did this right behind it in the cable tray; you'll have to cut back some of the shielding) (ii) run a new wire from that cut wire connected to the camper brake light down to the cut off pink wire still tied into your truck brake lights (If you left a portion of the pink wire in place and still connected to your tail light as installed by your installer) or otherwise just ground to the chassis (since your truck battery should also be ground to the chassis). That should restore the circuit. Maybe there's a better way to do it but that's what I did and it worked. Let me know if you have questions and I can answer or take some pictures to illustrate.
 

wackyhacky76CO

Active member
I had a very similar set of issues documented earlier in this thread. What you did was take your negative from your camper brake light since it is tied into the main camper harness and tied it into your house battery negative while leaving the camper brake light (correctly) connected to your truck positive (the purple wire that is tied into your truck brake lights). That broke the camper brake light circuit.

To fix you can (i) cut the camper brake light negative (I did this right behind it in the cable tray; you'll have to cut back some of the shielding) (ii) run a new wire from that cut wire connected to the camper brake light down to the cut off pink wire still tied into your truck brake lights (If you left a portion of the pink wire in place and still connected to your tail light as installed by your installer) or otherwise just ground to the chassis (since your truck battery should also be ground to the chassis). That should restore the circuit. Maybe there's a better way to do it but that's what I did and it worked. Let me know if you have questions and I can answer or take some pictures to illustrate.

Thank You!
 

hksjza70

Member
Has anybody been able to source M8 nuts that fit in the channels? All the ones I've found are 6mm-6.5mm thick and don't fit in the channel. I have been able to slide a ~5mm thick bolt head into the channels, but looking to match new button head hardware to what comes from Alu Cab.

Amazon has nuts that are advertised to be 5mm, but they are actually 6mm+
 

JBinAZ

New member
Has anybody been able to source M8 nuts that fit in the channels? All the ones I've found are 6mm-6.5mm thick and don't fit in the channel. I have been able to slide a ~5mm thick bolt head into the channels, but looking to match new button head hardware to what comes from Alu Cab.

Amazon has nuts that are advertised to be 5mm, but they are actually 6mm+

Yes, I just picked up some M8 “jam” nuts and test fitted them today. My local Ace Hardware had them, but not in stainless. I am trying to put together some hardware to fit the channels, but also looking to pick up a spare or two of everything else. I have looked at the fitment instructions, but if anyone has a hardware list handy, I’d love to see it.
 

SoyBoy

Member
Yes, I just picked up some M8 “jam” nuts and test fitted them today. My local Ace Hardware had them, but not in stainless. I am trying to put together some hardware to fit the channels, but also looking to pick up a spare or two of everything else. I have looked at the fitment instructions, but if anyone has a hardware list handy, I’d love to see it.
Very timely post - I'm also looking for a hardware list to start my accc build. (Stainless Steel, Button Allen head & best place to get it).
 

Mtpisgah

Active member
I picked up some t-slot end feed fasteners for use inside the truck but am also looking for SS hardware for outside. I just texted my ACCC dealer to see if he can source them.
 

Forum statistics

Threads
188,047
Messages
2,901,587
Members
229,411
Latest member
IvaBru
Top