Introducing the “NEW” Alu-Cab Canopy Camper

Mtpisgah

Active member
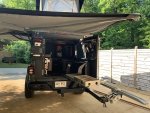
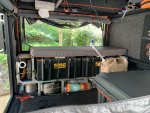
My build is pretty much done. I need to attach the second GP panel, install a paper towel holder, and add a USB port or two, but it is very functional.

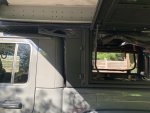
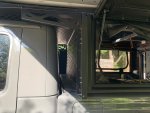
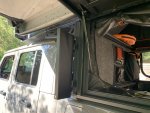
This week I added hinges to the gusset panel between the cab and camper. This will allow me to store stinky cycling clothes, shoes, and helmets there. They will dry and not stink up the truck or camper. I have some fancy hasp closures on order to ensure it does not swing open on the highway, but the hinges are torque controlled and should be ok.

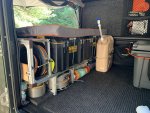
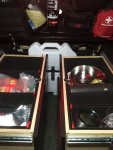
I built the framing from 8020, I love it. There are holders for the pots and pans, a food box, and recovery gear. The cushion from the attic trap door is the perfect fit and makes a great couch. It is held in place with some tabs my wife sewed on the back and soon there will be a tab on the front so I can stand it vertically for better access to the boxes. I almost went with Goose Gear but decided I wanted a system where everything was quickly and easily removable. The boxes obviously come out quick, the pots in just a minute more. The framing can be removed in about two minutes.

i used a Ram 1500 bed rug for the baca wall. A simple rug from Lowe’s is on the floor with an old yoga mat cut to fit the ridges in the bed floor. I will probably replace it with a bed rug next season. Still contemplating additional insulation.

The screens have been held in place with screws with finish washers since the factory velcro adhesive sucks.

My wife and I are both cyclists so we always have our bikes with us. The swing out hitch is greet for access, but makes an already bad departure angle worse. I am looking into fabricating a door mount rack that will utilize my 1Up rack.
 

Attachments

  • ECB0FE1E-6510-4E75-8983-742283237B63.jpeg
    ECB0FE1E-6510-4E75-8983-742283237B63.jpeg
    664.3 KB · Views: 269
  • A9CF9F66-6F26-4E91-8889-140BA9D0EAED.jpeg
    A9CF9F66-6F26-4E91-8889-140BA9D0EAED.jpeg
    718.9 KB · Views: 263
  • 49FAA2AB-53F6-41DB-B746-2B320967A115.jpeg
    49FAA2AB-53F6-41DB-B746-2B320967A115.jpeg
    836.9 KB · Views: 275
  • 87173936-1A71-436A-9E79-8DCB5D0E356D.jpeg
    87173936-1A71-436A-9E79-8DCB5D0E356D.jpeg
    995.1 KB · Views: 300
  • 8776EDDF-3BA5-4B50-80AE-CE795C464F19.jpeg
    8776EDDF-3BA5-4B50-80AE-CE795C464F19.jpeg
    997.5 KB · Views: 311
  • 048B16AF-95C9-4BB9-8A22-F66868A949E6.jpeg
    048B16AF-95C9-4BB9-8A22-F66868A949E6.jpeg
    1 MB · Views: 300
My build is pretty much done. I need to attach the second GP panel, install a paper towel holder, and add a USB port or two, but it is very functional.

This week I added hinges to the gusset panel between the cab and camper. This will allow me to store stinky cycling clothes, shoes, and helmets there. They will dry and not stink up the truck or camper. I have some fancy hasp closures on order to ensure it does not swing open on the highway, but the hinges are torque controlled and should be ok.

I built the framing from 8020, I love it. There are holders for the pots and pans, a food box, and recovery gear. The cushion from the attic trap door is the perfect fit and makes a great couch. It is held in place with some tabs my wife sewed on the back and soon there will be a tab on the front so I can stand it vertically for better access to the boxes. I almost went with Goose Gear but decided I wanted a system where everything was quickly and easily removable. The boxes obviously come out quick, the pots in just a minute more. The framing can be removed in about two minutes.

i used a Ram 1500 bed rug for the baca wall. A simple rug from Lowe’s is on the floor with an old yoga mat cut to fit the ridges in the bed floor. I will probably replace it with a bed rug next season. Still contemplating additional insulation.

The screens have been held in place with screws with finish washers since the factory velcro adhesive sucks.

My wife and I are both cyclists so we always have our bikes with us. The swing out hitch is greet for access, but makes an already bad departure angle worse. I am looking into fabricating a door mount rack that will utilize my 1Up rack.
Really love what you did with the gusset panel, I’ve been trying to figure out how to utilize this space as well. What you did is bloody brilliant. Did you just remove all the bolts and install the hinges? Do you have a link for the hardware you used?

Btw I’m Currently building a Lagun style swivel table out of all 80/20 components to attach to my 80/20 extrusions on my GG cabinets. I was going to adapt the Lagun table to make it work with 80/20 extrusion but figured I could come up with a better solution instead of hacking up a $200 table. Once the hardware comes in I’ll post up some pics, you might be able to use the design for your 80/20 setup as well. It wasn’t cheap in the slightest bit but I’m way more satisfied knowing it’ll fit together nicely considering it’s all 80/20 components.
 

Mtpisgah

Active member
I admit I am pretty happy with how it turned out. I used Southco hinges They are not cheap, but the aesthetics and size were right. I initially tried to find some where I would be able to use the channel so I would not have to drill the camper, but the hinges were too big and obvious. I used 10-24 x 1.5” black oxide bolts. And yes, I just removed all the bolts and pulled the panel off. You have tp be a bit of a contortionist to pull some of the bolts off.

A Lagun style table would be nice. I need to figure out something like that for the winter months when we are hanging out in the camper more.

i am starting to look at building a mount for the water jug so it can be easily tilted on its side to pour. I will either attach it to the 8020 inside or build a rack I could set over one of the wheels. if I do it that way it needs to be hinges so it can fold flat.
 
My build is pretty much done. I need to attach the second GP panel, install a paper towel holder, and add a USB port or two, but it is very functional.

This week I added hinges to the gusset panel between the cab and camper. This will allow me to store stinky cycling clothes, shoes, and helmets there. They will dry and not stink up the truck or camper. I have some fancy hasp closures on order to ensure it does not swing open on the highway, but the hinges are torque controlled and should be ok.

I built the framing from 8020, I love it. There are holders for the pots and pans, a food box, and recovery gear. The cushion from the attic trap door is the perfect fit and makes a great couch. It is held in place with some tabs my wife sewed on the back and soon there will be a tab on the front so I can stand it vertically for better access to the boxes. I almost went with Goose Gear but decided I wanted a system where everything was quickly and easily removable. The boxes obviously come out quick, the pots in just a minute more. The framing can be removed in about two minutes.

i used a Ram 1500 bed rug for the baca wall. A simple rug from Lowe’s is on the floor with an old yoga mat cut to fit the ridges in the bed floor. I will probably replace it with a bed rug next season. Still contemplating additional insulation.

The screens have been held in place with screws with finish washers since the factory velcro adhesive sucks.

My wife and I are both cyclists so we always have our bikes with us. The swing out hitch is greet for access, but makes an already bad departure angle worse. I am looking into fabricating a door mount rack that will utilize my 1Up rack.

Looking good. I bought a screen kit recently and fully anticipate the velcro to fail (as it has on my storage pouches on the inside rear door). I thought I saw someone on Instagram (maybe @tinyrigco) rivet the velcro strip into place, which I may try when I do the install. Have you noticed any water leaks inside?
 

Mtpisgah

Active member
Looking good. I bought a screen kit recently and fully anticipate the velcro to fail (as it has on my storage pouches on the inside rear door). I thought I saw someone on Instagram (maybe @tinyrigco) rivet the velcro strip into place, which I may try when I do the install. Have you noticed any water leaks inside?

I considered rivets but had sheet metal screws with finish washers on hand. Rivets would be nice.

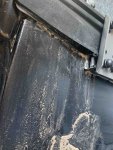
I have leaks where the camper meets the bed where the tailgate was. I have used butyl tape and caulk, but need to go over it again. It would have been so much easier to water and dust proof it during the installation than after the fact.
Yes, me too! I haven't tried to fix it yet — really just noticed it yesterday when I pulled up a rubber mat that I have placed over my Bedrug right at the entrance.
 
Looking good. I bought a screen kit recently and fully anticipate the velcro to fail (as it has on my storage pouches on the inside rear door). I thought I saw someone on Instagram (maybe @tinyrigco) rivet the velcro strip into place, which I may try when I do the install. Have you noticed any water leaks inside?
Yep i riveted mine as soon as I installed the screen kit, I would highly recommend doing that.
 

rvrboy

Member
Did a bit of work yesterday upgrading my potable water system. I decided to stick with small water cans vs. a large water tank and a 12V pump. Rotopax work the best for me for the areas I have for storage. I keep two behind my NL freezer/fridge up against the bulkhead. I Iike them there, out of the way. But of course getting them out, pouring water, putting them back is a bit of a pain.

I ended up adding a third rotopax and installed it to the interior of the rear camper door where it will stay clean and not freeze. I modified the cap to accept the tube of a food grade siphon with a hand pump bulb I found on Amazon. If the end of the hose is below the water line in the Rotopax the water free flows like a regular gravity shaker siphon. If I'm inside I can still get water using the hand pump. Now I can just rotate thru the Rotopax as I empty one.

Was a tight fit but everything works great and there is enough clearance with the camper door closed to still open the GG cabinet drawers. :)Rotopax Water System 01 052221.JPGRotopax Water System 02 052221.JPG
 

dustfro

New member
Has anyone had an issue with dirt and water coming in from underneath/between the bed liner and the plastic trim piece along the top of the bed sides? I had a tonneau cover on before the camper, and never noticed anything getting in. But now with the camper on, and especially in winter driving months, I have ALOT of water and mud coming in along the side of the bed, toward the tailgate area. When installing these campers, is anything done with the trim/bed liner before it goes on? Why is this happening. I have used sikaflex (thank you Tiny Rig Co.) along the outside of the camper where it meets the bed liner, so it can't be coming in from there. Any help is appreciated.
 

Attachments

  • IMG_0632.jpg
    IMG_0632.jpg
    640.5 KB · Views: 108
  • IMG_0633.jpg
    IMG_0633.jpg
    657.6 KB · Views: 104

wackyhacky76CO

Active member
My build is pretty much done. I need to attach the second GP panel, install a paper towel holder, and add a USB port or two, but it is very functional.

This week I added hinges to the gusset panel between the cab and camper. This will allow me to store stinky cycling clothes, shoes, and helmets there. They will dry and not stink up the truck or camper. I have some fancy hasp closures on order to ensure it does not swing open on the highway, but the hinges are torque controlled and should be ok.

I built the framing from 8020, I love it. There are holders for the pots and pans, a food box, and recovery gear. The cushion from the attic trap door is the perfect fit and makes a great couch. It is held in place with some tabs my wife sewed on the back and soon there will be a tab on the front so I can stand it vertically for better access to the boxes. I almost went with Goose Gear but decided I wanted a system where everything was quickly and easily removable. The boxes obviously come out quick, the pots in just a minute more. The framing can be removed in about two minutes.

i used a Ram 1500 bed rug for the baca wall. A simple rug from Lowe’s is on the floor with an old yoga mat cut to fit the ridges in the bed floor. I will probably replace it with a bed rug next season. Still contemplating additional insulation.

The screens have been held in place with screws with finish washers since the factory velcro adhesive sucks.

My wife and I are both cyclists so we always have our bikes with us. The swing out hitch is greet for access, but makes an already bad departure angle worse. I am looking into fabricating a door mount rack that will utilize my 1Up rack.

Excellent idea to provide access to these areas. Did you happen to ask your dealer or AC before hand if these are strictly cosmetic filler panels? In other words, they don't have any structural function for being there. I can't imagine they are seriously important, but was just curious. I may definitely copy this idea down the road.
 

Mtpisgah

Active member
Excellent idea to provide access to these areas. Did you happen to ask your dealer or AC before hand if these are strictly cosmetic filler panels? In other words, they don't have any structural function for being there. I can't imagine they are seriously important, but was just curious. I may definitely copy this idea down the road.

I asked my installer and he said they are only cosmetic. Based on photos I have seen, I believe the short bed Tacoma has a smaller panel and the long bed does not have one at all.
 

Mtpisgah

Active member
Has anyone had an issue with dirt and water coming in from underneath/between the bed liner and the plastic trim piece along the top of the bed sides? I had a tonneau cover on before the camper, and never noticed anything getting in. But now with the camper on, and especially in winter driving months, I have ALOT of water and mud coming in along the side of the bed, toward the tailgate area. When installing these campers, is anything done with the trim/bed liner before it goes on? Why is this happening. I have used sikaflex (thank you Tiny Rig Co.) along the outside of the camper where it meets the bed liner, so it can't be coming in from there. Any help is appreciated.

that is really weird. I have intrusion where the camper and bed meet, but that looks like a truck issue. I do not understand how water could even get that high unless you were splashing through huge puddles.
 

wackyhacky76CO

Active member
Has anyone had an issue with dirt and water coming in from underneath/between the bed liner and the plastic trim piece along the top of the bed sides? I had a tonneau cover on before the camper, and never noticed anything getting in. But now with the camper on, and especially in winter driving months, I have ALOT of water and mud coming in along the side of the bed, toward the tailgate area. When installing these campers, is anything done with the trim/bed liner before it goes on? Why is this happening. I have used sikaflex (thank you Tiny Rig Co.) along the outside of the camper where it meets the bed liner, so it can't be coming in from there. Any help is appreciated.

I am going to assume what I am looking at here is pictures of a Tacoma, but obviously I could be wrong on that. If so, this is frankly a problem with all our trucks. The bed is actually three main pcs. A composite tub which mates to the bedsides. It is not one solid pc. Therefore, unless you seal up this area under the factory bed rail caps and along the inside edge of the bed (where the metal bedside mates to the composite tub) before having your CC installed, this can happen unfortunately. It's probably easier to look at the pictures (link ) below to see how I sealed mine up if that doesn't make sense. I would imagine this is a little disappointing to find out at this point, but that is most likely issue, and really the only way to attend to it is lifting the camper back off. You could try getting as much sikaflex or silicone along that crack where you see it coming in to help possibly.

 
Is water intrusion an issue with most of these campers, or is it just installer error? Reading Wackyhacky's thread about snow blowing in on the drive home from the dealer is disconcerting. I was considering one of these for a multi-year trip and really don't want to deal with mold and troubleshooting leaks when out of the country.
 

Forum statistics

Threads
188,030
Messages
2,901,371
Members
229,411
Latest member
IvaBru
Top