Introducing the “NEW” Alu-Cab Canopy Camper

Mtpisgah

Active member
i am dropping my truck off Sunday for the camper install, i am excited. I have decided to build my cabinets myself, probably using extruded aluminum T slot framing for the frame and then either plywood for the front and top or a composite material. For those of you who have done something similar, what did you use and how did you attach it to the floor?

For any of you, what did you use for a floor covering to provide an even surface? 1/4 or 1/2” plywood with carpet or garage tiles?
 

rvrboy

Member
Just did my first trip with camper and I'm stoked on it. I spent several mornings of my trip just fielding questions from people about it - it's definitely a conversation starter. Was in a variety of climates (California, Colorado and Utah). Some notes and observations...

Dickinson furnace
  • Mine isn't hooked up to electric yet so I ran on low propane pressure and was comfortable when external temps were in the upper 20s outside. Don't have have internal thermometer so I'm not sure what internal temp was. I think temps could have been lower and it would have been fine. Obviously, upper portion of the camper gets much warmer than lower.
  • Without the fan, I did have some carbon buildup (I guess) on the glass of the furnace. Easy to wipe off.
  • One thing I struggled with was the furnace going out occasionally. I believe if the wind hits that chimney just right, it can happen. My last night it happened 4 times and I just gave up. Need to find a solution and I would like to hear others experiences. On all other nights, didn't struggle with this and it was great. The furnace is a solid install/buy - 10/10 would do it again.
  • At first I was worried about the ambient heat of the chimney damaging the awning or tent hood, but I had zero issue with that. Definitely checked a lot my first night.
Slide in table
  • Absolutely love the idea and overall I would buy it again. However, the edges of the aluminum are raw and it feels unfinished. I am going to go back and sand those down. Combined with the uber powerful struts and the possibility that they can just explode (not hyperbole) open, I started wearing gloves just to handle it. Given the quality of every other thing on the camper I was surprised by this. Not a huge deal, I suppose.
  • Feels flimsy but I guess that's the cost of lightweight.
  • The mount is dialed, they even lined the slides with carpet
Exped Mattress
  • I threw in the exped mega mat and am happy about it. It's spendy, but it's very comfortable and adds to the warmth.
  • I leave blankets on it and I am able to close the camper easily if I deflate. Have to store pillows elsewhere. I removed the cushion on the rear and they fit perfectly there. Inflating and deflating doesn't take much time so I don't find it to be a hassle.
Awning
  • The awning is incredible. Because it is soooo easy to deploy and put back, I deployed it all the time.
  • Felt like a dummy first time I put it back, but leave the velcro straps hanging from the top. The first time I had them attached on the bottom and then was trying with all my might to get them looped through the top. Then it hit me what I was doing wrong. After I get them in, I always go back and tighten the middle one, which makes it even easier to zip up.
General
  • The rear platform is the perfect height for a standing desk (for me at least).
  • Two front runner wolf packs stacked on top of each other fit perfectly under the overhang of the bulkhead in my tacoma. So does their jerry can. r/oddlysatsifying.
  • Swing out doors have various places to attach things. I added some bungie as quick solution to hang things for quick access.
  • These cargo nets are velcro and stick to the underside of the platform well. They aren't huge but fit perfectly in between the frame supports of the platform. I used them to stash commonly used stuff.

Nice write up! Glad your enjoying your camper!

A few comments...
I haven't had my stove go out on me like that, not once?
Agree on running the stove fan to minimize buildup, I believe the manual talks to that point as well.
The table is very useful and has proven sturdy enough for its given use.
Thanks for the link on those velcro storage nets!
 

rvrboy

Member
For those with the Dickenson stove...

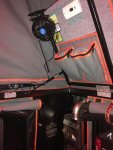
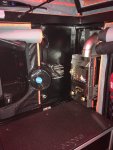
I tried a little experiment. When I run the stove either on the high or low setting I run the stove fan about half on to keep the stove burning clean and to help extract the heat. However the little computer fan in the stove doesn't do a great job of air circulation in the camper, so the bunk/upper area is always quite a bit warmer then down below.

I have a cheap 12VDC fan with a variable speed control I'd picked up on Amazon for those hot muggy NE summer nights. I decided to try it with the stove. I set it so that it was just on turning as slow as possible, with nothing else drawing power, the two fans were pulling around .7A. I was surprised at how well it helped get the heat more distributed in the camper.(y)
 

Attachments

  • Dickenson Second Fan 01 022421.JPG
    Dickenson Second Fan 01 022421.JPG
    1.7 MB · Views: 207
  • Dickenson Second Fan 02 022421.JPG
    Dickenson Second Fan 02 022421.JPG
    2.1 MB · Views: 208

kerry

Expedition Leader
My P12000 is a 2006 and has the pre-computer fan which Dickinson has since updated to the computer fan which they say is quieter. Has anyone swapped these and compared the air flow. I found the same computer fan Dickinson uses for $8 but when I powered it up, it didn’t seem as powerful as the original one in my heater.
 

abenteur_co

Member
What you are saying is all right. Is there any way you can take a picture of the back of the board for me so I’m able to see the wiring? It’s hard to say without looking at it.

Appreciate any thoughts you or anyone else may have on this issue. I am the first to admit I am a noob at electrical and have learned all I know putting this together so may be something really dumb I did!

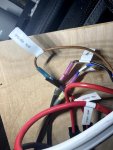
Here is the back of my panel:

IMG_1432.jpg

IMG_1433.jpg

Lower photo shows what I thought was the led positive and the two negatives coming to the panel from the harness.

I have done various troubleshooting steps with a multimeter and nothing seems amiss. My switch panel has power and my 12v outlet bank does as well. I tested other circuits (wiring for fridge) which all show a proper circuit.

Going from the original labels on the camper harness here are the routes:

LED main lights (brown) - from harness to switch, from switch to positive bus bar
USB and stalk lights (green and orange) - from harness to fuse panel in battery box (I didn't want those switched)
Negatives (blue and black) - from harness to negative bus bar on panel, from panel negative bus bar to negative bus bar in battery box
I have a main positive and negative run from my battery box to my bus bars in the panel

Thanks to anyone for insight on this!

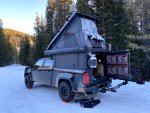
Here is a truck photo as a thank you

IMG_1248.jpg
 

blake92242

Member
Appreciate any thoughts you or anyone else may have on this issue. I am the first to admit I am a noob at electrical and have learned all I know putting this together so may be something really dumb I did!

Here is the back of my panel:

View attachment 646564

View attachment 646565

Lower photo shows what I thought was the led positive and the two negatives coming to the panel from the harness.

I have done various troubleshooting steps with a multimeter and nothing seems amiss. My switch panel has power and my 12v outlet bank does as well. I tested other circuits (wiring for fridge) which all show a proper circuit.

Going from the original labels on the camper harness here are the routes:

LED main lights (brown) - from harness to switch, from switch to positive bus bar
USB and stalk lights (green and orange) - from harness to fuse panel in battery box (I didn't want those switched)
Negatives (blue and black) - from harness to negative bus bar on panel, from panel negative bus bar to negative bus bar in battery box
I have a main positive and negative run from my battery box to my bus bars in the panel

Thanks to anyone for insight on this!

Here is a truck photo as a thank you

View attachment 646566

Hey! The electrical panel looks like it's wired correctly except the negative should be a pink wire. The small gauge black and blue wires are not used. Not sure what they go to. Now there is a 10 awg black wire that is a ground but it's for the solar. Still make sure to have that plugged in. This should make everything work, as right now the camper lights are not grounded. Also there should be a breaker in the engine bay close to the battery to protect the electrical panel. Not sure if you have one in there or not. Having a breaker in the engine bay doesn't relate to the issue you're having but it is good to have. Let me know if this works!

Best,
Blake
 

abenteur_co

Member
Hey! The electrical panel looks like it's wired correctly except the negative should be a pink wire. The small gauge black and blue wires are not used. Not sure what they go to. Now there is a 10 awg black wire that is a ground but it's for the solar. Still make sure to have that plugged in. This should make everything work, as right now the camper lights are not grounded. Also there should be a breaker in the engine bay close to the battery to protect the electrical panel. Not sure if you have one in there or not. Having a breaker in the engine bay doesn't relate to the issue you're having but it is good to have. Let me know if this works!

Best,
Blake

Thank you! The electrical panel is hooked into a battery box in the camper that is breakered so I think I'm good there but yeah, the two "extra" wires certainly messed me up! I did see the pink wire but it was wired into the rear brake light by the shop that installed my camper so I figured that was totally independent. I'll try and trace that rear light wiring but how did you wire up that rear brake light so its independent of the camper electrical (i.e. I will typically disconnect the battery via a cutoff from the panel and other appliance wiring but would still want the rear light to function, which seems challenged if it ties into the same single negative run)?

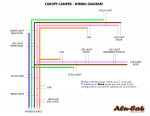
Distinct from the issues with finding this negative run in the camper harness, I planned to run a ground from my battery box to my truck chassis. Are you saying the solar negative is already tied into the camper as a ground? Or that's just a negative for the solar which should be an independent system imo. I wish this thing came with a good wiring diagram!
 

blake92242

Member
Thank you! The electrical panel is hooked into a battery box in the camper that is breakered so I think I'm good there but yeah, the two "extra" wires certainly messed me up! I did see the pink wire but it was wired into the rear brake light by the shop that installed my camper so I figured that was totally independent. I'll try and trace that rear light wiring but how did you wire up that rear brake light so its independent of the camper electrical (i.e. I will typically disconnect the battery via a cutoff from the panel and other appliance wiring but would still want the rear light to function, which seems challenged if it ties into the same single negative run)?

Distinct from the issues with finding this negative run in the camper harness, I planned to run a ground from my battery box to my truck chassis. Are you saying the solar negative is already tied into the camper as a ground? Or that's just a negative for the solar which should be an independent system imo. I wish this thing came with a good wiring diagram!
Cool that works on the breaker side of things. There should also be a purple wire wired to the brake light. The pink wire is probably wired to a chassis ground so the brake light on the camper will work. Does the brake light on the back of the camper work right now? If so I'd just leave the pink and purple wires as is. You are not running a Victron battery monitor so all negatives don't have to be run through a shunt. If the brake light is working the pink ground isn't your issue.

Your solar directly from the roof should go into a solar charge controller, which I don't see on the back of this board but it might be on the front. Those wires should go into the PV section of the solar charge controller, and two other wires should go from the battery section of the solar charge controller to the positive and negative bus bars. I also ran my solar through a 30 amp breaker just in case and used 10 awg wire for the solar. Hope that makes sense.

I'm working on a diagram, but I'm trying to figure out the best way to fit it all in one image.
 

blake92242

Member
This was posted by an Alu-Cab rep online on another site. Doesn't seem to include the anderson roof solar plug though. View attachment 646769
Yeah this wiring diagram is right. You can see the pink is the negative for all accessories. Then the solar has a separate positive and negative large gauge wire that isn't pictured. Also since you are running the stalk lights and usbs directly to the battery I would at least fuse them with a 15 amp fuse as that what the breakers are set to on your fuse panel.
 

blake92242

Member
Could you show or describe how you tied in the camper wiring harness? Mine came with labeled wires for stalk lights, led lights and 12v outlets that I assume are the positive leads to those as well as two unlabeled wires that I assume are neutrals. However when I wired up to my switch panel accordingly none of those items work, even though my switches show power. I haven't had a chance to trouble shoot yet, but would appreciate you're insight.

Thanks!
Is the switch panel at the very bottom of the board working?
 

abenteur_co

Member
Yeah this wiring diagram is right. You can see the pink is the negative for all accessories. Then the solar has a separate positive and negative large gauge wire that isn't pictured. Also since you are running the stalk lights and usbs directly to the battery I would at least fuse them with a 15 amp fuse as that what the breakers are set to on your fuse panel.

Thanks all. There is a purple as well which looks to be tapped into my brake lights. I am guessing that if I splice into the pink and run that to my negative battery bus bar this will all work; without that connection to the common negative (pink) there is no circuit on the built in systems. I suppose you could also run a negative to chassis from the camper electrical and that would complete the circuit (like a lot of vehicle electronics do) but I'd rather keep the path wholly through the wiring.

If the pink is already grounded to chassis that would also save a step in adding a chassis ground to a system. I think the main benefit of that is to just ensure there is never a voltage differential between camper system and truck chassis, but likely a low risk of that any way.

My solar charge controller is in my battery box at the front of the bed and yeah, that's breakered as well. Stalk and USB are fused there too.
 

blake92242

Member
Thanks all. There is a purple as well which looks to be tapped into my brake lights. I am guessing that if I splice into the pink and run that to my negative battery bus bar this will all work; without that connection to the common negative (pink) there is no circuit on the built in systems. I suppose you could also run a negative to chassis from the camper electrical and that would complete the circuit (like a lot of vehicle electronics do) but I'd rather keep the path wholly through the wiring.

If the pink is already grounded to chassis that would also save a step in adding a chassis ground to a system. I think the main benefit of that is to just ensure there is never a voltage differential between camper system and truck chassis, but likely a low risk of that any way.

My solar charge controller is in my battery box at the front of the bed and yeah, that's breakered as well. Stalk and USB are fused there too.

Before you go splicing into anything does you brake light on the camper work? If the light works then the ground for the camper is good and I'd just leave it as is no need to spice into anything.

The pink wire is a very small gauge wire and won't be able to support grounding for everything. I would still ground out the battery to the chassis with a large gauge wire like 4 awg.
 

Forum statistics

Threads
187,907
Messages
2,899,803
Members
229,071
Latest member
fireofficer001
Top