Los Angeles -Class Attack Sub(urban), Build / Collected Werks topic - '02 k1500 Z71

rayra

Expedition Leader
Rooting around in my boxes of electrical junk, pulling together the pieces I need for the front and rear winch plug extensions, some batter terminal post re-work, found my last length of 1/0 welding cable to make my new high output alternator charge wire. Found the bulkhead fittings for attaching the protective conduit to the cargo area floor for the rear plug extension and got those conduits rough cut and polarity-labeled.
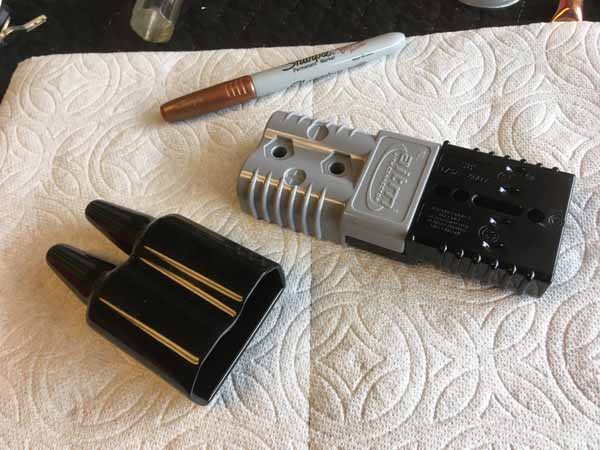
Looks like there's only a couple things I need to get still. THere's a rubber boot for the rear end of the SB175 plug, which the cables pass thru and seals the back end of the plug. The cable ends of this will get some 100% silicone slathered on them and the conduits will get shoved up on them and securely taped up. Sort of overkill / 'belt and suspenders', but I drive a lot of desert / fire roads, lot of gravel. So I want as much protection on this rear cabling as I can reasonably arrange.
The other item is a rotary cutoff switch to mount under the hood, for the front plug. Something like this, which is rated for 200A continuous and 500A peak -
https://www.amazon.com/dp/B06ZZ3749...colid=QWZ1BSZYG6VW&psc=1&ref_=lv_ov_lig_dp_it
Or one of the fancier Blue Sea versions.

I have this Anderson Power Plug handle that I bought a few years ago to experiment with. It was a little large and unwieldy inside my rear power module box, so I tucked it away. Now I'm thinking to mount it to the plug that will be terminating the power cabling of the winch itself.

winch049 sb175 plug handle.jpg
winch050 sb175 plug handle.jpg


The inexpensive rotary switch and solenoid I've been using for the last few years. They've been working fine for me.

winch051 rotary switch.jpg
winch052 PAC200A solenoid.jpg


I found a side port battery terminal stud, mate to the one I'm currently using on the (+) of the Aux battery. There's not a lot of room to bolt things on its stud length, but I figured out an arrangement of lugs that would work. I'm going to wind up with three 1/0 cables on the negative terminal of the Aux battery. Flipping and orienting the lugs various ways gives me a compact arrangement that will work for my intended setup.

winch053 battery terminal post.jpg
winch055 battery terminal post.jpg
winch054 battery terminal post.jpg


So the plug rear boot, a rotary switch, a bunch of expensive 1/0 welding cable, and some rearrangement of the components I have and I should be able to get everything wired up in the next few weeks.

eta

winch056 conduits charge wire.jpg
 

rayra

Expedition Leader
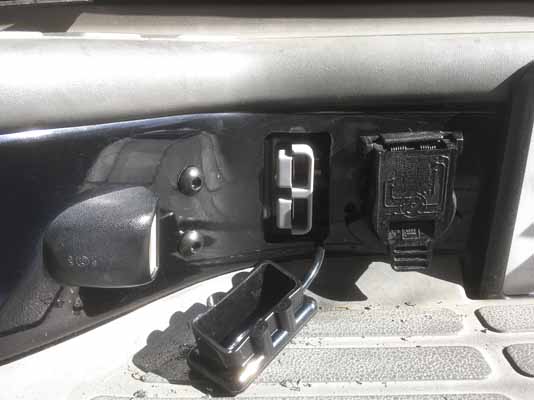
Got the rear plug bracket fashioned and test fitted, it's painted and hanging up now.

Used the vehicle as a multi-ton press, to open up the angle on the bracket I chose to use. Could of / should of just used some strap steel, but couldn't really find what I wanted at Lowes.

winch057 rear plug bracket.jpg


Had to open the bracket angle pretty far, 130deg or so (can't find my angle gauge). The curve of the bumper is pretty extensive and sloped. Took a little hammering and forming to get things to line up as desired.

winch058 rear plug bracket.jpg


And a couple pix of the test fitting of the parts. I should probably file a semi-circular cutout at the bottom of the bumper opening for the plug, as the thick rubber leash of the weather boot is jammed in there when the boot is on. But it's where I want it, the depth I want, the appearance I want. Albeit a little rough looking up close. I might try to find some edge-trimming and pretty it up a little.
I used a couple of the allen-drive button-head bolts from the winch carrier to bolt the new bracket to the bumper.

winch059 rear plug test fitted.jpg
winch060 rear plug test fitted.jpg


I need about 10' of cable to wire the rear extensions.

Next mini-project is cutting the front grill matrix for the front plug, and figuring out the mounting bracket for that plug. And my new alternator is due ~Wed. I'm waiting for it to see if any provision or demand is made for a thicker charge wire, before I actually fabricate one. I have the parts, but am waiting to see what is provided and what the stud size is on the ALT.
 

rayra

Expedition Leader
Boooo. Fedex delivered my new 'high output' alternator. To my neighbor's house.
Open the shipper box, nice internationally-labeled product box, labeled in English, German, Spanish, Chinese and Cyrillic/Russian. made by WAI, hecho en China. Almost grabbed a mask and gloves.

Standard 4-pin and the output lug looks standard too. Skinny little bolt with a 12mm nut.

Included test report says tested Nov13, so I suppose I've evaded the COVID19 virus, for now.
But this is where the 'Boooo' comes in. The performance / output graph says I'll get about 140A at my typical cruising speeds, at ~2200rpm. And that I'll only broach 200A at about ~3400rpm, which is me punching it on a highway incline. And peaking at 240A at 6000rpm where I'll never go.

This was marketed by Rockauto as POWER SELECT 8292N253A

Nice looking product, though.

I sorta want to return it and get the ACDELCO 3351092 {#88877302} Professional 145A for $45 more (plus the return shipping costs). But my current ALT is making bearing noises and I need to spend top dollar on a fuel pump real soon too, So I'm going to go ahead and install this thing today.

/and take a bunch of zinc
 

rayra

Expedition Leader
went ahead and installed the Chin alternator, don't have time or money to ******** with it further, on to the next problem (fuel pump). Another $60 and at least a week more for a Delco 145A and 'bird in the hand'.

ALT new WAI 253A 00.jpg
ALT new WAI 253A 01.jpg


Finished setting the new rear plug. When I do the wiring for it I can just stab in the new wired lugs from behind.

winch061 rear plug installed.jpg


And a peek at a future project, onboard air compressor, to be installed in the space where the factory subwoofer is now, in back by my rear power module. I intend to hard plumb it with metal brake lines to both front and rear bumpers. I'll cut another hole in the rear bumper and inset this air coupling about half its depth, so it can still be operable but not sticking out so far.

aircomp001 bumper coupler.jpg


went ahead and hit that fugly bumper cladding with some TurtleWax 'Trim Restorer'. It's like a thick gooey 'armor all' sort of product. Trim looks great now.
 

rayra

Expedition Leader
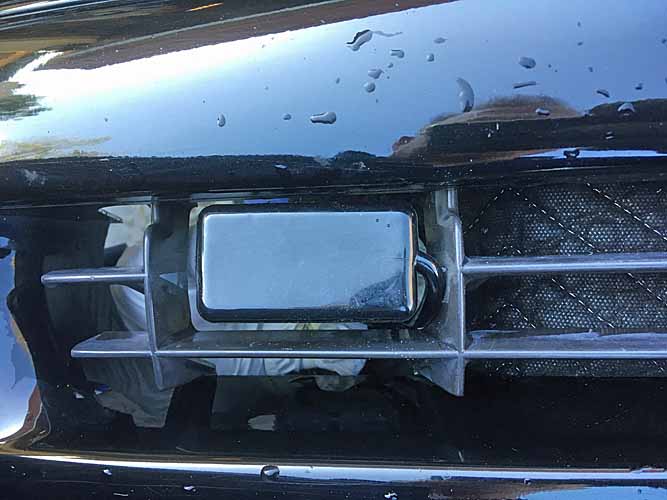
A little work done today to cut the front grill for the power plug for the winch (or jumper cables)
Just a rough cut with a small razor saw. The grids of the grill are wedge shaped, like a narrow V and hollow. So unfortunately the cut leaves visible openings. I'll probably dismount the grill and backfill those with black-tinted 5min epoxy, before I work with a flat / bastard file to carefully remove the remaining bits and make those vertical fins nice and smooth.
The weather cover on the plug just about fills the space and I'll be positioning it much like the rear plug, a bit proud of the grill so the cover can be grasped and removed.
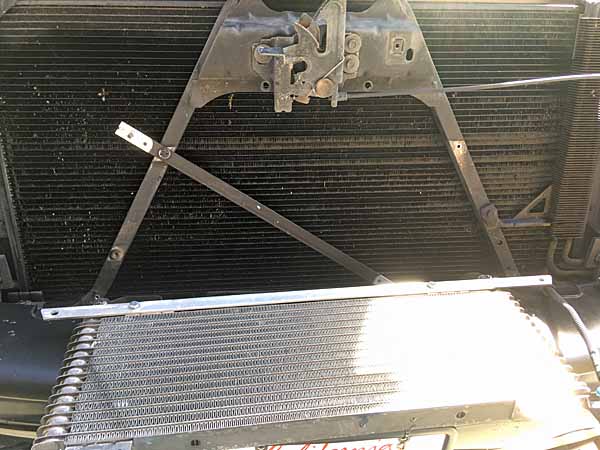
I think I'm going to have to relocate the aftermarket transmission cooler to the right / driver's side, ~1/2". I installed it with a bias towards the passenger side for reasons, but didn't consider the future plug and cabling. Truth be told I had intended to mount the plug in the vent-looking slot above the license plate, originally. But later plans for a future Aries brush guard will block that position.
If my sole intent was the winch, I could mount it on the front receiver and get up under the vehicle to plug the winch in. But I have additional plans for use of the plug, so I want it in a convenient place.
I also was initially intending to create a bracket that attaches to the trans cooler mounting bolts which will position the plug in the center of the grill opening. But now I'm thinking a little about heat transference. The fluid on that end of the cooler is ~200F. I don't know how well / badly that will conduct to the power plug, other than by doing it and measuring it with my laser thermometer. Dunno. I'll get a better look in there when I pull the grill and I've got a bunch of photos from the trans cooler install and re-work that I can consult. Want to figure a bracket that won't block a lot of airflow, but be sturdy and rigid enough to support the plug. And right now all the transverse brackets I'm imaging will have to have a perpendicular shelf / extension that the plug bolts to AND need to not block the cable routing to the back of the plug. Won't be hard once I get in there. Just don't have time to mess with it right now, but wanted to make some progress.

winch062 front plug grill cut.jpg
winch063 front plug grill cut.jpg
winch064 front plug grill cut.jpg
winch065 front plug grill cut.jpg
winch066 front plug grill cut.jpg
winch067 front plug grill cut.jpg
 

tbisaacs

Adventurer
A little work done today to cut the front grill for the power plug for the winch (or jumper cables)
Just a rough cut with a small razor saw. The grids of the grill are wedge shaped, like a narrow V and hollow. So unfortunately the cut leaves visible openings. I'll probably dismount the grill and backfill those with black-tinted 5min epoxy, before I work with a flat / bastard file to carefully remove the remaining bits and make those vertical fins nice and smooth.
The weather cover on the plug just about fills the space and I'll be positioning it much like the rear plug, a bit proud of the grill so the cover can be grasped and removed.
I think I'm going to have to relocate the aftermarket transmission cooler to the right / driver's side, ~1/2". I installed it with a bias towards the passenger side for reasons, but didn't consider the future plug and cabling. Truth be told I had intended to mount the plug in the vent-looking slot above the license plate, originally. But later plans for a future Aries brush guard will block that position.
If my sole intent was the winch, I could mount it on the front receiver and get up under the vehicle to plug the winch in. But I have additional plans for use of the plug, so I want it in a convenient place.
I also was initially intending to create a bracket that attaches to the trans cooler mounting bolts which will position the plug in the center of the grill opening. But now I'm thinking a little about heat transference. The fluid on that end of the cooler is ~200F. I don't know how well / badly that will conduct to the power plug, other than by doing it and measuring it with my laser thermometer. Dunno. I'll get a better look in there when I pull the grill and I've got a bunch of photos from the trans cooler install and re-work that I can consult. Want to figure a bracket that won't block a lot of airflow, but be sturdy and rigid enough to support the plug. And right now all the transverse brackets I'm imaging will have to have a perpendicular shelf / extension that the plug bolts to AND need to not block the cable routing to the back of the plug. Won't be hard once I get in there. Just don't have time to mess with it right now, but wanted to make some progress.

winch062 front plug grill cut.jpg
winch063 front plug grill cut.jpg
winch064 front plug grill cut.jpg
winch065 front plug grill cut.jpg
winch066 front plug grill cut.jpg
winch067 front plug grill cut.jpg


I always wanted to do this for a portable compressor or a folding solar panel.


Sent from my iPhone using Tapatalk
 

rayra

Expedition Leader
They make some smaller connectors, SB50, using the same sort of 'self-wiping' contacts that let you plug in higher loads. The SB175 connectors are almost the size of a pack of cigarettes.


More minor progress today. Dismounted the grill for epoxy work. Assessed the mounting tabs on the transmission cooler and determined I can just move it about 5/8" to the right just by unbolting the 4 mounts and using other holes in the tabs. That will give me a reasonable air-gap with the power plug and cabling.
Looked at various possibilities for a mounting bracket for the power plug. Has to float the plug ni the grill opening but be very sturdy and don't want a large flat construct blocking airflow. Looking at various factory bolts on the factory trans cooler square tube mounting frame and the upper mounting bolt of the AC condenser. Looked at extended the horizontal strap metal I added for the aftermarket trans cooler. That would give me some extensions I could build on to create a bracket and projecting 'shelf' to bolt the plug to. But that would complicate the power cables running to the plug. And conduct heat.
Then while poking around I spotted the upper bumper attachment bolt. 'a-ha' sez I. And the bumper cladding is conveniently notched out for access too. So I'm envisioning a C-shaped bracket, where the bottom of the C is short with the bumper bolt nailing it down. The vertical of the C gives me the height for the plug, the top of the C extends a bit further to the right which provides for positioning the plug left-right. Thick enough plate/ strap metal to be rigid, edge on to the airflow as well as oriented so it can best resist the push-pull of plugging in. Going to take some torching and hammering to fashion the bracket. Probably fashion it in sheetmetal first.
And with the bracket coming from the left side of the plug, the back of the plug is wide open for cabling.
And the whole thing is free / unattached to the grill, so it can come and go without any hassle.

Last a few pix of the epoxy fiddling. Using low-tack tape to form the mold, using JB Weld (color might even match real well!), troweling it into place. Later tonight I'll re-tape and flip it over and slather some more on the reverse faces to thicken things up. Tomorrow I'll mask things up and start working with a flat file to grind things down flush with the vertical vanes of the grill. I'll paint the inner faces of that grill opening for the plug, if I have to, but am attempting to avoid that.

winch068 trans cooler bracketst.jpg
winch069 trans cooler bracketst.jpg

winch070 front plug bracket.jpg
winch071 front plug bracket.jpg
winch072 front plug bracket.jpg
winch073 front plug bracket.jpg
winch074 front plug bracket.jpg

winch075 grill epoxy.jpg
winch076 grill epoxy.jpg


eta

winch077 grill epoxy.jpg
 
Last edited:

rayra

Expedition Leader
post-epoxy filing down of the grill fins. Went ok, but the putty isn't dark enough. I'll likely be hitting the opening with some auto primer, finish sanding with some 400grit wet/dry and then hitting the opening with as close a dark gray match as I can find. Got a lot of hobby paints and an air brush, so I might try to match it as best I can. Or could just crap out and hit it with satin black. Don't much care either way. Once the plug and weather boot are mounted, the interior surfaces of the opening won't really be visible.
But speaking of visibility I think I might get a black plug instead. The gray really stands out and I prefer it not to. IIRC the black and gray SB175 connectors are keyed alike. I'd already planned to just use black cable for both terminals, with just some red tape at the end to mark the positive cable. And that won't stand out much once the cable lugs are stabbed into the connector.

winch078 grill filing.jpg
winch079 grill filing.jpg
winch080 grill filing.jpg
winch081 grill filing.jpg
winch082 grill filing.jpg
winch083 grill filing.jpg


ran out of time today to move the trans cooler, but it only takes a few minutes to pull the top cover and grill. Few more things to order and rearrange, hope to have it all wrapped up by the end of April.
 

rayra

Expedition Leader
Thanks. Gonna take a few more weeks for me to get all the bits and pieces put together. Once I get the bracket formed for the front plug I have to re-arrange all my under-hood cabling for my solenoid / aux battery setup and buy and rig a rotary cutoff for the front plug positive.


This afternoon I got the aftermarket transmission cooler relocated about 5/8" to the right. Had to open up the factory bracket holes in a few locations, but that was easy with a step-drill-bit. And since I kept a few inches of rubber line as the final connections to the cooler, it was easy to leave it connected and just flop it forward to get access to the lower bracket bolts to move things.

winch084 front plug trans cooler.jpg
winch085 front plug trans cooler.jpg
winch086 front plug trans cooler.jpg


Then it was on to farting with a prototype plug mounting bracket. Just used a small narrow piece of aluminum flat stock, for speed and ease.
Faster to fab and try, than try to measure it all out and diagram it beforehand. The bumper bolt will work out, but need to use some 2" wide stock, maybe 1/8" steel. And will have to put a few notches in it for clearance with the grill structure at the bottom and to provide enough lateral (front-rear) stiffness. But it should work fine. Arranging the bracket this way doesn't block any airflow to the condenser / radiator stack. And leave the rear of the plug unobstructed for running the power cables back and down to the left. They're basically going to exit the grill area the same way the transmission fluid line enters.
Bracket missed the mark, but it's also distorted by shoving the grill back in. The red arrow in the last pic points to the grill contacting and pushing back on the bracket. Going to need to be some modifications there. Chiefly a thick washer into the 'cup' the bumper bolt passes thru, as a spacer. The cup has a raised lip the constrains the area around the bolt head. The plug bracket either needs to sit above that or the lip needs to be removed. Easier to shim it with a large washer.
You can also see where I need to relieve the fibrous air dam along the bottom of the radiator space, the trans line is rubbing on it. I looked, not much more than a superficial rub mark so far, caught it in time.

winch087 front plug grill.jpg
winch088 front plug grill.jpg
winch089 front plug grill.jpg
winch090 front plug grill.jpg
 

rayra

Expedition Leader
Ordered my new AC Delco fuel pump (mine is singing its death song), a nice 1/0 charge wire / cable for the new high output alternator off Amazon for $16, found my lugs and leftover 1/0 welding cable to make a new short power lead for relocating the Aux battery charging solenoid, and ordered a black Anderson SB175 plug for the grill location. and pick up the flat steel I want for the grill plug bracket. but it not be wide enough. There's some offsets involved with the bumper bolt, bumper cladding, base of the grill and the vanes where the plug will be perched. I might need a 2"W piece of flat stock instead of a 1-1/2"

Gotta quit spending money on this thing and start INSTALLING stuff. I've still got 4 u-joints waiting that I bought a year ago, a replacement backup camera bought 5mos ago, sunroof air dam repair to make... ooh and since I'm pulling the tank for the fuel pump I need to get my s in gear on my tank protective plate prototype stuff organized, to make fittings while the tank is loose.
 

rayra

Expedition Leader
This afternoon it was stripping out my original 2nd battery cable connections and solenoid, as part of rearranging and expanding my power cable setup to support the winch. Sometimes you have to back up to move forward. Parts coming out.

winch091 solenoid reloc.jpg


For all its size there's not a lot of good places under the hood to position a solenoid and battery rotary cutoff switch, where you can route the heavy cabling and have good access AND keep the stuff out of the splash / mud zones. High on the firewall / under the coaming there's only really one spot, on the passenger side. And it's where I originally installed the solenoid. This emulated other similar dual battery setups in these vehicles. And it's right next to the factory Aux battery location. I've pulled it out from there to instead put in a Blue Sea rotary switch.
300A capable. This switch will cut power to the front grill plug. It will be left switched off unless the plug is actively in use. I'll run cable from the Aux (+) to the switch, then from the switch to the front grill plug.

winch092 solenoid reloc.jpg


THere's a spot on the high firewall inboard of the master cylinder that might be best for the solenoid, but would have to move a bit of wiring and insulation. Instead I'm going to go with the side face of the shroud surrounding the big fuse block on the driver side. I pulled that shroud off to see what was behind the mounting area and then elected to beef up the mounting with some large fender washers. Probably still wont be sturdy enough. There's two tabs down near the bottom of the inboard face, you lift the shroud off of those. And I pulled the curved fender brace up near the hood hinge too. After that the shrouds pulls off and out easily.

winch093 solenoid reloc.jpg
winch094 solenoid reloc.jpg
winch095 solenoid reloc.jpg
winch096 solenoid reloc.jpg
winch097 solenoid reloc.jpg
winch098 solenoid reloc.jpg
winch099 solenoid reloc.jpg
winch100 solenoid reloc.jpg


I'm also changing the power source connection for the solenoid / Aux battery, to where I probably should have spawned from in the first place. The charge wire from the Alternator goes to a small red enclosure on the side of the motor, next to the ALT and above the Power Steering. Inside that enclosure is a connector that ties to the heavy cable running from battery (+) to the starter. That connection lug is where we're supposed to connect jumper cables. I've got a heavy duty 1/0 replacement cable coming for the high output ALT I recently installed. And I'm going to run a new 1/0 down from that lug and out to the terminal on the solenoid. So I need to mod that enclosure top and bottom to accommodate the fat cables. I looked at it today, it comes apart easy enough. When I get the new ALT cable and have fabricated the new solenoid cable, I'll take it apart and open the enclosure up with a nice step drill. Should be easy to mod. And to stack the cable lugs inside the factory enclosure.

winch101 solenoid reloc.jpg
winch102 solenoid reloc.jpg
winch103 solenoid reloc.jpg


This weekend I'll be making that solenoid cable and working to re-shape the 1/0 cable that ran across the coaming previously, to run from the new solenoid location to the (+) on the Aux battery. And the BlueSea rotary switch should come this weekend as well, so I'll see about mounting that. It has four bolt holes at its corners, but the area where the solenoid was doesn't have a 3" tall flat face (the size of the new rotary housing). Top two should be enough. But I might make a mounting plate to sort of bridge things. More on that later.
After that's in I can take some final measurements for the cabling runs I need and see how much expensive 1/0 welding cable I need to get.

oh and the new fuel pump came today. goodie.
 

rayra

Expedition Leader
got a few items way earlier than expected, so I'm trying to beat the rain. Going forward with the ALT and solenoid cabling / junction re-work.

The new phat 1/0 fine-strand charge lead for the high amp alternator -

ALT new WAI 253A 03.jpg


Might have a minor issue there as the terminal lugs are oriented on the same plane and the way things are laid out it would have been better if they were rotated 180deg to each other. But I think there's enough standoff on the ALT stud that I can put that lug on 'backwards'/flipped and make things work nice.


About to solder the lugs on the junction to solenoid cable and orientation will matter, here. So I'll do the junction end first and let it cool, then position the cable again and mark its insulation with how the solenoid-end lug should be oriented for a no-strain attachment.

winch104 solenoid relocl.jpg


Couple location choosing pics for the rotary cutoff for the bumper plug, with possible cable routings. The loose cable positioned above the rotary is where the cable from the solenoid may be routed. It has to come around and sort of hit the Aux battery (+) from above, the way the previous cable did.

winch105 solenoid relocl.jpg
winch106 solenoid relocl.jpg


couple other pix. The black connector will indeed mate with the other colors. Jungle Fever, baby. The others show the little junction box and the holes I have to open up in it for the 1/0 cables to ALT and Solenoid.

winch107 front plug grill.jpg
winch108 solenoid relocl.jpg
winch109 solenoid relocl.jpg
winch110 solenoid relocl.jpg


Should only take about 90ins to get those cabling changes and mods done. The rotary will take longer. Have to decide some things, maybe make a base plate of sorts to extend the flat plane of that coaming area, to the switch is mounted by more than just two screws at the top corners.

But I can go ahead and figure my total cable needs now. And start shopping that.


eta that black weather boot might go on the tail end of the front grill connector, if it overhangs my mounting bracket enough. If the bracket prevents that I might backfill that end of the connector with 100% silicone.
Or the boot will go on the plug I fit to the cabling on the winch itself.
 

rayra

Expedition Leader
one other thing, on the high output alternator. I'm keeping a crisper smoother idle now, seemingly smoother acceleration, too. And the voltmeter is routinely about 14V, but the first few days I caught a whiff of battery gas and got worried. Popped caps and discovered my near 3yr old Aux was a little low. 18mos old Starter battery seems fine. No signs of bulging, offgassing or leakage. But I'm still wary of it.
I've been thinking I'll probably want to buy another new battery this summer. Bump the Start to Aux and the Aux out for something else (thinking about re-assembling a little solar battery bank)
Previously, my Voltmeter would languish somewhere in the 12-13V range and my Start battery was never over 12.5V even in an excited state. First thing in the morning usually about 12.3V. My Aux is always reading almost a half volt higher, but I mostly attribute that to my rooftop solar / PWC charge controller keeping it topped off every day. I'll check on of these mornings what the resting voltage is on my Start battery is, with this new ALT doing its thing. And stay wary about potential overcharging / offgassing.

Too, the baseline voltage of this new ALT ought to be good for AGM batteries, seeing how lots of folks talking about them not getting fully charged with 'normal' / older vehicle systems.
 

rayra

Expedition Leader
Power sourcing stuff done. Used a step-drill-bit to open the holes in the little junction enclosure. Then a dremel wand with deburring / milling bit to remove some molded protrusions inside the enclosure from the small factory charging wire. Got those out of the way.

Had to use a dremel drum-sanding bit after I got things on the vehicle, as I hadn't accommodated the slightly thicker heat shrink on the cable to the solenoid and couldn't get the enclosure shut. So had to open the new bottom hole a bit more.

Then fabricated the cable run to the solenoid, soldered lugs, heat shrink etc.

winch111 solenoid reloc.jpg
winch112 solenoid reloc.jpg
winch113 solenoid reloc.jpg


Came out pretty well.
Not really sanguine about where I put the solenoid, even with the washers for reinforcement. too many washboard roads, I expect that shroud to crack. It's unsupported and not very thick. And the solenoid is a dense heavy weight, cantilevered in its mount. Just didn't want to strip insulation and move wires on the driver side of the coaming.

So if the rain holds off tomorrow, I should be able to re-shape that stiff THNN 1/0 cable that ran across my firewall before and fit it to its new connection arrangement. From solenoid terminal to Aux (+). Then I'll reconnect the solenoid trigger wire and ground and my dual battery setup will be back in operation.
And maybe do some work on the front plug bracket.

Then it's on to fashioning a backing / mounting plate for the rotary cutoff and get some good measurements for my cable runs.
 

Forum statistics

Threads
188,334
Messages
2,905,568
Members
229,959
Latest member
bdpkauai
Top