PCRover
Adventurer
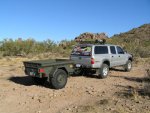
After receiving several requests for more information on how the cover was constructed for my M101CDN trailer, I decided to put together this write up.
Originally I had planned on welding the frame pieces together but my welding skills are lacking so I went with something I am more capable of, Nuts and Bolt assembly. The frame is made from 7 pieces of 1" x 1" square steel stock. There are 5 pieces 48" long and 2 pieces 74" long. The layout is fairly simple with 2 48" pieces and two 74" pieces making up the perimeter with mitered corners. The other 3 48" pieces form cross supports. The frame pieces were cleaned, primed, and painted with a Satin Flat Black paint.


Everything is held together by Stanley Heavy Duty corner braces and 1/4-20 bolts and nuts. There are 4 hinges on one side that fasten to one side of the frame and the lip of the trailer. I used removable hinges as my planned usage of the trailer includes utility hauling, but any hinge with the appropriate dimensions should work.

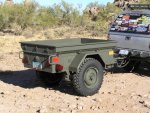
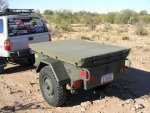
The frame is covered with 1/8" PVC plastic sheet. I PVC plastic for weight consideration and durability as it doesn't dent and when it gets scratched it stays white. Sheet metal or aluminum could certainly be used in place of it. The PVC sheet is held in place with Silicone seal and the base rails of the Thule Rack System kep it secure. I was planning on using sheet metal screws around the perimeter of the frame to help hold the plastic sheet down, but found them not necessary so far. To stop moisture and dust from seeping between the cover frame and the trailer lip I installed 1" wide x 1/4" thick rubber seal on the underside of the covers exterior frame. This weather strippng gets compressed when the cover is closed and does a good job of sealing out moisture and dust.
Rubber weatherstripping like this can be found at just about any local building supply retailer.

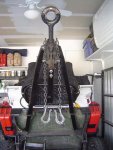
Since I was planning on mounting a Roof Top Tent on my trailer top I decided it would be wise to add some Gas Springs to assist in lifting the cover. I estimated the total weight to be in the 200lb range so having assistance to open the cover is a good idea. The first location of the Springs I tried did not work well as the weight of the tent caused some sagging of the frame. I relocated the springs further out on the frame and everything worked as I hoped it would.
This picture is of the original mounting location and since has been changed to the exterior also.

The Gas Springs used are from McMaster-Carr and have a gas pressure of 125lbs. The current spring location and gas pressure will support the weight of the cover and tent keeping it open when lifted to the springs maximum extension. If a tent is not planned then a lower pressure spring should be used. I have two sets of springs so I can change them depending on what my current application is. The springs are located on the outside as shifting trailer loads cold damage or displace them if located on the interior.
This is the end brackets used for securing the gas Springs.

Currently I have simple hasps holding the cover closed and also allowing it to be padlocked. My plans are to install these spring latches which will keep a constant closing force on the cover.

The overall theme of to this trailer is multipurpose so I wanted to have a versatile cargo mounting system. By using the Thule System on the cover I can mount just about anything one might want to take with them. Bikes, Additional Cargo Carriers, Cargo basket, a small boat or canoe, etc...

I chose an Overland Roof Top Tent from AutoHome as it is a well constructed tent that was readily available.

I welcome comments and ideas on how the building of the cover might have been done different and on what possible changes and or additions that could be made to it.
This post is directed mainly at the cover and its construction. I will continue to post to this thread as the build out of the trailer continues and I search for ideas and solutions for it.
Originally I had planned on welding the frame pieces together but my welding skills are lacking so I went with something I am more capable of, Nuts and Bolt assembly. The frame is made from 7 pieces of 1" x 1" square steel stock. There are 5 pieces 48" long and 2 pieces 74" long. The layout is fairly simple with 2 48" pieces and two 74" pieces making up the perimeter with mitered corners. The other 3 48" pieces form cross supports. The frame pieces were cleaned, primed, and painted with a Satin Flat Black paint.
Everything is held together by Stanley Heavy Duty corner braces and 1/4-20 bolts and nuts. There are 4 hinges on one side that fasten to one side of the frame and the lip of the trailer. I used removable hinges as my planned usage of the trailer includes utility hauling, but any hinge with the appropriate dimensions should work.
The frame is covered with 1/8" PVC plastic sheet. I PVC plastic for weight consideration and durability as it doesn't dent and when it gets scratched it stays white. Sheet metal or aluminum could certainly be used in place of it. The PVC sheet is held in place with Silicone seal and the base rails of the Thule Rack System kep it secure. I was planning on using sheet metal screws around the perimeter of the frame to help hold the plastic sheet down, but found them not necessary so far. To stop moisture and dust from seeping between the cover frame and the trailer lip I installed 1" wide x 1/4" thick rubber seal on the underside of the covers exterior frame. This weather strippng gets compressed when the cover is closed and does a good job of sealing out moisture and dust.
Rubber weatherstripping like this can be found at just about any local building supply retailer.
Since I was planning on mounting a Roof Top Tent on my trailer top I decided it would be wise to add some Gas Springs to assist in lifting the cover. I estimated the total weight to be in the 200lb range so having assistance to open the cover is a good idea. The first location of the Springs I tried did not work well as the weight of the tent caused some sagging of the frame. I relocated the springs further out on the frame and everything worked as I hoped it would.
This picture is of the original mounting location and since has been changed to the exterior also.
The Gas Springs used are from McMaster-Carr and have a gas pressure of 125lbs. The current spring location and gas pressure will support the weight of the cover and tent keeping it open when lifted to the springs maximum extension. If a tent is not planned then a lower pressure spring should be used. I have two sets of springs so I can change them depending on what my current application is. The springs are located on the outside as shifting trailer loads cold damage or displace them if located on the interior.
This is the end brackets used for securing the gas Springs.
Currently I have simple hasps holding the cover closed and also allowing it to be padlocked. My plans are to install these spring latches which will keep a constant closing force on the cover.
The overall theme of to this trailer is multipurpose so I wanted to have a versatile cargo mounting system. By using the Thule System on the cover I can mount just about anything one might want to take with them. Bikes, Additional Cargo Carriers, Cargo basket, a small boat or canoe, etc...
I chose an Overland Roof Top Tent from AutoHome as it is a well constructed tent that was readily available.
I welcome comments and ideas on how the building of the cover might have been done different and on what possible changes and or additions that could be made to it.
This post is directed mainly at the cover and its construction. I will continue to post to this thread as the build out of the trailer continues and I search for ideas and solutions for it.
Last edited:

")
