M416 hybrid (updated w lots O' Pics)

hesterj

Adventurer
I almost forgot. For anyone wanting to change the wheel hub on a m416 to a jeep TJ style hub here is the easy way to do it. I did not want to change the axle so I did some research. What I discovered is that if you use a wheel hub bearing like this it will fit fine without any modifications. The m416 axle has a spindle that is 1 3/8 on the inside and 1 1/16 on the outside. It is a somewhat common hub. The crown nut however was much harder to find. I had to go to a specialty bolt store to find it.

41e7830e.jpg


I got these at my local trailer supply store for cheap. The only thing you must be aware of is wheel backspacing.

The other thing needed to remember is the fact that the M416 had 2 axle's available that I have found. My M416
as seen here: http://www.jeepforum.com/forum/f104/my-little-m416-1209794/

came with a much larger dust cap. We have not come up with a good way of converting this style over to a 5x4.5 bolt pattern so we can run one spare and retain the park brake.
Please let me know if you (or any others) have conquered this battle.
 
Last edited:

DonBeasley

Adventurer
Well done!!!!!!!!!!!

I need a friend that owns a rhino liner shop..

Question on the tent rack:

There is a recurring debate on here about that much weight (the tent) being that high and how it effects COG. How did it do offroad and did it every feel like it was too tall?

I agree with Mark, a family project is always great. My grown son has worked on ours together and he knows more about the trailer than I do.
 

preacherman

Explorer
Question on the tent rack:

There is a recurring debate on here about that much weight (the tent) being that high and how it effects COG. How did it do offroad and did it every feel like it was too tall?

iIf you notice in the picture of mock up the tent rack was taller. After experimenting with the weight and feel I lowered the tent rack quite a bit. It felt more secure at the lower height. I had no problems with the tent at all. This might sound crazy but I tried to keep an evenly distributed amount of weight in all ways, even bottom to top. I also didn't go with a big tire or a spring over lift in order to keep the cog low. It seemed to help but that is all antidotial.
 

preacherman

Explorer
The other thing needed to remember is the fact that the M416 had 2 axle's available that I have found. My M416
as seen here: http://www.jeepforum.com/forum/f104/my-little-m416-1209794/

came with a much larger dust cap. We have not come up with a good way of converting this style over to a 5x4.5 bolt pattern so we can run one spare and retain the park brake.
Please let me know if you (or any others) have conquered this battle.

It may have been dumb luck but I just measured the spindle and went to a trailer store and looked around. My local trailer supply store was pretty helpful once I had the measurements from my axle.
 

preacherman

Explorer
Rebuild 2.0

So after a few years and about 7,000 miles of off road trips I decided it was time to update my design on the m416 I built several years ago. So far this puppy has been on 3 two week long family camping trips to Colorado, the Grand Canyon's north rim, and Moab. It has also been on every 4x4 road in Big Bend and about a dozen other smaller trips. While it is holding up well, I have had plenty of time setting by a campfire figuring out what I would like to do differently. So my wife and I got to planning and decided it was time for a rebuild.

What we like:
1. Its light and can be pulled with our 4runner with ease. I still get 15-16mpg fully loaded with our 2013 4runner.
2. Its small. It tucks in behind our runner very well. If the 4runner fits down a trail, so will this thing.
3. It's quite. This sounds funny but I put a lot of thought into making it not rattle down the trail. I used rubber bushing on all contact points of the body and accessories and it paid off.
4. The accessories and the m416 part. The lining material has held up well and kept this thing looking great. I love having the propane mounted to the front and its the perfect size.
5. The look. The stance, the color, the size, everything comes together to make this thing just look good.
6. The chuck box on top makes getting to our cooking gear easy and quick.
7. It's lockable. We often break away from the car on our trips to hike, bike, or raft and having it lockable gives me piece of mind that our gear is safe while we are gone.

What we don't like:
1. Its not 100% waterproof. I have gotten around this by packing in plastic totes, but that created the 2nd problem...
2. The totes waste a lot of space. The plastic totes make it so that I loose valuable space because they cannot be crammed into a tight space like a duffle bag can.
3. Its still hard to get all of our gear in it. This may sound funny but we take camping gear for 4, mountain bikes and gear for 4, climbing gear for 4, etc with us on our long trips. It gets cramped.

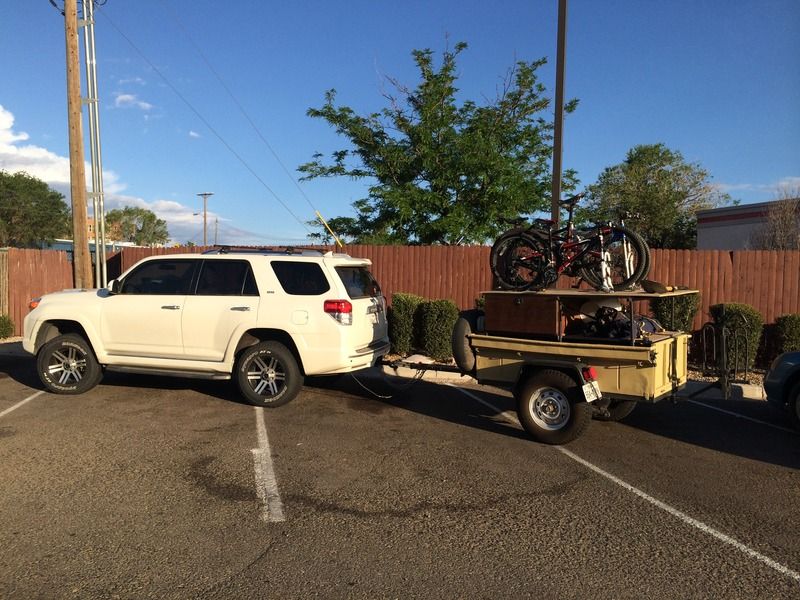
So we finally got tired of the things we don't like and made a plan. My new design had to keep items 1-7 in mind because I am not willing to give an inch on any of the things I like. I had done some additions to the trailer two years ago but I never really liked how it turned out. I did not make a good plan going into it and paid the price in a few key places. Here is a picture of what it looked like before I started this time. I called this design 2.0


Not wanting to make the same mistake twice, I spent much of the winter planning. I hit the boards and spent some time looking at teardrop builds as well as some boat building websites. I really wanted something that looked good but solved all my problems. It took a while but what I came up with a plan that solves all my "wants".


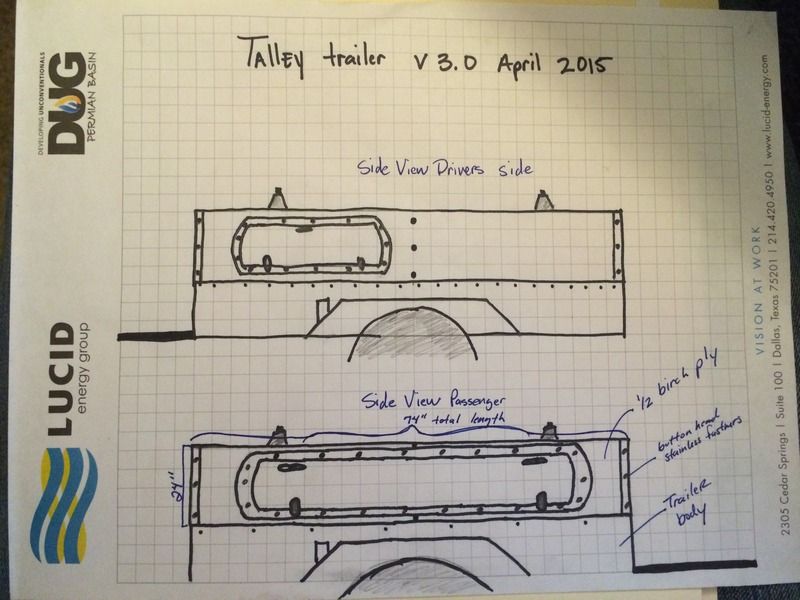
The plan was to simply rebuild the top portion of the trailer using a steel frame and wood sides. The wood will be stained and waterproofed (like a boat) and only stainless steel fasteners will be used. The wood's edges will be sealed with trailer trim taking a page from the teardrop guys.

So here we go. Trailer 3.0!
 

preacherman

Explorer
Day 1

Day 1.

I spent friday evening stripping the trailer off the old top. It didn't take long (teardown never does) but it did give me a chance to see how things were holding up. While I know I made several compromises in design, I was glad that everything was holding up well. There was no rust, and the welds looked good. Given that this thing has rattled down most of the classic 4x4 trails in the southwest I was happy to see that. Here she is all stripped down. You can see the old top setting beside the trailer.


If you look carefully in the last picture you can see the passenger bed side rail I fixed when I was rebuilding the trailer the first time. Over time the metal has slowly started to flex back to the bent position. I was saddened to see this because I spent so much time trying to fix it. I also knew that it would make it really hard to keep the new frame straight and true. I am not going to lie, it kept me up that night wondering if I should just scrap my plan or if I could figure out a way to keep the trailer square and straight. My biggest fear was not being able to make the new frame straight, it was keeping the new frame straight over time.

My plan was to use angle iron as my base for the new top so that it could be removable if needed. I was worried that over time the angle iron frame would bend to match the spot on the trailer and leave gaps, leak water and just look bad. After sleeping on it however I think we came up with a plan to stop it from bending. I say we because by this time I had recruited a good buddy to help out.
 

preacherman

Explorer
Day 2

Day 2 we broke out the welder. I used 1x1 1/8 inch steel tube for the frame. I plan on having a roof rack for our bikes and will even use our roof top tent on it form time to time. After taking about a gizillion measurements we started burring steel...


For the base I used 2 1/2 inch angle iron. I want to be able to take the top off if I need to so I have come up with a system to hold it on. More on that later. I took about a day to cut and weld everything up (and what felt like half the day trying to make it square) with almost just as much time grinding as welding. After I finished the frame I put some wood on the side to see how it was going to look.


As you can see by the design this will give me a lot more room inside and will also solve the waterproof issue. After two full days I had gotten a lot done. The next step was cutting the wood for the sides. Thats where the real fun started...
 

preacherman

Explorer
Next we started skinning the walls with the wood. As I said before my plan is to make it somewhat of a cross between a off road trailer and a boat, at least form the building materials standpoint. I used a columbian hardwood I found locally. I also sources all stainless steel fasteners. I choose button heads for reasons that will be clear later.


With one side


With a few sides


After carefully measuring multiple times we started on the hard part...the doors. This part had to be right or one mistake would mean starting over.


My design is a little different in that I wanted the doors to function well AND look good. I decided on an oval design with what I will call a "hatch" look. Thats where the button head fasteners come into play. First we grabbed a new piece of wood and started mocking up the door. In this picture you can see we started cutting the door out and then placed the hinges, before the door was completely cut. This allowed us to center everything up while our lines where nice and uniform.


After mounting the door you can start to see where I am going with this.


After mounting the door we still had another hard cut to make. This one was the interior door cut. Again after measuring several times we whipped out the saws and took the plunge.


Now it was really starting to come together. My vision, was starting to make since to my wife, who up until this point had just said, "ehhh yeah I think I get it"..


Next up, the interior mock up...
 

preacherman

Explorer
I felt guilty because I never finished this thread so I decided to use some free time at Christmas to finish it. I got so busy working on the trailer trying to finished it before our big summer trips I did not do anything but work on the trailer. After the summer trips, I meant to finish the thread and just never did. So here we go.

As with any big major build, it seems like I assembled and dis-assembled the trail about 50 times. To start working on the inside I had to completely disable it down to the frame again.

The frame without the sides


My plan was to make drawers in the first half of the trailer, but leave the rear half open for storage and stack-able totes. After more measuring, welding, measuring and more welding. I was able to make a good system I liked. In order to get it finished with no problems I had to take apart and reinstall the walls several times.


Next I started working on the door. I spent a lot of time on the internet searching what latch I would use. My previous fab work on the trailer meant I had limited options. One of the big problems I had from the beginning was that when I originally made the trailer I cut out a tailgate. While the sounds like a good idea on paper it caused some sagging of the rear trailer walls. My requirements for the door (weatherproof, lockable, big enough to load large items in, and fixes the sagging walls) was a tall order. After a ton of trial and error and lots of talking with others, I came up with a plan and started welding.


You can see in the picture that hanging the door required me to level the trailer and then shim the door with shims, clamps and anything I could to keep it level while I welded. All of my efforts worked, the door is level, does not close on itself, and opens and closes easily.

 
Last edited:

preacherman

Explorer
drawers

Next I started working on the drawers. I really wanted two large drawers on the galley side of the trailer (the side with the large shelf) and two small drawers on the storage side. The two small drawers will be used for small misc. items and the two large drawers will be used for cooking supplies. The drawer build required me to…you guessed it, put everything together again and check for clearance. One problem I did not anticipate was that the oval sides of the access panels limited how wide the drawers could be. I did not think about this when I was designing the trailer, I simply liked the oval look of the access panels. Oh well, I guess that’s it’s called custom built…You can see in the picture below what I am talking about.


Now that I had the dimensions and measurements I needed I could build the drawers. Because of changes I made to several parts, almost every drawer was a custom size.


preacherman

Explorer
Now that I had all the fab work finished, I could finally take everything apart again and start prepping the wood for finish. I enlisted the whole family for this task. Because of the finish I had planned there was enough sanding for everyone to get a turn.


How to finish the wood was another aspect of the build I spent hours and hours researching. At first I was leaning towards a bedliner type product. My only problem with this was, what if the trailer needed changed, repaired, or refinished? The trailer body has a complete bedliner product inside and out, but covering the wood didn't feel like the right thing to do and matching the existing color proved harder than I thought. None of my test samples ever looked close. Next I thought about a heavy stain and varnish like a boat. I had done this with the first version of the trailer topper I built and it simply took too much time. The new trailer sides had more wood surfaces than the old and the old took more time prepping, sanding, coating, sanding and finishing than I had. I also wanted something that was easier to repair than the multistage stain/varnish I used before.

While walking through home depot I had a stroke of inspiration...single stage deck stain. Deck stain, is waterproof, UV proof, cheap, easy to apply, easy to repair, and could be reapplied quickly if I ever needed to repair it. I still went ahead and prepped the wood like I was doing a fine stain to make it look good. After experimenting with several samples, I settled on one. Because i wanted a deep color, we used multiple coats applied with a stain brush to get depth and protection.


While the stain was curing, I went ahead and primed the metal frame and painted it with enamel implement paint with a hardener added. I coat all of my DIY metal bumper, sliders etc with this and it is almost as hard as a powder coat. (the picture just shows the frame primed, not yet painted)

 
Last edited:

mmp3823

Observer
Thanks for updating this thread. Your second build is similar to some changes that we have in mind for our trailer. Subscribing to see the finished product.
 

Forum statistics

Threads
188,949
Messages
2,911,289
Members
231,449
Latest member
4ROAMER1
Top