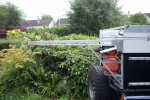
Making a ifting roof on a 110

wuntenn

Adventurer
Thanks Arjan!

When you come over later in the year we can meet up. Is it Caithness or Sutherland you're working the dogs?

Anyway - some internal details. This shows the fabric fastening at top of roof:

fstn-2.jpg

It's a simple alloy flat bar drilled and screwed through a wodge of folded-over fabric with flange-head fasteners into the timber edge surround.

fstn-1.jpg

There's numerous ways this could have been achieved but my use of wood is because it's easily worked, easily repaired, relatively light and very flexible and enables easy screwing into, plus it is 'warm' and not so prone to condensation 'sweating' as metal.
 

tacr2man

Adventurer
Thanks.


I got the material for the hard sides and will work on them sometime soon, but am currently making an awning support at the rear (two swing-out triangles) that will allow a fabric annexe to be slung off the back end, giving some more dry space and somewhere to take off wet gear and boots. That will really make a difference to its usability. Started that today and should have it working in a day or so.

will be very interested in how you solve , am just about to commence on the rear one for mine , different solution (mk1 version) in mind . For the side have just bought this , with ideas to fit removable sides , as mine is CSW with ability to give access into rear area from side canopy
http://www.ebay.co.uk/itm/2-x-1-5m-...Patio_Covers_Heating&var=&hash=item2a3b0d4f36

bought as cosmetic damage so quite a bit cheaper !
 

wuntenn

Adventurer
will be very interested in how you solve , am just about to commence on the rear one for mine , different solution (mk1 version) in mind . For the side have just bought this , with ideas to fit removable sides , as mine is CSW with ability to give access into rear area from side canopy
http://www.ebay.co.uk/itm/2-x-1-5m-...Patio_Covers_Heating&var=&hash=item2a3b0d4f36

bought as cosmetic damage so quite a bit cheaper !

Love it! It'll make your LR look even more like a shed! Good price though!

My triangles are coming on ok, but I need some bracing to make more secure. Pictures soon.
 

wuntenn

Adventurer
great test run ..by the looks lots of room for your young lad up top

Aye it was fine. Wee man loved it and there's a lot of space up there so plenty for two adults. I shoved in a load of water, and probably 3/4 tank of fuel (and I have additional fuel capacity) and on the way back had an extra 100lbs of alloy and the handling was fine. I pumped the rear air helper bags up to 30psi and the ride was smooth and secure on corners. I've recently replaced the springs all round with standard OE LR parts and shocks with the bog standard Armstrong, with PolyPro bushes. I was a bit concerned about the weight and handling as I've previously had HD suspension on when I bought the LR, which was terrible and spine-jarring, then aftermarket softer ones which were (literally) scary as they sagged so much and allowed so much roll I nearly tipped over, then half decent ones of unknown provenance. After a lot of consideration and discussion with 'experts' I decided to go back to original and add air helpers in the rear, and it seems ok.

Out first trip with full water, full fuel, food, three people, a dog, all our gear and three bicycles on the back will be the 'bottom line' - if that 'feels' ok then I'll be quite happy.
 

Arjan

Fossil Overlander
After a stopover near Moffat, it is North towards Tongue - a bit West of there is where I'm going to visit some friend, work a few dogs and talk about a future puppy. Plan is to be there for 3 days - it is a long drive... As the Greenlaning season keeps me very busy (6 weeks Alps, 3 weeks Auvergne) there is a chance the rooftent will be used but I really am pushing for the pop up roof..

After the engine has been out of the 110 to replace the rear crank oil seal...
 

wuntenn

Adventurer
After a stopover near Moffat, it is North towards Tongue - a bit West of there is where I'm going to visit some friend, work a few dogs and talk about a future puppy. Plan is to be there for 3 days - it is a long drive... As the Greenlaning season keeps me very busy (6 weeks Alps, 3 weeks Auvergne) there is a chance the rooftent will be used but I really am pushing for the pop up roof..

After the engine has been out of the 110 to replace the rear crank oil seal...


Tongue is lovely, great area. I'm sure we can work out meeting up.
 

ersatzknarf

lost, but making time
Hi John,
WOW ! What a wonderful job you've done with the interior, too !
Thank you so much for sharing all the photos, especially with the wee gentleman enjoying the adventure :D
You've done a brilliant job with it. Wonderful.
The photos with real people in them and the interior in use along with the commentary really help with perspective.
My project involves a HT w/MMB ambulance high roof, rather than a lifting one, but your sharing has really helped a ton!
The wood interior for its "warmth" and all your clever details are great food for thought !
Thanks :D

Well we had a wee run and sleep over in the LR over the last few days <snip> And to keep the wee chap happy we spent a glorious hour fishing with his new rod on the way home (without any luck!).
 

wuntenn

Adventurer
Hi John,
WOW ! What a wonderful job you've done with the interior, too !
Thank you so much for sharing all the photos, especially with the wee gentleman enjoying the adventure :D
You've done a brilliant job with it. Wonderful.
The photos with real people in them and the interior in use along with the commentary really help with perspective.
My project involves a HT w/MMB ambulance high roof, rather than a lifting one, but your sharing has really helped a ton!
The wood interior for its "warmth" and all your clever details are great food for thought !
Thanks :D


Thanks Frank - glad you like the interior (not finished yet - still got the inside wall fabric to stick on).

I really appreciate the feedback, there's a lot of views of the ongoing thread but relatively few comments.

Really glad to learn that it's useful to you. Well I've had over 20 years of 110 ownership and several different interiors, and learned a few things along the way about what will be useful, and what is not. There were several must-haves for this build: easy water access is one, and a small sink another. Easy access to a cooker vital. Lots of clear workspace to put stuff on (so it keeps the floor clear) an absolute must, and also to allow easy food prep. Somewhere to sit with back support so it's comfortable another must-have, and easy access to 'stuff' in storage boxes without dismantling half the van a priority. So I got all that plus the head room from the lifting roof.

Made the the alloy rear awning supports today. Pics will follow shortly.

Thanks again for your continued interest.
 
Last edited:

wuntenn

Adventurer
Awning supports just about finished. Basically two legs, each fastened on a side that swing out/in. No welding just pop rivets and nuts/bolts. Not as easy as it appears because the legs have to be different sizes so that the rear one can swing out past the hinge gubbins of the other, but they both have to be the same distance out from the back of the van when swung out (aye try working that out in your head!).

awng-1.jpg

I made the left side (viewed from rear) the rear one. Made it full width and put the hinge on then made the right one and fastened it on, marked the bit that had to come off the tip of the left one to be able to clear the right one's hinge, then cut the tip off, refixed it and swung it out to get a length from the back door to its end and then cut the right one to that length whilst it was swung out.

awng-6.jpg

The left one is over engineered as it will be where the door and zipper is (I'm having attachable sides that can be zipped on to enclose the area under the awning). The right one had to be smaller anyway because the gas bottle holder gets in the way of the bottom of the swing-out.

The legs each have a bracing strut that lives parallel with the main awning supports, with a wing nut release (you can see it in the picture below), then these struts swing down and are attached to a little bracket with a hole in on the left, and to the gas bottle holder on the right (pictured below), so they lock in place giving a nice firm triangle to support the spindly legs. Deployment takes seconds and the structure is very strong.

awng-5.jpg

awng-3.jpg

A piece of L alloy pop-riveted to the rear of the van just below my roof fasten-down clips will have the awning fabric bolted to it underneath, with a second piece of much shorter fabric bolted above on the upper side of the alloy which will form a 'wrap-around' to keep the main awning fabric from getting all covered in road snot when it's stowed.

awng-2.jpg

The other end of the fabric (the bit furthest from the van) will be fastened (bolted) to a piece of 19mm box (you can see it attached to the end below) and when not in use will simply be rolled up, and when pulled out (unrolled) will fasten over the end and two small bolts slipped in and wingnutted to simply hold it taut. I may add a middle alloy support as well as it will help prevent it 'dishing' with heavy rain. I'm 6' so making more of a slope on the roof would have me banging my head at the end so the angle is fairly relaxed, and wont shed rain like an alpine chalet, so the middle support might be vital.

awng-8.jpg

With some care the design should allow the zip-on sides to be easily fastened behind a 'valance' so the zips are protected and the whole thing has some integrity. I can add a couple of legs at the end if needed with a few guy lines to keep it all taut. The fabric design needs some thought because it has to have a cutout/extension built in to allow the spare wheel to go through.

I've thought ahead on all of this and the design of the gas bottle holder took into account that the spare wheel needed to come round when the door was open, and that the awning support leg would need to sneak past the gas bottle and spare wheel as well. It all worked!
 
Last edited:

ersatzknarf

lost, but making time
Hi John,

Well, then very much looking forward to the wall fabric being attached ;)

You are very, very welcome. As said before, have been enjoying every post. It is very clear that you've made great efforts to consider all approaches to solving problems. Glad you appreciate the feedback. It is sincere :)

Thank you also for sharing what you've learnt from all that time with 110s for camping. I've got the water mostly figured out and the small sink found or can be fabricated from a mixing bowl. For the cooker, we'll likely keep that outside as much as possible or come up with something for morning coffee when we cannot get outside. Your "upper shelf" was certainly a happy side effect of your design and I found it really impressive in the photos.

Your point about somewhere to sit with back support really hit home and I will be revising my design to allow for that just aft of the front seats, as I had only had that sort of seating along the passenger side with a flip over for the sleeping area. It should make the rear area a bit more comfortable, especially if I can work out a small table as well.

The storage bit will be a challenge, as there will be no upper sleeping area. Will work on that a bit more...

Yup, you got all that and full head room too ;)

Oh, please can you share a bit more about the Espar heater ? Sorry, I must have forgotten about it. It's an Airtronic, correct ? Am hoping to go with the Hydronic and use a matrix and fan for the rear and heat a boiler as well as the motor...

Looking forward to the awning !

Love that you're DIY-ing all this. All the better :D
 

wuntenn

Adventurer
I'll take some pics of the box/seating area tomorrow. Basically I chopped out the bulkhead and installed a MUDSTUFF replacement strengthener bar. Then built my storage box/seating unit to suit that height. My plastic storage boxes were in three different sizes, but ALL the same height so I used that height as the 'gospel' and designed everything around them. And all my current build is designed around them too. They're cheap plastic but crucially have sealed bases which means that anything that bursts or spills inside doesn't run everywhere. I had a milk disaster once - a carton burst and ran everywhere, it was midge hell outside and I had to strip everything out by the roadside and swill the milk out then lob in loads of water to clean it up. But by the next day the van was stinking as the milk residue went off. Never again!

My heater is an Eberspacher D4W Hydronic plumbed into the engine block, one of the simplest installs. It pre-heats the engine coolant and when the temp hits the preset it switches on the internal vehicle heater fan and blows hot air in, runs for 1 hour then switches off. It's a 4Kw output and pretty compact for what it does. The preheat advantage in the winter is worth it alone - making cold starts easy, reducing the load on the battery and warming the oil so helping engine longevity. Fairly easy to work on, I've had mine apart several times to replace glowplugs and fuel pump over the 15 years I've had it.

It can be installed to heat a water tank and provide on-demand hot water as well, but I went for the basic fit. Biggest problem was finding somewhere to fit it - I ended up bolting a metal 'leg' off the chassis up into the engine bay and mounted it on that.
 
Last edited:

ersatzknarf

lost, but making time
Hi John,

Thank you for the photos, that will be most appreciated.

Yes, we're using a bulkhead bar, rather than the MUD one, although I think theirs looks nicer :)

You're absolutely right about using the plastic containers. My wife has been doing that for some time now...

LOL- my height reference is the portable loo :D

I would have dreaded that milk disaster. That was a tough lesson.

Oh ! You've got the hydronic. Good ! So, the cab's heater fan is enough for the rest of the vehicle ? That might save me a lot of plumbing. We're even looking at a second A/C fitted to the rear from an early Discovery. Agreed about the engine preheat ! ! ! Very glad you like the Eberspacher/Espar. I have been looking at both brands and like the one you've got for the ability to compensate for altitude. That you've gotten 15 years+ service is very nice to know.

Agreed! Where to fit it ? Thank you for the suggestion. We'll have to see where everything else fits when the time comes.
 

wuntenn

Adventurer
Hi John,

Thank you for the photos, that will be most appreciated.

Yes, we're using a bulkhead bar, rather than the MUD one, although I think theirs looks nicer :)

You're absolutely right about using the plastic containers. My wife has been doing that for some time now...

LOL- my height reference is the portable loo :D

I would have dreaded that milk disaster. That was a tough lesson.

Oh ! You've got the hydronic. Good ! So, the cab's heater fan is enough for the rest of the vehicle ? That might save me a lot of plumbing. We're even looking at a second A/C fitted to the rear from an early Discovery. Agreed about the engine preheat ! ! ! Very glad you like the Eberspacher/Espar. I have been looking at both brands and like the one you've got for the ability to compensate for altitude. That you've gotten 15 years+ service is very nice to know.

Agreed! Where to fit it ? Thank you for the suggestion. We'll have to see where everything else fits when the time comes.

Here you go Frank.

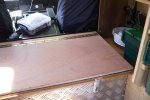
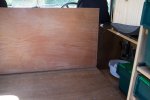
This is the box fitted to the rear of the bulkhead, with two lids. The lower one is lockable and the upper one is hinged (piano hinge) further back from the lower lid's hinge. Basically when top lid is down it is unobtrusive and flat. But when lifted and hinged back, leaning against the slightly tilted front seat backs, it becomes a back rest, making a really comfy seating area.
bxs-1.jpg

bxs-2.jpg

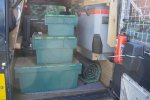
All of this internal build is fabricated around these storage boxes.
bxs-3.jpg

There are three sizes, the two larger ones being the same height. What I did was put a sheet of closed-cell foam insulation over the whole of the rear floor (left it loose) and fitted a sheet of 1/4 inch ply on top. That gave me a fixed point to work from, onto which I put the plastic boxes. They protruded up several inches higher than the extended wheel arches you get in a hard-top 110. So I put ply liners on both sides up to the level of the top of the boxes, plus an inch or so. Then I fabricated a set of three slip-in platform pieces made of 1/2 inch ply which were very bendy, but my design included a few strips of thin pine glued and screwed underneath the ply to strengthen it, but crucially acting as packers to allow the ply to actually rest on the storage boxes underneath. The boxes then become an integral support.

The reason for the pine strips is because the idea was that the boxes could be slid out without lifting the wooden panels, and with two different sizes of box this was the only way to achieve it, with the pine giving a regular surface underneath to allow the boxes to slide along. (if that makes sense!)

Here's one of the ply panels out of the van. It's lying face down - ie you are looking at the wood and boxes inverted.

bxs-6.jpg

bxs-5.jpg

When the boxes are fitted longways they support the ply on the pine straps. But the clever bit is that the gaps between the pine is made to fit the boxes when they are turned through 45 degrees at which point the boxes actually slot into the gaps and become a table out on the ground. The additional thin ply piece fitted into the lids of the plastic boxes act as both flat surfaces to slip against the ply panel above and act as seat bases and so its simply a case of taking my thermarest sleeping mat and fitting it into the chair kit and turning the sleeping mat and storage box into a chair that is very comfy and supportive. The great thing about thermarest chairs is you can use them inside the van in even the tightest of builds.
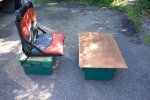
bxs-7.jpg

Rebated edges allow each ply panels to interlock, and the last panel is hinged across its width so that it can be in place (effectively filling the entire rear area with a platform, but the hinged bit allows you to lift the end section and climb in, take your boots off in the gap at the end, drop the end hinged section and the boots are underneath out of the way. Of course this whole thing requires careful planning and measuring but if you get it right you have a system that easily lifts out when not required but when fitted is flexible, functional and with a very modest weight penalty. A couple of big lash-down straps over the whole thing keep it down when driving.

I no longer use this system, but it served me well for a decade. I've retained the dimensions of most of it - my fridge is fitted to suit the box heights as you can see here meaning that I can slide the fridge out and it easily clears the storage boxes.
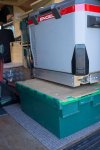
bxs-8.jpg

Two of these big boxes easily fit side by side across the width, and are tied down with cargo hooks and straps. They can be pulled out and just fit underneath the rear of the van out of the way when parked up, and will serve as a step into the van when I get the awning fabric all sorted and the rear end is enclosed. I try to make everything do at least two things, three if possible.

The other advantage to this build was that because the plastic boxes' height dictated a side that was a few inches higher than the actual wheel arch, it simply required a long hinged lid fitting on each side to turn that recess into a long storage area. I still have it underneath the new build - here's the plastic boxes in situ:
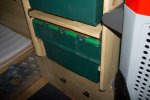
boxs-1.jpg

And when it's slid out the gap underneath is perfect to fit electrical spares, tools, small nicknacks and whatever else you need available but out of the way. The storage box slides neatly over the top of this lot and keeps it in and prevents it wandering. Basically my boxes serve three functions: storage box, internal or external seat base, and lid for the stuff stored below.
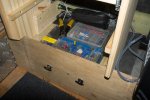
boxs-2.jpg

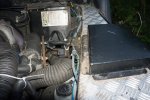
The Eberspacher is fitted on the right side of the engine bay (looking to rear). It's the black lump to the right of the turbo with the pipes coming out towards the camera. Its mounted on the steel plate you can just see protruding up to its right.
boxs-3.jpg

I originally installed it when I had the old 19J TD engine and was well away from the engine, However the 200Tdi I now have is a lot closer to the Eberspacher. I really need to pull it out and bend the steel support a few inches away from the turbo. Anyway it gives you some idea of the size relative to the engine. Its got a 4Kw output which is a lot in a small space. Mine used to shovel out heat in epic quantities but since I had the galvy chassis fitted its gotten a bit lame - I'm pretty sure the cables are badly adjusted on the heater (I know the matrix is ok because I renewed it several years ago) and the heater output is not as good as it was when running off the engine (it used to burn my feet!) so I'm going to renew both cables and adjust to original spec asap.
 

Arjan

Fossil Overlander
Good idea that awing !

We have one on the roofrack on the side of the Brownchurch. Works well and in the desert I love sleeping under it on a stretcher. Really like the "yacht look" you seem to have created with the roof project.
It shows you've put a lot of thought into it - not to forget the hard work.

Very inspiring !
 

Forum statistics

Threads
188,341
Messages
2,905,781
Members
229,959
Latest member
bdpkauai
Top