Making a ifting roof on a 110

wuntenn

Adventurer
Fantastic job man!

Now go use it.

Thanks!

Have just connected up the water-in and waste-out piping, need a stopper/tap on the waste tank so I can steer the slop into a drain, but if I can sort that tomorrow I'll be able to fill it up and check for leaks.

Most of the internal lighting is done, still got one light to fit at the rear that I want to have switched from the back door, and I still have to refit my front roof spots but I'll need to fab up a light-bar for them but that'll have to wait until I do the side awning as I intend to combine the awning supports with the bracket for the end of the light bar.

My idea is to fit the lights across the 'slabby' front of the new roof. Although its ended up not a great deal higher than the original roof the fact that I've lost the slope above the passenger seats makes the front look a bit 'top hatty'. I reckon the light bar and spots on it will break up that slabby bit quite nicely.

But yes - use it! My wee lad (6 years) is now on school summer holidays and is dead keen to get out in it. And my partner (who was previously, and most inconveniently, temporarily 'dead') is really looking forwards to getting out and about in it, and has taken some leave through the summer to give us several long weekends so we can go off and do some shakedown trips and just get a feel for it. We've got several islands we can visit and a couple of off-the-beaten-track spots I know we can bounce into for a few nights.

I'm sure there will be some adjustments and a few bits to tighten/loosen but as it is at present it's dry, warm and offers a nicely flexible living space. The rear and side awnings will increase the usability immensely - particularly the rear awning as it will enable comfortable in/outs when it's tipping it down and we need to get wellies and jackets off and on. The rear awning is a priority to be honest as it makes the rear end a very flexible space (I've fitted the gas cooker with quick-release connectors so it can be used either inside or outside).
 

Arjan

Fossil Overlander
Awesome - just awesome.

Can't wait for pics of you guys in nice places with the roof up !!
 

wuntenn

Adventurer
Cheers Arjan - hopefully by the end of the month it will have been off to the west coast for a shakedown trip!

Well I have have partially removed and refitted (permanently) the fabric sides . There was a slight 'error' with the rear angle - I say 'error' because it's not a huge practical problem more an aesthetic one: the top and bottom of the fabric is the same width - which is not ideal.

The top should be slightly narrower to enable the fixing point on the roof to be out of alignment with the bottom - in fact at least 1" if not 2" inwards, which, when the roof is dropped, allows the fabric to more easily 'fall' inside clearing the closing joint.
If you recall this pic:

attachment.php


....you can see the lower roof edge and upper section with the gap between to allow the fabric to come inside. Basically if the fabric fastening at top and bottom is inline vertically it less easily falls inwards. I've designed it with tie loops sewn in in several spots along the side and rear onto which elastic cords are attached which tension it and 'pull' inwards as it closes but it was still proving to be rather near to the closing joint. Anyway moving the fabric inwards at the rear 2" from where it sat naturally and looked perfect has resolved the issue but created a small 'billow' of surplus fabric at the top corners which I've had to fold inside and screw down.

It's not hugely noticeable, unless you've had your head filled with this nonsense for the last year and your face stuffed up against the fabric for a fortnight!

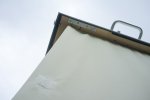
Anyway here are some close-ups to show the detail of the fabric attachment and where it fits (I'll do some internal ones another time).

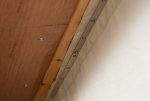
This is looking up to the rear left hand side. (and you can see the stitching for the internal cord loops in this pic on the left - slathered with seam sealer. These are what the internal elastic cords are fastened to when the roof is dropped).
fabsides-1.jpg

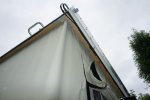
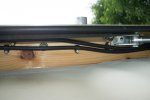
And this is the opposite (driver's side) it shows the slight 'billow' of fabric more clearly. You can also see the solar wires snaking down the outside of the fabric, fastened to the wooden subframe, well out of the way. And snaking around the gas struts:
fabsides-5.jpg

fabsides-3.jpg

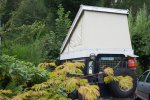
However it's not so noticeable that you'd focus on it:
fabsides-6.jpg

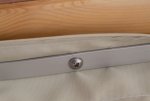
Seam-sealed the stitching yesterday, and ran a thin smear of clear silicone mastic along the bottom edge where the alloy flatbar fastens the fabric, and another bead along the roof joint between fabric and wood.
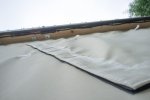
fabsides-2.jpg

And the opening vents on the side with very very fine bug net behind - the bug net is on velcro on the inside in the same configuration as the outside so I can open & close the flaps from the interior.

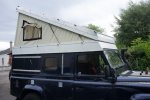
fabsides-4.jpg

fabsides-7.jpg

I'm now onto making a folding internal bench, and cushions. Some curtains are required too, so that's another bit of sewing.
 

Arjan

Fossil Overlander
Awesome job - very well done.

So, next year you come with us to the Alps ?


Roof tent for now - but the 110 HT is very much planned to get a pop up roof..
 
Last edited:

wuntenn

Adventurer
Hi Arjan - that might be nice! I'll give it some consideration!

I left the roof up last night - it rained most of the afternoon and was forecast to continue all night. I checked it at midnight and the rain was thrumming down and inside was dry and no sign of any leaks at all, so I'm mighty relieved about that.

Trip to the city this week to get alloy for the rear awning and side panels so that'll be another chunk of work looming!
 

wuntenn

Adventurer
Awesome job - very well done.

So, next year you come with us to the Alps ?


Roof tent for now - but the 110 HT is very much planned to get a pop up roof..


Are you actually working on/building the roof just now? Or going to start it? You mentioned you might be in Scotland this year - is this still a possibility?
 

Arjan

Fossil Overlander
Bon Soir,

Was in Scotland for a UK Raid - but with a V70.... - but did collect an 8x8 though :smiley_drive:

Phase 1 of the 110 HT project has been completed : French Plates

Phase 2 is on hold as the 30 km rear crank oil seal gave up and the engineoil is pi..ing out. So can't use the 110 at the moment and have gone back to the Ninety for this years seison.

I have a spare roof, a lot of fabric and aluminium box sections waiting for me to get started but that will have to wait until October as we're out Laning most of the time..

I've been invited to work some Gundogs late this year up North and am planning to take the 110 with me then - without the roof conversion but I'd love to come by and see yours if we can work time wise etc. something out.
 

wuntenn

Adventurer
Bon Soir,

Was in Scotland for a UK Raid - but with a V70.... - but did collect an 8x8 though :smiley_drive:

Phase 1 of the 110 HT project has been completed : French Plates

Phase 2 is on hold as the 30 km rear crank oil seal gave up and the engineoil is pi..ing out. So can't use the 110 at the moment and have gone back to the Ninety for this years seison.

I have a spare roof, a lot of fabric and aluminium box sections waiting for me to get started but that will have to wait until October as we're out Laning most of the time..

I've been invited to work some Gundogs late this year up North and am planning to take the 110 with me then - without the roof conversion but I'd love to come by and see yours if we can work time wise etc. something out.


Sounds like its a definite goer with the roof then! Aye - let me know when you might be about and by all means if we're here come by for a poke around at the 110.
 

wuntenn

Adventurer
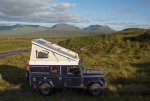
Well we had a wee run and sleep over in the LR over the last few days - a quick trip to the city for more materials and some other stuff. It was a late departure and my wee lad was getting hungry and tired so we'd to pull in on the roadside in the mountains and get as far from the road as we could (not far as it was a swamp - and we were perched on a small pile of old tar dumped there by the road menders which stopped us sinking in the glaur). It was only a few metres from the road but as this is the West Highlands it was fairly quiet and the views were no too bad ye ken!

gcoe-4.jpg

gcoe-3.jpg

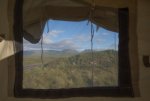
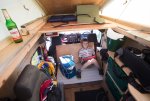
It was very warm and the bugs were quite bad (midges - no-see-ums, in clouds). So I popped the roof, opened the side flaps and hatch and let the breeze in but kept the bugs out. Worked just fine. The layout proved very flexible. My wee lad sat on a storage box I've built behind the bulkhead. It has two lids, one is very solid, but above it is a lighter ply one and designed to lift up and fold back against the seatbacks of the two front seats, becoming a handy backrest for the storage box which then becomes a small seating unit. I've still got to make a cushion to fit it, so just used some white foam on it temporarily. Worked fine - William was able to sit happily watching a wildlife video on the iPad while I made the dinner, and he was well out of my way.

gcoe-1.jpg

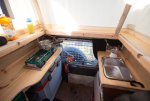
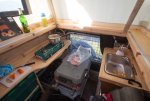
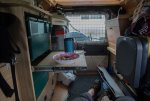
Whilst he was doing that I cooked, The door end proved very flexible with the large work surface to put the cooker on, and be able to chop veggies beside it. On the other side I could access the sink easily, and when I needed fridge access it slid out easily and provided another work surface when necessary.

gcoe-2.jpg

gcoe-1-2.jpg

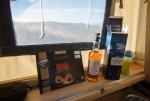
The 'shelf' around the edge higher up from the work surface is brilliant - its usefulness has surprised me (it's actually the remains of the old roof with a pine board screwed to it) it allows glasses and other stuff like binoculars and cameras etc to be placed out of harm's way and not interfere with the food prep surfaces and cooking etc. The two rough bits of wood you can see at the end are my temporary roof 'safety' struts (in case the gas struts fail one night) - going to replace them with alloy poles asap.

As you can see I decided to christen the van with a small dram of the island nectar and we supported our local salmon smoker too!

gcoe-1-3.jpg

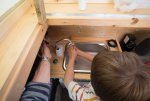
Having the small sink makes it really easy for William (and me) to hand wash with no dramas or risk of spilling water everywhere. Might seem like a minor thing but I've lost count of the number of times I've spilled water whilst trying to tip it out of a container, and which has run everywhere inside ending up with sodden socks and a grotty floor.

gcoe-6.jpg

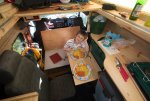
When dinner was ready I pulled out the sliding table on it heavy duty slides, then placed the larger table top on it (which normally acts as a cupboard front) and that was us ready to eat. The seat on the left is an Exmoor Trim lock and fold which faces forwards when driving or turns inwards for normal seating or sitting eating. When not in use it sits back well out of the way. It complies with all EU legislation regarding safety and child use so has been an excellent buy.

gcoe-7.jpg

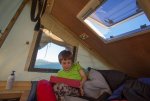
Then I put the wee lad to bed 'upstairs', let him have a quick iPad game, then read him a bedtime story (about dragons) and he was out like a light. I went down below and had some more food and a cup of tea with plenty of room to move about. The temperature difference between up and down was dramatic - very cool and airy above, a lot warmer down below. (thats W's new fishing rod lying on the floor in cardboard by my feet).

gcoe-8.jpg

gcoe-9.jpg


Next morning was cool so I ran the Eberspacher and it warmed up quite nicely but heat loss upstairs will be considerable in really cold weather.

There's a few things to adjust and tweak - I think the sleeping platform is a tad too long - I reckon I could lose a few inches off it, which would make getting up and down easier, and enlarging that rear access gap, and I need more steps for the wee lad as he had to struggle a bit to get up. All things considered it's provided a warm, dry, bug free airy space that's flexible and comfortable, enabling cooking, washing etc without a lot of fuss.

My careful measuring and experimenting has meant that the storage boxes slide out without affecting the sliding table that sits in between (on its HD extending runners - that's it in the frame left above with the tea on it after the bigger top has been put away again), the fridge slides out easily and goes back in without hitting the folding seat, and when the fridge is out it passes over the the top of any of the storage boxes that might be out, on the floor, the folding seat swivels and just misses the sink and clears the edge of the extending table etc. I'm really glad I spent the time measuring and doing 'dry runs' before committing to building anything permanent. It's a small space but surprisingly flexible.

And to keep the wee chap happy we spent a glorious hour fishing with his new rod on the way home (without any luck!).
 
Last edited:

grimbo

Explorer
That has turned out great. Fantastic planning has certainly paid dividends in the end.

How do you feel the space will work once all three of you are in it? Obviously tight but will the extra person still allow for access to items etc?

Have you tried it with the hard panels in place as well?
 

wuntenn

Adventurer
That has turned out great. Fantastic planning has certainly paid dividends in the end.

How do you feel the space will work once all three of you are in it? Obviously tight but will the extra person still allow for access to items etc?

Have you tried it with the hard panels in place as well?


Thanks.

Well it will be a bit tighter with the three of us but with 'choreography' I reckon it will be fine. Obviously we wont all be able to move around at the same time, but with one of us sitting either in the front or back (or up on the roof area platform, which can be pulled out to varying lengths) and the wee lad sat somewhere, the third person can move about easily. Two can stand comfortably if needed and do stuff too as I've made sure there's sufficient work surface running along one side. We'll soon find out for sure!

I got the material for the hard sides and will work on them sometime soon, but am currently making an awning support at the rear (two swing-out triangles) that will allow a fabric annexe to be slung off the back end, giving some more dry space and somewhere to take off wet gear and boots. That will really make a difference to its usability. Started that today and should have it working in a day or so.
 

Arjan

Fossil Overlander
Yes - this shows exactly why you have a roof like that : brilliant !

You've given the conversion so much thought and the build was as good so thanks a lot. I look forward seeing it in the aluminium !!

Keep them pics coming please - very inspiring !
 

Forum statistics

Threads
188,342
Messages
2,905,812
Members
229,959
Latest member
bdpkauai

Members online

Top