Get your tickets to THE BIG THING 2026!
You are using an out of date browser. It may not display this or other websites correctly.
You should upgrade or use an alternative browser.
You should upgrade or use an alternative browser.
malibubts's 2015 Ram 1500 CCSB Build
- Thread starter malibubts
- Start date
malibubts
Adventurer
After around a year of indecision on the suspension setup, my parts are on order!
I ended up choosing to go with the Carli Commuter 2.0 system after reading up on all of the luck folks have had on their setups. I also decided to add a set of Mevotech UCAs to replace the stock ones since I was working in the same area already.
I still have to make the final decision on the tires, but at this point I'm pretty set on 285/75r17 Falken Wildpeak AT3Ws on the stock wheels.
I'll have more updates as the parts start to arrive and I can get them on.
Last edited:
malibubts
Adventurer
Once all of the parts came in it came to get everything installed. Well I guess I should say almost all of the parts, for some reason the new sway bar links did not arrive at the same time as all of the other packages and weren't on my doorstop until the following Monday.
Parts List:
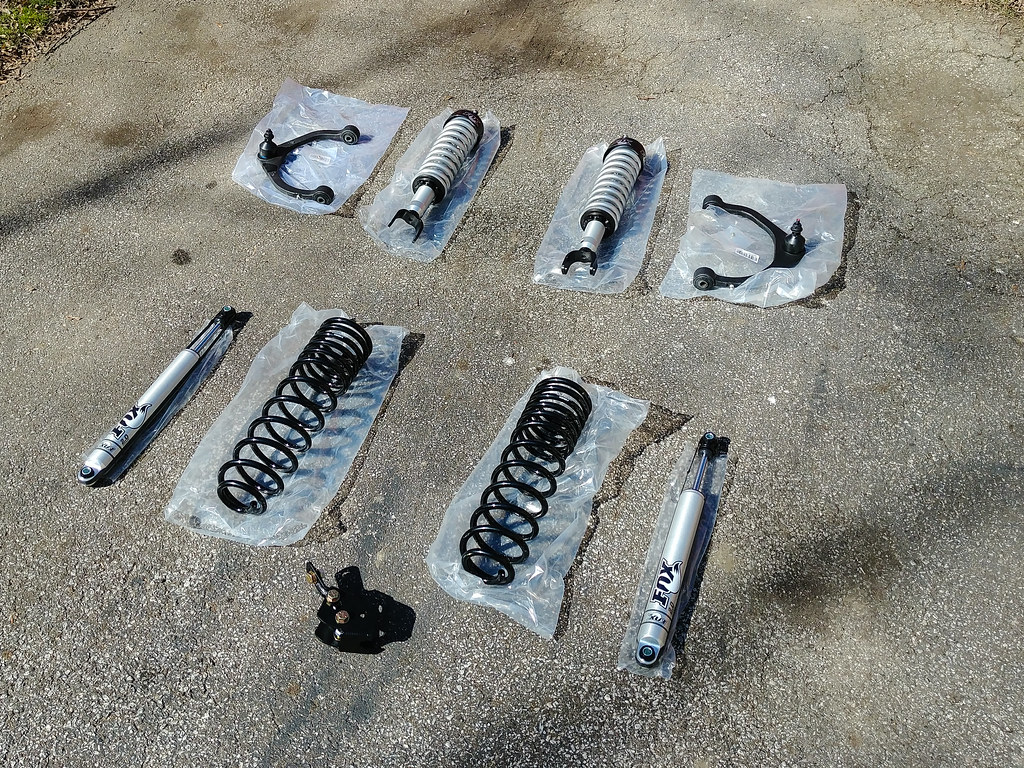
20180324_112424(1) by ebeiersdorfer, on Flickr
I decided to get to work on the front replacements first since they were more critical in getting my new tires installed. Everything started coming apart real issue and I didn't have any issues until it came time to separate the knuckle from the UCA. I spent around an hour with a couple good size hammers, blocks of wood, and dead blow hammers and couldn't get the thing to come apart. I was a bit surprised by this since after watch a few videos on YouTube no one seemed to have this much trouble. So I had to make a mid project run to the auto parts store to grab a forked ball joint separator. Even with the new tool, the drive side took another 20 minutes or so of pounding to finally release. After getting the knuckle to release it was no big deal to pull the stock coil-over out and prepare for the new one.
Stock vs Fox Coil-Over
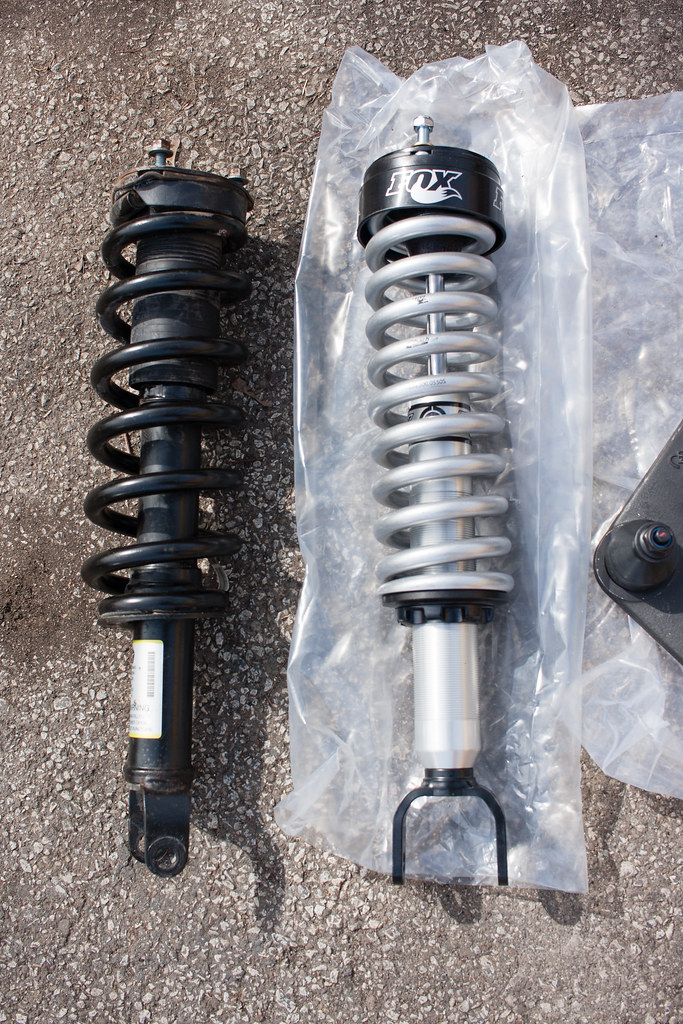
IMG_3166 by ebeiersdorfer, on Flickr
Driver's Side
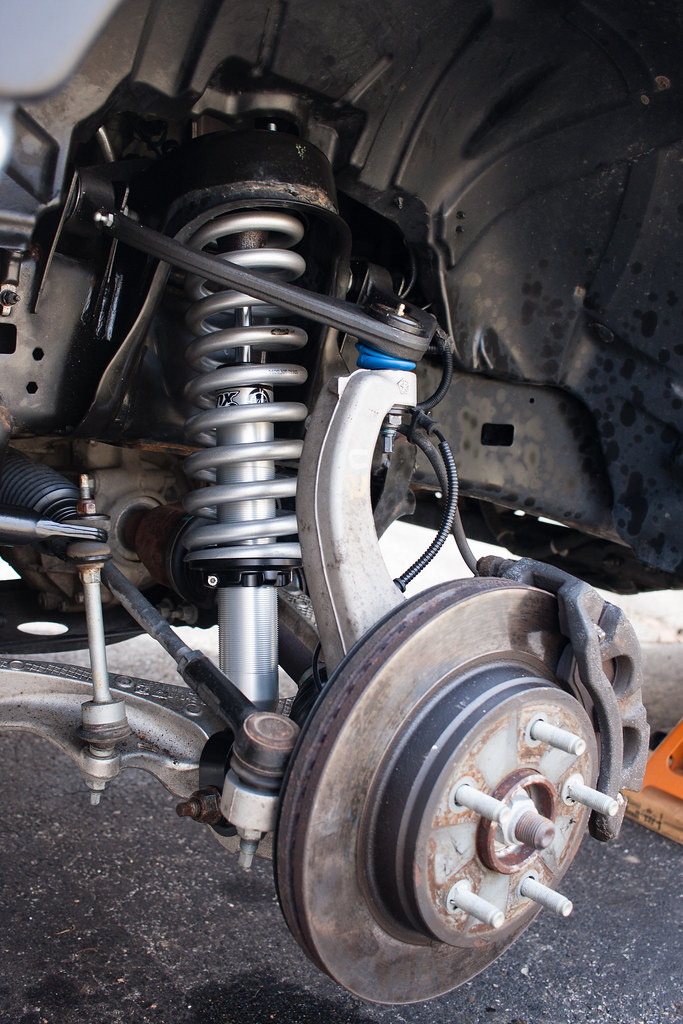
IMG_3184 by ebeiersdorfer, on Flickr
After the new coil-over came the new UCA and it was time to bolt everything back together and torque according to spec. Moving on to the passenger side, the ball joint took maybe 15 minutes to get separated. Amazing how things work when you have all the tools you needed. I flew through the install on this side until it came time to get the UCA bolted back in. There was a bracket that was preventing the forward bolt from being able to attach the UCA up.
Everything was moving a lot slower than I had anticipated and I actually ended up throwing in the towel Saturday night. While researching later that night I found other people had removed the bolts from that bracket and pushed it out of the way to get the bolt in. Following their advice I did the same and was able to finish up the front rather quickly.
I moved onto the rear and everything started coming apart easier than the front. I did hit a snag though on the counter for the upper shock mounts; the mount is very close in proximity to the bed and I couldn't get anything back there to keep from rotating the nut. A couple of forums saved my bacon again, I found that folks had been taking an adjustable wrench and cutting about 2/3 of the handle off and they were able to get it back in there and break everything loose.
After getting the upper shock mounts undone everything else came apart pretty easily.
Stock vs Fox/Carli
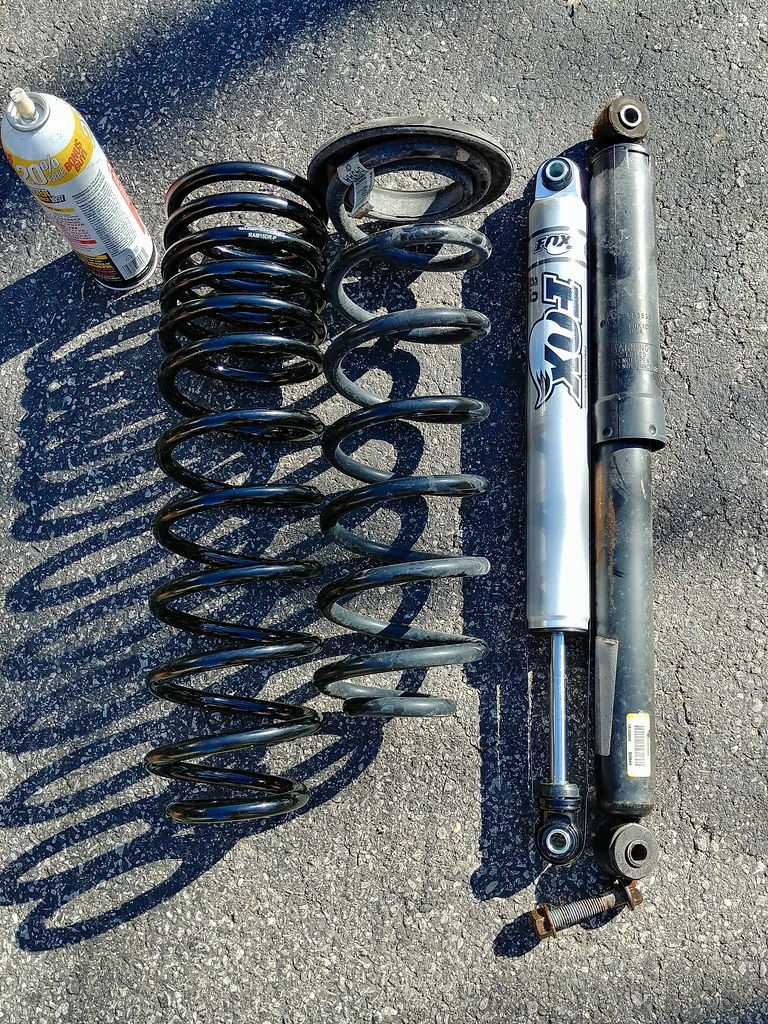
20180325_165725_HDR by ebeiersdorfer, on Flickr
Putting everything back in wasn't too bad either, unfortunately though I did have to reconnect the stock sway bar end links and will have to come back to that later.
Shocks and Coils
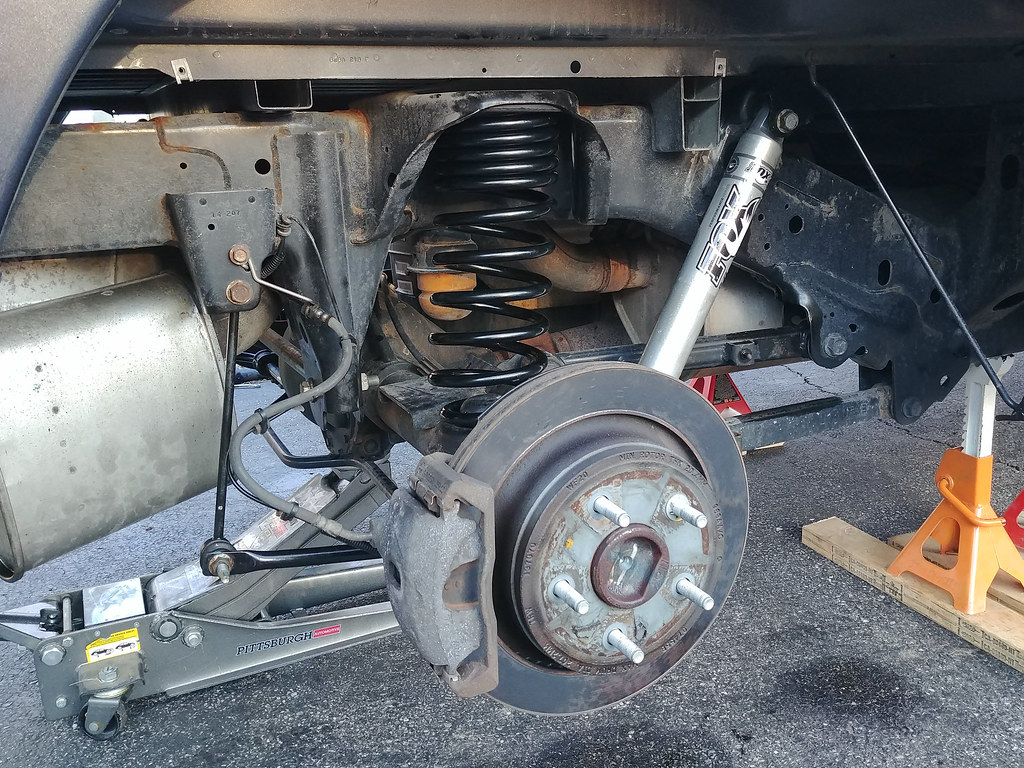
20180325_190704 by ebeiersdorfer, on Flickr
I'm pretty happy with how things turned out from the lift. I ended up pretty close to level, if not maybe 1/4" to 1/2" of rake in the rear. I do wish there was a little more height in the rear, but my extra weight in the shell, Decked, and tools doesn't help in that area. So far I've really only had a chance to drive the truck on pavement, but it is a world of difference in how the truck handles. I used to have pretty bad body roll through turns and would get beat up pretty bad on even the smallest imperfection in the road. The new setup has corrected both of these issues and rides much nicer down the road in general. I can't wait to actually get off road with it and see how it rides.
Side View
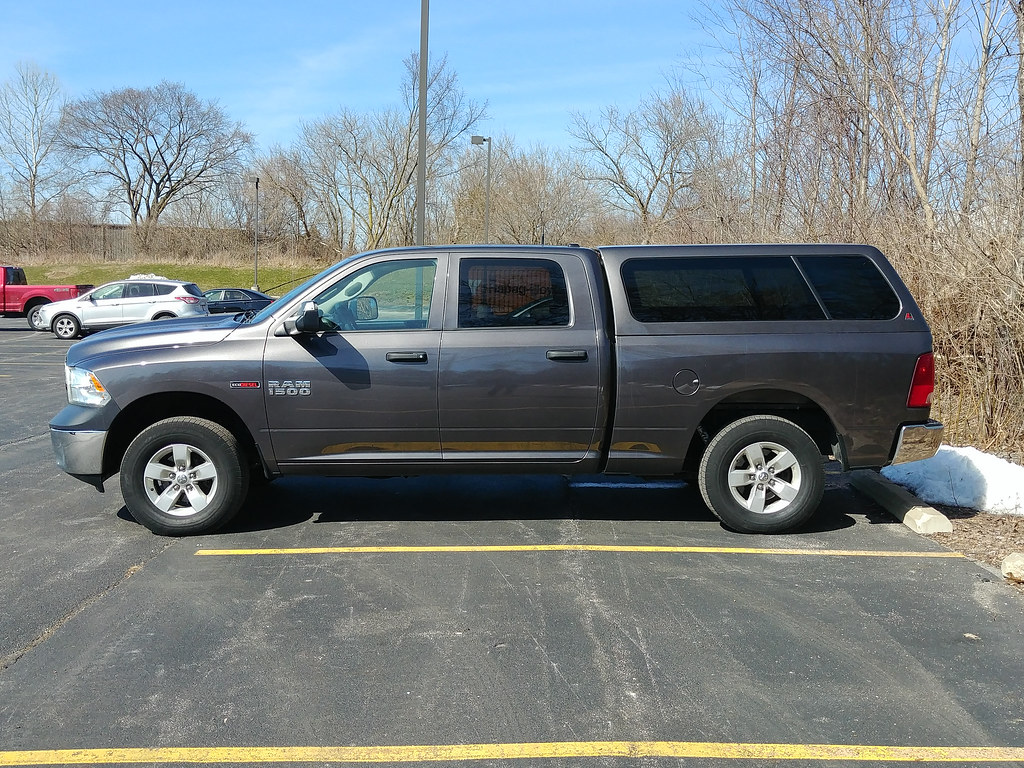
20180326_153113 by ebeiersdorfer, on Flickr
Angled View
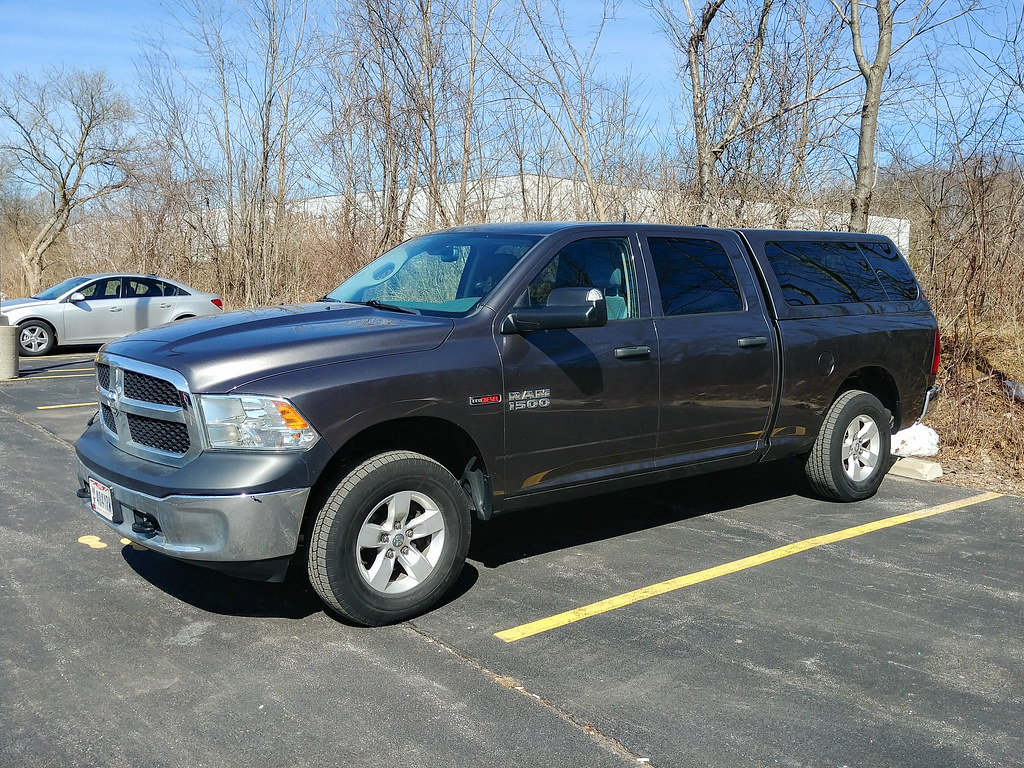
20180326_153132_HDR by ebeiersdorfer, on Flickr
One thing is for sure, the stock 265/75r17 (31.6") tires looked way too small for the wheel wells now. Later the week I had ordered the lift I ordered a set of Falken WildPeak AT3Ws in 285/75r17 (33.8") and would get them installed the next week after an alignment.
Parts List:
- Fox 2.0 Coil-Over IFP Shocks (2" Lift)
- Mevotech Upper Control Arms
- Fox 2.0 IFP Shocks
- Carli Variable Rate Rear Springs (1/2-1" Lift)
- Track Bar Relocation Bracket
- Sway Bar End Links

20180324_112424(1) by ebeiersdorfer, on Flickr
I decided to get to work on the front replacements first since they were more critical in getting my new tires installed. Everything started coming apart real issue and I didn't have any issues until it came time to separate the knuckle from the UCA. I spent around an hour with a couple good size hammers, blocks of wood, and dead blow hammers and couldn't get the thing to come apart. I was a bit surprised by this since after watch a few videos on YouTube no one seemed to have this much trouble. So I had to make a mid project run to the auto parts store to grab a forked ball joint separator. Even with the new tool, the drive side took another 20 minutes or so of pounding to finally release. After getting the knuckle to release it was no big deal to pull the stock coil-over out and prepare for the new one.
Stock vs Fox Coil-Over

IMG_3166 by ebeiersdorfer, on Flickr
Driver's Side

IMG_3184 by ebeiersdorfer, on Flickr
After the new coil-over came the new UCA and it was time to bolt everything back together and torque according to spec. Moving on to the passenger side, the ball joint took maybe 15 minutes to get separated. Amazing how things work when you have all the tools you needed. I flew through the install on this side until it came time to get the UCA bolted back in. There was a bracket that was preventing the forward bolt from being able to attach the UCA up.
Everything was moving a lot slower than I had anticipated and I actually ended up throwing in the towel Saturday night. While researching later that night I found other people had removed the bolts from that bracket and pushed it out of the way to get the bolt in. Following their advice I did the same and was able to finish up the front rather quickly.
I moved onto the rear and everything started coming apart easier than the front. I did hit a snag though on the counter for the upper shock mounts; the mount is very close in proximity to the bed and I couldn't get anything back there to keep from rotating the nut. A couple of forums saved my bacon again, I found that folks had been taking an adjustable wrench and cutting about 2/3 of the handle off and they were able to get it back in there and break everything loose.
After getting the upper shock mounts undone everything else came apart pretty easily.
Stock vs Fox/Carli

20180325_165725_HDR by ebeiersdorfer, on Flickr
Putting everything back in wasn't too bad either, unfortunately though I did have to reconnect the stock sway bar end links and will have to come back to that later.
Shocks and Coils

20180325_190704 by ebeiersdorfer, on Flickr
I'm pretty happy with how things turned out from the lift. I ended up pretty close to level, if not maybe 1/4" to 1/2" of rake in the rear. I do wish there was a little more height in the rear, but my extra weight in the shell, Decked, and tools doesn't help in that area. So far I've really only had a chance to drive the truck on pavement, but it is a world of difference in how the truck handles. I used to have pretty bad body roll through turns and would get beat up pretty bad on even the smallest imperfection in the road. The new setup has corrected both of these issues and rides much nicer down the road in general. I can't wait to actually get off road with it and see how it rides.
Side View

20180326_153113 by ebeiersdorfer, on Flickr
Angled View

20180326_153132_HDR by ebeiersdorfer, on Flickr
One thing is for sure, the stock 265/75r17 (31.6") tires looked way too small for the wheel wells now. Later the week I had ordered the lift I ordered a set of Falken WildPeak AT3Ws in 285/75r17 (33.8") and would get them installed the next week after an alignment.
Explorerinil
Observer
Cool project, good work, let us know how you like the falken tires.Once all of the parts came in it came to get everything installed. Well I guess I should say almost all of the parts, for some reason the new sway bar links did not arrive at the same time as all of the other packages and weren't on my doorstop until the following Monday.
Parts List:
- Fox 2.0 Coil-Over IFP Shocks (2" Lift)
- Mevotech Upper Control Arms
- Fox 2.0 IFP Shocks
- Carli Variable Rate Rear Springs (1/2-1" Lift)
- Track Bar Relocation Bracket
- Sway Bar End Links
20180324_112424(1) by ebeiersdorfer, on Flickr
I decided to get to work on the front replacements first since they were more critical in getting my new tires installed. Everything started coming apart real issue and I didn't have any issues until it came time to separate the knuckle from the UCA. I spent around an hour with a couple good size hammers, blocks of wood, and dead blow hammers and couldn't get the thing to come apart. I was a bit surprised by this since after watch a few videos on YouTube no one seemed to have this much trouble. So I had to make a mid project run to the auto parts store to grab a forked ball joint separator. Even with the new tool, the drive side took another 20 minutes or so of pounding to finally release. After getting the knuckle to release it was no big deal to pull the stock coil-over out and prepare for the new one.
Stock vs Fox Coil-Over
IMG_3166 by ebeiersdorfer, on Flickr
Driver's Side
IMG_3184 by ebeiersdorfer, on Flickr
After the new coil-over came the new UCA and it was time to bolt everything back together and torque according to spec. Moving on to the passenger side, the ball joint took maybe 15 minutes to get separated. Amazing how things work when you have all the tools you needed. I flew through the install on this side until it came time to get the UCA bolted back in. There was a bracket that was preventing the forward bolt from being able to attach the UCA up.
Everything was moving a lot slower than I had anticipated and I actually ended up throwing in the towel Saturday night. While researching later that night I found other people had removed the bolts from that bracket and pushed it out of the way to get the bolt in. Following their advice I did the same and was able to finish up the front rather quickly.
I moved onto the rear and everything started coming apart easier than the front. I did hit a snag though on the counter for the upper shock mounts; the mount is very close in proximity to the bed and I couldn't get anything back there to keep from rotating the nut. A couple of forums saved my bacon again, I found that folks had been taking an adjustable wrench and cutting about 2/3 of the handle off and they were able to get it back in there and break everything loose.
After getting the upper shock mounts undone everything else came apart pretty easily.
Stock vs Fox/Carli
20180325_165725_HDR by ebeiersdorfer, on Flickr
Putting everything back in wasn't too bad either, unfortunately though I did have to reconnect the stock sway bar end links and will have to come back to that later.
Shocks and Coils
20180325_190704 by ebeiersdorfer, on Flickr
I'm pretty happy with how things turned out from the lift. I ended up pretty close to level, if not maybe 1/4" to 1/2" of rake in the rear. I do wish there was a little more height in the rear, but my extra weight in the shell, Decked, and tools doesn't help in that area. So far I've really only had a chance to drive the truck on pavement, but it is a world of difference in how the truck handles. I used to have pretty bad body roll through turns and would get beat up pretty bad on even the smallest imperfection in the road. The new setup has corrected both of these issues and rides much nicer down the road in general. I can't wait to actually get off road with it and see how it rides.
Side View
20180326_153113 by ebeiersdorfer, on Flickr
Angled View
20180326_153132_HDR by ebeiersdorfer, on Flickr
One thing is for sure, the stock 265/75r17 (31.6") tires looked way too small for the wheel wells now. Later the week I had ordered the lift I ordered a set of Falken WildPeak AT3Ws in 285/75r17 (33.8") and would get them installed the next week after an alignment.
malibubts
Adventurer
Been a crazy couple of months so the updates on the tires are a bit late. I actually got a the tires and a new alignment within a week or so of getting the lift kit on. This whole project came on a bit earlier than I expected since my stock SRAs were starting to vibrate a ton on the highway. I knew the tires were coming up on the end of their life, but the vibrations speed up the process by a couple of months.
I was pretty torn on tires, but eventually ended up with the Falken Wildpeak AT3W as I mentioned before. I heavily considered the BFG KO2s and was almost decided on them when I posted here and a couple of replies gave me second thoughts. It was also easier to get the Falkens since my local Sam's Club carried them and they have a pretty good 'all in' package and warranty.
Stacked up inside the tire center.
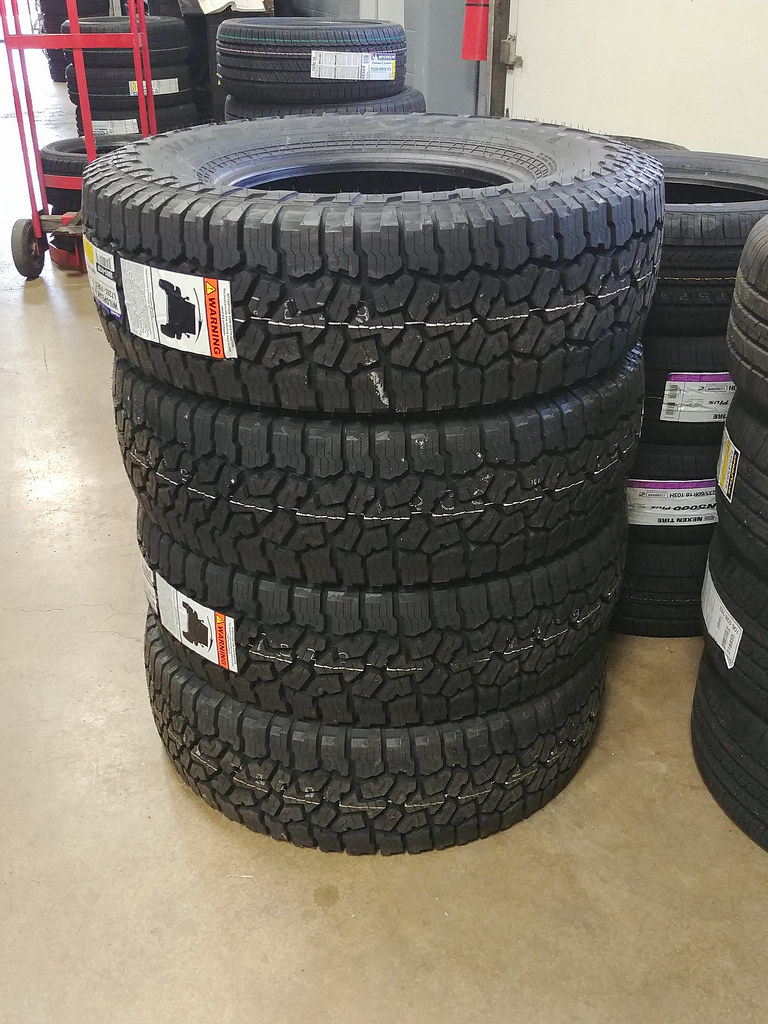
20180326_171024(1) by ebeiersdorfer, on Flickr
Sam's club was slammed when I went for the install and I ended up there for a good two and a half hours. 3/4 of the vehicles in there were all getting large LT tires mounted/balanced which didn't make things easy for the crew. Overall though aside from the wait they did a great job on the install and I couldn't find anything I was unhappy with. I actually got to talking with the tech who did the install about the EcoDiesel and was telling him about the good fuel economy; pretty quickly he half jokingly came back and said he wouldn't count on that anymore with these huge tires.
Front End Friday
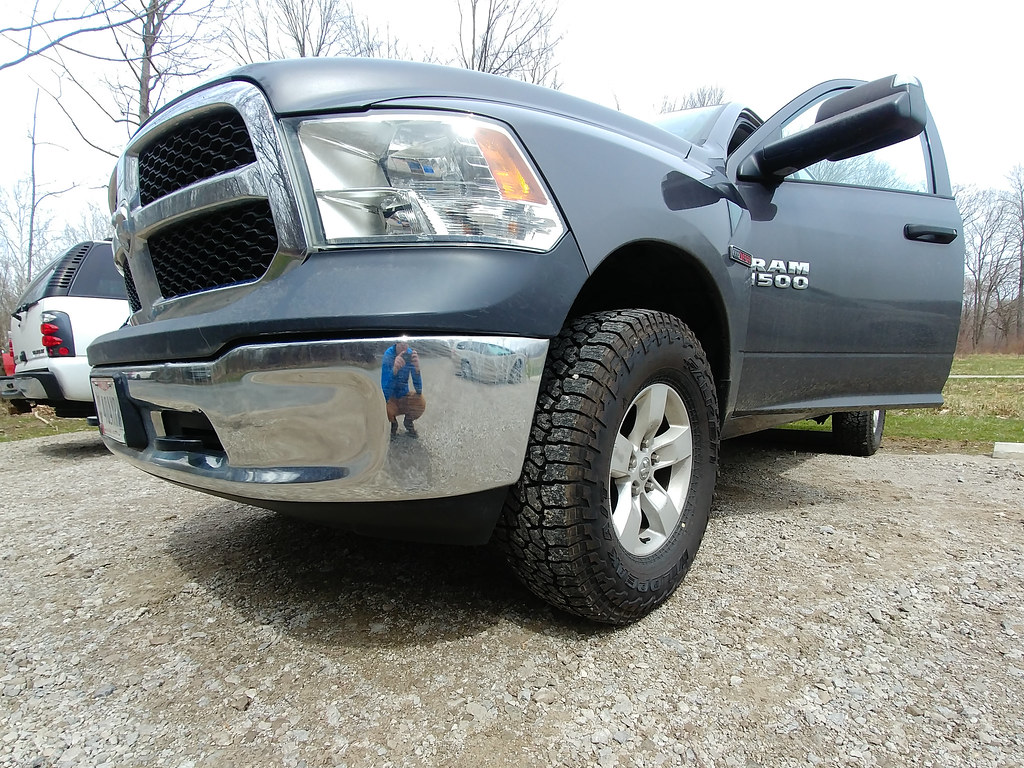
2018-04-21 14.39.56 by ebeiersdorfer, on Flickr
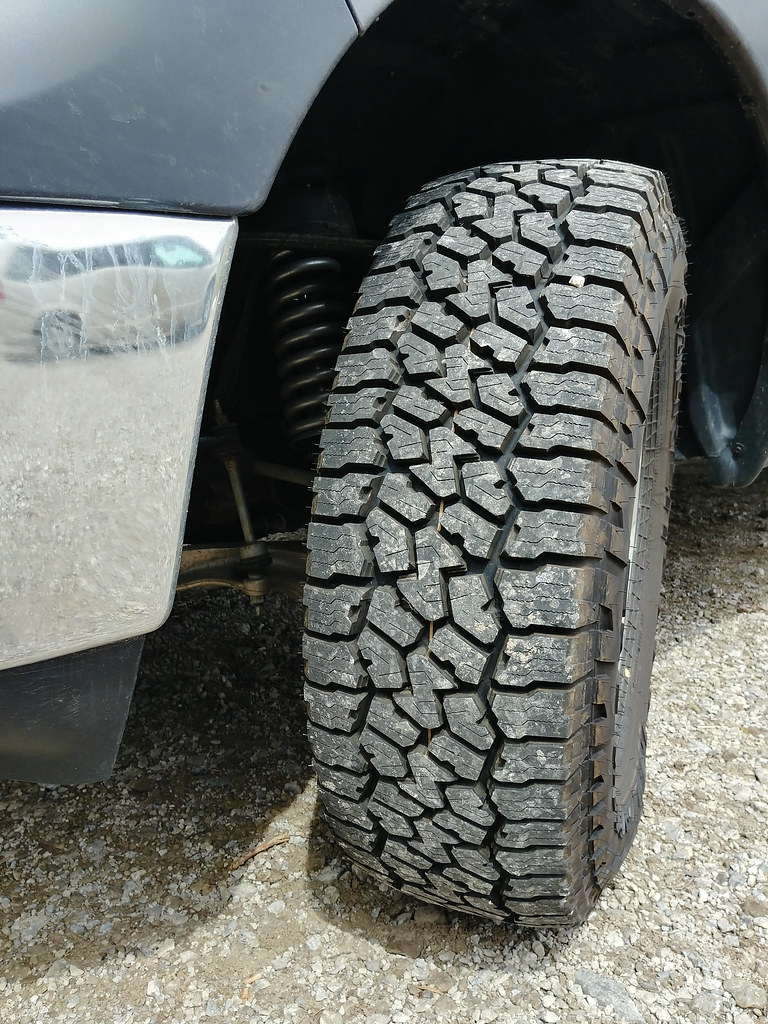
2018-04-21 14.41.27 by ebeiersdorfer, on Flickr
As I mentioned I've had the tires for a while now and I'm very happy with them. I have around 3,500 miles and am coming up on the first rotation here soon. Coming out of Sam's the pressure on them were set at the door sticker 42 PSI, which was way too low for these tires. I bumped the pressure up to 50 PSI and chalked tested, they patterned pretty well and ride much better now. Between the new tires and the suspension the battered roads around here are much easier to drive on. Unfortunately between my schedule and the rough spring my area has had I haven't had much of a chance to get them off pavement yet though. I'm hoping to get out here in the next couple of weeks to test them out though.
Stock
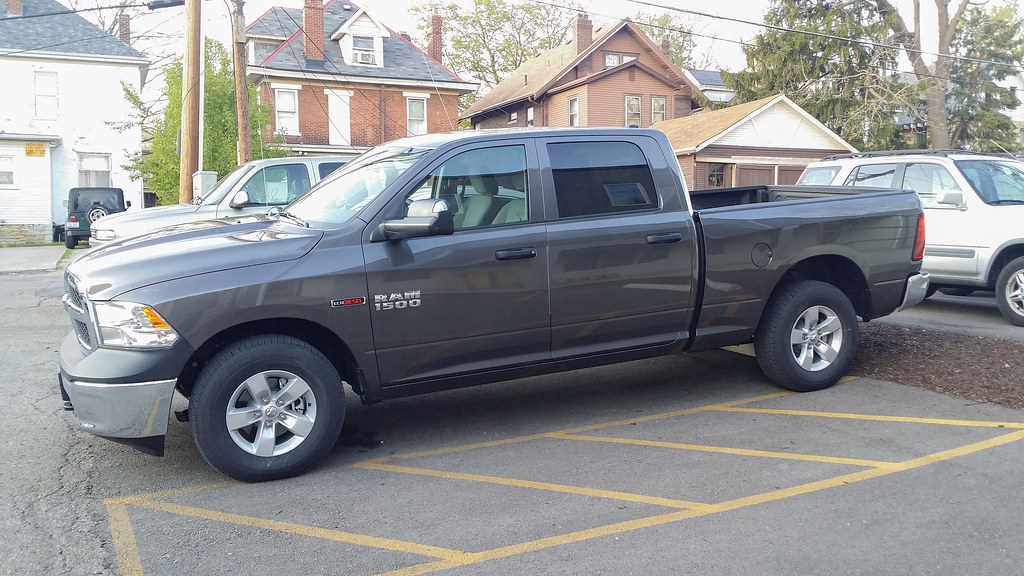
2015-04-30 19.44.07 by ebeiersdorfer, on Flickr
Carli Lift

20180326_153113 by ebeiersdorfer, on Flickr
Carli Lift and Falkens
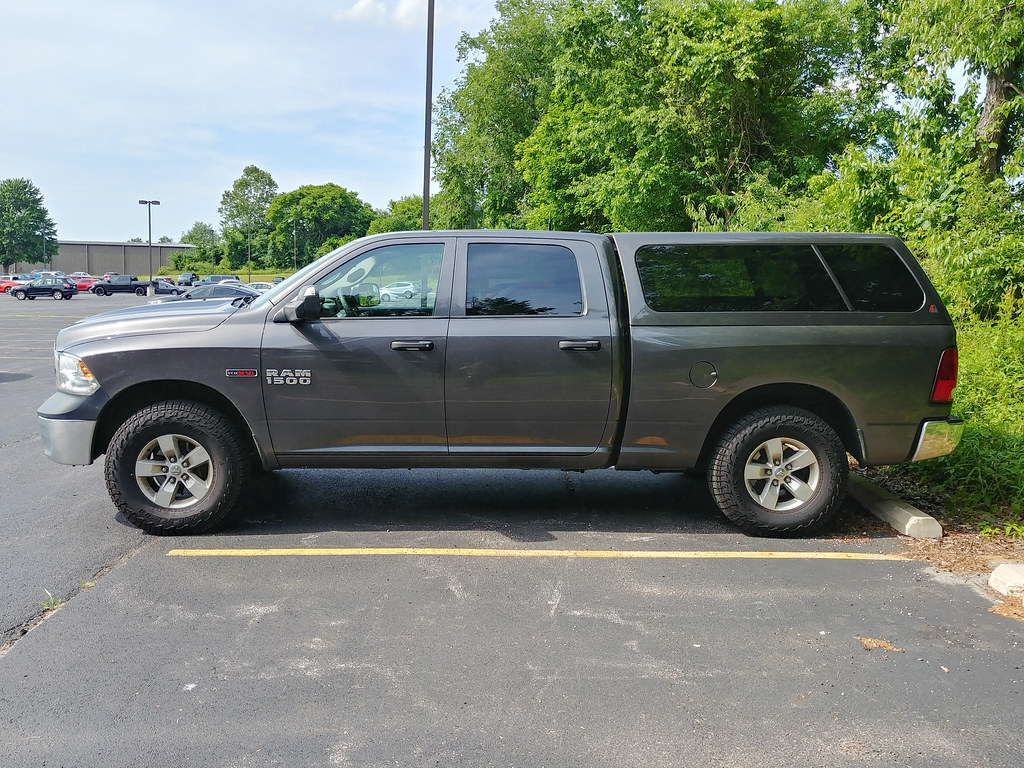
20180608_163802_HDR by ebeiersdorfer, on Flickr
I was pretty torn on tires, but eventually ended up with the Falken Wildpeak AT3W as I mentioned before. I heavily considered the BFG KO2s and was almost decided on them when I posted here and a couple of replies gave me second thoughts. It was also easier to get the Falkens since my local Sam's Club carried them and they have a pretty good 'all in' package and warranty.
Stacked up inside the tire center.

20180326_171024(1) by ebeiersdorfer, on Flickr
Sam's club was slammed when I went for the install and I ended up there for a good two and a half hours. 3/4 of the vehicles in there were all getting large LT tires mounted/balanced which didn't make things easy for the crew. Overall though aside from the wait they did a great job on the install and I couldn't find anything I was unhappy with. I actually got to talking with the tech who did the install about the EcoDiesel and was telling him about the good fuel economy; pretty quickly he half jokingly came back and said he wouldn't count on that anymore with these huge tires.
Front End Friday

2018-04-21 14.39.56 by ebeiersdorfer, on Flickr

2018-04-21 14.41.27 by ebeiersdorfer, on Flickr
As I mentioned I've had the tires for a while now and I'm very happy with them. I have around 3,500 miles and am coming up on the first rotation here soon. Coming out of Sam's the pressure on them were set at the door sticker 42 PSI, which was way too low for these tires. I bumped the pressure up to 50 PSI and chalked tested, they patterned pretty well and ride much better now. Between the new tires and the suspension the battered roads around here are much easier to drive on. Unfortunately between my schedule and the rough spring my area has had I haven't had much of a chance to get them off pavement yet though. I'm hoping to get out here in the next couple of weeks to test them out though.
Stock

2015-04-30 19.44.07 by ebeiersdorfer, on Flickr
Carli Lift

20180326_153113 by ebeiersdorfer, on Flickr
Carli Lift and Falkens

20180608_163802_HDR by ebeiersdorfer, on Flickr
malibubts
Adventurer
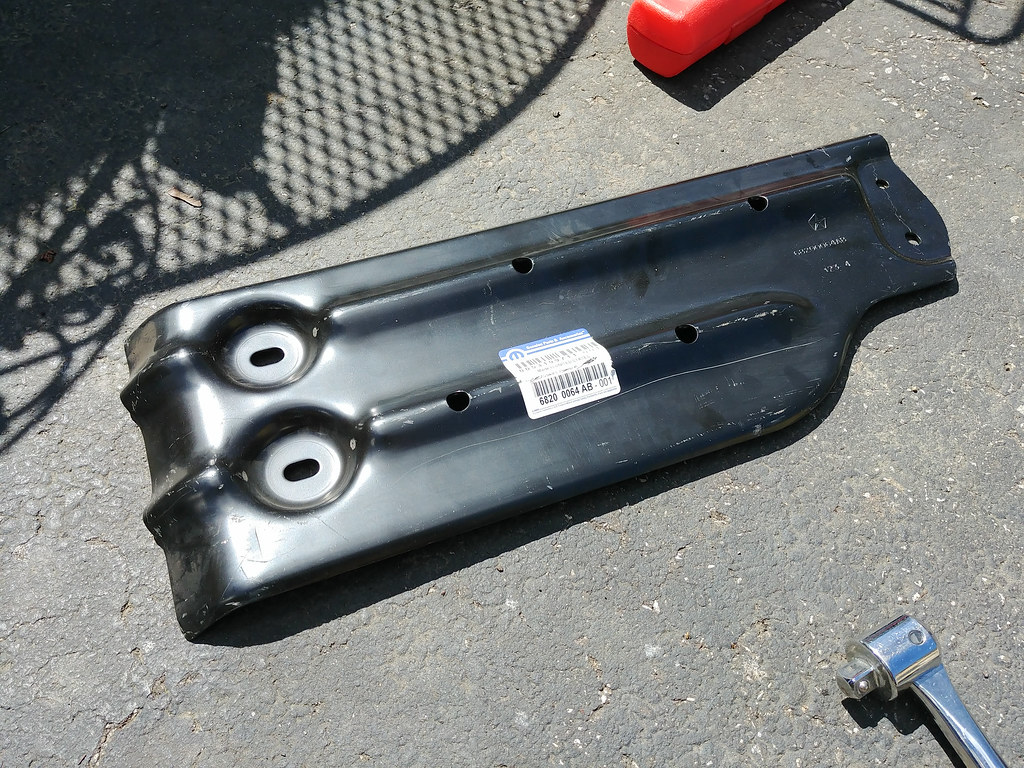
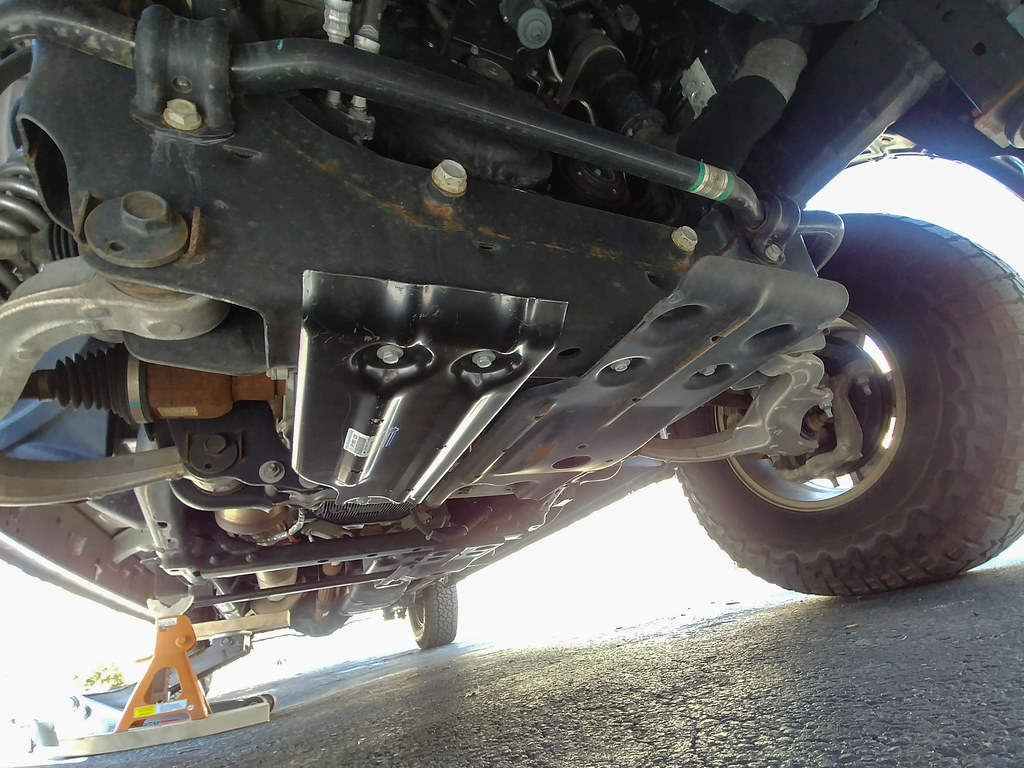
At about 500 miles I had to break a good portion of everything down again to retighten all the fasteners to proper torque specs. I took the opportunity to also add the fourth skid plate I bought a while back. I still think it's weird that it's not included in the 'Skid Plate Package' that came with the truck, but who knows what FCA was thinking.
New Plate
2018-04-08 14.15.43 by ebeiersdorfer, on Flickr
The underside with the new plate all mounted up, pretty easy to tell which one is new.
2018-04-08 14.35.53 by ebeiersdorfer, on Flickr
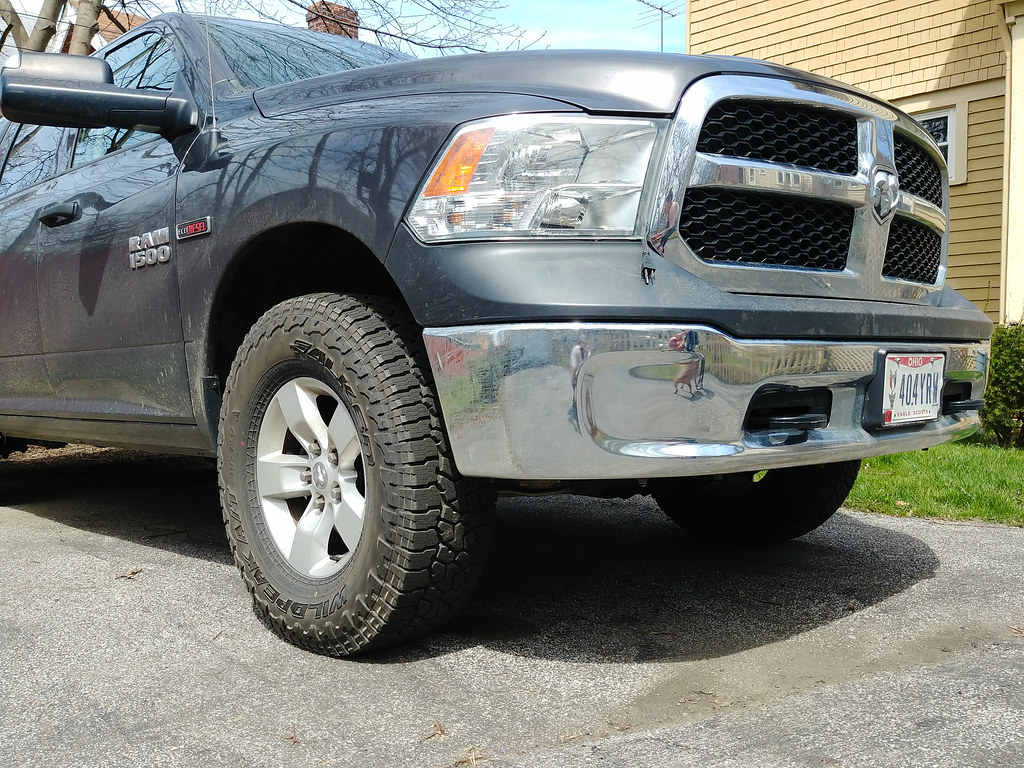
While I was crawling around under the front end I took the opportunity to pull off the front air dam as well. While I'm sure it was doing some good with the stock tires and suspension height, I doubt it does much any more with the front end 2" taller and the new tire. It was pretty easy to pull off with just a couple of screws and a good number of those body panel clips. It makes things look a little cleaner in my opinion and keeps the front end from hanging as low.
2018-04-22 11.57.31 by ebeiersdorfer, on Flickr
New Plate

2018-04-08 14.15.43 by ebeiersdorfer, on Flickr
The underside with the new plate all mounted up, pretty easy to tell which one is new.

2018-04-08 14.35.53 by ebeiersdorfer, on Flickr
While I was crawling around under the front end I took the opportunity to pull off the front air dam as well. While I'm sure it was doing some good with the stock tires and suspension height, I doubt it does much any more with the front end 2" taller and the new tire. It was pretty easy to pull off with just a couple of screws and a good number of those body panel clips. It makes things look a little cleaner in my opinion and keeps the front end from hanging as low.

2018-04-22 11.57.31 by ebeiersdorfer, on Flickr
plumber mike
Adventurer
Looks great. I had considered the Eco 1500 but my camper is awfully close to the max tow rating of it. I ended up with a 2500, but am still enjoying your cab and bed upgrades.
Mostly lurking.....The reason I am posting is to ask if you had considered removing the back seat entirely. It seems like a lot of wasted space if you don't ever use it.
Mostly lurking.....The reason I am posting is to ask if you had considered removing the back seat entirely. It seems like a lot of wasted space if you don't ever use it.
malibubts
Adventurer
Looks great. I had considered the Eco 1500 but my camper is awfully close to the max tow rating of it. I ended up with a 2500, but am still enjoying your cab and bed upgrades.
Mostly lurking.....The reason I am posting is to ask if you had considered removing the back seat entirely. It seems like a lot of wasted space if you don't ever use it.
Yeah I don't blame you, towing a camper is something you don't really want to mess around with in any 1/2 ton IMO.
I had thought about pulling out the back seat entirely, but honestly I don't know that I would really gain much. I'll also occasionally take a water or snow ski trip with some friends and pull the platform so we can all fit in the truck; it's not to much of a hassle to get everything out.
As it is now the seat folds up pretty well and doesn't get in the way. I guess I could pull everything out and rig up some sort of storage along the back wall, maybe something to keep in mind for the future.
McCarthy
Is it riding season yet?
I ran the AT3W's for about 25,000 and pulled them off, going back to KO2's. The falkens are a tough tire that wear like Iron, but they're mediocre at best in deep snow and mud, and terrible on ice (I live in Northern Canada). If I lived south, i'd have the Falkens for sure.
I bought pretty much this identical truck (even the color) as a 2017 model. I'm already planning on a lift and bigger tires. Also curious how these 2 items affected the fuel economy.
Mine is also 4WD and I did the longest trip in it yet this past weekend about 400 miles and it averaged 27mpg (mostly hwy 10% city) going around 70mph when I could. Lots of going up hills.... but also coming back down them from sea level up to 6000ft (Spicer Reservoir in Bear Valley, CA). I normally do about 80% hwy and 20% city with an indicated 24mpg average.
Mine is also 4WD and I did the longest trip in it yet this past weekend about 400 miles and it averaged 27mpg (mostly hwy 10% city) going around 70mph when I could. Lots of going up hills.... but also coming back down them from sea level up to 6000ft (Spicer Reservoir in Bear Valley, CA). I normally do about 80% hwy and 20% city with an indicated 24mpg average.
Martinjmpr
Wiffleball Batter
I have a question about cost-of-ownership:
The fuel economy figures of the Eco Diesel are very tempting, but how has total cost-of-ownership been compared to a gasoline truck?
Two things concern me: First of all, diesel fuel is anywhere between $0.30 and $0.60 per gallon more. At a worst case scenario of diesel fuel having a .60 premium over regular unleaded, that means diesel has about a 20% price premium. So that means I have to get 20% better MPG just to break even on fuel costs.
The second thing is DEF and whatever additional maintenance costs are associated with a diesel. Beyond routine maintenance like oil and filter changes, what diesel-specific maintenance has to be done and what is the (approximate) cause of said maintenance?
I've always been somewhat skeptical of the glowing praise of diesel but I have to admit that if the figures I'm seeing regarding towing capacity and MPG are accurate, they could make for an excellent light towing vehicle for our R-Pod travel trailer (about 3500lbs loaded weight.) Much as I'd love to go "whole hog" and get the 2500, this vehicle also has to be my daily driver and it doesn't make sense for a suburban dweller like me to have a 2500 that's going to get me 10 - 11 MPG. My current 2004 Suburban does that, I was hoping that something a little newer would yield me better MPG.
Two things concern me: First of all, diesel fuel is anywhere between $0.30 and $0.60 per gallon more. At a worst case scenario of diesel fuel having a .60 premium over regular unleaded, that means diesel has about a 20% price premium. So that means I have to get 20% better MPG just to break even on fuel costs.
I'll let the OP address the topic in its entirety, but I just wanted to point out that math is not correct. You don't need to get 20% better mpg in order to "break even" with a fuel type that costs 20% more. There is not a direct corollary relationship between the fuel price difference and the mpg difference needed to "break even."
Fuel price, annual mileage, combined mpg are all variables that influence how long it takes to "break even." Theoretically, you could break even with a truck that only gets 1% better mpg, assuming you drove it for long enough. Most diesels on the market are priced so that it takes ~5-7years for the fuel savings to "pay" for the extra cost of the diesel engine. Annual mileage and driving conditions will obviously influence that. Fuel type will too; the Hemi engines recommend 89 octane, though 87 is permissible.
Also, I'm not sure how common this $0.60 diesel premium is. The national averages for gasoline and diesel are $2.86 and $3.15 respectively, which comes out to a 10% difference.
Martinjmpr
Wiffleball Batter
There is not a direct corollary relationship between the fuel price difference and the mpg difference needed to "break even."
I think you misunderstood what I'm trying to calculate. I'm not considering the increased cost of the diesel engine because an (admittedly very cursory) search seems to indicate that there's not a lot of difference between the costs of the eco-diesel and the 5.7 hemi in the 2 - 3 year old used market where I am shopping, so the cost of the engine is actually not a factor that affects me. I am ONLY considering the cost of fuel and what I'm trying to figure is whether the decrease in fuel consumption is enough to offset the increase in fuel price.
There is also the DEF and maintenance costs which have to be factored into the cost-per-mile to drive and I honestly don't know what those are, which is why I'm asking here .
I am ONLY considering the cost of fuel and what I'm trying to figure is whether the decrease in fuel consumption is enough to offset the increase in fuel price.
Yes, the decreased fuel consumption of the diesel does offset the higher cost of diesel fuel. If you enter all the variables (annual mileage, fuel costs, combined mpg) into an excel sheet, you'll see that ecodiesel saves you money, despite the higher cost of diesel.
That margin of savings varies with time and annual mileage. Low time horizon (1-2 years) and low annual mileage (5k miles) will result in a lower margin of savings with the diesel. The longer you own the vehicle and the more annual miles you put on it, the greater the margin of savings.
There is also the DEF and maintenance costs which have to be factored into the cost-per-mile to drive and I honestly don't know what those are, which is why I'm asking here .
I'll let the OP chime in with his own experiences regarding the 3.0l ecodiesel. Generally-speaking, diesel maintenance (DEF, fuel filter, oil changes) will add another $80-$150 of annual maintenance.
Similar threads
- Replies
- 5
- Views
- 1K
- Replies
- 13
- Views
- 3K
- Replies
- 51
- Views
- 15K
