MB 1120 Coming to America! Purchase, Build and Now Travel!

Joe917

Explorer
Engaging the bolt compresses the springs and de-activates the spring brakes which are your emergency and parking brakes. This is called caging the brakes.
The cylinders on the front axle will be smaller as they do not have the spring.
The rear brakes with the spring need to be adjusted so that the spring gives full braking force. without this adjustment you have no brakes in an air failure. Air is required to hold the springs compressed, in a catastrophic air loss the springs will be released and stop the truck if adjusted correctly.
It appears that your 4 wheel parking system, which I am not familiar with, is masking the poor spring brake adjustment.
The service brakes and the spring brakes work on the same set of brake shoes.
Even though it is not required in the USA for an rv, I would suggest you take a commercial air brake course, you will get a lot out of it.
 

VerMonsterRV

Gotta Be Nuts
Engaging the bolt compresses the springs and de-activates the spring brakes which are your emergency and parking brakes. This is called caging the brakes.
The cylinders on the front axle will be smaller as they do not have the spring.
The rear brakes with the spring need to be adjusted so that the spring gives full braking force. without this adjustment you have no brakes in an air failure. Air is required to hold the springs compressed, in a catastrophic air loss the springs will be released and stop the truck if adjusted correctly.
It appears that your 4 wheel parking system, which I am not familiar with, is masking the poor spring brake adjustment.
The service brakes and the spring brakes work on the same set of brake shoes.
Even though it is not required in the USA for an rv, I would suggest you take a commercial air brake course, you will get a lot out of it.
Ok, I think we are talking the same thing. All of the 4 wheels brakes need to be adjusted the same way, with the brake linings .75mm from the drum when the brake is released (whether by service or parking brake) using the toothed wheel above each cylinder (front and rear brake shoes/linings and drums are the same, at least on our truck). With this adjustment both the service and spring brakes would be adjusted and then work properly. As far as I can see there isn't a separate adjustment for just the spring brake portion. Also, it seems these combination cylinders can not be rebuilt are generally replaced. They are not longer available directly from Mercedes, but there are after market ones available.

Since our front brakes are adjusted ok they masked the poor adjustment of the rear brakes (and the fact we mainly use the exhaust brake). Essentially our rear brakes were providing little braking either by service or parking brake as they were not adjusted properly. And since we have a 4 wheel parking brake system testing the rear spring brake in isolation is difficult. Without this system checking your emergency/parking brakes seems pretty easy, with it I am not sure of a process. I do know I will add checking each brake pad thickness and lining/drum space to my maintenance schedule.

And not sure if anyone is interested, but here is the schematic for the optional 4 wheel parking brake (which I am still trying to figure out). I wonder if it was a Sweden thing as there seems to be a lot of Sweden specific brake parts for our VIN in the EPC. Once again, this schematic was sent to me by Stefan, that guy has forgotten more about our trucks than I will likely ever know.
 

Attachments

  • Haltestellenbremse B23 im LN2.pdf
    48.4 KB · Views: 14

VerMonsterRV

Gotta Be Nuts
Funny, @Iain_U1250 has his thread title including construction never stops. Seems to be the same for us.

We have a few sort of major projects coming up, and the one I am jumping on first is the replacement of our entry door. We are not 100% happy with our current entry door for a number of reasons (2 of the 3 internal return springs have failed, the locking latches are plastic, cold bridging leading to small puddles on the floor in colder temps, and the worst one, the interior plastic seems to be pretty low quality and has yellowed on the way to brown). The yellowing plastic was the reason we replaced our original door after only a year. It has turned yellowish brown and would emit a chemical smell when damp.

Now given our truck is "completed" it makes it impossible to get a higher quality replacement door out of Europe (size/fitment issues). So, I decided to build my own... It is going to be a 3 part composite door with a composite frame. The 3 parts are fiberglass, wood and core foam. I am using epoxy resin and fiberglass (along with various fillers), poplar, baltic birch plywood and structural marine core foam. I was also able to source a 3 point lock, pressure compensated double pane glass and full length stainless piano hinge. This is a bunch of work and luckily I have a close friend with a great shop for me to do the work in.

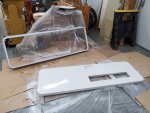
This is the main structure and is the exterior door skin. To reduce the chances of warping I built in a structural grid using fiberglass and foam. The interior skin will be bonded to it once I build it up a bit more. The glass will be inset using adhesive from the inside, so no external frame on the door skin. The lockset will be inset so it doesn't protrude on the exterior door skin.
IMG_20221006_152251.jpg

This is the interior skin. This photo is a little old, I have cut the holes for the lockset and trimmed the window hole. You can see on the right edge the mortising for the lockset is also complete.
IMG_20221006_152300.jpg

And the window and lockset on my messy work top.
IMG_20221006_152328.jpg

With any luck I will have the 2 halves ready to bond together at the end of the day today. Then the tedious process of wrapping it in fiberglass and fairing. Then once the door is bonded together I will use it as a base for laying up the door frame.

Can't wait for this project to be completed. Then coming up is a complete brake redo, new drums, pads, canisters, sprag units and springs. Still struggling with shipping in getting the pads, the rest is all sitting waiting for me in Oregon. And then there is a couple more projects in the coming months, but I don't want to spoil the surprise ;).
 

Iain_U1250

Explorer
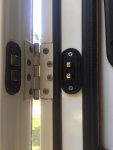
Looks like a pretty solid door. Fibreglass and plywood is a great combination, easy to work and very strong. We had to make our door out of steel and aluminium, as it had to be "rated" with an ant-burst two stage lock like a car door because it being a passenger compartment. Getting a dust proof seal was difficult with the flat hinges, the way the door rotates means the inner edge compresses the seal a lot, whist the outer ( lock side) doesn't do much. We have a double seal on the hinge side. We found this nifty device to transfer the power to the central locking. 2018-12-24 17.39.43.jpg

I added another rubber strip lower down, as we found that was were the fine dust would come in. It has worked great, we are dust free even in the fine bull dust we get over here. I used countersunk bolts, not screws so I can replace the hinges if I need to, this meant making a access panel into the door frame so I can get a spanner onto the lock nuts.

2018-12-31 16.51.30.jpg
 

VerMonsterRV

Gotta Be Nuts
Looks like a pretty solid door. Fibreglass and plywood is a great combination, easy to work and very strong. We had to make our door out of steel and aluminium, as it had to be "rated" with an ant-burst two stage lock like a car door because it being a passenger compartment. Getting a dust proof seal was difficult with the flat hinges, the way the door rotates means the inner edge compresses the seal a lot, whist the outer ( lock side) doesn't do much. We have a double seal on the hinge side. We found this nifty device to transfer the power to the central locking. View attachment 746260

I added another rubber strip lower down, as we found that was were the fine dust would come in. It has worked great, we are dust free even in the fine bull dust we get over here. I used countersunk bolts, not screws so I can replace the hinges if I need to, this meant making a access panel into the door frame so I can get a spanner onto the lock nuts.

View attachment 746262
Thanks for the tips. Very fancy with the central locks! That would be very nice but not in the books for us, got way too many other projects to complete. I did notice something though, very cool idea mounting your grab rail on the inside of the door. I have never seen that and seems to be a very interesting idea. Never would have been possible with our current door but could be possible with the new one, but I already have an exterior one mounted.

Given I am using slow hardener for the resin I didn't end up bonding the 2 skins together today as I wanted to let the resin cure a bit. So first thing tomorrow morning I will bond them together and head out for a much needed hike. then starts the fiberglass skinning of the door. Not really looking forward to this process and it is a bit slow and tedious.
 

Iain_U1250

Explorer
Thanks for the tips. Very fancy with the central locks! That would be very nice but not in the books for us, got way too many other projects to complete. I did notice something though, very cool idea mounting your grab rail on the inside of the door. I have never seen that and seems to be a very interesting idea. Never would have been possible with our current door but could be possible with the new one, but I already have an exterior one mounted.

Given I am using slow hardener for the resin I didn't end up bonding the 2 skins together today as I wanted to let the resin cure a bit. So first thing tomorrow morning I will bond them together and head out for a much needed hike. then starts the fiberglass skinning of the door. Not really looking forward to this process and it is a bit slow and tedious.

The handle is great, provides some extra stability when climbing into the truck.
 

VerMonsterRV

Gotta Be Nuts
Quick update before I run up to our friend's house for dinner. The door project is definitely not for the faint of heart but it is progressing. Which it really needs to since it snowed last night. Will have to head south to get warm enough to install it. Anyway, the door is painted (though not that wonderful, the quality of the custom mixed paint was pretty poor) and the frame is all molded with a coat of paint. With any luck tomorrow I will bed in the glass and mortise in the strike plates into the composite frame (there is some wood embedded into the fiberglass for these plates). More pictures to come but here is one from yesterday (the door hardware is now installed but no pictures yet). I decided to go the hard route and do the rounded corners, it just seemed like it would reduce the probability of the corners cracking (I have seen this happen even high end professionally built trucks). The interior will be trimmed with 3/4" aluminum angle bent around the parameter, with screws into the edge of the frame. That way the door will be both adhesive and mechanically bonded in the hole. I also decided to laminate a strip of wood into the edge of the wall with the hinge. I will run the screws through the frame and into that strip so the weight of the door will not just be on the frame but also the wall.

Once we get to Tuscon I will work with a welder/fabricator to build a set of bins for the inside lower section of the door. Not sure if it will be aluminum or stainless, but probably aluminum.
IMG_20221021_174849.jpg
 

VerMonsterRV

Gotta Be Nuts
Other than painting the door frame (it needs the final top coat) and mounting the door in the hole, it is finished. Here in Oregon it is just too cold to let adhesives cure so the door will ride around with us until we get south enough to install it. I need to take the interior window trim back out as it has small wood blocks in place to hold the glass in to let the adhesive cure. I will put a small weatherstrip gasket on the trim ring up against the glass for condensation. When we get to Tuscon we know a welder and will have the interior bins for the bottom inside of the door made up. We'll probably also make up a shade that will attach to the top of the window and just roll down when needed. A roller shade wasn't available for this size of window and we liked it better than the more square windows.

IMG_20221024_165747.jpg

On a side note I now have the parts for the brake overhaul. I had thought the new linings came with the needed rivets but they are not there. I will look into it and see if I can get them in the USA. Now I need to find space for all the parts to transport them to Reno where I hope to do the work.
 

VerMonsterRV

Gotta Be Nuts
With any luck the brake overhaul will be completed today, mainly due to having our friends with us to help wrench and how accommodating the 2 businesses that are helping us are. There was a bit of a cock up with the rear axle in that the EPC actually listed 2 different rear axles for our truck (we have the "Simplex" rear brakes). Unfortunately, I didn't see/choose the correct one and ordered the wrong linings/drums (the fonts are correct). Luckily though the only difference in the drums/linings are slightly wider. With the help of Reno Brake (these guys really are top notch) Mark there cut the new pads down, added some new holes and bonded them onto the shoe. Probably not as good as the correct shoes but I am pretty sure they will be 99% as good (and Mark thinks so also, and he has been doing this all his life). I will also have to add a small spacer for the rear dust shields since the drums are wider. So one rear wheel is all back together, the other will be first thing this morning (just got to put the shoes back on, then drum and wheel). One of the front wheels is all apart and once the other one is Mark will replace the linings for us. The DT Spare Parts combination cylinders for the rear went in well, we just needed to rotate them a bit to get the air connections to line up. The PE sprags went right in, the only difference is that they don't have the set screws in them to hold them in place while you bolt on the cylinders, not a huge deal and the screws are not really needed. Once all the brakes are in, I will adjust the sprags so the linings almost touch the drum surface.

Nevada Sandblast and Paint, the generously allowed us to park in their back lot to do the work. This is the "crew", it is a bit cold here, but it is working out. Without these guys helping we would have been here way longer, this is a time consuming job. I do miss having an air compressor nearby, the shoulder is taking a beating with all the manual wrenching (I really don't have space for an electric impact, one of our future projects is to clean out the truck and get rid of stuff we aren't using).
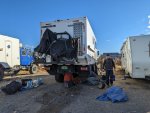
PXL_20221103_223946463.jpg

All back together! Reno Brake also painted the shoes for us while replacing the linings. You can see the little toothed wheel next to the green boot for adjusting the lining to drum once installed.
IMG-20221103-WA0005.jpg

Yeah, I am pretty happy we will have brakes we can trust.
IMG-20221103-WA0004.jpg

After taking things apart we think we have come up with why the rear brakes were so bad (well besides the previous driver with a heavy foot for the brakes). Our friend Karsten (from Germany) suggested that the fire service must have backed the truck up into the water to fill the tank. He says they have seen the fire service do that in Europe. When we got the truck I couldn't figure out why the rear leaf springs were so rusty but the fronts were fine. Well now after taking apart the cylinders/sprag units I completely agree. They were a complete mess internally and I doubt we had much braking force ever in the rear.

We still haven't installed our new door. We need temps above 60 for the adhesive to cure so it will happen further south. But as a bonus Reno Brake is also a custom paint supplier and Nevada Sandblast and Paint sprays. And since I really have never mastered the art of spraying paint and we used enamel (which isn't that great) I asked them to respray it for us using some urethane paint. And they jumped right on it, it is now painted and hanging in their paint booth letting the paint cure! I'll have to take a picture today but the finish is way better than what we did and should last a lot longer. Both these businesses have been great.

If you've read this far, does anyone know of a place in the USA to have the brake force checked? Seems like it is common in Europe but I have never heard of it here, though I do not know commercial trucks.

Gotto go and eat breakfast, need to get out there and finish these brakes!
 

VerMonsterRV

Gotta Be Nuts
Brakes are all back together with a little adjustment needed. Will go out in a few minutes to do that. Glad to get that project over with, lot of work crawling around the truck. We also got to see our new door and frame after getting professionally painted. The painter did a great job and even filled/sanded some of my smaller imperfections! With this urethane paint it should last a lot longer and be easier to keep clean. Now we will let it cure in the paint shop over the weekend, then on Monday pack it back up to head further south for some warmer temps to install it. Can't wait.
PXL_20221104_171556471.jpg
 

VerMonsterRV

Gotta Be Nuts
Well, the wait is finally over, we got the new entry door mostly installed (got the aluminum interior trim ring and aluminum bins for the inside bottom, which we will do with other welding projects soon)!

One of the things I wanted to do with this new door was to bond in a strip of wood on the hinge side. I removed a channel of foam, mixed up some resin with chopped fibers and bonded the inner and outer fiberglass together. I wanted to do this so the screws for the new full length hinge would not only go into the fiberglass door frame but also this strip of wood bonded in. That way all the force of the door is not just on the outside skin.
PXL_20221220_181543469.jpg

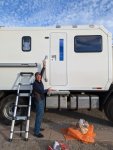
And the door mounted, looks a lot like the previous one but is full composite including the frame. It also has 2" of core cell foam, 3 point locks and pressure compensated glass. I also wanted to stick with the rounded corners to help reduce the chance of cracking. Although it isn't perfect (like the rest of the truck) I am pretty pleased with how it has turned out.
PXL_20221220_230906167.MP.jpg

Another project that is finally complete is I upgraded our BMS with a new JBD 200 amp unit. It seems to be working well and the installation went smoothly. This BMS has way more features and protections than out previous one.

Also coming soon, we decided to replace the interior cushions (I made our current ones quickly and inexpensively as we had already moved into the truck without cushions). The upholster in Phoenix has started work and the foam has been shaped and the sewing will start soon. We decided to go with a top-quality microfiber Sensuede in a navy blue. The foam will be 5" thick using high density foam, with a roll on the top and bottom cushions. Really looking forward to getting these as they should prove to be more comfortable than our current ones.

And a few more projects in the next couple of weeks, but I'll save those for the next post.
 
Last edited:

VerMonsterRV

Gotta Be Nuts
Well, I guess I spoke a bit too soon about the BMS. With our previous BMS we couldn't see the individual cell voltages. Now with this JDB we can, our 400ah pack is made up of 16 100ah 3.2 LifePo4 cells from Frey in China made up in a 4P4S pack to get to 12v. One of the 4P packs (4 of the cells in parallel) now will charge to 3.65 way sooner than the others, causing an overvoltage cell alarm and charging shutoff (it rises to 3.75). This starts to happen when the cells are nearing what the BMS is saying 99% charge. Before that the voltages are all very close and seem to be in "balance". I never top balanced the cells when I got them, back then it seemed like it was an optional step just to get the most out of the batteries. Now I am seeing it is pretty much standard and required. So, at this point would you think of pulling the pack apart to top balance them would correct this or am I a bit too late?
 

Forum statistics

Threads
188,039
Messages
2,901,489
Members
229,411
Latest member
IvaBru
Top