Mercedes Single Cab "Gully Wagen"

Gullywagon

New member
IMG_7215.jpg
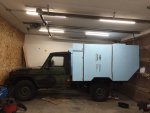
I have been lurking around here for awhile and thought I would share a project that I have already begun. It's been a slow process and I am having to learn alot as I go. The single cab chassis that I am building on is a 1991 ex-Dutch military ambulance. I will be building a composite panel camper on the back. Initially I wanted a cabover camper but struggled with how large it would end up being. So I went back and forth many times, considered eliminating the cab over, but it still seemed too tall. I was pretty adamant about not wanting a fabric style pop-top. I found a camper in my researching that had a lower profile and only a portion of the roof popped up using hard sides. I thought hard about all the tradeoffs, and finally decided to go this route. What helped me decide on these various versions was a bunch of foam sheets I used to mock up the different designs so I could actually see what they looked like. I loved all the space the cabover would have. If you know about these Mercedes, then you know they are quite underpowered. This was a big consideration as I thought about this build. A more powerful engine could be swapped in, but I don't know anything about swapping engines and I think it would be quite expensive too. So thats one reason I wanted something smaller, not to mention tree branches and other obstacles and I think for a chassis like this something smaller and more nimble looks right to me.
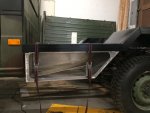
I will post some photos and updates when I can. I already have a subframe constructed, some storage boxes and just finished mounting in an auxiliary fuel tank. I will get some of those photos up here as well.IMG_7181.jpg
 

cdthiker

Meandering Idaho
Awesome Truck. In the day and age of bloated 4x4's running quad cabs and the interior that might be found in a limo, I am always refreshed to see something simple. Even more so anything regular cab this old benz screams function above comfort and fancy. Or, in short everything a truck used to be, and ought to be still. I admit, I am biased. I look forward to seeing the build on this.
 

Gullywagon

New member
IMG_7552.JPG
This will be fairly close to the final size of the cell on the back, a much simpler, slimmed down version than my original plans. Nimble. Standing height is only 5ft. In the pop top area it will be closer to 6ft. The pop top area will only be about 3x5 ft which will allow standing height in the Kitchen and entrance area. Otherwise I figure if your sitting or lying down, who needs all that head room. I joked with a friend of mine I may have a permanent crease across my forehead from bumping into this ledge that will result form this style of top. Time will tell.

Awesome Truck. In the day and age of bloated 4x4's running quad cabs and the interior that might be found in a limo, I am always refreshed to see something simple. Even more so anything regular cab this old benz screams function above comfort and fancy. Or, in short everything a truck used to be, and ought to be still. I admit, I am biased. I look forward to seeing the build on this.
I agree! It is just that, very bare bones and simple. Built for a purpose - reaching your destination. All mechanical 5 cylinder diesel, no turbo either. Im not a big guy, so the interior is just right for me, and I carry over those smaller dimensions in the cell as well. However these trucks might not be so comfortable for a large guy.
 
Last edited:

Gullywagon

New member
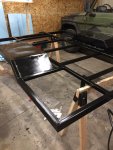
The subframe is built out of 1 1/2" square tubing on the interior wrapped by 2 1/2" x 1 1/2" rectangular tubing around the periphery. There are only 4 stock mounting points and that is what I used to mount the sub frame to the chassis. Initially I was going to have a welder fabricate the subframe. In the end, I bought a welder and taught myself how to weld and built it myself. I had never fabricated anything from steel before so I am pretty pleased with how it turned out. It's almost square ;)
IMG_7465.JPG
IMG_7466.JPG
IMG_7467.JPG
IMG_7469.JPG
 
Last edited:

cdthiker

Meandering Idaho
purpose built is always a good thing. Another thing I like about the regular cabs is the smaller footprint. This is important when you are off road. You can turn around mid trail in a lot of places, you have a lighter rig that can float over things with ease. When you do get stuck it is easier to get out of a pickle. Honestly, The only down side of the reg cab for me that I run into on a semi regular bases is in cab storage. And, the camper will fix that issue as the cap on the back of my regular cab tacoma fixes that problem. And, with that being said it would be nice to have a spot for my dog a bag of layers etc etc.
I was not even aware of this type of truck. Such a cool looking platform.

good luck !
 

Gullywagon

New member
Thanks cdthiker, I will need it!
A few more pics of the sub frame, now with wheel arches welded in place.
IMG_7488.JPG
IMG_7485.JPG

I covered over the wheel well arches with thin steel sheeting. (welding was a little tricky because it was so thin) Nothing fancy just hand bent the stuff so it's not perfect. No one will see it anyways. I added some small angle to support the sheeting from underneath. I used a two part epoxy, hand painted with sponge type brushes. I applied three coats and it gets the job done and looks fine for me.
IMG_7517 2.JPG
The epoxy seems like good stuff. I recommend it. Just wear a good respirator, it's wicked stuff. Southernpolyurethanes
 
Last edited:

CoyoteThistle

Adventurer
Following this build for sure. Your thought process on cabover/no cabover was very similar to mine. I went without and am very happy with the result. Looking forward to seeing your pop-up design, floor plan, etc. as it all unfolds.
 

Wyuna

Observer
love these ute's, going to enjoy watching this build

what is the payload on the rear axle, the new G utes here in Aussie are about 2000kg
 

Gullywagon

New member
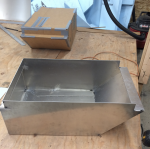
I enjoyed fabricating the subframe and I got a quote for aluminum subframe boxes, which was way too expensive. So I figured I may as well learn aluminum welding.
icon_lol.gif


I bought a spool gun and a bottle of argon and started to practice with aluminum.

I mocked up what I wanted using cardboard and duct tape as a model. I can't recommend enough to go this route. So helpful. I took the measurements straight off my cardboard model and cut up an 1/8" thick sheet of aluminum.

IMG_7620.JPG
My cardboard model and a few tack welds to hold it together enough to see if it will fit correctly
Screen Shot 2018-10-25 at 10.17.10 PM.png
I cut all the pieces with a smaller toothed skill saw. Cuts pretty easy
IMG_7647.JPG
I may have gotten a little carried away with my tack weld spacing... but It's my first time welding and was told aluminum easily warps and moves on you. I also designed it so the edges just meet which then gives a nice place for the aluminum filler to lay in.
IMG_7643.JPG

IMG_7638-2.jpg
 

Gullywagon

New member
love these ute's, going to enjoy watching this build

what is the payload on the rear axle, the new G utes here in Aussie are about 2000kg
I love those new Professional models you guys have there. Super expensive, but other than a few things they look just like mine, which is pretty neat considering almost 30 yrs apart. I believe payload is similar to the new models. Mine has all HD axles and suspension because it was designed to carry an ambulance cell on the back. I am trying to find the exact info. It would be good to know. Cheers
 

Gullywagon

New member
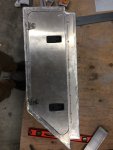
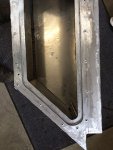
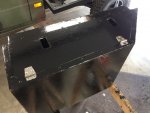
I cut out the door opening and then it took me a long time to sort out how I was going build a sealing/latch system. I think I mentioned I have a hard time designing it all on paper to completion. So I make what I can, then I have to sort out how to continue on from there. Not the best system, I admit. I was trying to avoid using rivets, so It would be a cleaner looking front panel. But in the end, I resorted to rivets. I essentially cut out a piece of aluminum that framed in the door to create a base for the seal to sit and a place for the latches to catch. Using rivets and rivet washers to create a bit more space. Some adhesive in between to seal all that up and riveted it in place. I used Southco compression hinges, Taco marine seal, and stainless marine hinges. I painted it, like I did the subframe. Just by hand. It looks ok. Not perfect, but it's usable. Then I made another one for the other side. It went much quicker since I knew what I was doing. And the aluminum welding of the second box is not nearly as ugly as the first one. I am not convinced they are water tight, but I know I will appreciate all the storage I have come up with.
IMG_7644.JPG
IMG_7645 2.JPG
IMG_7715.JPG
IMG_7781.JPG
IMG_7782.JPG
IMG_7783.JPG
IMG_7784.JPG
 

Attachments

  • IMG_7781.JPG
    IMG_7781.JPG
    913.2 KB · Views: 73
Last edited:

Forum statistics

Threads
188,173
Messages
2,903,168
Members
229,665
Latest member
SANelson

Members online

Top