You are using an out of date browser. It may not display this or other websites correctly.
You should upgrade or use an alternative browser.
You should upgrade or use an alternative browser.
Mikey's Sprinter Expedition Camper: Cab and Interior
- Thread starter mhiscox
- Start date
bmwtrekker
New member
Roof Rack Supports
What brand are the roof rack supports, and where did you get them. I'm looking for some like that to go over a hi-top fiberglass roof. Thanks. Great thread and build.
WAIT A SECOND . . . you mean I'm actually supposed to GO somewhere in the trucks?! I thought you just bought them and spent money on them. :sombrero:
Seriously, the Sprinter's been a number of places, but nothing worthy of the sort of trip reports we post up here. The situation will improve when I've got the EarthRoamer reassembled and start taking it and the Tacoma out together this summer. But I can post up one of the "Sprinter in Death Valley" pictures to prove that I occasionally leave home.

along with a cute picture of the Sprinter with a road-blocking calf in Wyoming:

What brand are the roof rack supports, and where did you get them. I'm looking for some like that to go over a hi-top fiberglass roof. Thanks. Great thread and build.
Vantastic Adventure
#vanlife
I'd also be very interested in the shower design as I'm considering doing something similar.
Fantastic build here, btw!
Fantastic build here, btw!
mhiscox
Exp. Leader Emeritus
Oops . . . I haven't been a good steward of my thread. Here's the information I owe you guys . . .
The roof rack supports are Thule Super High gutter feet. In the old days, they weren't available here and I had to get mine from Europe. Nowadays, though, it's just something you can obtain from Thule:
https://www.thule.com/en-us/us/roof-rack/accessories/thule-super-high-gutter-foot-pack-953-_-1089.
As far as the flooring and shower questions . . . Tony sent me a private message when I didn't respond and I wrote this up for him--some of it relevant to the questions, some just general information:
and then followed up with this . . .
Our teak was glued, though I can't say for sure with what. We had quarter-round molding around the edges to cover a small gap left around the perimeter.
There was a narrow bead of caulk put around the outer edge of shower pan where it mated against the fixed flooring and the kitchen cabinet. Not sure that it did much, but I don't know any reason not to do it. The pan was a custom job, though about as simply as such things get.
One piece of advice, which you've probably already thought of . . . CMI didn't put a filter into the line from the bilge pump to the grey tank. But given that the shower pan was also the entryway, we'd get crap into the bilge and some of it (dog hair was the principal problem) would occasionally clog the hose. It took hardly any time to install a $15 filter housing with a cleanable filter that worked a charm.
The bilge pump wouldn't suck up the last eighth- to quarter-inch of the bilge water, which was sometimes a little bit groddy. You can decide if it's worth putting a plug in to drain the bilge of this small amount. We'd wipe ours out with a rag, and for that reason, did not fasten down the pump so that a leaving a little slack in the hose and wire meant we could raise the pump a little and wipe under it.
IF THERE ARE ADDITIONAL QUESTIONS, PLEASE ASK. I'M PAYING ATTENTION NOW.
The roof rack supports are Thule Super High gutter feet. In the old days, they weren't available here and I had to get mine from Europe. Nowadays, though, it's just something you can obtain from Thule:
https://www.thule.com/en-us/us/roof-rack/accessories/thule-super-high-gutter-foot-pack-953-_-1089.
As far as the flooring and shower questions . . . Tony sent me a private message when I didn't respond and I wrote this up for him--some of it relevant to the questions, some just general information:
In the rear, we actually started with just the raw floor and then put a thin sheet of underlayment down. The teak went on top of that, but it's important to note that they made the rear floor out of resawn solid teak boards rather than flooring. That was a function of how small that area was. I doubt it was more than maybe six square feet, so this approach, which wouldn't be practical for any normal-sized area, was not that tough.
The way you are suggesting putting down your layers shows a lot of care, and it has no downside. I will say, though, that in both of my vans, I haven't obsessed over the insulation. In the current Sprinter, we have so much single-pane glazing that we've sort of already lost the war, and in the first one, the inner cabin wasn't well insulated from the big uninsulated rear mechanical room. In both cases, we made a conscious decision that once we got the walls insulated, the rest gave somewhat diminishing returns. The cabin was pretty easy to heat, so we didn't do as much as maybe we should have. No one's ever going to complain if you do it the right way, though.
(And as a similar aside, noise insulating the floor with RAAMmat--that's what I use most often, too--has no downside, but in our T1N Sprinters, the noise from the front--mostly wind roar then tires, then engine--is enough to make ongoing noises from the cabin relatively insignificant. The cabin squeaks, rattles and buzzes seem to always get through, but the constant noises weren't really noticable. Your mileage may vary.)
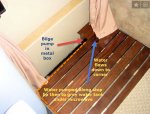
I can't readily lay my hands on a good shower pan picture, but it's not exciting, basically a flat sheet with about an inch high lip on it. I don't remember that we ever agonized over having a slant toward the bilge pump, figuring it was small potatoes compared to the tilt your van was probably at from your parking space.
It's important to understand, though, that there's a carefully-calibrated change in floor level from the shower pan front part to the fixed rear part. The top of the pan's aft edge lip (leftmost if you're standing in the doorway) is level with front (rightmost) top surface of the rear fixed flooring. The slats on the shower pan "cover" are bolted to two or three (can't remember) steel strips, and it's the steel strips, not the shower pan, that the slats rest on. The combination of the steel strip thickness and the slat thickness is chosen to bring the top of the slats flush with the fixed flooring.
and then followed up with this . . .
I'd recommend the teak if you like the look. I was worried that the wood would be too sensitive and pick up a lot of scratches and scrapes. In point of fact, it held up pretty well, and about the only thing we did--given how small the area was--was to clean it with a damp rag and oil it once or twice a year. Not many alternatives as good for the fixed part, and nothing I can think of would work as well for the shower pan slats. Maybe the only drawback was that teak is pretty heavy and thus the set of slats were a bit heavy to remove. Conversely, though, the weight kept it from bouncing around much.
Our teak was glued, though I can't say for sure with what. We had quarter-round molding around the edges to cover a small gap left around the perimeter.
There was a narrow bead of caulk put around the outer edge of shower pan where it mated against the fixed flooring and the kitchen cabinet. Not sure that it did much, but I don't know any reason not to do it. The pan was a custom job, though about as simply as such things get.
One piece of advice, which you've probably already thought of . . . CMI didn't put a filter into the line from the bilge pump to the grey tank. But given that the shower pan was also the entryway, we'd get crap into the bilge and some of it (dog hair was the principal problem) would occasionally clog the hose. It took hardly any time to install a $15 filter housing with a cleanable filter that worked a charm.
The bilge pump wouldn't suck up the last eighth- to quarter-inch of the bilge water, which was sometimes a little bit groddy. You can decide if it's worth putting a plug in to drain the bilge of this small amount. We'd wipe ours out with a rag, and for that reason, did not fasten down the pump so that a leaving a little slack in the hose and wire meant we could raise the pump a little and wipe under it.
IF THERE ARE ADDITIONAL QUESTIONS, PLEASE ASK. I'M PAYING ATTENTION NOW.
mhiscox
Exp. Leader Emeritus
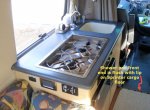
In response to a request, I've annotated the set of bathroom related photos to (one hopes) make it clearer what's going on with the bathroom layout. Note that doing this layout requires three custom parts: the steel shower pan, the catchment box that houses the bilge pump, and the fiberglass end piece that covers up the Thetford cassette when the toilet is no against a wall. (As always, photos get bigger when clicked.)


Let me know if there's any more information I can provide.


Let me know if there's any more information I can provide.
mhiscox
Exp. Leader Emeritus
Check here:I assume its an A/C next to the bed. YES. Is that a split one? NO. Can you tell me please what kind of A/C is it and who makes it?! IT'S A 5000W SHARP WINDOW UNIT.
http://www.expeditionportal.com/forum/threads/26415-Mikey-s-Sprinter-Expedition-Camper-Systems
for some more information about the AC system in the my first Sprinter. Unfortunately, the photos vanished with Picasa Web, but it'll give you the general idea. As you'll see, putting the AC internally was a bit of a hassle and, FWIW, I air condition my current Sprinter with a portable unit with the exhaust hose stuck out the window.
Superchief
New member
I hate photobucket
mhiscox
Exp. Leader Emeritus
Yep. Considering that their change made about a third of the Web largely useless, I'm thinking hangin' might be too good fer 'em. 
If you are using the Chrome browser--or might consider using it for situations like this--you can (as others have mentioned in other threads) get an extension to Chrome that will restore the photos. Since installing mine, I can see all of the ExPo Photobucket photos, including on this thread, whereas previously I was shut out, too..
Go to the Chrome Web Store and type "Photobucket" into the search box and you will see what's available.
And assuming it works for you, tell your friends. While I understand that Photobucket needed to adjust their situation, the way they did it really reduced the usefulness of these forums.
4xdog
Explorer
Mike, that Chrome extension worked perfectly here.
It seemed to cause some problems on another forum I follow with posts not loading properly. Disabling the extension allowed that other forum to function. Seems to be a use-it-when-you-need it solution, not a universal fix.
Thanks for the tip.
Don
It seemed to cause some problems on another forum I follow with posts not loading properly. Disabling the extension allowed that other forum to function. Seems to be a use-it-when-you-need it solution, not a universal fix.
Thanks for the tip.
Don
Last edited:
Similar threads
- Replies
- 17
- Views
- 1K
- Replies
- 1
- Views
- 355
- Replies
- 1
- Views
- 396
- Replies
- 5
- Views
- 2K
