My 2007 gmc topkick project.

Farrah’s_dad

New member
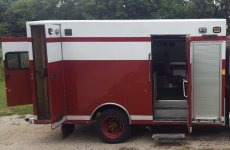
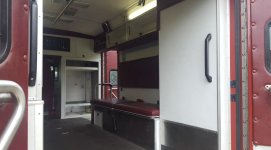
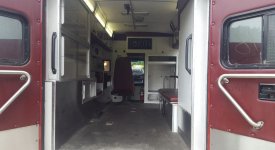
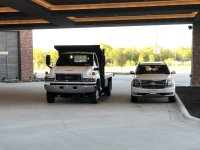
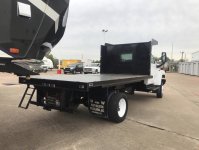
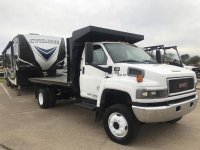
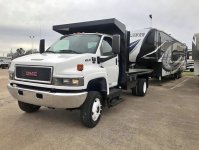
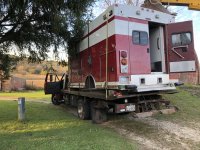
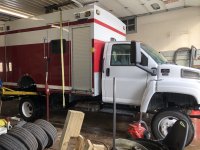
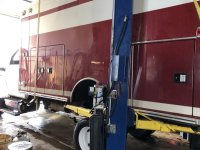
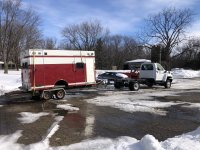
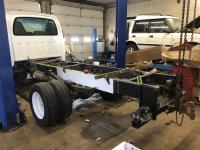
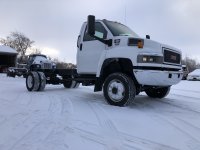
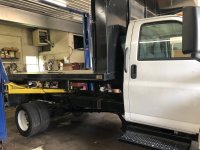
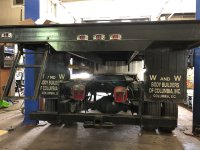
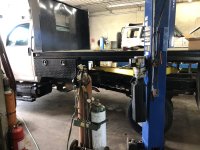
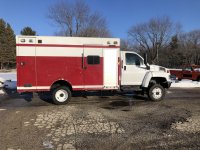
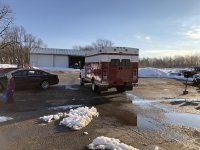
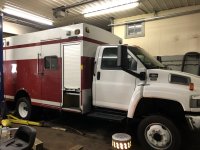
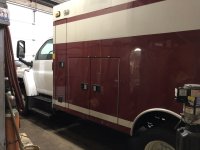
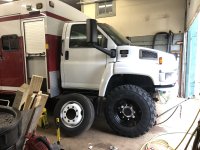
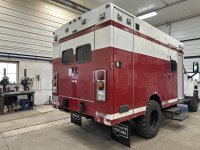
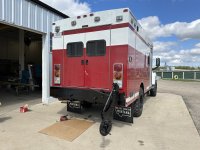
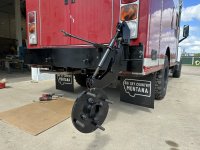
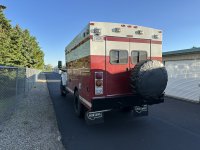
So this seems to be a great place to post about my build. I started this build quite a few years ago (2018) but I still thought that it might help some others building similar trucks. I’ll try to start from the beginning and work my way up to current time, as I have the time to make posts. I originally bought a 16’ Braun ambulance body for scrap price to install on a 1978 4x4 international loadstar I had at the time. I quickly realized that this wasn’t going to be the best chassis for my intended usage. It had a gas engine and 7.17 gears. Top speed was only about 40 miles per hour. It was big and bad, but also rude and crude and nearly impossible to find parts for. For a brief moment I actually considered swapping a Cummins and an Allison along with more modern axles to make it more streetable, but that seemed like a huge project so I started looking for a truck that was already properly equipped for my intended usage. After a bit I found the Kodiak/topkick trucks. After looking for a bit I found my truck in Dallas, Texas just as Covid started. It was a lucky break.
 

Attachments

  • IMG_9605.jpeg
    IMG_9605.jpeg
    108.5 KB · Views: 7
  • IMG_9603.jpeg
    IMG_9603.jpeg
    188.5 KB · Views: 7
  • IMG_9601.jpeg
    IMG_9601.jpeg
    224.1 KB · Views: 8
  • IMG_4458.jpeg
    IMG_4458.jpeg
    1.6 MB · Views: 8
  • IMG_4310.jpeg
    IMG_4310.jpeg
    3.3 MB · Views: 7
  • IMG_3934.jpeg
    IMG_3934.jpeg
    375.8 KB · Views: 6
  • IMG_3933.jpeg
    IMG_3933.jpeg
    376.7 KB · Views: 4
  • IMG_3932.jpeg
    IMG_3932.jpeg
    461.7 KB · Views: 5
  • IMG_0252.jpeg
    IMG_0252.jpeg
    3.3 MB · Views: 5
  • Like
Reactions: mog

Farrah’s_dad

New member
Once the truck was home, the project began. The frame was the correct length, but the wheelbase was 4” too long for the box. Removed the old flatbed and sold it. Shortened the wheelbase and had the driveshaft professionally shortened and balanced. Bought new bushings, installed the mounts and installed the box. Easy peasy.
 

Attachments

  • IMG_2500.jpeg
    IMG_2500.jpeg
    1.9 MB · Views: 5
  • FullSizeRender.jpeg
    FullSizeRender.jpeg
    1 MB · Views: 4
  • IMG_2521.jpeg
    IMG_2521.jpeg
    1.9 MB · Views: 5
  • IMG_2496.jpeg
    IMG_2496.jpeg
    3.4 MB · Views: 5
  • IMG_2319.jpeg
    IMG_2319.jpeg
    1.8 MB · Views: 6
  • IMG_2256.jpeg
    IMG_2256.jpeg
    2.3 MB · Views: 6
  • IMG_1101.jpeg
    IMG_1101.jpeg
    1.4 MB · Views: 4
  • IMG_6721.jpeg
    IMG_6721.jpeg
    2.1 MB · Views: 5
  • IMG_6720.jpeg
    IMG_6720.jpeg
    2.4 MB · Views: 5
  • IMG_6719.jpeg
    IMG_6719.jpeg
    2.4 MB · Views: 5
  • Like
Reactions: mog

Farrah’s_dad

New member
Here are some more after the box was installed.
 

Attachments

  • IMG_2557.jpeg
    IMG_2557.jpeg
    4.2 MB · Views: 9
  • IMG_2556.jpeg
    IMG_2556.jpeg
    3.3 MB · Views: 8
  • IMG_2526.jpeg
    IMG_2526.jpeg
    2.2 MB · Views: 7
  • IMG_2524.jpeg
    IMG_2524.jpeg
    2.1 MB · Views: 10
  • IMG_5646.jpeg
    IMG_5646.jpeg
    2.1 MB · Views: 10
  • IMG_5645.jpeg
    IMG_5645.jpeg
    4.1 MB · Views: 11

Farrah’s_dad

New member
Once the box was on there was another fairly long break in the action, then I modified the hitch to fit the truck around the box, and I ordered new wheels and tires from 1st attack. I also found some more of the spotlights like were installed on my body and installed them where the strobe lights were. Best part is that I was able to convert them with 12 volt led bulbs from Home Depot. They were a direct bolt in. Easy peasy. The new spotlights were the same mounting pattern at the old lights so I didn’t have to make any covers for the old mounting holes. Saved a ton of work and now I have really bright spotlights all the way around and they use minimal power. Also reused the wiring from the strobes for the spotlights. This was all around 2021
 

Attachments

  • IMG_4713.jpeg
    IMG_4713.jpeg
    2 MB · Views: 7
  • IMG_4670.jpeg
    IMG_4670.jpeg
    1.8 MB · Views: 7
  • IMG_4694.jpeg
    IMG_4694.jpeg
    1.1 MB · Views: 8
  • IMG_4640.jpeg
    IMG_4640.jpeg
    2.2 MB · Views: 8
  • IMG_4638.jpeg
    IMG_4638.jpeg
    4.3 MB · Views: 8
  • IMG_4637.jpeg
    IMG_4637.jpeg
    1.6 MB · Views: 7
  • IMG_2595.jpeg
    IMG_2595.jpeg
    1.1 MB · Views: 6
  • IMG_2594.jpeg
    IMG_2594.jpeg
    1.5 MB · Views: 8
  • IMG_7608.jpeg
    IMG_7608.jpeg
    4.1 MB · Views: 7

Farrah’s_dad

New member
A busy work and home life created a few more long breaks in the action. I between all the life I bought some more big parts, got the bed frame built. It has a foam queen mattress I bought from Walmart, along with an electric carving knife to cut the foam to fit around the tall passenger side compartment. During this time I started buying parts for the electrical system also. Battle born batteries, lots of Victron equipment, and also a diesel fired marine water boiler system made by a Canadian company called internal thermal research. More on all this to come.
 

Attachments

  • IMG_6037.jpeg
    IMG_6037.jpeg
    2.4 MB · Views: 7
  • IMG_4608.jpeg
    IMG_4608.jpeg
    2.1 MB · Views: 7
  • IMG_4604.jpeg
    IMG_4604.jpeg
    2.6 MB · Views: 7
  • IMG_8184.jpeg
    IMG_8184.jpeg
    1.8 MB · Views: 5
  • IMG_6034.jpeg
    IMG_6034.jpeg
    2.9 MB · Views: 6
  • IMG_6033.jpeg
    IMG_6033.jpeg
    2.4 MB · Views: 6
  • IMG_2680.jpeg
    IMG_2680.jpeg
    1.7 MB · Views: 7
  • IMG_2679.jpeg
    IMG_2679.jpeg
    2.8 MB · Views: 7
  • IMG_2681.jpeg
    IMG_2681.jpeg
    3.3 MB · Views: 5
  • IMG_1224.jpeg
    IMG_1224.jpeg
    2.9 MB · Views: 6

Farrah’s_dad

New member
Spring ahead to 2023-2024. Started installing a lot of the electrical equipment. I’ve tried to make everything as redundant and modular as I could. Secondary dual alternator with a Wakespeed smart regulator; 350 amp. 1085 amp hours of battle born batteries, 3000 watt Victron inverter charger, cerbo gx, dual lynx distributor’s and shunt. SPOD touch screens and switches. I tried to reuse as much of the existing wiring as possible. Purchased 365 watt solar panels, but those still haven’t been installed yet. Also started installing all of the 120 volt ac box and outlets. The entire interior of my box was spray foamed at the factory. I added some more insulation and installed tongue in groove knotty cedar along with led pucklights that are wired to the spod and programmed to be dimmable.
 

Attachments

  • IMG_7230.jpeg
    IMG_7230.jpeg
    1.7 MB · Views: 4
  • IMG_3341.jpeg
    IMG_3341.jpeg
    2.4 MB · Views: 4
  • IMG_3370.jpeg
    IMG_3370.jpeg
    1.9 MB · Views: 4
  • IMG_3372.jpeg
    IMG_3372.jpeg
    2.8 MB · Views: 4
  • IMG_3342.jpeg
    IMG_3342.jpeg
    1.6 MB · Views: 4
  • IMG_3435.jpeg
    IMG_3435.jpeg
    2.4 MB · Views: 5
  • IMG_3371.jpeg
    IMG_3371.jpeg
    3.9 MB · Views: 5
  • IMG_3438.jpeg
    IMG_3438.jpeg
    2.2 MB · Views: 5
  • IMG_3717.jpeg
    IMG_3717.jpeg
    2.7 MB · Views: 6
  • IMG_4608.jpeg
    IMG_4608.jpeg
    2.1 MB · Views: 6
  • Like
Reactions: mog

Farrah’s_dad

New member
It’s been a huge project. At times if feels to be never ending. I’m adhd so I tend to bounce around a lot. But I’m still making regular progress. Slow but regular. I had a chance to purchase an army surplus spare tire carrier a few years into my project and just saved it until the beginning of this summer and finally got it installed. It’s a pretty neat piece of gear, it’s designed so a small person can handle a big spare tire by themselves without much risk of causing themselves any sort of injury. It’s basically a ratcheting screw like a chain binder. It raises and lowers the tire with low effort. I made a heavy steel bumper to mount it to, and also that ties in with the hitch to give it more strength. I added d rings and also added 3 hit receivers in preparation for adding a motorcycle carrier sometime in the future. I will also add another spare tire carrier on the other side to mount the mini split a/c unit. I moved the license plate up high and out of the way. I tried to over build the entire setup for any eventual use I may meet it for. Hauling a bike, pulling a trailer, winch points for self recovery of helping recover others.
 

Attachments

  • IMG_0840.jpeg
    IMG_0840.jpeg
    531.9 KB · Views: 9
  • IMG_0841.jpeg
    IMG_0841.jpeg
    438.9 KB · Views: 7
  • IMG_1369.jpeg
    IMG_1369.jpeg
    1.9 MB · Views: 7
  • 2239595198532513913.jpeg
    2239595198532513913.jpeg
    325.2 KB · Views: 6
  • IMG_9352.jpeg
    IMG_9352.jpeg
    3.3 MB · Views: 7
  • IMG_9400.jpeg
    IMG_9400.jpeg
    3.8 MB · Views: 7
  • IMG_9461.jpeg
    IMG_9461.jpeg
    3 MB · Views: 7
  • IMG_9462.jpeg
    IMG_9462.jpeg
    3.3 MB · Views: 6
  • IMG_9463.jpeg
    IMG_9463.jpeg
    2.3 MB · Views: 7
  • IMG_9464.jpeg
    IMG_9464.jpeg
    2.7 MB · Views: 8

Farrah’s_dad

New member
Some more pics of the tire carrier and bumper. There is still quite a bit of current progress. I’ll post some more as I have time.
 

Attachments

  • IMG_9588.jpeg
    IMG_9588.jpeg
    2.9 MB · Views: 4
  • IMG_9494.jpeg
    IMG_9494.jpeg
    2.2 MB · Views: 4
  • IMG_9489.jpeg
    IMG_9489.jpeg
    2.2 MB · Views: 4
  • IMG_9472.jpeg
    IMG_9472.jpeg
    3 MB · Views: 4
  • IMG_9471.jpeg
    IMG_9471.jpeg
    1.7 MB · Views: 4
  • IMG_9468.jpeg
    IMG_9468.jpeg
    3.1 MB · Views: 4
  • IMG_9470.jpeg
    IMG_9470.jpeg
    2 MB · Views: 4
  • IMG_9466.jpeg
    IMG_9466.jpeg
    1.9 MB · Views: 4
  • IMG_9465.jpeg
    IMG_9465.jpeg
    2.7 MB · Views: 3
  • IMG_9590.jpeg
    IMG_9590.jpeg
    3.4 MB · Views: 3

Forum statistics

Threads
189,549
Messages
2,918,102
Members
232,442
Latest member
rumpityz28
Top