My 60 mods thread

ntsqd

Heretic Car Camper
The 2F is now in NM to be put in an FJ60 that pitched a rod out the side of the block. Yea! My cast-off is getting another 60 on the road after sitting for 2 years plus! Speculation is that the KOP did it's trick and ran it out of oil. My old 2F needs the mod, but the friend who took it back there is now familiar with the issue.
 

ntsqd

Heretic Car Camper
Milestone!

The engine is now out of the "joe dirt" car and the trans is sitting under it on a floor jack. Tonight's challenge will be figuring out how to raise the car enough higher that the trans can come out.

IMG_0949.jpg


IMG_0952.jpg


Also, I had a thought on the VATS. Most folks send off their ECU's and have that function disabled. I'm really tempted to keep it and make a plug with the correct resistance in it that can be removed separately from the ign key.
 

red87

Adventurer
Could you use your engine hoist to lift the shell higher? You've got that hi-lift too if you want to be super sketchy about it
 

ntsqd

Heretic Car Camper
This might work!


forklift-lifting-a-forklift-thumb.GIF

:)

I think that I can block up the floor jack high enough with cribbing. The trick will be placing the jack so that the trans can still slide out.
 

ntsqd

Heretic Car Camper
Update on a couple things:

The trans came out w/o much drama. Just had to hold my mouth right and it was done. It is currently waiting for the trans shop to have time to marry it's later, better internal part with the 'K' case & output shaft that I bought out of a burnt 4WD truck. The truck's TBI unit caught on fire, but didn't do much other damage.

The "joe dirt" donor hulk was further harvested for parts by a friend with an S-10 DD project. Looks like a lot of the zippy-go-faster parts will work for him. Then the hulk went to the great Z-28 burial ground. RIP.
Which freed up enough of the driveway that my GF can now park off-street when she visits.

One of the parts harvested from the Z was it's fuel filler neck. The plan was to remove the threaded section and merge it with the FJ60's fill neck. The goal being to get away from the tang type fuel cap and use a modern screw-in type fuel cap. That plan went to ashes when the Z's fill neck got ovalized in the removal attempt. Then I noticed that Patch has a screw-in fill cap. Why did the pinnacle of Toyota 4WD engineering get the inferior tang cap when the same year 4WD Mini-Truck got a screw-in cap? The goal remains, the current plan is to harvest a screw-in cap from something Toyota in the local junkyard, once they dry out a bit.

I nearly have the engine bay clean. It wasn't all that dirty, but it sure has taken some time to get it clean. I'm glad that the slimy, greasy, oily mess part went to New Mexico.

The original trans and transfer case went away today. Less carp on the driveway....
 

Willman

Active member
Just read over 10 pages of this great thread! Your tan 60 looks really killer!

This V8 swap looks very cool! I'm currently on the hunt for a 60/62 project....But our money tree lately has taken a hit!

Keep it coming!

:drool:
 

ntsqd

Heretic Car Camper
Thanks Nic!
I try to be patient and accept that when it's meant to be it will happen, but sometimes I run out of patience and grab a hammer... :D

Minor update: both original frame mounts for the engine have been removed. Kind of disappointing, with the exception of the welds on the top of the frame it proved easier to cut the vertical sections off with a 3 lber and a big chisel than to try to cut them off with a Sawzall. Only one of the 4 was well welded on, the other three peeled right off. There was the front end of 800+ lbs sitting on those? Really?
Special thanks to MotoDave, who after asking how he could help removed one of the two (so far) most difficult bolts on the whole project. I removed it's mate. Jeez! What a PITA!!! For those familiar with 60's (not sure if 62's have this or not) I'm referring to the hold-down clip bolts for the forward tube of the PS cooler. Those on top of the frame, but under the core support. I'm going with a stacked plate cooler as there is a hyd winch that will likely be included late into the build.
 

ntsqd

Heretic Car Camper
Fill Neck Mod

Yesterday's small chore was to finish the fuel filler mod between the rain showers. The tang type bung is easily bent by fill nozzles and then the cap can pop partly off the bung's ramps. This results in fuel vapors inside the truck.

The plan was to use silicon-bronze filler rod and my GTAW to weld the screw cap portion to replace the tang-type cap bung. Silicon-Bronze was chosen because it flows like brazing rod, but allows the use of a GTAW to keep total heat to a minimum. I have found S-B to work very well for applications where sealing of fluids or low total heat - or both - is more important than maximum strength. Like brazing, the base metal does not need to be heated to the point of melting for the process to work.

I started out with the engine donor car's fill neck, but managed to ovalize it in the process of cutting it down. Off to the junkyard where I picked up a fill neck from an S-10 of nearly the same vintage as the donor car. I also picked up a fill neck from the same vintage body style as my '84 4WD mini. The idea being that any future necessary replacement cap would be either the vintage of the donor car, or one that would also fit my mini truck, which happens to be the same year as my FJ60. :)
Experiments in the JY showed that the threads of the two necks were apparently different. Very close, but different. Somewhere along the way the Toyota fill neck vanished! The one in the pictures is from the GM S-10. The cap is from the donor car, though I plan to replace it with new. I should note that I tried the cap from my Mini in the completed FJ60 neck, and it threaded in and sealed like it was supposed to!!!

The cut down fill neck, the angle is intentional for cap clearance of the door:
IMG_0974.jpg


Fill neck with the new, cut-down screw-cap section mocked up:
IMG_0975.jpg


Checking fit and for door closure:
IMG_0968.jpg


Finish welded filler mocked up in place to double check for door closure:
IMG_0972.jpg


Without the cap:
IMG_0976.jpg


I'm calling it a success. I do need to order replacement body gaskets and a new fill neck to fuel tank hose.
 

ntsqd

Heretic Car Camper
Not much has happened lately. Life is getting in the way.....
Now that I've got daylight after work I hope to be able to put in more time on it.

The engine is hanging in the engine bay with a mock-up trans case bolted to it. I had hoped to have the mounts built by now, but.....
It looks like it could go in higher than most that I've seen by a large margin. Trans bellhousing to body interference looks to be the limiting factor. I hope to measure the pinion angle next weekend, that will decide the installation angle and should begin to define where it will need to be.

I'm sort of pondering using a Morse type cable to shift the NP241 and blanking off the t/c shifter hole in the floor. Could put that shifter next to the Winters trans shifter. Getting one of the old t/c shifter boot bolts out is going to be a PITA. Some of the HVAC system sits *right* above it and is closer than it's length.
 

ntsqd

Heretic Car Camper
Small update. Proposed and all of the stuff triggered by her acceptance has eaten a bunch of time, but I've gotten some time in on the project. If I didn't at the beginning I should have warned y'all that I normally move on projects about like molasses and this project is proving to be no different.

All of the SYE parts except for the partial rebuild kit arrived late last week. I've got the t/c apart and mostly cleaned up. With a final cleaning it will be ready for all of the new parts and assembly. The trans guy is taking his sweet time, but I don't need it yet so I'm not pushing for it too hard.

In the mean time I've got the front 1/2 of the t/c's case bolted to the mock-up trans case. I'm going to want a clocking ring to put the front drive shaft further over to the right and to keep the t/c's case from hanging too far below the bottom of the frame, so I just ordered that from Kert @ DIY4X.com. Good guy, recommended vendor.
As I suspected a while back, the trans-t/c to floor interference is the limiting factor in how high I can mount the power train. The t/c has a bolt boss that will hit the underside of the floor once the clocking ring is in place. So I'm stalled on engine placement until the clocking ring gets here. I don't really want to go there, but a 1" BL would sure open things up quite a bit.

In looking at where the stock engine mounts are and where the exhaust is likely to need to go I'm starting to think that going with a mount like these: Chevy Weld-In Motor Mounts might be a better idea. I had wanted to use the stock mounts for ease of replacement parts, but they use up a LOT of room where exhaust might need to go.

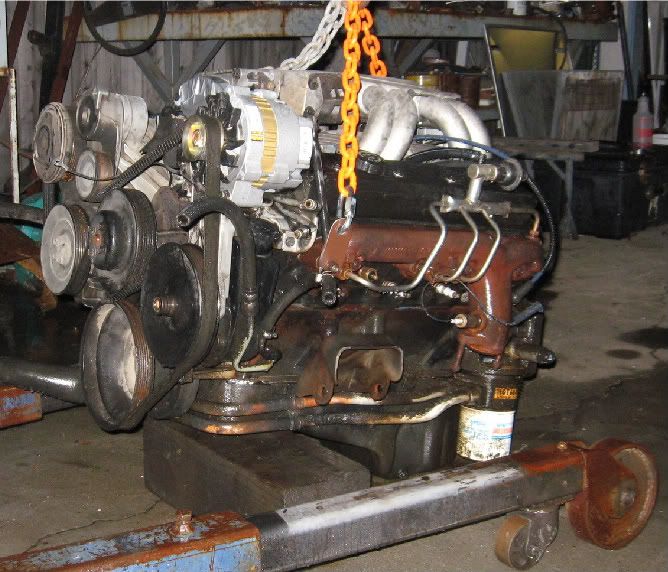
The engine is currently sitting in the truck at 7* relative to gravity while the rear pinion angle is 2.5* relative to gravity. Since I have to make major mods to the axle housing to center the pinion anyway I can re-set the pinion angle, but I don't think that I want to go as far as 7* so a DC rear drive shaft may be required.

EDIT: Turns out that the Speedway parts are on back order. I have some OME urethane bushings that I could make something similar from, but if I do something like that I want the bushing application to be for the FJ60 as that will make finding replacement parts much simpler. I called Kurt @ Cruiser Outfitters and he was kind enough to look up what I had. Dimensionally I though that they were marginal. The FJ parts would've worked better. In the process I find out that Kurt stocks the OE rubber spring eye bushings! I much prefer rubber in engine mounts to urethane, so I've got 8 of those on the way.
 
Last edited:

red87

Adventurer
Big congrats on the lady saying yes :victory: Let me know if you need an extra set of hands working on your rig
 

ntsqd

Heretic Car Camper
Thanks Tim & Kurt!

Bushings tomorrow? Need to step up the pace on mfg'g the related engine mount hardware!

EDIT: They're heee-rre!
:)
 
Last edited:

Forum statistics

Threads
188,641
Messages
2,908,259
Members
230,800
Latest member
Mcoleman
Top