Metcalf
Expedition Leader
I typed this for another thread and decided to move it over here for some more feedback hopefully....
I am most likely going to use a 1300L Unimog because you can find them in the states already imported and registered. I also like the fact that they are fully mechanical without any engine electronics....
I do like the new U4000 unimogs too...but cost would be a big issue and I don't even think you can get them in the states at all.
I want to build a very lightweight and compact unimog camper. I don't think you see that too often. Most people seem to build a pretty large camper that takes up a good deal of volume. Its far to easy to get overweight on an off-road platform...be it a unimog or a suzuki samurai. You almost always have the space to add too much stuff. I want to keep things pretty simple overall without a lot of fluff....but without having to camp out in the open ( setting up and talking down every day ).
Some of the features I am going to integrate....
-Small overall 'box' size. I don't want the camper to be over the height of the cab of the unimog by much at all, maybe a few inches ( 6 or less ). I will have a small rack on the top of the unimog cab that might be part of a roll cage system. I'm a pretty big fan of a nice clean look though....less is more and all that.
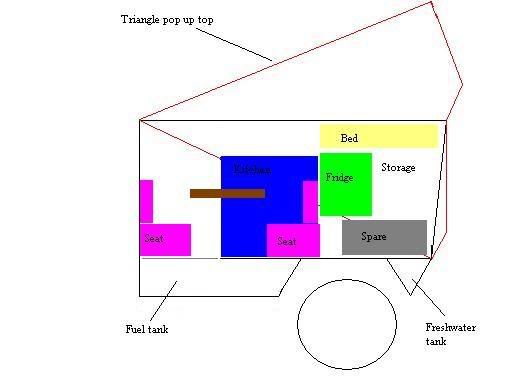
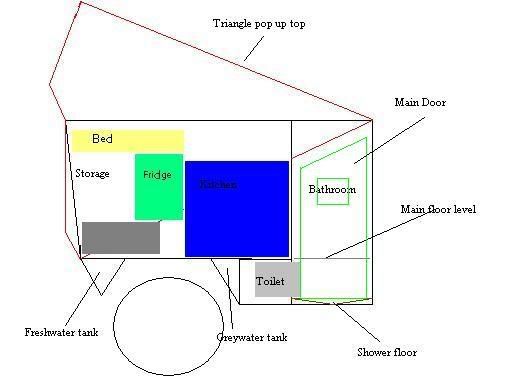
-The camper is hardsided with a triangle shapped section ( side profile ) that raises up with the hinged end at the cab end. This allows for max space over the bed which is raised to create storage under it, and allows for full standing height in the kitchen. The short portion by the cab only contains the mud room ( which is sunken ) and half of the seating area ( seating for 2 that converts into a couch for lounging, or a spare bed for a 3rd person, or to extra counter space for the kitchen ). The moving section of the camper uses brush seals around the base that move with the top. This should help keep out the wind and dust. The top is raised with two long air rams on a balanced circuit. These are also dual action rams so the top can also be held down in the closed position without the need for a lock system ( keeping rattles to a minimum and extra parts out ).
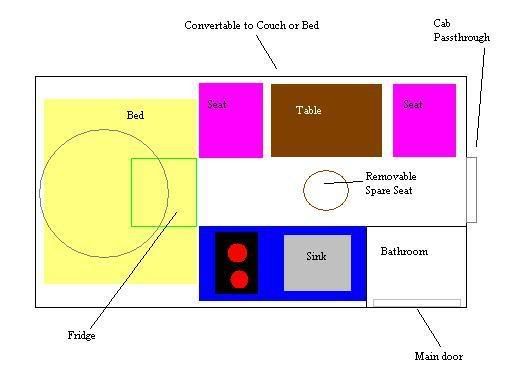
-The bedroom has a full size double bed ( so sheets and stuff work ) that sits against the roof when the top is in the closed position. The bed is at the rear most portion of the camper. This creates maximum space under the bed for storage. Under the bed is space for clothes and personal gear. The bed lifts up on gas struts to allow you to get under it. A full size non-convertable bed was one of the design requirements. I didn't want to have to make up a bed or convert it from something else after a long day on the road. All you have to do is hit the switch to raise the top and jump in the ready made bed.
-The kitchen is in the middle of the camper on the passenger side ( LHD model ) It is very simple overall. It is made up of a 2 burner diesel fired boat stove and a medium sized sink with a hot and cold water tap with a wand style faucet. A cutting board fits over the stove or the sink when you need it. This allows you to go from wash and cut to cut and cook by just moving the board over. There is a small 12V microwave under the stove along with a misc drawer or cupboard. Under the sink is the hot water exchanger and esbar diesel fired water heater. This functions as not only the water heater, but also a truck heater and space heater with a hydronic loop under the floor. The diesel stove can also function as space heater when needed. The fridge is in the middle under a portion of the bed. Since the fridge is in the middle of the camper this should help mimize the distance from the roll axis of the truck and keep things in the fridge a little more stable ( glass jars and such ).
-The dining room is opposite the kitchen and takes up most of the room from the bed to the front of the camper. There will be some storage cupboards in there too, but size will depend on the dining table setup. the dining room is pretty standard with seating for two people ( opposite each other ) with a table in the middle. The dining area also converts in to a couch that faces the center of the camper for lounging by moving the table and some cushions around. The dining area also converts into a spare bed for a 3rd person is the need comes up. We are planning on having a family member or friend ride along with us sometimes. Under the seats are storage bins for misc stuff.
-The mud room/bathroom was mentioned in another post. It is basically a mud room that you walk through to get in the camper. It is in the forward portion on the camper on the passenger side right behind the cab. The area functions as a shower, a mud room, and as a bathroom when the toiled slides out from the wall ( under the sink ). The shower head is recessed in the rear wall. There are also two folding steps in the area to help you walk up into the main camper area. The bathroom was designed like this so you could use it with the top down. The sunken area allow full standing height with the top down. You could even use the bathroom when the truck was moving. This allows a sick person to be sleeping in the back ( on the walkway ) and use the bathroom as needed while driving if need be. This design also keeps the wasted space to a minimum overall, while allowing some privacy when needed for the toilet or shower. You can sill exit the camper if needed through the pass through into the cab.
-The freshwater tank is in the rear under the camper. It is kept above freezing by a heat exchanger run off engine coolant or the diesel esbar heater.
-The greywater tank ( for the sink only ) is in front of the passenger side tire right behind the toilet storage area and basically under the sink. The tank is triangle shapped to keep solids buildup from the sink to a minimum and maximize the usable space in front of the tire. I hope to be able to just gravity drain this without a pump. It is also kept above freezing by a heat exchanger from the truck or the esbar.
-The spare tire is under the bed in the storage space ( laying flat ). It is hooked up to a large drawer slider ( above the tire ) that can lower it to the ground from above using a small winch ( hand power or electric ). A hydraulic bottle jack is stored in the space created by the round shape of the tire. A jack base is in the wheel of the tire. A wheel chock is opposite the jack in the other space created by the wheel. A tire iron and wheel bar stores in the same general area. Hopefully everything needed to change a tire is in the same space. This way you don't have to dig around for everything. I hope I can find room for an impact gun back there too.
I could go on and on and on.....I have been thinking about this for a few years now!!!!
I did a few super quick sketches to show everyone my general idea. As my solidwork model stops changing and gets more finalized I will post more detailed pictures....


