My Ford Camper

Witchdoctor Oz

Adventurer
Hi All,

New to the site & what a site it is!
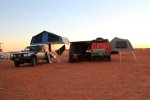
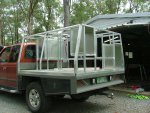
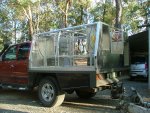
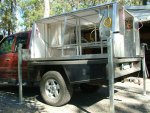
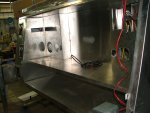
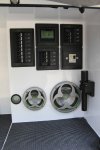
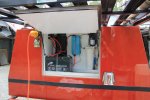
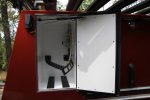
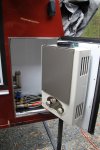
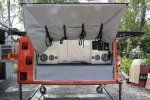
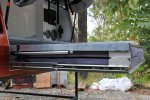
My camper is a tray top job, all alloy with a two pack finish to match the cab.
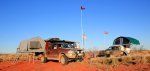
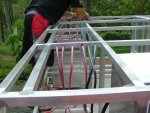
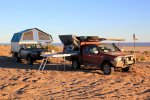
The build has taken me 2 years and very close to having it working as it was designed, just returned from a 3 week trip into the heart of Oz for its first real shake down & every thing worked as expected.
I hope the images come through.

Cheers
David
 

Attachments

  • IMG_3059.jpg
    IMG_3059.jpg
    232.8 KB · Views: 979
  • IMG_3060.jpg
    IMG_3060.jpg
    249.1 KB · Views: 1,005
  • IMG_3586.jpg
    IMG_3586.jpg
    184.3 KB · Views: 1,109

FreeManDan

Adventurer
I give it
images
images
images
images
halfEarth.jpg

4 and a half globes
 

Witchdoctor Oz

Adventurer
Hi Guys,

With only a small area to work with this camper required loads of forward planning, it’s also my first attempt at anything like it.

The driver’s side area houses the sleeping & personal storage with the stereo & main control panel as well. The bed folds in two like a roof top tent then slides into the box, the canvas is then folded & stored on the inside of the door. This side is finished except the bed frame needs powder coating.

The right rear door houses the LPG instant hot water with the shower rose assembly. The water tank filler is also in this box to minimize external tampering.

The middle door houses main storage draw with room for table, chairs, tools, parts, chainsaw & generator or extra diesel depending on trip requirements.

The left door holds the 4.5kg LPG bottle.

The passengers side door is all kitchen, with a gas/240volt domestic stainless steel cook top, sink with prep area on slide, above will be the dry food storage cupboard. To the left of this is the custom 80lt fridge also on a slide, above fridge is more cupboard space.

In the front of the box only accessible with box off the truck is the service area, 2 130amp batteries, 20amp 3 stage charger, 1200Watt inverter, 60PSI water pump & a domestic inline water filter. There is a marine roof vent to remove hot air build up from around the fridge & also the service box.

I hope this is the correct area for this post.
 

Attachments

  • Camper Box 001.jpg
    Camper Box 001.jpg
    234.3 KB · Views: 307
  • Camper Box 006.jpg
    Camper Box 006.jpg
    205.6 KB · Views: 246
  • Camper Box 016.jpg
    Camper Box 016.jpg
    490.9 KB · Views: 236
  • Camper Box 046.jpg
    Camper Box 046.jpg
    487.8 KB · Views: 257
  • Kitchen 008.jpg
    Kitchen 008.jpg
    466.8 KB · Views: 253
  • Kitchen 003.jpg
    Kitchen 003.jpg
    447.7 KB · Views: 255

jay3253

Adventurer
More I want to know more. It is things like this that give the rest of us ideas that improve on your idea or copy it and you have one heck of a great idea IMHO.
 

greg mgm

Explorer
Super nice! Love the stainless sink/ stove. And the whole thing looks like it's removable....very cool!
 

Witchdoctor Oz

Adventurer
Thanks for the comments,

The dry weight of the camper is 305Kg.
There is no RTT, it's an all custom alloy queen size folding bed that slides into the camper.
The box is removable if required with of the shelf jacking legs, but these are very heavy (12.6Kg each) building a set of alloy ones at the moment.
The camper has storage for 110Lt of fresh water, with an ultrasonic sensor back to the main control board.
The control panel switching is all Blue Seas 360 circuit breaker panels. Monitoring the 12 & 240Volt is a VSM422, love it as one look & you know what is going on with the complete system.
The base of the frame is 50x25x2mm, the front & rear walls are also 50x25x2mm, all other from structure is 25x25x2mm. The outer skin is 1.6mm & the internal skin is 1.2mm with polystyrene insulation in all cavities.
The frame is all TIG welded; the skin is fixed using Fixtek polyurethane. We started with Sikaflex but found it rather expensive & problematic to use, the Fixtek is loads cheaper & easy to use.
All the electrical wire was run inside plastic tube to reduce chafing & easier to draw through if needed.
All the boxes have LED strip lighting with switching back at the control panel, except the Kitchen & bedroom side witch have secondary switches on each door, with all the light on it only draws 2.4ah/h.
There is a Hannibal 2.4 awning on the Kitchen side that also has walls if the weather terns bad, There is also a small awning out the back with walls that is our shower area. Both awnings have LED lights inlaid in the arms (I do not like fumbling around in the dark).
 

Witchdoctor Oz

Adventurer
Here is an image of the bed without the canvas. It took a while to work out the support legs just back from the hinge point; they are hidden in the frame of the bed when not in use.
 

Attachments

  • IMG_3275.jpg
    IMG_3275.jpg
    355.1 KB · Views: 339

Witchdoctor Oz

Adventurer
Finally the sun has come out long enough for me to take some images of the box, close to being finished.
The hinges that I used are the plastic continues hinge from UESInt, they also supplied the lockable latches on all doors. The latches mechanism had to be machined down to allow fitment & operation in the 25mm thickness of the doors. All doors have gas struts to keep them in the desired position; the bed side door has self locking struts to stop the weight of the canvas from closing it.

Cheers
David
 

Attachments

  • Control Panel.jpg
    Control Panel.jpg
    273.6 KB · Views: 186
  • Service Box.jpg
    Service Box.jpg
    239.6 KB · Views: 209
  • Gas storage box.jpg
    Gas storage box.jpg
    183.9 KB · Views: 199

Witchdoctor Oz

Adventurer
Some more images.
 

Attachments

  • LPG Instant Hot Water.jpg
    LPG Instant Hot Water.jpg
    232.9 KB · Views: 178
  • Main Storage Draw.jpg
    Main Storage Draw.jpg
    360 KB · Views: 193
  • Kitchen.jpg
    Kitchen.jpg
    285.1 KB · Views: 203

Forum statistics

Threads
188,928
Messages
2,911,054
Members
231,329
Latest member
greggarnett
Top